My Creative Blog:
CreativeBro

  • The Honest Truth

    The Honest Truth

    One of our New Year's Resolutions was to share a little bit about ourselves. And you want to know something about me? Last year was the year I quit {almost} everything. Want to know something else? Last year I didn’t like who I was. Let me explain.

    Probably one of the most frequently asked questions of us is “How do you do it all?” The answer for me this past year, was “Not very well.” First, let me preface this by saying, I’m speaking only for myself. I recognize that every person juggles their hats differently, and every person has a different tolerance level for busyness. I would say that I have an above-average tolerance for busyness- it takes very little to stress me out. However, that level was completely maxed out last year.

    I'm sure it had nothing to do with you, Mr. Berkus. You're too dang cute to cause much stress.
    Don’t get me wrong- I’m not complaining about the past year. No way. I have a fabulous life and I wouldn’t trade it for anything. And I have to admit, I really liked it when someone said “oh my gosh- I don’t know how you do it all! You are so inspiring!” On the outside, it looked like I had it all together and that it just wasn’t a big deal to juggle all those things. All of that busyness was of my own making. Yup, I said it. But if you were in my home every day, you’d know that I was short-tempered with my husband and wasn’t allotting any quality time for him. I was hurrying my kids through their day, not really focusing on them, just waiting for naptime to come. I was comparing myself to other bloggers and feeling badly about my projects. My confidence took a hit because I was so focused on how good other people’s stuff is and how insignificant my stuff was. I got uber-upset when a criticism would come along. I wasn’t enjoying my life. Period. I felt like I couldn’t ever give 100% to anything I was doing because I was spread so thin. I was exhausted.

    Pinned Image

    source
    I finally realized that I needed to simplify my life a bit so that I could really focus on the things that matter most to me: my faith, my family, this little ol’ blog and the opportunities that might come as a result of it. I quit my job and stopped coaching tennis. I have dedicated myself to enjoying my babies while I still have them at home. I’ve stopped putting pressure on myself to come up with the best projects ever, and am just creating things that I love. I’ve developed the ability to say no, if I know it will negatively impact my family. I figure that I won’t ever look back and wish I had worked more and spent less time with my family. I’m happier, more focused and more productive. Plus, my kids think I’m more fun. I’m not saying it’s all better. I’m a work in progress and I’m still tempted to compare myself with others. In fact, it's often still really hard to say"no" to good things, especially when I know it may disappoint people.

    So, what am I saying? I guess my hope is that you'll realize that it's ok to say no to some things, even when it feels like you're letting people down (I'm a HUGE people-pleaser, and this was hard for me to learn). I know that it's not possible for everyone to quit their job to pursue just the stuff that gives them joy, but there are tons of good things that we can do with our time, that don't fulfill our goals in life. I encourage you to evaluate what's important to you, and then pursue those things. Don't bog yourself down with stuff you think you're supposed to be doing, just because it makes other people happy or even because you like the appearance of being busy. Figure our your priorities, and cut out all that junk that messes with them. Just my two cents.: )

    So, how about you? Do you over commit or are you good at saying no?

  • In or Out Media {Giveaway!}

    In or Out Media {Giveaway!}

    Every once in a while, one of our readers sends us an email saying"Hey! I have this cool Etsy shop, and I think you guys might like it." We love it when readers do that. Discovering fun, unique and creative people and shops is one of our favorite things…and of course, we always want to share them with you! When Julia, from In or Out Media, asked us if we would take a peek at her shop and consider doing a giveaway on our blog, we did a little happy dance. (Haven't seen our happy dance? Check it out here)

    In or Out Media offers professionally printed Wedding Invitations, Save the Dates, Stationery, Notecards, Holiday Cards, Birth Announcements, Birthday Invitations, and more. Julia also designs and prints typography quote posters, wall art, and offers logo design, both premade and custom. This girl is not messing around, folks. Her stuff is so stinkin' cute that we had trouble picking our favorites. I decided to go with a classy, nautical 2013 calendar print that I can't wait to put on the wall in my new office space under the stairs!

    Monica decided to order a personalized state print for her brand new baby niece. The print is adorable and Rylie isn't too bad either!; ) (BTW-that's the big brother, Jax, holding the print on the left- too cute!)

    Just take a look at all this cuteness in her shop!

    Chevron Birthday Party Invitations — boy birthday invites, pirate theme, party invitations, sailboat nautical invitations

    In honor of the big day of love quickly approaching we just had to include these fun Valentines (order by February 7th for classroom valentines!)

    School Valentines — Owl Chalk Kid Valentines to pass out — 25 4x5 cards for the whole class, Chalkboard Valentine Card
    Funny Valentine Card — 4x5 folded card with envelope — I love you more than fryin' bacon naked

    Now for the fun part!: ) One lucky reader will win a $30 Gift Card to In or Out Media! The giveaway will be open until midnight on Thursday, February 7th. The winner will be revealed on Friday, February 8th. To enter: 1."Like" us on facebook! 2."Like" In or Out Media on Facebook 3.Leave a comment telling us what you would spend your gift card on!
    a Rafflecopter giveaway

    And if you just can't wait to get your hands on those cute valentines or anything else in her shop, use the code CREATIVE to get 10% off your order!

    --------------------------------------------------------------------------------------------------------------------------
    Also, don't forget that TOMORROW is the day you can begin entering your best project in our Creating with the Stars contest. Eeeeek, we can't wait to see what you guys come up with! If you need more information, want to check out the guidelines or take a peek at the awesome prizes, click here.

    --------------------------------------------------------------------------------------------------------------------------
    Good luck!

  • Smart Blonde and Crafty

    Smart Blonde and Crafty

    We love inspiring all of you and empowering you to take risks in your home and do what you love. We love it even more when other women are inspired to do the same thing. One of things that is so fabulous about this DIY/Home Design blogging niche is how supportive it is and that bloggers genuinely want to see others succeed. Not to mention, home bloggers are sooooo generous about sharing ideas and projects with each other! -------------------------------------------------------------------------------------------------------------------- Amanda emailed us a few weeks ago. Who is Amanda, you ask? She and her business partner (and best friend!), Kelly, are wives and mothers who own their own business (Smart Blonde Creative) and manage to be creative and crafty in their spare time. Sound familiar? Yeah, we liked them right away. They were so inspired by the blogs they read on a daily basis, that they decided to use their graphic design and marketing talents to create an online magazine that is a source for easy and fun projects inspired by bloggers like us! The first publication goes live today!

    We got an early peek at the magazine and immediately loved the bright colors, fun layouts and super on-trend chalkboard typography. Not only that, we are thrilled to be featured in a two-page spread!: )

    This month's premier issue features a super cute idea to make your own romantic dinner plates for Valentine's Day…

    …and an easy way to DIY a pillow cover with button detailing…

    …and a host of awesome blogs you should be reading!

    Every two months, Amanda and Kelly will bring you a round-up of their favorite projects and the women and blogs that gave them the inspiration. We hope you'll take a peek at their first issue by going to Smart Blonde and Crafty RIGHT NOW. Then hop over to their site to learn even more about these awesome ladies, what projects they have going on and their goals for their new mag! And if you love it, tell your friends all about it.: )

  • A Peek into my Reality & Some Jello!

    A Peek into my Reality & Some Jello!

    Do you ever get the feeling that DIY and Design bloggers have the perfect life? We keep it pretty real here at EC2, but I'd guess it's still easy to assume that every room in our homes look perfect, are always clean and beautifully staged and that our kids are perfect cherubs that don't make messes. Well, I'm here to promise you that's NOT the case! And since they say a picture is worth 1000 words, today I'm going to expose the ugly, un-styled, downright messy over on Instagram! Throughout the day I will be giving you boosts to your self-confidence and your style as I expose the unfinished rooms in my house, the half-way finished projects, and just a healthy dose of reality. (If this doesn't make you want more, I don't know what will! Ha! #canyouspareasquare)

    If you're not following me on Instagram, you can at: @eastcoastcreative (Jess is on Instagram too! Follow her at @Jess_ec2blog)
    And if you're not into reality, and would prefer to see a pretty project, today is our first day contributing over at Tatertots and Jello!! WooHoo! We still are sort of shocked that we're getting such an awesome opportunity. So, head over to TT&J to see this fun project and tutorial!

    And, last but not least… If you missed the announcement about Creating with the Stars, you have to head HERE to get all the details!! It's going to be so much fun and submissions start on Tuesday 2/5!

    Okay, now go head over to Instagram and get ready to for a behind the scenes look at my world! Have an awesome day!

  • Real Design {M.Elle Designs}

    Real Design {M.Elle Designs}

    Ok, so in my imaginary world, I'm an amateur, never-been-trained, but still somewhat decent designer. Then I come across someone who is a REAL designer, and man, I am totally put in my place. I'm like the little girl decorating her doll house when you put me up against real designers. Ha! (And I'm not looking for reinforcement here- I'm ok with it! I figure there's always going to be someone who is better than you at everything in life.) Anyhow, remember this antique table turned vanity we made for my hallway bathroom last year?

    Well, it was sort of inspired by this picture:

    Pinned Image

    Totally love it. Today, I was doing some research for something else and came across the designer of this gorgeous space above. It was created by M.Elle Design and let me tell you, once I was on their site, I got totally sucked in and couldn't peel my eyes away from the screen. I just had to share with you guys the beautiful spaces they create.

    Portfolio
    Portfolio
    Portfolio

    Ahhhh…this bedroom!

    Portfolio
    Portfolio
    Portfolio
    Portfolio

    I know, right? There are no words. Now you can feel bad about your designs too.: ) You're welcome. If you want to see more, check out M.Elle Designs. ------------------------------------------------------------------------------------------------------------ Also, did you guys see our big announcement about Creating with the Stars yesterday? Read all about this amazing contest packed with great prizes and incredible blog stars here.

    Have an awesome day!

    Creating with the Stars

  • Creating with the Stars on EC2!

    Creating with the Stars on EC2!

    **Update: Submissions are NOW open! Click here to enter! You'd better be sitting down ladies and gents, because we're thrilled to announce that we are hosting the BEST, MOST AWESOME contest in all of blogland!! Remember that contest we won last year? Crafting with the Stars? Well, not only did we win it, but we also bought it! Tam, from Sew Dang Cute, took a leave from blogging and we jumped at the chance to run the contest that helped jump-start our blogging careers. We're hoping that we can help one of YOU jump start or boost your blogging career, too! Welcome to the new home of Creating with the Stars! ------------------------------------------------------------------------------------------------------------ We're super excited because it's bigger, badder and better than it has ever been. In case you didn't notice, we've renamed it Creating with the Stars, which means no limits to the incredible stuff you can create. It's not just crafts anymore, people.

    What the heck is Creating with the Stars, you ask? CWTS is the ultimate creative DIY competition that pairs 12 contestants with 12 of blogland's biggest stars to duke it out over 4 weeks. Only one team will make it to the end to claim the Grand Prize. The best part? You, the readers, choose the winners!
    Here's a peek into our projects from the 2012 season…

    One of our favorite parts of this competition is that contestants are paired with a super famous, awesome Blog Star! We've rounded up the best of the best and we know you all would LOVE a chance to work 1:1 with any of these bloggers!

    Introducing the 2013 Creating with the Stars Blog Stars!

    1- Sherry from Young House Love
    2- Whitney & Ashley from Shanty 2 Chic
    3- Brooke from All Things Thrifty
    4- Jane from Tatertots and Jello
    5- Sarah from Thrifty Decor Chick
    6- Beckie from Infarrantly Creative
    7- Mandi from Vintage Revivials
    8- Jamielyn from I Heart Naptime
    9- Shaunna from Perfectly Imperfect
    10- Beth from Home Stories A to Z
    11- Kari from U Create
    12- Brittany from Pretty Handy Girl
    That's some serious talent all in one place! And let me tell you, some of these bloggers are in it to win it-they're all about the competition!! Wouldn't it be so awesome to be paired up with one of them?!?

    We also have some ridiculously awesome sponsors, who are chomping at the bit to give you some great prizes!
    The 2013 CWTS Prize packages Total over $4100!!
    A special thanks to Homes.com, HomeGoods, and Home Depot for their generous sponsorship of CWTS! We're so honored to have them!
    The Grand Prize Winners (Contestant and Blog Star) will each receive:
    $500 from Homes.Com
    $500 Gift Card to HomeGoods
    Project featured by HomeTalk

    All contestants that make it to Week 4 will be given a $100 Giftcard to HomeGoods to use during the week 4 home decor challenge!
    The Semi-Finals Winner will receive:
    $500 Gift Card to Home Depot (Contestant & Blog Star)
    $100 worth of Martha Stewart supplies from Plaid Crafts
    $125 Gift Card to Lucent Lampworks
    Project featured by HomeTalk

    The Week 2 Winner will receive:
    $100 Gift Card to Royal Design Studio
    A pair of $120 Robert Allen pillows from Chic Decor Pillows
    Project featured by HomeTalk

    The Week 1 Winner will receive:
    $50 worth of 31 Gifts products
    $60 worth of Twtsted Yarn products
    $70 of Henle Headbands products
    $100 Blog Re-design from 733 Design
    Project featured by HomeTalk

    Here's how it all works:
    Submit one project that shows everyone your best stuff into the linky party here on East Coast Creative that will begin on February 5th. Projects must have been made October 1, 2011 or laterand must be your own work. You have until February 21st to enter. From those entries, 12 of you will be chosen by the blog stars and us as contestants and will be randomly paired up to work one-on-one with a Blog Star, to duke it out in a four-week competition to see who's the most creative. The Star will give suggestions, ideas, encouragement, and help so you can come up with the best project possible. Each round will have a theme and the bottom three will be eliminated based on reader votes. Once the contest is started, weekly projects are anonymous, so big blogger or rookie, everyone's on the same, even playing field! Find your favorite project to link up and be prepared to put your best foot forward if you want to survive!

    What to do Now!
    Submissions are NOW open! Click here to enter!
    Be sure to Like East Coast Creative on Facebook. We're going to be messaging reminders, sneak peeks, and lots of contest info via Facebook, so you don't want to miss out! Also, start deciding what one project you want to submit for your chance to be a contestant! The sky is the limit and we're so excited to see all the amazing project submissions! Anytime you tweet about the contest, make sure you use #cwts2013 to stay in the loop and see what everyone else is saying about the contest!

    If you have any questions about the contest, please email us at
    CWTScontest{at}gmail.com

    We're so excited about our 1st season hosting CWTS and we hope you are too!! Spread the word, because it's going to be one awesome ride!

  • Canvas for Valentines! {11x11 for only $11}

    Canvas for Valentines! {11x11 for only $11}

    The day of love is quickly approaching, and I thought I'd let you know one of the things I'm doing. You know that Jess and I love Canvas People and we're super thrilled that they now offer square canvas options! I don't know why, but even before Instagram, I was a huge fan of square pics (call me a trendsetter! lol!) Anyhow, Canvas People has a deal for $55 off any canvas (11x11 or larger)… We did the math and guess what- it works out to…

    11x11 for 11… Well, that has a nice ring to it! I've yet to do anything fun with all the pictures we took on our trip to London and Paris, and I think this deal just got me motivated! I ordered a map for Eric back in August, but it arrived all wrinkled, so I've been planing to do a little DIY project with it. I'm thinking square canvases from our trip, paired with map pieces mod podged onto plain canvas just might be pretty awesome!
    Here are a few other pics I'm thinking of using.

    Here's the link to get the $55 off deal! Click HERE for discount And yes, you can get $55 off any size as long as it's over 11x11, but we're just loving up that size right now!
    So, do tell, what are you going to turn into canvas?

    ** And I just came across this adorable picture of Kaden (who's now 8-sniff, sniff) but it made me think I just might order some of the kids for the grandparents! Woohoo!

  • Dining Room Lighting {Lucent Lampworks}

    Dining Room Lighting {Lucent Lampworks}

    My dining room. Well, like everything else around here, it seems like it's taking forever to pull together. I am oh-so-close to doing a full reveal for you (like next-week-close!), but I wanted to give you the juicy details about the fabulous lighting that we installed that totally completes the look I was going for. Love it when that happens! The last time you saw this space, it looked like this:

    Awesome planked wall, beautiful white-washed table and the doesn't-quite-fit-in spray painted chandy. I'm happy to report that it has come a long way since then. When this picture was taken, I was feeling so stumped as to how I could make this room feel like I wanted it to, and I knew that what was holding me back was that coral chandelier. I mean, don't get me wrong- I love the color, but it was definitely limiting me. And limits I do not like. That's when Brad, from Lucent Lampworks, stepped in and said he might be able to help me.

    His lighting. Oh, his lighting. It's gorgeous and simple and modern and vintage and industrial and cool all at once. Brad invited us over to his shop to take a look at his work and we were blown away. He's not a lighting guy by trade, but creates some beautiful fixtures in his spare time. Just recently one of his lights was featured on Extreme Home Makeover, so you know if Ty P. is sold, then this guy is the real deal. Anyway, I digress. I told him what I wanted, and you know what? He made it for me. Custom. And they're awesome. And his prices are ridiculously reasonable. See? I like Lucent Lampworks so much I can't even write in complete sentences. Let's just cut to the chase, shall we?

    I really wanted two sconces to flank the piece of Marbled Paper Art that fit in with the whole coastal, cottage feel. Brad searched for these cages and found them on Ebay and turned them into fabulous sconces. I absolutely love them- all they need are some edison bulbs, but I keep forgetting to pick them up when I'm out!

    I love the contrast between the industrial sconces and the marbled paper art.

    I'm still messing around with the final touches for the dining room (for instance, those plant pots aren't staying that color, but it's been too darn cold to spraypaint!), so most likely this buffet will look different next time you see it.
    As for the pendant light for above my dining room table, I decided to go with a white enamel shade (similar to this one in his shop) that Brad reclaimed from the Scranton Lace Factory. This light is probably from the early 1900's, which I love! It has loads of character and chippy goodness.

    It's perfect, isn't it? And, I am thrilled with the view from the kitchen, now that it includes my fabulous lights!

    The pendant has really soft uplighting from holes in the top of the shade that is just beautiful and helps illuminate the space better at night.

    I seriously could not be happier with my new lights! If you guys are in need of any lighting, head over to Lucent Lampworks to see all that Brad has to offer! You will not find a nicer, more accomodating guy than Brad and he is super talented. Use the code EC2tenoff to receive 10% off your order and tell him we sent you!
    Tell me, what does your dream light look like??

  • A New Look {Free Firmoo Glasses}

    A New Look {Free Firmoo Glasses}

    Well hey there! Want to know something about me? I find something I like and then stick to it. I have only ever ordered one meal at The Olive Garden for about 14 years straight (Chicken con Broccoli and FYI they took it off the menu, so I don't go there anymore! Ha!) I wish jeans, sneaks, and a sweater with an oxford underneath was still as cool now, as it was when I was in high school. So basically, I don't do much in the way of mixing things up (except for in my decor and design, which is weird, but who knows…). This month some of that changed! Hello Bangs and Glasses!

    A few things happened to bring about these changes… #1 I spent 8 days in London and Paris surrounded by people that had more style in their pinky finger than I will in my entire lifetime. #2. I was given an opportunity from Firmoo Glasses to try a pair of glasses for free #3. I got a zit on my forehead (I'll explain later)
    So, here's what we ended up with… Awesomely geeky glasses that I completely adore (plus, I can see better!) and blunt bangs! I know I'm completely wild and crazy aren't I?

    Let me tell you a little about Firmoo and the glasses first, then we'll get onto the bangs. Firmoo is the largest online retailer of glasses (who knew right?!). For years I'd been going to my eye doctor and ordering the uber expensive glasses they had. None of them were super cool, so I only wore them when I really needed to. Well now, I know that there is a HUGE world of glasses out there at like 80% less! And guess what peeps?? They give you your first pair FREE! Seriously doesn't get much better than that! (If you're the type that hears FREE and now is all distracted, here's the link to get your own free pair right away Firmoo Free Glasses)
    **Oh, and lots of people asked which style I got, they're #ZS8024 **

    I knew I needed to post pics of myself (not my fav thing to do), so I added fun quotes I like to distract you! Is it working? Okay, back to Firmoo… Check out their website and make sure you try out their cool virtual try-on system. You can upload a picture of yourself and try glasses on. It's like paper dolls of the future. I made a quick call to my eye doctor and got my prescription info and just typed it in when ordering. If you don't have vision issues, that's okay- they make clear lenses too! Jess' hubs Kev, calls them his placebos and I LOVE that name! Glasses are definitely an accessory, not just a necessity anymore.
    A few day later, I got my glasses in the mail and it was love at first sight (Get it? Sight? Sorry, I can't resist a cheesy joke). They were step one in my mini Monica makeover. Then, I started toying with the idea of bangs… I love the look on other people, but I was a little worried because of my curly, unruly mop. Then, last week I was at the salon getting Kaden a hair cut and noticed this annoying zit on my forehead- suddenly I had my solution…bangs! If you can't beat em, hide em! Kaden gave me the go-ahead and I had one of my favorite hair stylists cut them for me! I couldn't be happier!! (If you're local, Rachel is awesome! Here's their FB page call her if you need a new do!)

    I have to tell you, I am amazed that it took me so long to try something a little more daring with my"style"… I think it's a lot more"me" even. And just in case you're wondering, I'll still be ordering all the same foods at restaurants-I'm not that changed!!
    Here are all the details you need to get your first pair free from Firmoo… Firmoo Website Firmoo on Facebook (head over and let them know EC2 sent ya!)
    Just check out their site, choose a pair you love, and have them in about a week! (There are a few designer pairs that are excluded, but I found tons that I liked that were included)
    So are you going to get a free pair? Any other"stuck-in-a-rut" readers out there?
    ** A huge shout out to our favorite photographer Stacy Salvatori for taking these pictures of me. She is a Bucks County local and does amazing family, portrait, and wedding pics. Check out her site and let her know EC2 sent you!! **I wasn't compensated for writing this post. I got a free pair of glasses from Firmoo (like you can) and was thrilled to review them for you guys. All opinions are 100% mine**

  • DIY Faux Canvases {Kira's Room Makeover}

    DIY Faux Canvases {Kira's Room Makeover}

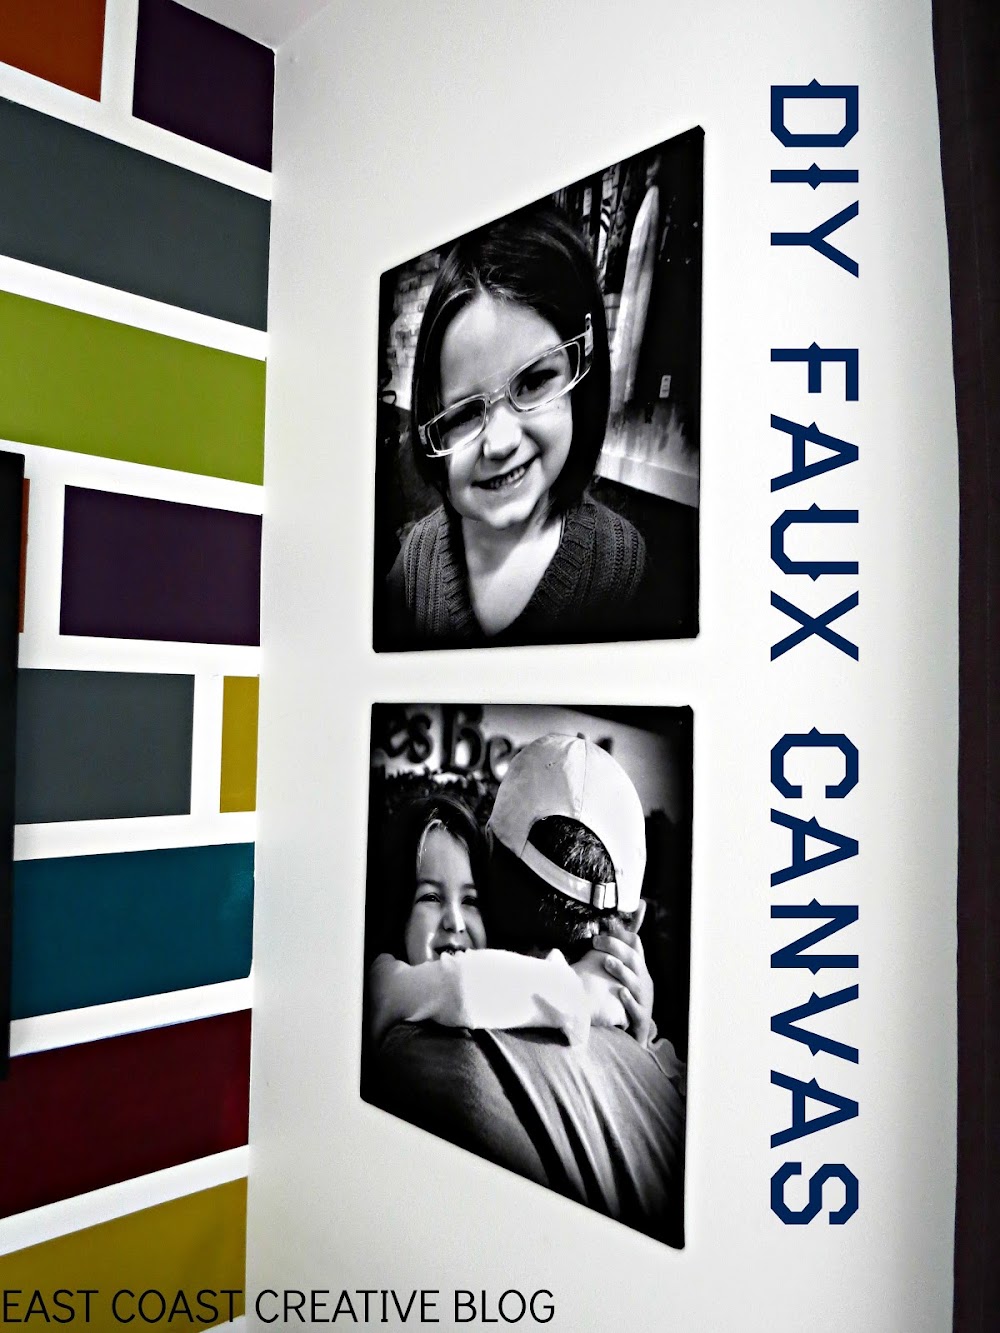
    I'm excited to share one of my favorite projects from Kira's Room Makeover today! These faux canvases make an awesome impact on the room and man alive do they make me smile! Everyone knows that Jess and I are slightly obsessed with Staples' Engineering Prints and this project just added one more reason to love them!

    Oh, and if you haven't seen the rest of the post for this room makeover, you can check them out here: Room Reveal & Video
    Mosaic Accent Wall
    Whiteboard Wall

    This could perhaps be the easiest DIY on the planet and, I think I might have said that about a few projects before, but really it is! Here's What You'll Need: Staples' Engineer Prints Foam Core Scissors Tape The first thing I did was to edit and crop my pictures into squares. Next, Jess cut down the foam core into squares (we needed 4)

    IMG_0685

    We placed the prints over the foam core and left plenty of extra on all sides so that we could basically wrap it like a present.

    IMG_0694

    To hang these canvases, I nailed directly through the foam core into the wall. The nails barely show (I used really thin ones), but you could use chunky ones for an industrial look, or Command Strips for a more polished look.

    IMG_0705

    Don't they look awesome? Kira LOVES them and I do too. The bottom picture is of KJ and her Papa while we were waiting for the gates to open at Disney World last year. The look on her face is priceless!

    IMG_0799

    And oh.my.word- Those Converse with her skirt rock my world! This little girl has so much spunk and personality and I just love that this simple DIY project captures that.

    IMG_0806-001

    You can check out some of our other Staples Prints Projects: Huge Family Art for Under $20

    Main Pic

    Garage Artwork for $6.99

    Engineer Print Artwork

    Ginormous Family Art

    Ginormous
    IMG_0821

    So tell me, do you have a have a place in your home where these faux canvases would be an awesome addition?
    P.S. Jess and I are pretty excited to spend the day FILMING something amazing on Monday. We are bursting at the seams to tell you all the details, but our lips are sealed… for now!!

  • How to Paint a Whiteboard Wall

    How to Paint a Whiteboard Wall

    Thanks for all your feedback on Kira's Colorful Room Makeover this week! Funny story… Jess and I are doing some filming this coming Monday (can't spill the beans yet!) and they need to get some footage of Kira's room… can I just tell you how messy her room is now? There are about 200 tiny Polly Pocket accessories on the floor! If only my house could stay as clean as it is on the blog! If you missed the makeover reveal check it out here and you can read the full accent wall tutorial here.

    Today we're talking whiteboard walls!! It's the perfect solution for creative kids that color on walls anyway!

    I recently learned of IdeaPaint and I was super excited that they wanted to have me try out some of their new CREATE Idea Paint and accessories! I am a sucker for packaging and good fonts and they scored major points with me right off the bat!

    Most people think of whiteboard paint as just that… White! Guess, what? IdeaPaint actually comes in clear (also black and white) so that you can put it over any color wall. That allows for so much more creativity… so guess what I did?? Yup, painted it on white walls! Ha! I have another can that I plan to use on a color-filled space when Jess and I get a blogging office (someday!)
    I have to show you the way IdeaPaint comes… you get two ingredients that need to be mixed… you add THIS to THAT (did you know I love witty things?!?) The prep directions were super simple.

    Office

    So, here's how it all went down… We painted the entire room stark white. It's actually the first time I've ever painted a wall white…ever!

    We didn't use a chalk line to mark off our whiteboard area because we didn't want blue chalk getting into the clear paint. We made really small pencil marks. I knew I was adding a frame, so the edges didn't have to be perfect. The paint was simple to apply with a roller (included in the paint kit) and you could clearly see the painted and unpainted areas because of the shine.

    We bought two 8 foot pieces of plywood for the frame.

    I wanted to mirror the rectangular shapes of the mosaic wall, so I sketched out a happy little drawing. I'd almost kill for just an ounce of artistic ability! (Don't worry, I won't really!)

    We cut the plywood with a jigsaw (Jess and I sure love our jigsaws!!) We didn't take any pictures of that part, because it was really late… Yes, that's AM!

    We waited until the IdeaPaint had dried for about an hour and was dry to the touch before we placed any wood near it. We needed to measure for a few cuts.

    One REALLY important thing to know about IdeaPaint… you need to let the paint cure for 4 days before you write on it at all. They even include a really cute sign to put on the wall!

    The next morning (yes, we do sleep sometimes) I spray painted the plywood. I really liked how some of the grain showed through.

    Want to see something funny?… I don't have sawhorses… but I do have Power Wheels!

    Once the boards were dry, we simply nailed them into the wall with finishing nails (making sure to hit some studs)

    We were left with a HUGE area for Kira to color on! She and her little friends have so much fun playing school, store, and creating"Princess lands" on her wall now! (And don't forget the plain surrounding walls are getting something very special- hopefully this weekend!)

    I highly recommend IdeaPaint- I know chalkboards are all the rage, but they're really messy! I didn't want a constant pile of dust on Kira's light carpet. The whiteboard wipes off easily and I feel like the kids can be even more creative with their color choices. There are so many dry erase colors available.
    I was browsing the IdeaPaint website and found these other cool ideas that I just might try in other areas of my house!
    I love the simple calendar!

    See how cool a colored surface looks with IdeaPaint? That green is awesome!

    Kaden has bunk beds in his room and as soon as he saw this picture he wanted a bunk bed that could write on! I've also seen it used on student desks and table tops for homework etc… There are so many cool ideas you could try (no pun intended!)

    I want to give a great big Thank You to IdeaPaint for allowing me to try out their CREATE paint. Kira and I love the result and I can't wait to try it in on some other surfaces!
    Have you ever thought of adding a whiteboard to your house? Where would you try one first?

    Check out IdeaPaint's Website IdeaPaint on Facebook
    ** I was provided with IdeaPaint to review. I was not compensated in any other way for this post. All opinions are 100% legit and all mine. **

  • Valentine's Day Printables

    Valentine's Day Printables

    Click HERE to Download

    Click HERE to Download

  • How to Paint a Mosaic Accent Wall {Bedroom Makeover}

    How to Paint a Mosaic Accent Wall {Bedroom Makeover}

    Yesterday, I shared my daughter Kira's Colorful Bedroom Makeover with all of you. Check it out here if you missed it. It's interesting when you're doing a room for a little person… there's this part of me that wants to go all crazy blogger-designer-nutso on the space, and then there's the realistic mom side that reminds me that her room will be a disaster of toys in about 3 minutes flat and that I don't need to go over the top to make her happy. Honestly, I'd kind of be going over the top just for my own self-interest. So, with that being said, the mommy voice won out and I went with a fun, yet practical room makeover. I'll guess I'll save up the glitz and glam for the master bedroom (if I ever do tackle it!).

    Today I'm going to share with you the focal point of the room… The Mosaic Accent Wall!

    I'm a total sucker for an accent wall. Honestly, since I was a junior in high school I've been whipping them up! My very first was a blue feather dusted wall in my parents' house. Then, I did a pretty cool square grid wall (again at the 'rents house) when I was a senior. Kenzie's first bedroom had vertical stripes and stars, then I changed to a fun magenta gingham. We had an argyle bedroom too! I wish I had pictures of all of those, but it was in the film day and age- boo! Enough of the trip down memory lane, let's get going with the tutorial! How to Create a Mosaic Accent Wall Since this is the room of my 5 year old, I asked her what she wanted, and she told me LOTS of colors."Mommy, I want purple, blue, green, orange…" and the list went on and on. I thought about it and finally decided, I could give Kira exactly what she asked for- lots of color!

    I bought a sample size of each color and a gallon of white paint to use as my base and for all the other walls. One word of caution, Valspar sample paints do not have the normal bonding agents that regular paint has. It will require more coats for solid coverage. Just keep that in mind when you're planning a project. For me, buying 8 quarts wasn't an option (this was a makeover on a budget) and I'd rather have to do a few extra coats of paint. I had JUST enough- it was close, but we stretched the samples far enough.

    This unfortunate event occurred as soon as we got home with the paint. Grrr… I was sort of hoping Hurricane Sandy would wash some of the stain away a few weeks ago- No.Such.Luck!
    Blogger Fail!

    Here's my supply list: Valspar® Sample Paints Base coat paint Purdy® Paint Brush Chalk-line (a DIYer Must Have!) Tape Measure Pencil Frog Tape® Mini Rollers Paint Trays

    I had to get rid of that BRIGHT aqua color and amazingly, the Valspar white paint & primer in one did the trick! I was left with a blank"canvas" and two weirdos (the hubs and my oldest)!

    There are all kinds of approaches to getting perfectly straight painted lines, but I really think we use the BEST method. I'll tell ya about it, and then you can be the judge…
    1- Measure out your stripes and put tick marks on both sides of the wall.

    2- Use a Chalk-line to get Perfect Guide Lines- Simply, put the string directly on the tick marks on both sides of the wall, pull the string taut, and snap that baby! It is so much MORE accurate and FASTER than using a level and a pencil. Let me remind you of something… you've seen how awkward I am at dancing… would you trust me to use a level on wall stripes? I think not.

    These bad boys are crisp, straight and ready for some Frog Tape!

    3- Use Frog Tape to Divide your Stripes. When I'm working on an accent wall, I know it's going to be the main focus of the room, so I have to have crisp, perfect lines (yes, perfectionist tendencies admitted).

    My hubs uses a few pieces per stripe, but I'm a one stripe wonder. I definitely prefer to do the entire stripe with one piece to make sure there aren't any uneven seams. Also, make sure you tape off the two side walls.

    I love me some stripes!

    After all my horizontal stripes were finished, I randomly placed my vertical dividers. I toyed with using a mini level to get them perfect, but then decided I could do it well enough by eye. Please ignore the epitome of frumpy DIY clothes, no shower, and tape on the leg.

    Whenever I'm working on a project like this I rip off a bunch of pieces the length I need and keep them on the wall so I can get to them quickly, if I'm not using that method, I keep the roll of tape on my arm. Works like a charm.

    4- Paint the Edge of your tape with your Base Color. It's one extra step, but it's the MAGIC INGREDIENT to perfect, crisp lines. Frog Tape alone is excellent, but on an accent wall like this, I had to be sure everything would be perfect. Just take your base coat color (whatever color is under the stripes) and with an semi-dry brush (not dry, but not sopping wet either) paint over every edge. I don't recommend using a roller for this step, I always use a paint brush.

    It makes the wall look a little scary, but it will all work out in the end! Allow it to dry- I gave it about 40 minutes before putting color over it.

    I had a tray and roller for each color. I wanted to work in a random pattern and that meant making decisions as I went along- no time for washing rollers and brushes.

    Finally, it was time to put some color on the walls!

    If you want a random look (like mine) I'd recommend working in one section at a time, mixing your colors as you go.

    Because of the sample paints, it took 3 coats per square. It was a tad scary at first, but by the second coat, I was confident the coverage would be good.

    Jimniy Cricket- Even before I removed the tape I knew I was in love!

    Now, for the Moment of Truth-Removing the tape…
    Once again Frog Tape & the Mangin Method = Perfection!
    Seriously, I do a cheesy dance (you can picture it) every time I remove tape from a project!
    I do recommend removing the tape as soon as you're done-I don't wait for the paint to dry, and I remove it VERY slowly and evenly.

    Here's the finished product!
    It was so simple and took me and Eric about 4 hours from start to finish.

    Here's a before and after…

    It's a lot of color (as requested by Kira), but I like the extreme contrast that the white walls bring. I also could totally picture doing this with muted tones or even all in one color with an ombre effect!

    Almost every morning, I find KJ hunkered down reading books in her PJs… She loves her new room!

    Tomorrow, I'll be giving you all the details on the whiteboard wall and Wednesday one of our favorite things… DIY faux canvases with Staples prints! Make sure you check it out!
    What do you think of the accent wall? Have you ever tried something bold with paint?

  • Colorful Bedroom Makeover {KJ's Bedroom}

    Colorful Bedroom Makeover {KJ's Bedroom}

    November marked 2 years in our"new" house. I can't believe it's already been two years, and at the same time, it feels like we've always lived here! Before we moved in, I quickly painted each of the kids' rooms in a solid color and did very minimal decorating. Last year, I did Callen's room with the fun Pallet Wall, but he's the only one that has a"cool room" as my kids say. Kira was next on the list for a room makeover and thankfully, it's already gotten the"cool room" stamp of approval from my kids!

    This room makeover was part of one of my projects for P&G. It was my first video for those readers, so sorry about the introductions, but this video does give you a great little room tour! (Excuse the creepy freeze frame… why does Youtube do that?)

    Here's a still shot before and after

    Pretty Big Difference isn't it? I can't wait to share all the fun projects and DIY details with you- I'll be featuring one project each day this week, but for now, here's ton of pictures!

    I grabbed this adorable little hooter at Target.
    The mirror was something we DIYed about 8 years ago, yup, we DIYed before DIYing was cool!

    Little Book Nook!

    Spray paint and round bulbs make all the difference!
    All the color details coming later this week.

    And this is the other side of the room! Helloooo… huge whiteboard wall!
    As you heard in the intro video, KJ had a tendency to write all over the walls. We now have a dedicated place for that!
    Wednesday you'll get all the product info and tutorial for this.

    A little DIY took this dresser from boring to custom-ish!

    For P&G I can't have any pictures showing, so I left Kira a little note in this cute frame instead.

    Creative coloring storage!

    Masterpieces from my little artist

    Now that you've gotten the quick tour…
    Here's the plan for the posts for this week… Tomorrow (Tuesday) I'm going to give you all the details on this stinkin' awesome mosaic accent wall. I'm not sure I'm allowed to say something I did was awesome, but man I love it!

    Wednesday, I'm going to tell you all about Idea Paint and how it can turn almost anything into a cool whiteboard surface!

    Thursday, it's more Staples LOVE and I'll give you the 411 on these foam core faux canvases. And to think I almost bought 4 frames at 39.00 each! The entire project ended up costing me under $25!

    There's actually one REALLY BIG step left before this room is finished. You might have been thinking that the walls are a little too plain and white, and I agree! They won't be that way for long! One crazy-talented Art Teacher from my school, who Kira has now titled"The Artist" is coming to doodle on the white walls with paint pens! Kira has all sorts of fun, things she wants doodled… peace signs, butterflies, and flowers are at the top of her list."The Artist" and I are coordinating our schedules, but once we do I'll be sure to do an update post! Until then, make sure you check back this week for all the tutorials and fun details of the room! So what do you think of my colorful bedroom makeover? Any favorite parts? Do tell!

  • Family Valentine's Mailboxes {Try this Now}

    Family Valentine's Mailboxes {Try this Now}

    Occasionally, Jess and I do or see a project that is deserving of the"Try this Now" title. The project needs to be super simple to execute and have a major awesomeness factor. We know it's easy to have an ever-growing DIY list, but these babies are projects that you should try right away. We've started a page on the blog where we'll catalog these super-simple projects, including today's Family Valentine's Idea. So be on the lookout for our fun Try this Now logo. TRY THIS NOW PAGE

    I was browsing the Target dollar bins and spotted these cute mini mailboxes. We have a little over a month before Valentine's Day, so I decided that we were going to create a little family mail center!

    Here's the plan… we set these mailboxes in the family room with a stack of blank notes where anyone can leave a note for the kids and they can leave notes for each other. We're encouraging them to write something nice to one of their siblings each day.
    Of course I wouldn't leave you hanging without free printable notes of your own! You can download the ones I created HERE.

    I printed them on plain,old computer paper, but I think they're pretty cute!

    I had bought one mail box for each kiddo and some Valentine's stickers. I pulled out some washi tape and a bunch of Sharpie markers.

    After dinner last night, the kids went to town decorating. They were really into it!

    The best part wasn't the decorating though… it was seeing how excited they were to write each other notes! Kira is really sweet and put so much effort into her brother's note.

    Here are a few of the notes that are going to be read this morning…

    Kaden is honestly the best big brother on the planet!

    He actually wrote 2 notes for Cal!

    I'm really excited about the next month and how excited my kiddos are to send each other thoughtful notes. We're not a super touchy-feely family, so this is one way we can do Valentine's Day on our terms!

    Are you ready to Try This Now? Will your family be getting a Valentine's Mail Center?
    Linking up to: I Heart Naptime

  • 6 Ways to Display Instagram Photos

    6 Ways to Display Instagram Photos

    I can't even tell you how much I love Instagram. If you follow me (Jess_EC2blog), you'll quickly find that out. Out of all our social media avenues, IG is definitely my favorite. I comment and"like" things more there than on Facebook. For real! There's something so charming and fun and real-lifey about Instagram photos and I wanted to figure out a way to show them off in my house. But even if my version (which is not original, by the way, I've seen it done many a time!) isn't your cup of tea, I've rounded up a few other fun ideas of what to do with those cute, square pics.

    I found a site called FoxGram that makes ordering your pics super easy. Just sign in using your Instagram account on their site and all your pics load right up. Choose your favorites and for 25 cents a picture, they'll print them and send them out the same day!

    It didn't take long for me to get my prints in the mail, and when I did, I was thrilled with the quality. The pictures are nice and clear and the size is just plain adorable. Love, love, love them. I kind of went buck wild and ordered way more prints then I needed for this project so I sorted them out and decided which would go in my frame.

    Since I already has this large frame for our Advent Calendar, it was already set up for me to use. You can check out here how I threaded the twine and adhered it to the frame if you want to make your own. I used the mini clothespins I got from Consumer Crafts (check out our ridiculous haul video here!) a while back and started clipping the photos in the frame.

    I love this method because I can change the pictures out whenever I feel like it. Plus, it really adds some personality to our kitchen and makes me happy when I walk in that room.

    I love the subtle pop of color in the pictures as you enter the kitchen from the hallway, and I think the dark frame is a nice change from the all-white gallery wall going on in the hall.

    I couldn't stop there, though. I had to find some other awesome ideas to get your Instagram juices flowing. Take a peek!
    Instagram Friendly Softcover Books from Artifact Uprising

    DIY Giant Instagram Frame from The Handmade Home

    iPhone Cover from Casetagram

    DIY Instagram Coasters from A Nerd Like Me

    DIY Instagram Necklace from dot coms for Moms. Isn't this soooo cute?! Like a modern day locket.

    Don't forget to follow Monica, too, @Eastcoastcreative! What do you do with your Instagram photos? Leave us a comment with your IG name so we can follow you and add to my Instagram insanity.: )Linking up to: I Heart Naptime

  • Faux Sofa Table {Tutorial}

    Faux Sofa Table {Tutorial}

    A few weeks ago during my Christmas home tour, I gave you a sneak peek at the faux sofa table we built and promised the tutorial for how we did it. Well, today's the day, folks! Quite honestly, this does not even need a step-by-step because it's such a simple project. You'll laugh when you see what I mean, and then you'll get to work building your own. I can't even believe what a difference this little DIY made to our living room space, which if you remember, is on my list of rooms to tackle in 2013. We're one project closer to an updated, fresh living space. Woohoo!

    Before we get started, let's take a look at the room before the sofa table came to be. Seriously? This picture makes me want to slap myself across the face. I can't believe I was ok with this for so long!

    Our sofa is a recliner on both ends, which is super comfortable, but kinda ugly. See that big gap behind the couch? It's a wall-hugging recliner so it needs a little space to open up the recliner. I used to just shove random picture frames back there…you know, to utilize the space. (aka to lazily hide things there because it was easier than taking them to the garage).

    Luckily for us, we had some great old barn wood laying around (we LOVE barn wood!) that just happened to be the perfect length of the couch. Every once in a while, these things happen and they renew our DIY energy and make us feel like we're invincible…until the next project. If yours isn't the perfect length, use a chop saw to cut it down. Anyhow, we held the wood up to the wall at the height that we wanted (FYI- the standard height of a sofa table is 32-36 inches high), found the studs and marked the location for each of the"L"-brackets. It's important that you make sure you're drilling into studs so that your shelf faux console table holds up when you put items on it. Once the brackets are attached, place your board on top and screw the brackets to the wood. That's it! Super easy.

    You ready for an onslaught of after pictures? You better be!

    Ahhhhh…so much better, right? I love it. Unfortunately, because the back of the couch is still about 8 inches away from the wall, there's still a noticeable gap. We could have added legs to our shelf/table- in fact, that was our original plan- but since it's a recliner there was still an awkward gap. But, never fear! A plant that I found on clearance at Lowes' for $2 (yes, you read that correctly!) distracts the eye from the space.

    The room feels so much more finished. And in case you're wondering, that old window that I love is moving. Not sure where, but I have something else in mind for above the couch. You'll just have to wait and see. Bahahahaha.

    It's looking pretty good with the dining room (full reveal coming in 2 weeks!):

    Of course, nothing is ever perfect in my house- that's just how we roll. If you'll notice, there are several things that are wonky about the shelf, but I couldn't care less.: )

    So, what do you think of my faux sofa table? Gonna give it a try?

    Yay for checking things off my home goals to-do list!
    Linking up to: Home Stories A to Z, I Heart Naptime

  • Best Valentine's Day Gift Ever- Take Two: 2013

    Best Valentine's Day Gift Ever- Take Two: 2013

    Last year, I took a little risk here on the blog and got personal… really personal… I shared my idea for the Best Valentine's Day Gift Ever! I guess you guys liked it, because it was our most popular post of 2012- you dirty dogs! Ha! Have no fear, this year I have another idea that's a lot less prep and will still keep your man saying…

    Let's recap really quickly…

    Check out this post for all the details and the full tutorial, but basically you're going to use a bed sheet as a game board and pull off the most incredible surprise ever. Trust me ladies, you will win major points with this one. I can't tell you how many letter I've gotten from readers that had the best time with this project! Husbands are huge fans of The Game of Love!

    This year, we're introducing the Game of Love Travel Version!

    You don't actually have to be traveling to play this version, but it's perfect to take on the road. However, even at home sometimes you need a little"spice" and don't have time to DIY an entire game board sheet (definitely find the time to make it at some point though!).
    Here's how you prep your game… #1 Print out a bunch of our free printable cards. Download free printable cards HERE

    #2 On each card you'll write some kind of fun bedroom activity. Make some nice and others a bit more naughty. You'll want some variety in your cards. If you need ideas for your cards you can check out The Original Game of Love Post and click on any of the pictures to enlarge and read my game board squares *blush*, but be creative and remember that your husband will appreciate the effort you're putting in! #3 Put all of the cards in a bag or container

    Here's how you play… It's kind of like let's make a deal. Your hubs will choose a card out of the bag (without peeking), read the card and determine if he wants to PLAY or PASS. Here's the catch… he can only choose 5 total cards to PLAY and once a card is PASSED you can't get it back! Oh Snap! It's super fun to see which activities he can't resist and which ones he's willing to pass on in hope of something even better! I'd recommend putting about 15 card options in your bag, but you can definitely do any number you'd like- you guys are pretty wild; ) You can play one of two ways, either do all the wheeling and dealing at the beginning and then get to business or do one card and activity at a time. Jess prefers having Kev make all his decisions up front. Either way is fun!
    We're pretty sure this Game of Love Travel Version will be a huge hit! We hope it gives you the second year in a row of the Perfect Valentine's Gift! Who knows, it might also make your hubs want to plan more weekends away so you can bring your game along!
    Being married is hard work and with so many marriages falling apart these days, it can never hurt to go the extra mile to let your man know you love him! So here's to another successful Valentine's Day and here's to women that aren't afraid to have a little fun with their hubs! Good luck and let us know how it goes! We loved hearing all your success stories from last year!

    So, are you going to play the Original or Travel version this year? Linking up to: I Heart Naptime

  • Our Home Goals for 2013

    Our Home Goals for 2013

    Ok, folks. Yesterday we shared our BLOG goals with you and today's the day we publicly lay out our plans for our homes in the hopes that putting it down in writing for the whole world to see will motivate us to actually geterdone. These goals include our big plans for the year, but we'll be sharing lots of little projects and ideas along the way.
    So, here goes:

    1. Finish the dining room, goshdarnit. I'm the worst at putting the finishing touches on a room (ugh, the details!), but that's all I have left to do. Look for the full reveal later this month!

    2. Update the Living Room. This room is attached to the dining room, so it looks a bit drab compared to the new cottagey/coastal dining room. The stenciled fireplace is just waiting for the rest of the room to catch up!

    3. Tackle the Master Bedroom. Oh, this room. It's dark, dingy and in dire need of some love. I'm ready to paint, add an accent wall, change out the bedding, refinish the furniture, and make some art that speaks to my hubs and me. This will be the last room on the main level that gets done! (Oh wait, there's the master bath too…)

    4. Create an organized (but beautiful!) desk area under the stairs in our finished basement. We need a place to keep our files (instead of my husband's underwear drawer. I kid you not!) and house our computer. I'm not entirely sure what I want to do there, but I know it will include this fabulous antique door. We planned to use it in our Guest Room Makeover, but we went with shutters instead.

    5. My baby turns 3 this year and it's time for a big boy room! I'm so torn about the direction I want to go in for Charlie's room: preppy and nautical or vintage baseball. I know he'd go nuts for baseball, but I'd go nuts for nautical! Who will win?!

    Pottery Barn Kids & Source Unknown
    6. Be content to just live in and enjoy our home without constantly scrutinizing it for problem areas. I'll be honest. Sometimes being in the home blogging world feels like everyone has the perfect house. I don't and that's ok. I'm going to try to read a book in my ugly bedroom every once in a while and just enjoy it, instead of wishing it were someone else's gorgeous retreat. You know why? Because I am blessed…ugly rooms and all.

    Pinned Image

    1. Eliminate Wasted Space. Almost everyone has that one room (usually the formal living room) that is just totally wasted space. Either, it looks pretty, but no one uses it or it's kind of an unfinished eyesore… Mine is the later. When you walk into our foyer you see our bold wallpaper, fun word art wall, and then BAM it hits you… to the right is a completely unfinished jumble of a room. I was going to make it a completely predictable formal living room, but I'd never really use it. Jess, the hubs, and I have been brainstorming and I think we just might have a plan!
    (this is part of the current jumbled up mess- don't worry I'll just be relocating this area, because the kids do use the crafting area all the time)

    2. Compromise in the Bedroom No! It's not what you think (geesh you guys!)… Eric and I recently discovered (okay, he knew, but I was oblivious to the fact) that we both have really different styles. He would love a bedroom that's warm and I believe he used the word"Lodgey" (like a ski lodge). If you look at my home for even a second, you will notice that nothing about it fits that bill. So, we're making it a 2013 goal to finally design a bedroom that we both love (Honestly, I'm okay with me loving and him liking… just keepin' it real) and I'm thinking it will be sort of Rustic-Industrial.
    So, as embarrassing as it is to show you… welcome to my current master bedroom.

    3. Details. Details. Details. I am not good at the little details of designing a room. I am a big-picture, big-ideas kind of gal. Once the walls are painted, a few pieces of furniture are in, I tend to walk away and never bring it all together with accessories etc. It's my goal this year to work through each room and make sure it feels finished. So you'll be seeing a lot of thrifted accessory upcycles, fabulous accent pillows, and who knows what else.

    4. Kenzie's Room (Heaven Help Us All!) Man, if you could meet one of my kids, I'd want it to be Kenzie. She's a trip (and I sounds 98 yrs old for saying that)! She's funny, spunky, sassy, and adores animals like no one I've ever met.

    Anyhow, she has been promised a room makeover this year and it's going to push my design skills to the limit. Have you ever seen this guy?

    He's the"TurtleMan" and he has a reality show where he rescues"critters" and it's by far Kenzie's favorite show (sometimes I feel like I live in the Twilight Zone). Anyhow, she would like a combination Turtleman and Equestrian room. I have a strong feeling that will be a first on Pinterest! Ha! So far, her only specific request is a pallet wall ceiling. This project is going to be a challenge to say the least.

    So, there you have it. Our home goals for 2013! We know there will be about 2 million other projects we tackle this year, but hopefully all of these will make the list too!
    Now…who wants to keep us accountable?!!
    What are YOUR home goals this year?

  • EC2 in 2013 {What to Expect When You're…}

    EC2 in 2013 {What to Expect When You're…}
    Last year Jess and I shared with you our 2012 goals for our homes, the blog, and our community. We did a pretty good job chipping away at our lists (more on that later). This year, we're going start with our goals for this little ole blog. We have some fun changes and some big aspirations for EC2 in 2013. This is kind of like"What to Expect When You're Expecting", but a blog version! Here goes…

    For the first two years we've pretty much kept it all DIY projects and home decor on the blog. Occasionally we've shared some of our lives and what's important to us. From all your emails and comments, you like the inside scoop, so we're gonna give it to you! We plan to work in the occasional post about our friendship, how we survive as moms (did you know Jess' son is a super picky eater? Well, soon you will), and just life in general. Don't worry, we'll still be focused on DIY, but just injecting a bit of"Us" along the way.

    Holy moly we are beyond excited about this one. Here's a BIG hint- we're going to be hosting a contest that we won last year! We purchased it back in October 2012 and will be giving you all the details soon. Think HUGE prize packages, some crazy famous bloggers, and you!

    In 2013 we're going to invite you into our casas (I'm fancy because I took four years of Spanish… casa = house. Ha!) We'll be adding home tours to the blog. You'll get to see the layouts, finished rooms, rooms in progress, and the downright ugly, unfinished. Trust me, this will boost your self esteem! We hope to have these up in the next month.

    Blogging can feel like a one-way conversation sometimes. We love interacting with so many of you on Facebook (don't already LIKE us? Go do that now, then come back and finish reading)

    and other social media outlets, but we also want to have an intentional forum for Q & As. About once a month we'll be answering your questions (anything goes) and giving you ideas on your own design dilemmas.

    We'll admit that we loved seeing our names and faces in HGTV Magazine and Ladies Home Journal in 2012 (ok, I-Monica-didn't love seeing my face. Can you say Bad Pic?) We've made it a goal to have a full article or feature in another publication. I was doing a little magazine research and do you know that these are actual magazines: Bacon Busters, Miniature Donkey Talk, & Girls with Corpses… Umm, I don't think you'll find us in those, but who knows, maybe Bacon Buster readers need some DIY help?

    We never want to compromise our commitment to keeping it real here on EC2, but we do want to provide you guys with better pictures. We'd like to be more intentional about learning about photography and using what we learn to take it up a notch with our blog pics. Don't worry, we'll still take plenty of cheesy midnight pics that look so grainy you think they were taken in 1963.

    Yes, we know the"Big Screen" refers to movies, but saying"be on TV" doesn't sound as fancy. Jess and I are both Big Idea people and when you combine the two of us, the combo can be pretty intense. We loved working with Nate Berkus on his show last year and we were surprised how much we enjoyed the process of working on a TV show. So, I'm happy to announce that we'll be taking over for Whoopi and Barbara Walters on The View! Ok, nope that's a total lie… we are however, in the early stages of pursuing our own TV show. We've gotten feedback from so many of you that you'd watch us again, so we figured we'd give it a shot! If you think it's something you'd want to watch, be sure to leave a comment or email us and let us know! --------------------------------------------------------------------------------------------------------------------------
    So, tell us: What do you think of our goals? What would you like to see us do this year? What are your big plans for 2013?? As always, thanks for joining us on our blog journey!

  1. block printing & creative textiles - textiles work
  2. Ideas for sewing projects - creative textiles - textiles work
  3. Ideas for sewing projects - coasters - creative textiles - textiles work
  4. sewing project using old tights - creative textiles - textiles work
  5. Ideas for sewing projects - coil pots made from recycled clothes
  6. Anja Rubik: H&M Magazine Fall | Mode: Fashion
  7. Monika Jagaciak | Mode: Fashion
  8. Diana Dondoe & Tyson Ballou: Harper’s Bazaar Australia | Mode: Fashion
  9. Constance Jablonski | Mode: Fashion
  10. H&M 2010 Fall: A First Look! | Mode: Fashion