My Creative Blog:
food

  • Blank & White

    Blank & White

    Well hey there! Want to know something about me? I find something I like and then stick to it. I have only ever ordered one meal at The Olive Garden for about 14 years straight (Chicken con Broccoli and FYI they took it off the menu, so I don't go there anymore! Ha!) I wish jeans, sneaks, and a sweater with an oxford underneath was still as cool now, as it was when I was in high school. So basically, I don't do much in the way of mixing things up (except for in my decor and design, which is weird, but who knows…). This month some of that changed! Hello Bangs and Glasses!

    A few things happened to bring about these changes… #1 I spent 8 days in London and Paris surrounded by people that had more style in their pinky finger than I will in my entire lifetime. #2. I was given an opportunity from Firmoo Glasses to try a pair of glasses for free #3. I got a zit on my forehead (I'll explain later)
    So, here's what we ended up with… Awesomely geeky glasses that I completely adore (plus, I can see better!) and blunt bangs! I know I'm completely wild and crazy aren't I?

    Let me tell you a little about Firmoo and the glasses first, then we'll get onto the bangs. Firmoo is the largest online retailer of glasses (who knew right?!). For years I'd been going to my eye doctor and ordering the uber expensive glasses they had. None of them were super cool, so I only wore them when I really needed to. Well now, I know that there is a HUGE world of glasses out there at like 80% less! And guess what peeps?? They give you your first pair FREE! Seriously doesn't get much better than that! (If you're the type that hears FREE and now is all distracted, here's the link to get your own free pair right away Firmoo Free Glasses)
    **Oh, and lots of people asked which style I got, they're #ZS8024 **

    I knew I needed to post pics of myself (not my fav thing to do), so I added fun quotes I like to distract you! Is it working? Okay, back to Firmoo… Check out their website and make sure you try out their cool virtual try-on system. You can upload a picture of yourself and try glasses on. It's like paper dolls of the future. I made a quick call to my eye doctor and got my prescription info and just typed it in when ordering. If you don't have vision issues, that's okay- they make clear lenses too! Jess' hubs Kev, calls them his placebos and I LOVE that name! Glasses are definitely an accessory, not just a necessity anymore.
    A few day later, I got my glasses in the mail and it was love at first sight (Get it? Sight? Sorry, I can't resist a cheesy joke). They were step one in my mini Monica makeover. Then, I started toying with the idea of bangs… I love the look on other people, but I was a little worried because of my curly, unruly mop. Then, last week I was at the salon getting Kaden a hair cut and noticed this annoying zit on my forehead - suddenly I had my solution…bangs! If you can't beat em, hide em! Kaden gave me the go-ahead and I had one of my favorite hair stylists cut them for me! I couldn't be happier!! (If you're local, Rachel is awesome! Here's their FB page call her if you need a new do!)

    I have to tell you, I am amazed that it took me so long to try something a little more daring with my"style"… I think it's a lot more"me" even. And just in case you're wondering, I'll still be ordering all the same foods at restaurants-I'm not that changed!!
    Here are all the details you need to get your first pair free from Firmoo… Firmoo Website Firmoo on Facebook (head over and let them know EC2 sent ya!)
    Just check out their site, choose a pair you love, and have them in about a week! (There are a few designer pairs that are excluded, but I found tons that I liked that were included)
    So are you going to get a free pair? Any other"stuck-in-a-rut" readers out there?
    ** A huge shout out to our favorite photographer Stacy Salvatori for taking these pictures of me. She is a Bucks County local and does amazing family, portrait, and wedding pics. Check out her site and let her know EC2 sent you!! **I wasn't compensated for writing this post. I got a free pair of glasses from Firmoo (like you can) and was thrilled to review them for you guys. All opinions are 100% mine**

  • Brookie Bites

    Brookie Bites

    This post is being interrupted to wish a VERY HAPPY BIRTHDAY to our very own Jessica! Happy Birthday friend- so glad you're in my life!
    Ok… on with the Brookie Bites Post…
    You have not lived until you've tried a Brookie Bite.

    Now, I can take no credit for these delectable bite-sized pieces of heaven. I got the recipe here, but changed a few things to make it a bit easier for me. You might remember that I mentioned I do not bake. Ever. There are two reasons for this: 1) I don't measure ingredients very well. This makes for a decent cook, but an awful baker, and 2) I am not a huge fan of sweets (Don't hate, it's the way God made me). However, there are two desserts that I do enjoy immensely and they are chocolate chip cookies and brownies. If these two things are combined, you pretty much have my dream dessert. Lucky for you, I'm willing to pass this recipe along to you. This dessert is a huge crowd-pleaser, and it's so easy that even I can do it!

    Here's what you'll need:
    1 package of Chocolate Chip cookie mix 1 box of brownie mix All the ingredients listed on the boxes to make the brownies and cookies (eggs, butter and vegetable oil) Colored sugar
    Step 1: Bake brownies as directed. Remove when done.
    Step 2: While brownies are baking, mix up the cookie dough according to the directions. Place in very small spoonfuls on a cookie sheet. (You want them to be small. because the Brookie Bites will be, well, bite-sized.)

    Step: 3: Bake cookies for the minimum time required, so that they are nice and gooey (crispy cookies won't work in this recipe!). While still warm, roll the cookies into bite-sized balls. This is very messy, and you'll have to wash your hands several times (or I guess, lick them clean) during the process. Place cookie balls in the freezer until frozen.

    Step 4: Place frozen cookies inside a brownie, and smush the brownie all around the outside of the cookie. This is not at all glamorous, but trust me, the end result is worth it!

    (Please excuse the blurry picture. I might have gone into a sugar coma at this point)
    Step 4: Roll Brookie Bites in colored sugar and freeze again until frozen.

    Step 5: Eat and Enjoy!

    P.S. Please don't leave me comments saying that I helped you fall off the dieting wagon. You are a grown person, and if you can't stop yourself from making these Brookie Bites from heaven and then consuming every last morsel, that's your own fault.

  • Once a Month Lunches {20 minutes: 35 sandwiches}

    Once a Month Lunches {20 minutes: 35 sandwiches}

    So, this isn't a DIY or design post, BUT it will save you so much time that you can work on projects to your heart's content!

    lunches intro

    Pin It
    Confession Time: I don't make the lunches in our house… my beyond awesome husband does. Yup ladies, sorry he's taken! Anyhow… being the thoughtful wife that I am, I wanted to find a way to make it easier on the hubs so I suggested we try making a whole weeks' worth and freeze them. Eric was skeptical, but it worked like a charm… i.e. the kids didn't notice! Since I'm a wild woman, I suggested we get a little crazy and the next week we made an entire months' worth! It's a small change that has rocked our making-lunches-with-four-kids world! Lunches are now as simple as grabbing a sandwich and snacks- easy peasy (or so it seems when the hubs is doing it!)
    The Once a Month Lunch Secret! Make a Costco run and buy lots of supplies. (It really doesn't take two peanut butters or anything, but you never know when Michelle Duggar is reading our blog! Hi Michelle!)

    ingredients collage

    Lay out all your bread. We divide it up because we have one fluff lover in the house.

    DSC_0015

    Okay ladies, do your husbands do any simple tasks so weirdly? Now, Eric is a dreamboat for making lunches, but he holds the knife and slaps the peanut butter on in such a strange, caveman-like way! Oh well, I guess I can live with caveman PBJs.

    DSC_0019

    Here's the most important step… you have to peanut butter both sides! The one time I did the lunches, I of course didn't see the importance of this step, so I skipped it and we had soggy sandwiches. Mommy fail!

    DSC_0027

    The hubs tells me that squeeze jelly makes the process even faster!

    DSC_0040

    You might notice some of the sandwiches only have peanut butter in the middle… well, here's why!

    crust

    This tool from The Pampered Chef is so inexpensive and awesome! It turns our normal sandwiches into homemade uncrustables! I pick my battles and I guess I'm still not convinced the edges are any more healthy! If you want to order one, contact our Pampered Chef blog sponsor Jane.
    Ta-da! Awesome, complain-free sandwich!

    punch sandwich

    We are left with a lot of crusts, and there are some times that we use them in meatloaf, and I've debated trying them as a french toast bake… although, my logical husband reminds me that it's only about $1.89 worth of waste, so sometimes they just become duck bread!

    DSC_0054
    DSC_0052

    Another important detail… Get really good freezer bags. It makes a difference and keeps them nice and fresh!

    DSC_0034

    Pack 'em in and you're done! Yup, it's that easy!

    DSC_0036

    We keep a few bags in the freezer and all the rest in our deep freezer in the basement. Eric's new favorite midnight snack is grabbing a frozen sandwich and eating it cold. Weird if you ask me, but he loves it!

    freezer shot

    So there you have it. Our little family secret revealed! Maybe everyone has been doing this all along, but it's rocked our world and I strongly suggest you give it a try if you haven't. Who knows, maybe your hubs will think it looks so fun that he'll take over!

    Monica

    PS- We can't believe it, but we were nominated as one of Apartment Therapy's DIY blogs of the year. However, we need some serious votes. We're kind of getting smoked by the big blogs! It definitely takes a minute or two to vote, but we'd sure appreciate it. Go HERE to vote! Thanks so much!
    Linking to: TipJunkie

  • {Be Intentional}

    {Be Intentional}

    (created by Jones Design Company)
    This is my motto for the year 2011. Lest you think I am superwoman, super-organized, or even know what I'm talking about, this is my first time ever that I've chosen a motto for the year. I have just been feeling motivated to do more with the beautiful, crazy life I've been blessed with. I'll be sharing more about this in future posts, but there are endless possibilities and ways to be intentional. Remember the story in the Bible (Matthew 25) that talks about the men who were given talents by their master, and what they did with those talents? I want to be like the one who used his talents well, did more than was expected with them and turned them into something great. If everything in this life has been given to us, including our abilities and passions, then why I have I been so selfish with mine? You can be sure you'll be hearing more from me about this!

    For now, I'm going to share with you one practical, less abstract way I am trying to be more intentional. It's with regular meal-planning and grocery shopping. If you know me, then you know I am a fly-by-the-seat-of-my-pants girl. I realized, however, that this was not serving my family well, nor was it managing my money well, in the area of meal planning. There are a lot of reasons that planning meals with variety and regularity don't come easily to me, but let me tell you what has been working for me.
    First, I begged and pleaded with my friends on facebook, and with family members, scoured my cookbooks, and hunted online for excellent, tasty recipes that met my very simple criteria. 1. Must have very few ingredients. 2. Must have common, not-too-difficult to find, or strange (I am an adventurous eater, but I'm in the minority in my family) ingredients. 3. Can be crock-pot-able (is that a word? If not, it is now.)
    Secondly, I put those recipes in an easy to find, and easy to read form. For me, I picked up a set of color-coded 3x5 cards that were already on a ring-binder. Each colored card has a category (poultry, beef, side dish, fish etc).

    Thirdly, (this one is so silly, but it works for me), I put a peelable chalkboard tile on my refrigerator (a gift from my sister, but you can find them here), where I write the next day's meal. This keeps me on task, and makes me less likely to be lazy about making the meal that night.

    I do a big grocery shopping trip twice a month (we do run to the store weekly for things like eggs, milk and bread). I plan ahead for 4 meals a week (8 dinners total for the 2 week period), because usually this is how many nights a week we actually sit at home together for dinner. Then I make my shopping list and shop accordingly. I've been doing this for one month, so far, and it has been great! Hunky has loved the variety and I actually feel that I'm being really effective with my time and money! Hooray!

    Here are a couple places that might help you in your quest to be a meal-planning guru!

    E-mealz — sign up for $1.25 per week, and get specific meal plans, shopping lists and more for any size family (Bonus: if you have special dietary needs, they'll give you a plan for that as well.)

    Meal Planning Mommies give tips for meal planning, and lots of easy, kid-friendly meals, perfect for busy families.

    Crystal and Co. is my personal favorite site for all things related to meal planning. From Menu Planning Mondays, to how to display your menus, to recipes, she's got the whole thing covered! And maybe, just maybe, I would be a little better at menu-planning if I had something cute like this (below) to display my meals on. You may be seeing something like this from me in the near future. Stay tuned!

    All Things Beautiful

    What's your method for meal planning? Organized or Fly-by-the-Seat-of-your-Pants?

  • Creamy Guacamole with Homemade Tortilla Chips {Guest Post}

    Creamy Guacamole with Homemade Tortilla Chips {Guest Post}

    We're so happy to welcome Becca from Home Beccanomics (isn't that a fabulous name?) here at RHBC. She's the mastermind behind loads of amazing recipes that have been tested by the toughest critics: kids! That's right, she's a Family and Consumer Science Teacher, so you know her recipes have been tried and tried and tried until they passed the test! Clean up the drool after looking at this guacamole and head on over to her blog for tons of other delicious recipes!
    Creamy Guacamole with Homemade Tortilla Chips

    When I introduce the homely avocado to my high schoolers, some girl inevitably raises her hand and states, “avocados are super fatty and bad for you”. Gasp! You lie, little girl, and I won’t have you speaking badly of the avocado.
    Avocados DO actually have a lot of fat, but it’s the GOOD for you fat that you can eat as much as you want of; true story, as much as you want. It’s called monounsaturated fat and it lowers your bad cholesterol and raises your good. Also, Oprah said it reduces belly fat (and we know she probably has some intense fact checkers).
    Buy your avocados when they’re hard and let them ripen at room temperature (to speed up this process put them in a brown paper bag with a banana). When one of your avocados “gives” when you press on it, put it into the fridge. When all four avocados are in your fridge, you’re ready to guac it up.
    My husband likes guacamole. He is, in fact, crazy about it. I have made eggs with guac, guacamole chicken salad; sometimes I just give it to him in a bowl and he eats it with a spoon. I pretty sure he’s not alone in his love affair. I bet you don’t know anyone who dislikes the green happiness that is guacamole. If want a crowd pleasing appetizer, this wins every time. As long as the avocados are ripe and you add enough salt, guacamole is SUPER easy to make. The add-ins are really up to you. Love cilantro? Or lime? Add in small amounts and taste as you go. If you prefer to just follow a recipe then I can assure you, this one is legit.
    Creamy Guacamole with Homemade Tortilla Chips Serves 8

    Chips: 8 Medium Flour tortillas ¼ c. extra virgin olive oil ¼ tsp. salt 1/8 tsp. black pepper ¼ tsp. garlic powder Sprinkle chili powder or paprika, to taste
    Dip: 4 ripe avocados ¼ c. minced onion 2 garlic cloves, pressed through garlic pressed or minced 2 c. quartered cherry tomatoes 2 partially seeded jalapenos, minced ¼ c. sliced green onions (or scallions, same thing) ¼ c. nonfat plain Greek yogurt ¾ tsp. kosher salt Pinch cayenne pepper, or to taste Pinch garlic salt, or to taste Tomatoes and green onions for garnish

    1. Preheat oven to 350 degrees. Brush olive oil over tortillas.

    2. Stack tortillas and cut into 8 wedges.

    3. Grease two cookie sheets or cover with parchment paper. Arrange wedges in an even layer on cookie sheets.Sprinkle salt and spices over wedges.

    4. Bake for 15-18 minutes or until starting to turn light brown. Let cool, and store in a Ziploc bag at room temperature. These chips will be good for several days.
    5. Cut avocados in half vertically. To remove pit, chop your knife into it and give it a twist. Remove any part of avocado that is brown.

    6. Scoop out flesh of the avocado and place in a mixing bowl. Mash with a fork, breaking up the large chunks.

    7. Add onion, garlic, tomatoes, jalapenos, and green onions. Mix to combine. To prep the jalapeno, slice in half vertically. You must remove the white part of the pepper. Leave seeds if you like a lot of heat; remove all seeds if you don’t. I usually keep about half.

    Here’s a tomato tip: Take two Tupperware lids and put your cherry tomatoes in the middle in an even layer. Slice across with a sharp, serrated knife, while pressing down on the top lid. A great way to slice them all at once! If your tomatoes are small you might only need to halve them; if they are large like mine were, quarter them.

    8. Add Greek yogurt, salt cayenne, and garlic salt. Stir. Taste, and add more salt and cayenne according to how you like it.

    9. Scrape mixture into a serving bowl. Garnish with tomatoes and green onions, if desired. Guacamole is best served the day it’s made. If planning to serve it several hours after making it, store in the fridge with a sheet of plastic wrap pressed against the surface.

    Mmmmm…We can't wait to try this! Thanks so much for stopping by today, Becca!
    Have a GREAT weekend, everyone! Any fun plans that include guacamole?

  • Favorite Things Party

    Favorite Things Party

    After being inspired by Hayley, I hosted a Favorite Things party with 7 of my best girl friends last night. I asked each of them to find their favorite thing under $10 and wrap it up; one for each girl, as well as a favorite appetizer or dessert to share. We had so much fun that I completely forgot to take any pictures of my friends, but of course, we got a few of the goods!: )

    Both of us had fun wrapping our gifts up pretty. I printed my adorable {free}tags from Jones Design Company and they were the perfect addition to my gift. Can you guess what our favorite things were based on the packages?

    There was such a wide variety of favorite things, which made it that much more fun! Each girl wrote what she thought the other one brought and then we revealed our guesses just before we opened each gift. Some guesses were really accurate, and others were waaaaayyyy off. (Based on the packaging, I guessed that one of my friends brought trash cans, but really it was a tub of popcorn!) So what were our fav things? (Clockwise from top left corner.)
    1. Homemade Iced Coffee with the fixin's & a Starbucks gift card. Jane used this recipe from The Pioneer Woman, and let me tell you: it was awesome! And that's coming from a non-coffee drinker.

    2. Mrs. Meyer's Basil Hand Soap. If you guessed that this was mine, you were right! I've already gone on and on about my love for Mrs. Meyer's, so I'll stop now. 3. A thermal"sippy cup" for adults. Don't call it anything else or Jane might bite your head off. 4. Popcorn in a Christmas tin. Man, we used to get loads of these from my dad's co-workers etc. and so this brought back memories of eating more popcorn than is legally allowed. 5. J.Crew t-shirt and Land O' Lakes Mint Hot Cocoa. Yes, it's good to have friends with good taste, folks. 6. Spelt Flour. A bit unusual, but my friend Steph is unusually passionate about the stuff. 7. My sis made her famous Puppy Chow, because, duh, it's peanutbutter, chocolate and powdered sugar. Everyone's favorite mix! 8. Monica's gift was chocolate chip cookie dough and a pair of tight-fitting ankle socks. She actually buys the children's sizes because she's so particular about the fit. And you wouldn't believe how much cookie dough we consume in a year. It would probably break a record.
    Of course, we had great food too! A yummy hot chocolate bar:

    And I also made Cheddar Bacon Ranch Bread (aka Crack Bread) that is absolutely to die for. I'm sorry, but if you don't like this, your taste buds must not be functioning correctly. This has been my go-to appetizer lately. No joke- I've made this 3 times in the last 4 days, and it never fails to please.

    I'm so thankful for good friends and sharing the little things that make us happy. I'm adding this to my list of annual traditions!

    Pin It
  • Fab Find Friday

    Fab Find Friday

    This Fab Find is near and dear to my heart:
    Dream Dinners!

    Why, you ask? Several years ago my mom and I decided to go into business together, owning and operating our very own Dream Dinners store. It was a fabulous experience that we'll never forget, but because of my growing family and the declining health of both of my grandmothers whom my mom cared for, we made the difficult decision to close our store. If you don't know about Dream Dinners- you are missing out! I know this company to be a good one, and the care that goes into creating delicious, excellent quality, healthy meals can't be outdone! Do you ever get home from a busy day and ask yourself,"what's for dinner?"At Dream Dinners, they answer that question for you. Their monthly menu includes over 14 different recipes each month, along with additional pre-assembled dinners, sides, breads and desserts ready for purchase while in one of their stores. A wide variety of options means there are plenty of meal preparation choices to satisfy everyone in the family.

    1. Garlic & Balsamic Marinated Flank Steak 2. Raspberry Stuffed French Bread 3. Greek Island Shrimp 4. Fruit-Stuffed Pork Roast
    You know I LOVE food, and the meals, sides and desserts are mouth-watering! (My personal favorites are Chicken Mirabella, Herb-crusted Flank Steak and Arroz con Pollo and Monica can't get enough of their amazing biscuits with cinnamon-honey butter!)

    The best part about this whole thing is when you take the meals home and realize you have 12 or more meals in your freezer ready to cook at a moment's notice. (Side note: do you see all that loose corn in my freezer? One of my hubs' biggest pet peeves is the fact that I tend to leave open containers everywhere or don't properly put the lids on things. Case in point.) Anyway, I have a regular size freezer and 12 meals fit perfectly, so don't worry about a lack of space! And now, the question I'm sure you are dying to ask: is it affordable? Well, take a look at this little video and see for yourself:

    I know the owner of our local store, Kris, well since we worked closely with her for several years and she'll take good care of you! Plus, she's offering 10% off your first full order! Just use the code DDNC201110.
    I do hope you'll check Dream Dinners out! Happy Eating!

    PS. Dream Dinners can save you LOADS of time when it comes to holiday meal planning. They have some really great entree items, and even offer delicious appetizers for your parties. I've used them several years in a row for my big Christmas party, and the stuff is amazing and always gets rave reviews!

  • Thanksgiving #1 and Dining Room Update!
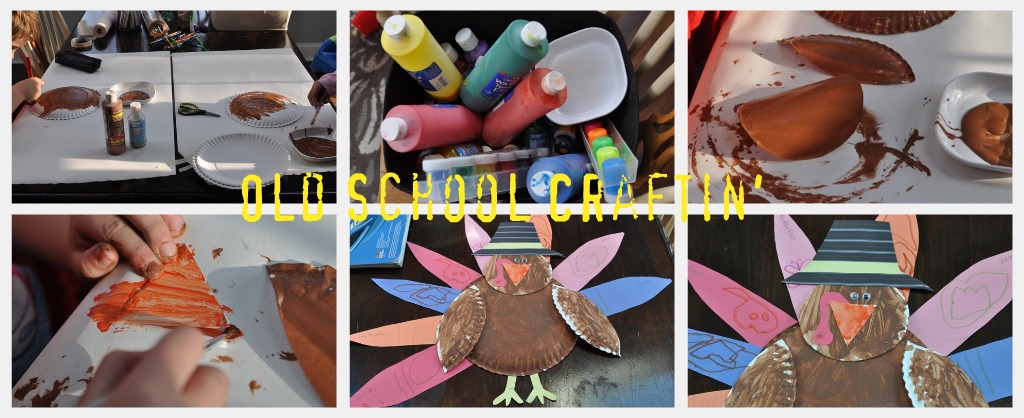
    Thanksgiving #1 and Dining Room Update!

    I can't even tell you how stuffed I am right now. I couldn't eat another bite if you paid me! We had Thanksgiving with some of our close friends and it was awesome. We're so thankful to be blessed with such amazing friends. I didn't go crazy with decor, but I did a few cute little things that I thought you might like to see… My kiddos helped me make"really fancy" centerpieces for the kids' table… Craftin' it old school my friends…

    Who doesn't love a paper plate turkey? My favorite part is that we made these before 9am Saturday!
    I wanted the kids' table to be fun (so that the adults might actually get to sit down and eat), so my younger two helped me make placemats.

    I made the little name cards on Picnik and then snagged a free printable from Pinterest (I pinned it if you want it), added a piece of construction paper, tied up the utensils and voila! Remember, this was quick and easy, not fancy schmancy, but the kids loved it and had a blast!

    Look at all those happy kiddos!

    Since the kids had a fun table, I had to do a little something for the adults. Using the same method we shared on 69 News, I just printed out some little cards. Under the"Thankful" I listed the people at Thanksgiving. If you wanted to use these as place cards, you could just circle the name of the person.

    Since Jess shared a fail (turned awesome) yesterday… I'll share a fail (turned umm… still fail!) today. So, I was inspired by this jute runner, but forgot to get jute, so I figured I'd use my kids' craft paper and do the same thing… umm, not so much…

    I measured out the paper, I had the hubs help me fold it (then I mentioned he was in the picture, and this is the cheeseball pose I got. Nice one babe), I started cutting on the lines and was reminded that I'm a lefty in a right handed world (and my perfectionist husband couldn't stand the sight) so Eric cut. I started weaving, but guess what? The paper was all rolly and wouldn't stay put and needed tape every two inches. UGH. I gave up halfway through, trimmed what I had done, plopped a huge gourd on it and had a good laugh with Jess over it!

    Lame table runner or not, we had an amazing time together! Now, ready for a dining room update? Well, thanks to an awful cold, I've been worthless the past few days. Today, about 4 hours before 20 people arrived for thanksgiving Eric and I used our lunch breaks to paint the bottom half. (I love the days he works from home!)

    We love chalklines. Honestly, I won't paint a line without one! Since we're using a chair rail we didn't have to be neat with the top line (just in case you thought we were sloppy!)

    I'm so thrilled with the color. It's Antique Silver, from Olympic (but I got it color matched in Valspar).

    We still need to paint the area between the moulding, but that can wait until after I've wallpapered. It arrived in the mail and I can't wait to put it up!! I called in the big guns for that job. My father in law is coming this week to lend a hand. There are just some things that I know better than to do with the hubs!
    So there you have it. Thanksgiving # 1 and at least some progess on the dining room. I'm hoping that my next update will have the room almost done!

    PS… Did I mention that we deep fried our first turkey? It was amazing, but I'll point out that it's never a good sign when someone is lighting the gas and has the directions in hand. We were clueless, but in the end, it was worth all the craziness!

  • The BEST Mulled Cider

    The BEST Mulled Cider

    What do you do when you have a bunch of people coming over for a Trick or Treating party following two days of widespread power outages? And stores, businesses, gas stations are still waiting to reopen after a big storm? Browse pinterest for some last minute recipes, of course! I was hoping to find a recipe for hot mulled cider (a favorite of mine for those cold Fall evenings) that I could make for a crowd using items I already had on hand. And guess what?! I found one!

    I found the original recipe here, but had to tweak it a bit to make it work with what I already had at home. I'm sure that recipe is amazing, but let me tell you, this easy, no-fuss cider I made totally rocked. It's so ridiculously easy that absolutely no pictures are needed, but a post is a lot more fun (and yum-inducing) when photos are involved.: ) So. here's what you need: 

    One gallon of Apple Cider One whole orange, cut in half 1/2 cup of brown sugar 3 tsp. of Pumpkin Pie Spice 

    1. Pour the cider in your crockpot. Ignore the exposed outlet. Yes, that's been there for oh, um…at least 8 months. Yuk, I hate details.

    2. Mix in 1/2 cup of brown sugar.

    3. Add 3 tsp. of pumpkin pie seasoning and mix well. The spice won't immediately mix in, but will eventually as the cider warms up.

    4. Cut your orange in half and place it cut side down in the cider. Keep the orange in the entire time.

    5. Heat it on high for 2 hours, or on Low for 4-6 hours.

    Serve nice and hot with gingersnaps for dunking.; ) Enjoy! -------------------------------------------------------------------------------------------------------------------------- We are over-the-moon-excited to be posting over at I Heart Naptime today! Head over there to see a super fun Christmas project we did using slices of wood. It turned out sooo cute!

    Happy weekend!

  • Apple Dumpling Goodness

    Apple Dumpling Goodness

    First, a disclaimer: If you've ever read our bios on the About Us page, you'd know I do not bake. At least, not well. For some reason, baking and I don't usually mix since I'm usually a"throw-in-a-dash-of-that", or a"that-looks-like-about-a-1/2 cup" type of person. Anywho, you need not be an expert baker to attempt this recipe. I'm living proof of that.: ) Now, on to the yummyness that is these apple dumplings. These are soooo simple to make and use only a few ingredients, but the best part is that they taste amazing! Gooey and sweet and perfect for Fall. I originally found the recipe here, and am forever grateful!

    Here's what you'll need:

    • 2 sticks of butter
    • 1 tsp. vanilla
    • 2 tubes of crescent rolls
    • 2 Granny Smith apples
    • 1 1/2 cups granulated sugar
    • 12 oz of sprite (or mountain dew)
    • Cinnamon to taste
    Step 1: Peel and slice your apples into wedges.

    I was so wishing I had a Pampered Chef Apple Wedger for this job, but alas, I had to do it the old-fashioned way. (If you want to make your life easier, contact our PC sponsor, Jane B. and she'll hook you up!)

    Step 2: Roll an apple wedge up in one crescent roll triangle.

    Step 3: Place crescent-wrapped apples in a sprayed baking pan.

    Step 4: Melt both sticks of butter and mix with sugar and vanilla.

    The consistancy should be sludge-like. (Mmmm…sounds good, doesn't it?)

    Step 5: Pour butter mixture over the tops of the wedges, or spread on top with a spoon.

    Step 6. Pour the can of soda all around the wedges and sprinkle cinnamon on top.

    If it looks gross and like something the dog threw up, you're on the right track.
    Step 7: Bake at 350 degrees for 30-40 minutes or until brown and crispy.

    Step 8: Serve warm with vanilla ice cream. Yum!

    source
    Honestly, you can't go wrong with this recipe. It gets rave reviews every.single.time. Go ahead and give it a try! It might just convert you into a baker.; )

  • Delicious

    Delicious

    Dan-Cutrona-Photography-018


    Have a cosy Saturday evening!

    Hugs, Bettina.: )

  • I HEART September!

    I HEART September!

    I love September. It's my favorite month of the year. It does mean the end of summer, but the beginning of fall. I adore fall. September in the Northeast gives me the best of both worlds… Warm summerish days and cool, crisp mornings and evenings. Sweaters + 77 degree days = one happy blogger!

    I can't tell you how many mornings in September Jess and I will text each other before 8am with something like,"OMW have you gone outside yet? Perfect weather!" (Yeah, we really are big dorks!)
    Ok, so one of my favorite things about September is acting like it's still summer on one of the the really warm days. Whether it's a Saturday, or just an evening when the kids get home from school, we love to just head out to the pool, have one last night of grilling out, and eat ice cream… of course ice cream!
    Homemade Cookie Dough Ice Cre am  We recently bought an ice cream maker from Target. You can get it online HERE, but I suggest checking out the clearance aisle because I got mine for like $8.00!

    I've had homemade vanilla ice cream before, but I thought it was only so-so. I went to a favorite recipe blog and found a chocolate chip cookie dough recipe. Not just vanilla with cookie dough, but a real cookie dough flavored ice cream with dough in it. YUM! Click HERE for the recipe… then bookmark it because her site is awesome!

    It was a simple recipe…

    and the whole family got in on the fun!

    My helpers checking to make sure it was working…

    My skeptical supportive husband wasn't so sure this was going to work out… after all, the maker was only $8.00 and the rock salt we needed was only 75 cents per bag! But, look at that creamy goodness!

    So, if you're at Target this week, check out the clearance aisles and maybe you'll find this fabulous ice cream maker. Bring a little summer fun into September this month. Trust me, you'll be glad you did!

    So, are there any September lovers out there like me? What's September like"in your neck of the woods?" (Thanks Al Roker)

  • A Rest

    A Rest

    Ahhh…Labor Day.

    Source: sil.si.edu via McKenzie on Pinterest
    Monica and I are enjoying a very much-needed rest from working this Labor Day. We have been soooo busy trying to pretty up this blog, put together projects and posts that you'll love, caring for our kids and homes, preparing for our tv debut on The Nate Show, coaching a highschool tennis team (me), all while working our other jobs (Monica-teaching, Me- Recreational Therapy). It's been a crazy few weeks, and although we love it, we're pretty darn tired. We're sure all you moms out there can definitely relate. So, please excuse us, while we recharge our batteries today. We'll be coming back at ya tomorrow with some good stuff, so stay tuned.: )
    Here's to a work-less, restful Labor Day!

    PS. If you're in need of some delicious picnic foods, don't forget this little Tomato/Cucumber number, or this easy Pulled BBQ Pork crowd-pleaser.
    And, if you don't mind, please vote for us as Most Valuable Blogger in Philly! Thanks a bunch!

  • Today is the Day {EC2 Fall Kickoff!}

    Today is the Day {EC2 Fall Kickoff!}

    It's Fall! Yay! Well, ok, we might still be experiencing 80 degree weather, but Monica and I are in total Fall project mode. We both have lists miles long of stuff we want to accomplish, and things we want to do during this, our favorite season ever. There's just something about getting back into a regular groove that makes us so much more productive. We're already planning our usual Tuesday evening blog nights (if you ever want to reach both of us at once, that's the perfect time!), and have some awesome tutorials, fun room designs, and, of course, lots of seasonal decorating to share with you!

    If you're new around here, you'll quickly realize that we looooooooove Fall. In fact, last year, we dedicated a whole week to Autumn goodness. You'll definitely want to check out some of our fav Fall finds from last year, like…

    Easy Apple Dumplings Oh yummmmmm. I can't wait to break these things out at our first Eagles football party. I don't know about you, but the only reason I watch every game is for the food. Oh yes, I said it.

    Fall Mantle Inspiration
    This is my Fall faux-mantel from last year and I absolutely loved it, but I'll be mixing it up this year since my kitchen looks totally different.

    Fall Anti- WreathMonica is a wreath-hater, and she's not afraid to admit it. Her solution for her front door was totally awesome, and I daresay it'll make you a hater of traditional wreaths, too. --------------------------------------------------------------------------------------------------------------------------

    With the start of the Fall blogging season, we're happy to announce that we're accepting new sponsors! We have a few openings that we would love to fill, so if you have a business that you think we'll love and can help you promote, send us an email at eastcoastcreativeblog@gmail.com! Seriously, what better way to sell your stuff than to have two loud, passionate, crazy women on your side?! For all the nitty-gritty info about our sponsorship opportunities, click here. Come on board with EC2- we'll take good care of you!; ) --------------------------------------------------------------------------------------------------------------------------We can't wait to share with you all that we've been doing in our homes (anybody ready for a Monica patio update?!), so why don't you throw on a pair of jeans and a comfy sweatshirt and cozy on up with us. Let the Fall fun begin!

  • Fab Find Friday

    Fab Find Friday

    This Fab Find is kind of silly, but is truly knock-your-socks-off delicious.

    Many of you grow your own veggies and may be looking for something to do with all those ripe tomatoes and cucumbers, or many of you, like me, may hit up your local roadside stand to help them get rid of all those ripe tomatoes and cucumbers. This recipe from my mother-in-law is so simple, but I managed to cut and eat 5 tomatoes and 3 big cucumbers in 2 days because of it. Are you ready? Here it is:

    Just add enough blush wine vinaigrette (I used Brianna's which is to die for, but any blush wine vinaigrette will do) to cover the veggies and let marinate a few hours in the fridge. And voila! A refreshing, delicious salad to enjoy on these last few summer evenings…or afternoons. Probably most of you won't eat it in the morning like I did. Enjoy! ------------------------------------------------------------------------------------------------------------

    Also, we have a winner of the Salvatori Photography giveaway:
    Congratulations, Amy Z!

    Just email us, Amy, and we'll hook you up with Stacy so you can schedule your"momography" tutorial (no, that's not mamography, for those of you who were wondering. Do you really think we'd give away one of those?!! True, it could save your life, but really…). ------------------------------------------------------------------------------------------------------------- And finally, announcing…

    Come back next week to get yourself in the back-to-school spirit!
    Have a FABULOUS weekend!

  • Strawberry fields forever

    Strawberry fields forever

    strawberries
  • Party Planning the Mangin Way…

    Party Planning the Mangin Way…

    We party hard in the Mangin family… We I love themed parties and have for about 10 years… before all the party planning websites and pinterest existed, I actually had to be creative and come up with ideas on my own {gasp!} I used to go a little extreme with the parties, but the hubs made me scale back I learned a little self control. I never went nuts like ponies and millions of dollars, but party prep would take FOREVER and other wifey duties would be ignored. Right now I'm planning Kira's 4th birthday party. She's wants a DOLPHIN themed party… UGH. I just designed her semi-dolphiny, semi-nautical invitations. I'm going to go with an ocean/dolphin party. She's cool with it.

    I thought it would be fun to pull up some old party pics and get the creative juices flowing. These pics weren't taken for a blog, so go easy on me!
    Kitty Party Obsessed with cats, we did a kitty theme. Pink. Black. All things Cat.

    Probably my favorite cake ever.

    Pumpin Party I took the easy way out and went with the fall theme since it's a November birthday. Pumpkin Mini Golf

    Bobbing for Apples

    Garr… Pirate Party It's been done 100s of times, but he loved pirates! (Oh, my word… do you love that I accidently drew him a french mustache instead of a piratey one?)

    Wish this picture was better, but we made two huge plywood boats so the kids could have cannonball wars and walk the plank!

    So, no we're not fancy-schmancy, but my kids LOVE their theme parties, and their mommy does too! All our friends know how we roll and they're great sports… Minute to win it anyone?

    Starwars Babyshower anyone?? Little fella was going to be named Lucas after Luke Skywalker!

    Ok, looking back at these made me laugh and inspired me to get my butt in gear and get all dolphiny! Here's a few pins to get me going…

    Source: newenglandfineliving.com via The Real Housewives on Pinterest

    Source: thesweetestoccasion.com via The Real Housewives on Pinterest
    How do you partay?

  • Yum

    Yum

    Our lives have been so crazy lately. I've picked up a couple extra shifts at work in the evenings, my hubs has been playing 2-3 softball games per week, and we're trying to cram in as many summer activities as we can into each day. That leaves very little time for planning and eating good meals. Remember one of my very first posts on this blog about being intentional with meal planning? Well, that idea has gone right out the window this summer. And that's ok. We'll get back on track when life settles down (hooray- softball ends this week!). All that to say, I miss good food.

    Source: etsy.com via Jessica on Pinterest
    I totally agree. I just love food. Anyway, every recipe that catches my eye on Pinterest makes my mouth water. Here are three recipes that I can't wait to try, and I thought you might be interested in them too. We'll start with an appetizer/snack, then a dinner item, and then, of course, dessert.

    Fruity Peanut Butter Yogurt Dip

    Source: thewannabechef.net via Jessica on Pinterest
    Ingredients(Makes 6-8 servings):

    • 1/2 cup fruit-flavored yogurt*
    • 1/2 cup natural runny peanut butter
    • 1/4 cup powdered sugar (or 1/4 cup honey)
    • Fruit/veggies for dipping
    *To customize the flavor, use 6 tablespoons of yogurt and 2 tablespoons of any fruit jam.
    Mix together all of the ingredients completely making sure there aren’t any clumps. Move to a serving dish. Serve with chopped fruit and vegetables.
    Grilled Chicken Tzatziki Wrap
    (Mmmm…makes me long for my days in Greece. Such delicious foods!)

    Source: styleathome.com via Jessica on Pinterest
    Ingredients

    • 4 pitas
    • Extra yogurt for garnish

    For chicken marinade:

    • 1/2 cup yogurt
    • 2 tbsp honey
    • 2 tsp fresh lemon juice + 2 tsp lemon zest
    • 2 tsp hot sauce
    • 1 to 2 garlic cloves, minced
    • 1 tsp dried oregano
    • 1/2 tsp ground cumin
    • 1/4 tsp freshly ground pepper
    • Pinch salt
    • 4 boneless, skinless chicken breasts

    For cucumber relish:
    • 1 English cucumber, halved lengthwise and thinly sliced (about 4 cups)
    • Pinch salt
    • 1 cup seeded, finely diced tomato
    • 1/2 cup finely diced red onion
    • 6 tbsp coarsely chopped and pitted black olives
    • 4 tbsp coarsely chopped fresh parsley
    • 2 tbsp coarsely chopped fresh dill
    • 1 garlic clove, minced
    • 4 tbsp extra virgin olive oil
    • 4 tsp fresh lemon juice
    Directions
    1
    To prepare chicken marinade, whisk all ingredients except chicken breasts together in a bowl. Combine marinade with chicken breasts in a large zip-lock bag, seal and gently shake to evenly distribute marinade over chicken. Place in refrigerator and chill for 2 to 4 hours.

    2 Meanwhile, prepare the cucumber relish. Lay cucumber slices in a sieve placed over a bowl and sprinkle with pinch of salt. Leave for about 30 to 40 minutes, or until cucumbers soften and their liquid begins to drain into the bowl. Stir occasionally.

    3 Combine the tomato, onion, olives, parsley, dill, garlic, olive oil and lemon juice in a medium bowl. Stir in drained cucumbers, then cover the bowl and refrigerate for 1 to 2 hours.

    4 Grease grill and preheat to medium-high. Remove chicken from zip-lock bag and discard marinade. Grill chicken breasts until cooked through, about 15 to 18 minutes. Remove chicken from grill, let rest for a few minutes and slice thinly on the diagonal. Lay chicken slices on top of each pita round and divide relish evenly among them. Garnish with a little extra yogurt and serve.
    Gooey S'Mores Dip

    Source: tastebook.com via Jessica on Pinterest
    Ingredients:

    • 1½ cup semisweet chocolate chips
    • 1 can (14 oz) sweetened condensed milk (not evaporated)
    • ½ cup marshmallow creme
    • 1 box (13 oz) graham cracker honey sticks
    Directions 1) In small microwavable bowl, microwave chocolate chips and condensed milk on High 1 to 2 minutes, stirring occasionally, until chips are melted. Stir to mix well. Pour into 9-inch glass pie pan, spreading evenly.
    2) Drop marshmallow creme by tablespoonfuls randomly over chocolate mixture. Microwave on High about 30 seconds or until marshmallow creme is softened. Immediately with knife, make several small swirls through marshmallow and chocolate, creating a marbled appearance.
    3) Serve immediately with graham sticks for dipping. 
    And that's what's for dinner, folks…in a few more weeks.; ) What's on your menu for tonight?

  • The Good Ol' Mason Jar

    The Good Ol' Mason Jar

    I'm going to attempt to share my adoration with mason jars with you, without completely embarrassing myself. I do love these guys. They are extrememly versatile, easy to find, and very inexpensive! What more can you ask from a decoration? Lately I've been seeing quite a few of these jars at flea markets in the light blue variety shown above, and the regular clear jars. If you aren't into scouring flea markets, my local grocery store carries them in boxes of 12 for less than a dollar a jar. I've used mason jars in a couple of projects over the past few months:
    1. First, my daughter and I made cinnamon honey butter for our friends and neighbors at Christmas, and packaged it in small mason jars with the lids covered in fabric and tied with a ribbon and homemade mongram tag.

    2. Next, I used them as a vase for the floral arrangements I made for my sister's sugar and spice baby shower. They were perfect. 

    3. And finally, I whipped up this arrangement this afternoon for a little something different on my dining room table. I had these leftover jars and an old drawer with pulls on both ends that I had been wanting to use. Then I remember that I had dried flowers from a visit to Pike's Place Market in Seattle a few years ago just sitting in closet. Within five minutes, I had a pretty new centerpiece for my table.

    I'm thrilled with it! (But I've already decided to do something else with the jars. Ahh! Sometimes being impulsive is a curse.: ) And yes, I do need curtains for my poor naked windows, and yes, those are my custom bird art pieces in the back. Aren't they cute? *Side note: my hubs and I found our dining room table on clearance for $60.00 at a furniture store in Harleysville. Excellent find, if I do say so myself. Ok, enough about my mason jar projects! I've rounded up some great mason jar inspiration from the world wide web. Feast your eyes on these pretty pictures, and be inspired!
    Food/Drink There are a million cute ideas for serving food and/or drink in mason jars but I thought these two were adorable.

    Source: None via Jessica on Pinterest
    Use small jars as individual cup for lemonade-genius! I love the decorative cut-out in the lid.

    Source: curbly.com via Jessica on Pinterest
    This is so sweet- who wouldn't want to eat pie from a jar?; )
    Storage/Organization
    Both of these ideas utilize mason jars, clamps and a board. Easy as 1, 2, 3, I'd say. I absolutely love the toiletries stored in mason jars- such a great idea for a guest bathroom!

    Source: curbly.com via Jessica on Pinterest

    Source: weepingcherries.wordpress.com via Jessica on Pinterest

    Decor/Lighting I can't wait to try out some of these simple projects!

    Source: lh5.googleusercontent.com via Jessica on Pinterest
    In September, we are celebrating my parent's 40th wedding anniversary, and these pictures in a jar would be a great way to showcase pictures from their four decades together.

    Source: google.com via Jessica on Pinterest
    This is so much fun! This would instantly add whimsy to any room, and be a conversation starter, for sure.

    Source: atozebracelebrations.blogspot.com via Jessica on Pinterest
    These mason jar lanterns are SO easy to make, and I can't wait to give it a try. If you're looking for an easy way to update your porch or deck with ambient lighting, look no further.

    Source: blog.freepeople.com via Jessica on Pinterest
    And don't get me started on this. Isn't it gorgeous? I die.
    So give me your thoughts: Are you a fan of Mason Jars just like me? What projects have you done that include these simple beauties?

  • Raspberry Coconut Popsicles

    Raspberry Coconut Popsicles

    Home made popsicles will always be a super popular way to satisfy small mouths in the summer heat. Here are an easy recipe. No sweat at all. ;-)

    Ingredients (about twenty 1 dl. popsicles)
    1 cup raspberries (fresh or frozen)
    1 cup blueberries (fresh of frozen)
    1 can coconut milk (full-fat or light)
    2 cups water
    1 cup of juice preferred
    1/2 cup honey (or more if you want)
    1,5 dl paper cups
    wooden popsicle sticks
    Preparation
    1. Combine all of the ingredients in your blender.
    2. Pour mixture into 1,5 dl. paper cups, filling 2/3 of the way.
    3. Freeze for 30 minutes, insert sticks, and continue to chill until the popsicles are fully frozen, 2 hours or more.
    4. Carefully cut and tear the cups off of the popsicles, and seal in a plastic bag.

    And there you go!

    popsicle
  1. Hand Embroidery - textile creative holiday to India
  2. Happiness is a Garden Shed!
  3. Handmade bags with textile artist Marilyn Pipe
  4. Contemporary Wall Art Indian Embroidery Motifs
  5. Bucks Open Studios
  6. Toni Garrn | Mode: Fashion
  7. Rachel Bilson | Mode: Fashion
  8. Isabeli Fontana | Mode: Fashion
  9. Tara Gill: Dress to Kill Magazine | Mode: Fashion
  10. Morning Beauty | Mode: Fashion