My Creative Blog:
Kitchen

  • How to Paint Cabinets White

    How to Paint Cabinets White

    Ok, let's be real here. You know how when we write a tutorial and most of the time we say something like,"It couldn't be easier!" or, "Anyone can do it"? You won't hear that from me today. Painting kitchen cabinets really isn't hard, but it's time-consuming, monotonous and boring. It took us a full 10 days (working on weekday evenings- it could take less time if you have a big chunk of time to devote to it!) from start to finish. That being said, for the amount of money you put into it- really only the cost of paint- you won't find anything that makes as big of a difference. So, if you think you're ready to tackle this project- go for it! You won't regret the time spent in agony. Ha! Just kidding. But seriously, you will absolutely love the results.

    1. Take off all of the doors and pull out all drawers. Take off all hardware and store in a safe place! We had a bag labeled with what went where. And if you're anything like me, clean out your cabinets because that's just gross.

    2. Sand away! A lot of people will tell you that sanding is unnecessary. However, if you want a really seamless, smooth look, or if you have very glossy cabinets, I recommend a light sanding. I used my palm sander with 80 grit sandpaper (the higher the number, the finer the grit. For heavy duty sanding, use a lower grit sandpaper!)

    3. Wipe down the cabinets to remove all dust and choose your supplies. We used a 2-inch high density foam roller that is meant to be used on cabinets. We found that they didn't hold paint well, which meant we needed to do lots of coats, but the paint went on so smoothly! We also used a 2 1/2 inch angled paint brush (Purdy is the best!) to get the corners and hard to reach places.

    4. Prime and Paint. We started off priming everything, but quickly realized that to get good coverage we'd have to do way too many coats of paint. So we used Olympic ONE Paint + Primer in pure white that coordinates with our moulding in the kitchen and entryway. We didn't feel the need to use an oil-based paint as long as we used an enamel paint (enamel = paint that dries hard, is usually glossy, and is easily washable). Also, the higher the gloss of the paint, the harder it dries. I wanted a glossy look, so this works for me.

    Because our cabinets were previously stained (by us!) a dark walnut, it took several coats of paint. I would say that each door got 4 coats of paint. You could sand the cabinets in between each coat for an even smoother finish, but honestly, that would have taken us 4 extra years, so we decided to skip that step. They still look amazing.

    We did both the outside and inside of the cabinets, so that no dark wood peeks out when you open the doors. Here's a super great tip that I wish I had heard of before we started: use push pins in the back of the cabinets to lift them off the ground. No more sticking to the dropcloth!

    5. Seal with a water-based polyurethane (we used Sherwin Williams Wood Classics) for extra protection and even more washability (is that even a word?) Again, we went with water-based because oil-based polyurethane can yellow over time and that's not the look we're going for!

    Wood Classics® Waterborne Polyurethane Varnish

    6. Wait and wait and wait some more for the paint to cure. You don't want to nick up your beautiful white cabinets, so make sure you wait the appropriate amount of time written on your paint can before putting them back together.
    7. Put all the hardware back on the cabinets and drawers.

    8. Time to put the kitchen back together! This step couldn't have come sooner in my book, and I was literally, dancing for joy. We hung the upper cabinets first, and made sure to caulk along the side of the cabinet to make sure it look seamless.

    9. Step back and admire your beautiful cabinets! All that hard work was worth it, for sure!

    I hope I answered all of your questions about how to paint cabinets. If not, be sure to leave a comment with your question!
    I LOVE my new cabinets! What do you think? Worth the effort, or just way too much work?

    jess
  • DIY Herringbone "Tile" Floor Using Peel & Stick Vinyl {Knock It Off}

    DIY Herringbone "Tile" Floor Using Peel & Stick Vinyl {Knock It Off}

    It's true- most people have heard of vinyl peel and stick tile. We both have used it in our homes in the past. But, what's also true, is that most people have never thought to create an awesome herringbone pattern with that tile! These tiles are ridiculously easy to cut which makes it the perfect material to go crazy with pattern! We have to say that this floor is one of our favorite projects to date- we transformed this dated floor into an expensive, slate-look-alike.

    To say this flooring was dated would be the under-statement of the year. It was yellow and green and oh so bad! Even though the kitchen was tiny, we didn't have enough money or time to go with real slate tile.

    Instead, we got our DIY on… Lowe's sells lots of vinyl peel and stick tile and while it does actually look like stone, when installed the traditional way it looks good, but doesn't have a big wow factor…

    So, we had an idea… This flooring comes in 18x18 tiles- we decided to cut each tile down into three 6" strips per tile. Vinyl flooring cuts easily with a utility knife- Just score it and then fold it to divide.

    We cut down all of our tile into strips and then measured to find the center point of the floor. We used a chalk line to snap a guide for us to follow.
    Then, to give it a unique and high-end look, we laid the tile in a herringbone pattern. You just make"L's" over and over again. It's one of the easiest patterns to do!

    How's that for a before and after?? And, honestly… these pics don't even do it justice! You definitely have to watch this segment of the episode! (Here)

    I honestly was amazed and how good we made inexpensive vinyl look. It's like it was all dressed up for prom or something! Fancy!

    Changing out the flooring played a big part in making this tiny kitchen renovation complete! No one would ever guess that this flooring was installed with some of the cheapest materials on the market! Changing the shape of the tile and the installation layout gave us amazing style, without the expensive price tag!

  • Free Printable Invasion

    Free Printable Invasion

    I'm serious when I say that I think one of the best things about blogging and the internet is free printables! They add so much character to your home without having to spend lots of money. Thank you to all you who provide little ol' me with free stuff for my home! I've talked about a few different places you can find free printables here, but I decided that for my open shelves in the kitchen I wanted something specific and custom-matched to my color scheme. What's a DIYer to do? Why, make one herself!

    I wanted to create something that was meaningful to me, but that also had some connection to eating and the kitchen. While searching around, I came across 1 Corinthians 10:31 and knew that it was perfect for this!

    I found a pattern that I loved by Moo & Puppy (it's the morrocan trellis pattern that comes in a bajillion colors), uploaded it to Picnik and went to town. Why doesn't everyone buy digital paper? Seriously, there are SO many uses for it and it's so darn cheap! Plus, you can get 15% off if you use the code RHBC15. ----------------------------------------------------------------------------------------------------------------------Anyway, back to the printables. I have three identical frames in the kitchen that I spray-painted turquoise, and needed to fill them with something. I made this one using a great Julia Child saying…

    …and printed this beautiful peacock from The Graphics Fairy!

    Three cheap thrift store frames + free printables = one happy girl! And since I'm so happy, I decided to share the love. Free Eat, Drink, Glory of God Printable

    It's a 5 x 7 print and you can choose from three different colors: mustard yellow, turquoise and lime green.

    Click here to Download Printables I'm excited to finish accessorizing my open shelves, but you got a little glimpse today of how they're shaping up. What do you think?
    Have you ever made your own printable? Do share! 

    jess
  • White Cabinet Reveal! {Kitchen Update}

    White Cabinet Reveal! {Kitchen Update}

    Before you get your hopes up, this is not a total room reveal. (I can already hear the booing and hissing.) We still have loads of final details to finish up, but I wanted to give you a peek at our freshly-painted cabinets, which I am head over heels in love with. You may remember that our goal was to lighten and brighten our kitchen by painting the cabinets white, adding a neutral color to the walls, and taking down some unused cabinets. We then added open shelving, a fabulous stenciled wall and a beautiful new pendant light with custom shade. Today I'm just sharing the take-your-breath away cabinet transformation, so I'll give you the nitty-gritty details of our painting process in a post next week. You may remember that this is how we started out:

    And here's where we are today:

    I know, right? It doesn't even look like the same room! It's such a calming space, and is ten times brighter. Plus, because the cabinets are white, the space seems so much more open and a lot bigger.

    My hubs finished off the half-wall and added a ledge made of a 1x12 piece of pine. He painted it, sanded the edges until they were rounded, and then trimmed it out with moulding.

    Well, fickle, little me decided I didn't like the black brackets used to hold up my shelves, so we took them all down and are in the process of painting them white. My poor husband.

    Painting the cabinets has made me want to change the countertops out ASAP, but we're being patient and are waiting until it fits in the budget. We took a trip to Ikea and were told that, based on our measurements, unfinished butcher block counters would cost us around $300. Not bad at all, but that's just not going to happen any time soon. Don't tell my hubs, but I'm hoping that Fall will be ther right time.; )

    Yes, in case you were wondering, I have decided to take back my brown Ikea curtains and replace them with navy panels. Thanks for all of your input!

    The next phase will be installing two shelves to the right of the refrigerator. The bottom shelf will house the microwave, so that we can have a bit more counter-space. You can get a good idea by my rough (and I mean really rough) drawing below:

    Before that happens, though we have to take care of this little problem behind the fridge:

    We moved our oven across the room to the other side of the kitchen, but the problem is that we originally had a gas oven, and so there is a pretty substantial gas valve sticking out from the wall. As a result, the fridge doesn't sit flush against the wall. We're pretty sure we can cap off the valve, but we're going to consult an expert because the last thing we want is our house to set on fire after all the hard work we've put into it!

    I really am starting to love our kitchen and can't wait to start adding some color back into it with accessories and linens (dish towels etc.)!

    Now, when you walk in the front door, the house feels clean, fresh and bright! Hallelujah!
    What are your feelings about white kitchens? Beautiful or boring?

    jess
  • DIY Pendant Light & Custom Shade

    DIY Pendant Light & Custom Shade

    And now for the long awaited kitchen update…sort of. We're planning on finishing painting our cabinets sometime this decade because they need four coats each and are taking forever! this week in time for our daughter's 4th birthday party, but in the meantime, I made some progress on the lighting situation in our breakfast area. You may recall that this is what the light looked like before we made the big change.:

    And now, for only $40, we have a gorgeous, huge, custom pendant light:

    Pin It Adorable, isn't it? Our kitchen was in dire need of some color, and this baby does the trick! After looking around for affordable light fixtures, I wasn't thrilled with the selection and decided to come up with something on my own. I'm totally loving what we made and can't wait to bring in some of those fun, vibrant colors into the rest of the room. Here's how we did it:

    I purchased this Ikea Jara Shade for $20, and Januari light kit to go with it.

    Unfortunately, this light kit is intended to be plugged into the wall, but we knew that for only $10 we could make it work.

    We consulted with my father-in-law who is an electrician and he told us that as long as the light kit was the same voltage as the existing wiring, we should be fine. The typical voltage of an outlet is 120W, and so was the light kit, so we were good to go. We measured the length of the wire that we needed and then my hubs snipped the wire. (If you want to be extra sure, check with an electrician before attempting this!)

    Then, my husband used the nut/screw/thingy (?) from the old light fixture and threaded the wire through, separated the individual wires by color, and attached them to the existing wiring (white wire to white wire, black wire to black wire) with a wire nut.

    We hung it just to be sure it worked:

    Yay! I lived with it a few days just to see how I liked it, and decided that even though it made our space look soooo much better and a little more modern, it needed something. My plan is to thrift a round pedestal table and paint it, as well as, add a rug underneath it. I wasn't sure if I would paint the table a fun color, or add color and pattern on the shade and the rug and leave the table white. I decided on covering the shade with fabric, because it's an easier change than repainting a table several times. I knew I wanted to incorporate aqua or turquoise into the kitchen so Monica and I took a trip to JoAnn's, and found this super cool fabric that works perfectly!

    Waverly Modern Essentials-Solar Flair in Lime & Indigo

    I know, I know, it's bold, but I'm telling you the kitchen was feeling boring and beige without it. I bought 1 1/2 yards just to be sure I had enough and I did. I took my supplies to my mom's house because I had a feeling it would be a two-person job because of the size of the shade. I'm glad I did! I couldn't have done it without her.: ) I wanted the medallion to be centered on the front of the shade, so we measured the width of one,

    and then measured the height of the shade to figure out the placement. In this case both were about 12 inches.

    Janell at Isabella & Max Rooms has a great, in-depth tutorial on how to cover a tapered shade, and I pretty much followed that which made this easier. Basically, you want to place your shade on the center of your fabric (I placed mine on the medallion on the front of the shade across from the seam) and roll it out to the sides of the fabric.

    Cut along the edge as you're rolling it, leaving about 2 inches of extra fabric.

    You'll end up with a rounded edge that goes up on the ends. This will allow the fabric to lay flat, and the medallion to rest squarely on the front of the shade.

    (Please ignore my abnormally skinny legs. Can you say no muscle tone? It's a genetic thing.) You'll want to iron the fabric at this point to be sure that it will lay completely flat.(Thanks for doing the dirty work, Mom!)

    Place the fabric on the shade exactly as you want it (for me, the medallion on the front) and pull both sides around to the seam. Cut one side about 1/2 inch past the seam and tape in place. Then pull the other side snug so there are no gaps or bubbles and tape in place. (I marked my line with a pencil first.)

    Because I didn't want to add any trim (ie:ribbon) along the top and bottom, I needed to make an exact cut along the top and bottom of the shade. So, I fold the extra fabric over the top of the shade, pull tight, and make small marks with a pencil along the edge of the shade. This will be the line you will cut to get an even edge.

    Once you've made your cut, fold down about a 1/4 to a 1/2 inch all the way around the top of the shade. Tuck it under and make sure it lines up evenly with the edge of the shade. Hot glue a thin line along the edge (Janell uses fabric glue, in case you were wondering!) and press the folded fabric down to create a finished edge. I suggest doing this in small sections at a time. I didn't want to see any hot glue, so I followed each section with a damp paper towel to get any hot glue that escaped the fold.

    Create the seam on the back by cutting the fabric on the non-taped side about 2 inches longer than the seam, fold the fabric over and run a line of glue down the seam. Press to seal. (Sorry no pics of this step!) Finish the bottom edge in the same way as the top of the shade and you're done!

    What?! You wouldn't celebrate by wearing the shade on your head? Shame on you! Covering the lamp shade took about 2 hours to do, so it was a bit time-consuming and a little tricky. Having four hands was definitely a huge help! Admittedly, there are some very minor imperfections in my shade, but I figure that it's pretty darn good for our first try!: ) And now for some more swoon-worthy shots:

    Pin ItLove the way it looks lit up at night!

    I love it, and my kids do too!: ) Now the question is, should I keep the brown curtain panels, or go with a different color, maybe navy blue? Thoughts, please!

    jess

    If you aren't connected with us on Facebook, we'd love you to!

    ;
    Linking up to: TT&J, Sundae Scoop, Sunday Showcase, Saturday Night Special, Show & Tell Saturday,

  • At Long Last {Urban Outfitters Rug}

    At Long Last {Urban Outfitters Rug}

    It's been a while since I first posted about never having bought a rug and daydreaming about what I'd buy if I could. Since then, I DIYed two floor mats and made my first big rug purchase. I feel like rugs are a really big commitment, and I have trouble taking that first step knowing that next year, I'll probably change my mind and hate the rug, but I have to keep it anyway because it was so expensive. Is that true for anybody else? Well, I found the perfect solution: a really cool rug for under $100. That's a commitment I can -and did- make. Let's take a look, shall we? (Warning: This is a picture-heavy post!: )

    I'm so super excited about this rug because it adds so much personality to my otherwise pretty white and neutral kitchen. I love the pattern and that it isn't too overwhelming, but still makes a statement. After seeing the same rug in a different color on Young House Love, I got it from Urban Outfitters for $89 plus free shipping.

    It is not a cushy rug at all, and will probably need a rug pad, but I'm going to live with it a few days before making any decisions. You know, because I'm cheap like that.

    I was so anxious to get it in the kitchen and snap pictures to show you guys, that I didn't even let the seams settle at all. Oops! 

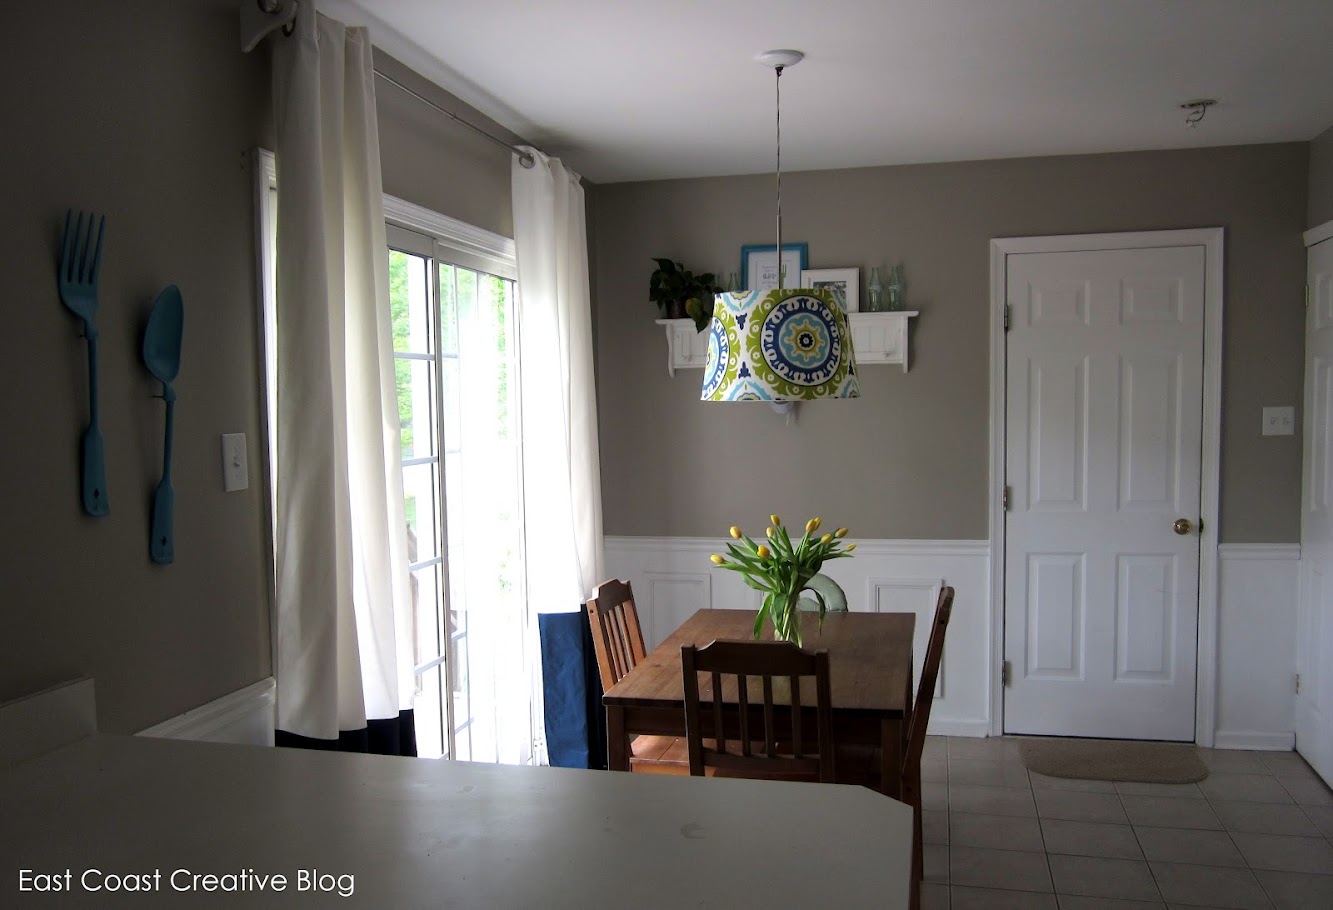
    I'm pretty happy with the way the navy color-blocked drapes play off the green in the rug. The room still feels sophisticated, but also a little bit playful. (Which, by the way, I would love to be described that way!)

    I'm still on the lookout for a round pedestal table and chairs, but haven't had any luck. My original plan was to thrift a table and chairs, but I actually just saw that Ikea has a white round table exactly like I want for just over $100. I may have to resort to that if I don't come across a table I can DIY soon.

    Ooooh, I'm so thrilled. My first rug purchase made me a happy girl.
    What do you think of the rug? Did you know Urban Outfitters sold rugs?

  • DIY Marquee Sign {Knock It Off Project}

    DIY Marquee Sign {Knock It Off Project}

    You all are familiar with marquee signs, right? They're those lighted signs that you see outside of old movie theaters, hotels or casinos in Las Vegas.

    Source
    These signs are definitely a retro throwback, but have come back as a home design trend in a big way! Adding one brought whimsy and fun to this kitchen and dining room that otherwise lacked both. These beauties aren't only meant for kitchens, though! They would look fabulous in a kids bedroom or playroom, a fun family room or even a game room. The best part about this project is that you can use absolutely any word that has meaning to you!

    We've actually seen a bunch of tutorials for marquee signs using 3-D cardboard letters, and honestly, we toyed around with the idea of using them too. But we knew we wanted this to be a permanent fixture in her dining room so we didn't want it to be flimsy or break after awhile. Using chipboard letters (wooden would work too!) from Michael's on top of a plywood frame made this piece one that will last.
    To create the box that your letters attach to, we used a piece of plywood and 1x2 pine boards. Cut the plywood to your desired size and the cut two horizontal 1x3’s and two vertical 1x3’s. Attach those pieces to the back of the plywood with a nail gun, creating the frame. We painted our plywood with the same color as the kitchen cabinets (Summer gray by Valspar) to tie in with the rest of the room, but feel free to go as bright as you want. It's your project, after all!

    Decide how many lights you’d like on each letter and mark their placement. Our bulbs were evenly spaced.

    Drill pilot holes where on each mark on the letters. Doing this allows the larger bit to go through the letter without splintering it, so don't skip this step!

    Using a large bit the slightly larger than the socket of the light bulbs, drill larger holes through your pilot holes.

    Go ahead and clean off those letters and spray paint them in the color of your choice. We LOVE Rustoleum's spray paint in Blue Lagoon (it's the color we used on our giant shaped frame)

    Once your letters are dry, lay them back down on the plywood and figure out the spacing you want. Draw a small “x” in each of the holes and then drill a hole in each of the “x’s”.Place a few dots of liquid nails on the back of the letters and align the letters over the holes in the plywood. Let dry completely. Thread the sockets through the holes and then screw the bulbs in. We used these string lights from Target- there are about 25 bulbs per strand, so plan accordingly.

    Room Essentials® Clear Globe Lights (25ct)

    We chose to add an outlet behind the marquee sign to hide the cord, but you could easily drill a small hole in the bottom of the frame to pull the cord through. If you paint the cord the same color of your walls, you'll never even notice that the cord is there!

    We think this sign is pretty darn awesome and Linda has since told us that it inspires her to be more creative with her cookies and cakes business!

    Haven't seen this episode yet? Watch the whole thing online HERE!

    Also, we're always adding new Knock It Off projects to our DIY gallery, so be sure to check those out, as well.: )

    jess
    Monica
  • Painted Kitchen Cabinets {Knock it Off Project}

    Painted Kitchen Cabinets {Knock it Off Project}

    It's kind of a bummer that kitchens are usually the hub of a home and at the same time, they're the most expensive room in a house to remodel!! The good news is that we found ways to DIY almost every item in this galley kitchen and did the entire makeover on a tiny budget. Today we're going to share with you how we took the kitchen cabinets from dated, pickled wood to classic, crisp white!

    To watch this full episode online Click HERE!

    This was the cabinet situation when we arrived. I really wonder why on earth pickled wood was ever a trend?!? I'm sure in a few years, we'll look back on lots of our design choices and wonder the same thing.: )

    Other than this one cabinet, all the rest were in good working condition. We also got lucky that the style of these cabinets was pretty simple and classic. No crazy scroll lines, just clean and straight- perfect for a paint-pick-me-up! The hardware however… that had to go!

    The finished look was insanely different!!

    Now, we're going to share some basic tips for painting your cabinets, but Jess also did her entire kitchen white last year, so at the bottom, be sure to click through to her post for a really detailed tutorial!
    1. Remove the cabinet doors from the frames. Take off all of the hardware at this time and put them in a safe place, if you’re going to be reusing them. We did reuse the hinges for the cabinets, but that was it. 2. Set up a work station where you can lay out all of your cabinets at once- this is the fastest way to get all those cabinets painted as fast as possible. We like using plastic folding saw horses with 2x4s laid across. They're light and easy to move around. We got ours at Lowe's for $49 for a set of 2.

    3. If you’re cabinets aren’t super glossy, you can use regular old steel wool to rough up the fronts of the door. You just want to make it so that the paint adheres. If you’re cabinets are glossy, go ahead and sand them. You won't regret doing this step right- it will determine if you have paint chipping in 6 months or not.

    4. Wipe down the cabinet doors to remove all dust. Make sure you use paint plus primer to get the best coverage. Using foam rollers designed for cabinetry, roll on the paint in even coats, making sure to not drip!
    For Linda's kitchen we used Valspar's Summer Grey in Semi-Gloss. It reads like a white, but looks just a little moodier: )

    5. Once the paint has cured for the recommended time, flip them over and repeat the process on the insides of the doors. 6. When your doors are drying, head back into the kitchen and rough up the frames of the cabinets with steel wool and paint them, as well. Once they’re dry, rehang your cabinet doors.Reattach the hardware, or install new hardware. This is when you can step back and admire the way your kitchen feels completely transformed!

    Check out Jess' kitchen makeover with a full breakdown on how to properly paint your cabinets.

    It's amazing the difference a coat of white paint can make! For about $30 you could completely transform any dated kitchen!!
    To watch this segment or the full episode- click HERE! Stay tuned for these other DIY tutorials coming to the KIO DIY Page soon!

    jess
    Monica
  • Transom Window {Kitchen Update}

    Transom Window {Kitchen Update}

    I know what you're thinking. Another update? I thought she was done! What? Is she crazy? And the answer is yes and yes. I thought I was done, too, but alas my brain works in mysterious ways, and once I get an idea in my head, it's really hard to get it out. Just ask Monica. And my hubs. (Thankfully, Monica understands completely because she is the exact same way.) Anyway, I kept looking at the new opening we made from our kitchen to the dining room, and I liked it. Really I did. But it just seemed like it was missing something, or that the opening was too vast and non-descript. I wanted to add some architectural interest without taking away the openness or blocking the light. A few weeks ago, Monica and I were at our second home, Architectural Antiques looking for a Plan B headboard for our Superfab Room Redesign, and this baby jumped out at me. An old, beat up transom window. We both knew at that moment that it would be the perfect addition to my kitchen.

    It was just a little too beat up- paint chips were literally dropping off in mass quanitites every time we touched it, so I sanded off the old paint. I liked the look of the natural wood with just a hint of the old paint still on it, so I went with that. Plus that means less work for me, which I'm always a big fan of.

    After carefully measuring where we wanted it to go, Kevin pre-drilled some pilot holes in both the window and the ceiling. There's a beam that goes straight across the top of the opening, so we didn't have to worry about finding studs to drill into. We added eyehooks, and hung the window on S-hooks (is that the right name?)

    I absolutely love the way it looks now. It fills the space so well, doesn't block the view and adds some much needed visual interest! The kitchen feels a lot more cozy and finished.

    You're seeing a whole lot of unfinished and empty dining room, which just gives you a glimpse of what our next BIG project is.: ) Can't wait to get started so that the first floor will be pretty much done!

    I may just go ahead and paint the window white and then distress it a bit, but I still haven't decided. Thoughts?

    I love that the old, original hardware is still attached.

    It looks so much better! So glad my crazy idea actually worked out.: )

    Are you guys impulsive decorators, or do you mull over your ideas for awhile before making a decision? Dish!

  • Wood Crate Centerpiece

    Wood Crate Centerpiece

    So, by now, most of you know that we're in the middle of filming for our brand new TV show, where we're doing big, fabulous room makeovers. But every once in a while it's really nice to do a simple DIY project that doesn't take a lot of time or effort. This wood crate centerpiece is beautiful, easy to do, and only requires the use of a couple of tools. Not bad.: )

    Here's how to make your own:
    1. Gather the materials. I used a couple of 1x5's that I had lying around, but you'll need to purchase one 8 foot 1x5 from your local hardware store.

    2. Measure and cut the wood using a chop, circular or hack saw to the appropriate lengths. Cut three identical pieces at 24 inches long, and two end pieces at 6 inches.

    3. Sand the rough edges with 120 grit paper. At this time, also sand the boards so that they receive the paint well.

    4. Roughly assemble your crate to see which pieces fit best together. Run wood glue or liquid nails along the length of one side and adhere it to the outside edge of the board that will be the bottom of your crate. Be sure to make sure the edges are flush. Let dry. Do the same with the other side and the end caps.

    5. Using a hammer, add finish nails along the base of the crate on both sides and the ends for additional support.

    6. Paint the crate your desired color. I went with navy to tie in with the colors in my kitchen, but white would be pretty and really versatile. You could also use your favorite stain instead of paint.
    7. Fill with plants and fruit for a colorful and pretty centerpiece!

    Doesn't it look great in my kitchen? By the way, I finally scored a pedestal table- a hand-me-down from my parents and have yet to decide what color to paint it. Any ideas?? It's no surprise that I'm drawn to white, but haven't made the leap yet.

    Yay for easy projects that make you feel accomplished!: )

  • The Curtain Solution {DIY Painted Curtains}

    The Curtain Solution {DIY Painted Curtains}

    This curtain situation in my kitchen stumped me for the last month or so. I showed you the brownish-gray drapes I bought from Ikea first:

    And after living with them a day or two, (and asking for your advice. Thanks, BTW!) I decided to take them back because they made the room look dark. Then I bought navy drapes, also from Ikea, that made the room look even darker, so back they went. And so, it's like I always say, when all else fails, go for the DIY! Well, maybe I never said that, but I'm going to start. Here's what I ended up with:

    I loooooooove them. Color-blocked drapes for only 25 bucks! DIYing it lets you do your own thing and create something totally custom. Now for the break down:

    The curtains came from…Ikea! Surprise.: ) These things are so awesome because they cost $25, and that's for 2 panels. Woohoo! The panels are 96 inches long, but come with fusible webbing to hem them without sewing. (Another plus in my book!)

    It's a good thing they provide the stuff to hem them because they were way too long when I hung them up. I also felt like they were just a little too uninteresting and, since this is a high-traffic area (we let the dog in and out through the slider, go out to the deck to play, and close the drapes at night), I knew that white would get soooo dirty really quickly.

    Then the idea of color-blocking them popped into my mind and I knew that that was the solution! It would hide the dirt on the bottom of the curtains, while still allowing the room to feel airy, bright and clean. Yesss!!! I ironed, measured, hemmed, ironed some more, measured some more and then got to work painting them using this method. It worked like an absolute charm.

    While painting curtains might just be the bane of my existance- don't ask me why, I really don't have an answer- I am so happy with the results and the fact that it was so inexpensive. I already had the paint on hand from our first Nate Show episode, which was super convenient, and so it really was only 25 dollars for a pair of custom drapes!

    They totally compliment my fabric-colored pendant light and bring a little more color to this side of the room.

    And now, I think, I'm taking a break from kitchen stuff. We'll see how long that lasts…

    Oh yeah, I added a picture of my hubs and me eating souvlakis from our favorite place in Athens, Greece (which is where we met!) right next to my"People who love to eat are always the Best People" quote. Makes me smile every time I see it.

    And did you know that if you put a penny in the water with your tulips they will *supposedly* stand up straight instead of drooping? Just a little tip I picked up from Emily that I thought I would pass on to you. You're welcome. I'll let you know if it works.; )

    One last thing: lest you think my kitchen is darn near perfect, here's the other side of it: one of the doors to our laundry area, that never actually fit properly, ripped off the doorframe last week. Sadly, it is always that disorganized. *Sigh*

    My daughter told me today that she does not appreciate me painting everything (she's four!), but man, I sure appreciate how you really can paint everything!
    What unusual things have you painted?
    *Monica once spray-painted a pillar candle. Hilarious!*
    P.S. Did you hear about the awesome new Pinboard we've started with five other amazing bloggers? You'll definitely want to check it out for loads of home decor and crafting inspiration.

  • Done…for now! {Kitchen Renovation Update}

    Done…for now! {Kitchen Renovation Update}

    Ahhhhhh…I can finally breathe a sigh of relief. Well, kinda. Our kitchen renovation that I've chronicled here, here, here and here, is done…for now! You may remember that it all started like this:

    Ugh. That's a sad picture, people. It's not sad anymore, though, just look at it now in all it's *almost* finished glory!

    Seriously, that is one big difference! I am absolutely crazy about our open shelves, new kitchen layout and big opening to the dining room. (Although I REALLY wish I made some sort of effort to clean up our dining room before snapping pics! Bad blogger!) I've been decorating and undecorating the shelves for weeks now, and I'm pretty happy with them, so I figured it was about time I shared. This is how they look right now, but I can absolutely guarantee you that they won't stay this way forever, since I crave change after about 4 days of anything staying the same.

    The blue and green add just the right pop to my otherwise serene color scheme. I really do love the contrast of the fancy stencil with the trendy aqua blue accents. So fun! Those two round pie plates were wedding gifts, but they're only hanging out there until I can find a tray or something that I love- the blues just aren't perfectly spot on.

    Up close and personal:

    You've already seen the printable I made, but the plate right next to it is from the Pottery Barn Outlet. Can't get enough of that thing. That and the bird (from Joann's) are the only new things I bought for the shelves. Everything else was gathered from around the house- you got to work with what you have sometimes, right? Ok, I lied. I forgot that I bought this blue vase at a flea market this weekend for $4, and the mugs came from Ikea.

    I have been scouring the stores to find dish towels that I liked and that matched the kitchen, and couldn't find anything that wasn't chevron (no offense to all you chevron-lovers out there, but I'm just not on that bandwagon!), but I found this one at Kmart! Yes, I was shocked too.: ) Cute, cute, cute!

    I'm showing you this picture of all our mail for two reasons: 1) I just got this mail sorter from Kmart and it's a lifesaver. Really. All that stuff used to just lay on my counter making my already frazzled brain even more frazzled (if that's possible), and 2) See that uncovered outlet? I didn't even realize it didn't have a cover on it until I looked at this picture. It's so ridiculous what you get used to living with, and then start to ignore. *Fingers crossed that that baby EVER gets a cover.*

    Here's a view of the other side of the kitchen:

    We finally cut and hung two more open shelves to house our microwave. I gotta tell you, I so enjoy the extra space on the counters now that thing is off of it. So roomy! And if you're wondering about that crack in the counter, it's there because we moved a cabinet and it's counter from it's original spot on the other side of the fridge. It'll stay like that until we upgrade our countertops, and then it'll be seamless. Technically, I could hide the seam using a painting method a friend told me about, but, honestly, there are so many other things I'd rather be doing with my time.; )

    I'm thrilled that, after 8 years of marriage, I can finally easily access my china. What a nice surprise to see that it actually works really well with my damask stencil and the colors in the kitchen. Woohoo for happy accidents!

    Oh yes! I almost forgot that we installed this new light fixture above the window, and it's stinkin' awesome. Forget about all the additional light it gives off, it's adorable!

    ***Update: Several people have asked where I got this light. It's Allen + Roth from Lowes.

    And finally, a view from the hall. I'm contemplating adding simple, wooden blinds to the window because it seems a bit bare. Anyone have thoughts about that? Should I or shouldn't I?

    So now I've promised my husband that I'll tackle only really easy projects that don't involve him for a while.: ) I think this room has come a long way, and it just feels so much more like me. After a few annoying touchups on paint, fixing some broken tile and installing one more light switch, this pretty baby will be complete. Phew! Next week I'll show you what I finally decided about the curtain situation on the other side of the room.

    Next on my agenda? A dining room redesign! I can't wait to show you what I have up my sleeve.

    So, what's your favorite part about my new kitchen? Color scheme, open shelving, white cabinets, something else entirely?

    Linking up to: Tutorials & Tips

  1. Crafts for Children - with Janome
  2. Gilda Baron - machine embroidery
  3. Craft Holiday - Fiber Art with Beryl Taylor
  4. Creative Holiday
  5. Textile Holidays
  6. Billy Reid Peacoat Stars in James Bond Skyfall [men's fashion]
  7. Campione Autumn/Winter 2016 Collection [men's fashion]
  8. Ljung Autumn/Winter 2016 Collection [men's fashion]
  9. Ljung Denim, Fit for a Boxer! [men's fashion]
  10. Sosnovska, Deviating from the Norm [men's fashion]