My Creative Blog:
diy

  • Temporary Accent Wall with Grass Cloth & Nailheads {Sarah M. Dorsey Designs}

    Temporary Accent Wall with Grass Cloth & Nailheads {Sarah M. Dorsey Designs}

    If you missed all the amazing projects of our first annual Creating with the Stars, be sure to check them out below!

    Round 1 Projects & Winners Round 2 Projects & Winners Ro und 3 Projects & Winners Round 4 Projects & Winners
    --------------------------------------------------------------------------------------------------------------------------
    Sarah's unbelieveable bedroom transformation blew us away. The color combinations, details and style of the room were simply perfect and we fell in love immediately. She had a few awesome tutorials for her projects, so we decided to break them into two posts. Today, you'll see how she made that removeable accent wall that is a great solution for you renters out there, or those of you who have Design ADD like us!: )
    When I heard that this week's theme was home decor I instantly knew that I wanted to do a bedroom feature wall and a dramatic headboard! With my amazing diy partner and husband, David, we got straight to work!

    Living in a rental makes it nearly impossible to install classic wallpaper and nailhead, so we decided to build a separate feature wall! We wanted to incorporate two of my favorite materials, nailhead and grasscloth wallpaper. I love the texture of the wallpaper and the dimension of the nailhead!
    Want to know how we built the wall? Here we go!

    We purchased three sheets of plywood from Home Depot and had them cut to 7' high. Since the feature wall is 12' long, it would need to be built inside of the room. We designed it so that it could easily be dismantled into three pieces to be removed. We tied the seams together with 1x3s and built a frame on the back with 1x3s so it was extra sturdy and straight. We then flipped it over and primed it so that they wall paper adhesive wouldn't soak in.

    Once dry, we cut the wallpaper to the correct height, placed it to the side and rolled wallpaper adhesive over the primer. We then used a wallpaper smoothing tool to remove any bubbles. The steps were repeated with 4 rows across, lining up the seams. It was helpful to have two people so that it could be adjusted as needed!

    For the design, I was inspired by this fantastic headboard by Annie Selke. We created the design in Illustrator, and calculated the distance between the nailhead and printed it on two sheets of 11x17 which were taped together. We then punched little holes through the dots and used a felt tip pen to lay it out on the wallpaper.
    Nailhead isn't the most fun thing to apply, but once you hit a rhythm you move pretty fast! Here are a few tips that I found helpful as I went.
    1. To help protect my fingers from the hammer and to grab the nailhead more easily, I used rubber finger tips on my thumb and index finger (you know the ones that they sell in the office supply stores for sorting paper and such?) When I did hit my fingers, it hurt a lot less, and they weren't even sore when I was done!
    2. If your wood is soft enough, push a few in with your finger first and then hammer. This saves time since you are putting the hammer up and down less frequently. Since our plywood was soft and hard in different spots, this wasn't always possible, but it helped when we could!
    3. Lastly, this feature wall took about 2,250 nails. Wow, that's a lot of nails! So it was helpful to have two people or if you have the time, break it up over a few days. Total install time for the nailhead with two people was about 8 hrs.

    It was helpful to install the trim (we painted first) before the nailhead reached the edge, so we knew exactly where to stop it. We used finish nails to secure the trim and then filled the holes with wood filler, sanded and painted once dry.
    Next, we decided that we wanted the wall to sit just above the trim, so we cut legs to height out of a 1x12 and secured it to the back frame. We then installed a few cabinet anchors through the trim into the wall to make sure that it was firmly attached.
    This wall was pretty massive! Almost the length of the room, but I LOVE the impact that it has on the space! Just because we are renting doesn't mean that without a little creative thinking we can't have a statement wall!

    I mean, c'mon. That is genius, and we don't mind saying we wish we had done it first! Ha! Check out Sarah's fabulous blog, and then come back tomorrow to learn how to make that coral headboard!
    Oh yeah! One more thing! Have you linked up your favorite home decor project yet? You can do that here for a chance to be featured on EC2 and win some great prizes. Fun for everyone!: )

    jess
    Monica
  • How to Paint Cabinets White

    How to Paint Cabinets White

    Ok, let's be real here. You know how when we write a tutorial and most of the time we say something like,"It couldn't be easier!" or, "Anyone can do it"? You won't hear that from me today. Painting kitchen cabinets really isn't hard, but it's time-consuming, monotonous and boring. It took us a full 10 days (working on weekday evenings- it could take less time if you have a big chunk of time to devote to it!) from start to finish. That being said, for the amount of money you put into it- really only the cost of paint- you won't find anything that makes as big of a difference. So, if you think you're ready to tackle this project- go for it! You won't regret the time spent in agony. Ha! Just kidding. But seriously, you will absolutely love the results.

    1. Take off all of the doors and pull out all drawers. Take off all hardware and store in a safe place! We had a bag labeled with what went where. And if you're anything like me, clean out your cabinets because that's just gross.

    2. Sand away! A lot of people will tell you that sanding is unnecessary. However, if you want a really seamless, smooth look, or if you have very glossy cabinets, I recommend a light sanding. I used my palm sander with 80 grit sandpaper (the higher the number, the finer the grit. For heavy duty sanding, use a lower grit sandpaper!)

    3. Wipe down the cabinets to remove all dust and choose your supplies. We used a 2-inch high density foam roller that is meant to be used on cabinets. We found that they didn't hold paint well, which meant we needed to do lots of coats, but the paint went on so smoothly! We also used a 2 1/2 inch angled paint brush (Purdy is the best!) to get the corners and hard to reach places.

    4. Prime and Paint. We started off priming everything, but quickly realized that to get good coverage we'd have to do way too many coats of paint. So we used Olympic ONE Paint + Primer in pure white that coordinates with our moulding in the kitchen and entryway. We didn't feel the need to use an oil-based paint as long as we used an enamel paint (enamel = paint that dries hard, is usually glossy, and is easily washable). Also, the higher the gloss of the paint, the harder it dries. I wanted a glossy look, so this works for me.

    Because our cabinets were previously stained (by us!) a dark walnut, it took several coats of paint. I would say that each door got 4 coats of paint. You could sand the cabinets in between each coat for an even smoother finish, but honestly, that would have taken us 4 extra years, so we decided to skip that step. They still look amazing.

    We did both the outside and inside of the cabinets, so that no dark wood peeks out when you open the doors. Here's a super great tip that I wish I had heard of before we started: use push pins in the back of the cabinets to lift them off the ground. No more sticking to the dropcloth!

    5. Seal with a water-based polyurethane (we used Sherwin Williams Wood Classics) for extra protection and even more washability (is that even a word?) Again, we went with water-based because oil-based polyurethane can yellow over time and that's not the look we're going for!

    Wood Classics® Waterborne Polyurethane Varnish

    6. Wait and wait and wait some more for the paint to cure. You don't want to nick up your beautiful white cabinets, so make sure you wait the appropriate amount of time written on your paint can before putting them back together.
    7. Put all the hardware back on the cabinets and drawers.

    8. Time to put the kitchen back together! This step couldn't have come sooner in my book, and I was literally, dancing for joy. We hung the upper cabinets first, and made sure to caulk along the side of the cabinet to make sure it look seamless.

    9. Step back and admire your beautiful cabinets! All that hard work was worth it, for sure!

    I hope I answered all of your questions about how to paint cabinets. If not, be sure to leave a comment with your question!
    I LOVE my new cabinets! What do you think? Worth the effort, or just way too much work?

    jess
  • DIY Herringbone "Tile" Floor Using Peel & Stick Vinyl {Knock It Off}

    DIY Herringbone "Tile" Floor Using Peel & Stick Vinyl {Knock It Off}

    It's true- most people have heard of vinyl peel and stick tile. We both have used it in our homes in the past. But, what's also true, is that most people have never thought to create an awesome herringbone pattern with that tile! These tiles are ridiculously easy to cut which makes it the perfect material to go crazy with pattern! We have to say that this floor is one of our favorite projects to date- we transformed this dated floor into an expensive, slate-look-alike.

    To say this flooring was dated would be the under-statement of the year. It was yellow and green and oh so bad! Even though the kitchen was tiny, we didn't have enough money or time to go with real slate tile.

    Instead, we got our DIY on… Lowe's sells lots of vinyl peel and stick tile and while it does actually look like stone, when installed the traditional way it looks good, but doesn't have a big wow factor…

    So, we had an idea… This flooring comes in 18x18 tiles- we decided to cut each tile down into three 6" strips per tile. Vinyl flooring cuts easily with a utility knife- Just score it and then fold it to divide.

    We cut down all of our tile into strips and then measured to find the center point of the floor. We used a chalk line to snap a guide for us to follow.
    Then, to give it a unique and high-end look, we laid the tile in a herringbone pattern. You just make"L's" over and over again. It's one of the easiest patterns to do!

    How's that for a before and after?? And, honestly… these pics don't even do it justice! You definitely have to watch this segment of the episode! (Here)

    I honestly was amazed and how good we made inexpensive vinyl look. It's like it was all dressed up for prom or something! Fancy!

    Changing out the flooring played a big part in making this tiny kitchen renovation complete! No one would ever guess that this flooring was installed with some of the cheapest materials on the market! Changing the shape of the tile and the installation layout gave us amazing style, without the expensive price tag!

  • Creating Custom Artwork

    Creating Custom Artwork

    I recognize that DIY art projects are not for everyone. My love for custom art was born out of necessity (read: lack of funds). Creating my own artwork works for me, and I've found out why:
    1. I don't worry about ruining something I already have. With the exception of a few things, everything I own was bought second-hand or for a low price. I don't fear repurposing things, because the originals cost me almost nothing!
    2. I am not afraid of change. Actually, I crave it.

    3. I am not a perfectionist. Little imperfections in my art/craft projects are endearing to me. They say"I was handmade, and therefore may be flawed, but a lot of thought and care went into making me". I'm not saying perfectionists can't create art (because I'm sure most real artists are perfectionists), it's just easier for me to say this picture is"good enough", than someone who wants everything to be perfect.
    Ok, that's that. Recently I bought a yard of fabric for a project (stay tuned for more on that!) that I fell in love with. I ended up having some extra fabric left over that I wanted to use somewhere- anywhere!- in my house. I was feeling inspired by a gift bag in which my husband had wrapped my birthday present. I decided to combine my fabulous fabric, the cute bird, old frames, and some patterned scrapbooking paper into one art project!

    First, I started with the bird stencil (the bag had a 3D bird on it, so I just ripped it off to use as a stencil). I laid it onto the back of the fabric in the opposite direction I wanted it to face, and then traced it. After that, I carefully cut along the line, flipped it over, and then mounted it to the scrapbook paper, using regular, old tape!

    My husband insisted that this poor bird needed legs, so I drew two legs freehand and cut them out of the fabric, as well. Then I put the whole thing together and…

    Voila!

    I used the same method with my second art piece, but used the fabric as the background and the scrapbooking paper as the bird. I didn't have a smaller stencil, so I again, I freehanded the bird.

    Then I had Kevin hang them on an empty wall in our living room. (I promise that these two pictures are level, it's just a wierd angle)

    I love the way the pictures look as I enter the living room, and that I can see them from my kitchen table. Makes that room feel one step closer to completion, or until I'm ready to redo the entire room again for the third time.: ) I may not keep these pictures forever, but for now, they are a cheap solution. Below are some images from a few other bloggers of artwork they created using what they had on hand, or a few inexpensive items they purchased. Click on link under the image for specific instructions on how they made these beautiful pieces of art.

    The Nester
    The Nester simply scoured her home for items that would look good grouped together in a frame. This could easily be done finding stuff on a hike out in the woods, or on a trip to the beach.

    Martha Stewart
    These prints were made using memorabilia from trips (like tickets, maps, postcards etc) that were blown up and then framed.

    Ashley Ann Photography This is not everyone's style, but these two canvas prints were made for a nursery, and were created using a canvas, scrapbook paper, mod podge (amazing stuff!), and a little paint. Adorable and easy!

    Isabella & Max
    This look is much more sophisticated and elegant. This piece of art hung above the couch was made using a canvas, paint and a few different paint brushes, and nail heads. My sister who regularly tells us that she is not creative, painted three canvases in varying shades of colors that now hang above her fireplace, that are similar to this one.

  • Kitchen Renovation {Putting it Back Together}

    Kitchen Renovation {Putting it Back Together}

    New here? You can check out our kitchen demolition here.

    Imagine with me for a minute…See this soffit?

    Imagine with me that that soffit is no longer there. There would be no interruption from the countertops to the ceiling, and as a result, the ceiling would seem so much higher. Nice, right? It would be so open and clean.

    I could hang the cabinets from the ceiling, which would increase the space between them and the countertop. You with me? Are you seeing what I'm seeing? Ok, good. Because here goes:

    First we removed all the upper cabinets (and by"we", I most definitely mean my hubs). We were amazed at what we found behind those cabinets- apparently the homeowners before us did their own DIY with painted tiles, framed by a sharpie marker! Plus, there's a vent that was hooked up to the microwave that we realized we need to take care of, as well.

    I did loads of research on removing soffits, since this is our first big demo/remodel, and everyone said the same thing: make a small hole in the drywall and check to see if there is any wiring or pipes behind the soffit. In a lot of cases, soffits have no real structural function, but are there so you could hang cabinets from them. If you notice, new construction homes almost never have soffits in the kitchen. Luckily for us, there is a recessed light in our soffit, so we were able to remove it and get a good view into the interior of the soffit.

    Since it's a pretty small hole, we stuck our small digital camera up in the soffit and took a few pictures in each direction to make sure all was clear. It worked like a charm and I was thrilled to see that there wasn't anything there but insulation!

    Also, a bunch of people said that soffits aren't always made of drywall, but could also be plywood, which is why we weren't afraid when we saw this:

    So, we kept on ripping things out (while trying hard to ignore the mouse droppings- Eew!) Then, when we were all done, my hubs said he thought that maybe this big beam in the front might be load-bearing beam that runs along the entire length of the back of the house. Ahhhhh!!! Noooooo!!!!

    This is when we called in the experts, ie: my father-in-law and my parent's genius handyman, Robert. While we waited for them to come, I spent a few days trying to decide how I felt about have no upper cabinets.

    I decided that I really liked it, but after stewing over it, I also came to the conclusion that it wasn't really practical for us since I removed the upper cabinets on the other side of the kitchen. My new plan for this side of the kitchen is a combination of cabinets and open shelving that I'll share with you as we get closer to it. (Believe me, LOTS has to happen before that).My hubs also spackled the wall, and painted it the new gray/tan in anticipation of the next step.

    Well, you guessed it, we did find out that the beam was load-bearing like my hubs suspected and needed to stay in place. So, (and this is so sad, and yes, I know my hubs is a saint!) my hubs went to work drywalling the soffit back in, with the help of Mo's husband, Eric. Poor guy. But, we were able to remove the recessed lighting kit and install a pendant light kit. Woohoo! I can't wait to pick that baby out!

    Even though we had a really big I'll be trying to make it up to my hubs for a long time minor setback, we did make some progress elsewhere. When we moved the oven to the other side of the kitchen and slid the fridge in it's place, we were left with this small cabinet space to the left. It was not functional at all, and it really made that side look disjointed.

    We removed the counter from the wall, and then moved the whole thing over to the other side of the refridgerator, giving us more counter space to the right.

    There is, of course, a crack between the two countertops, that, we're told can easiliy be masked with some paint that matches the counter brushed on the crack and then wiped away. You'll still notice it, but it won't scream out at you, and we don't plan on keeping this countertop forever (hopefully not past this year!). Here's where we are right now:

    I have to admit that my 3 year old took this picture, but what can I say? She has a good eye!
    Ok, take a deep breath. That's all for now.: )

  • Family Room Art & How To Add Grommets!
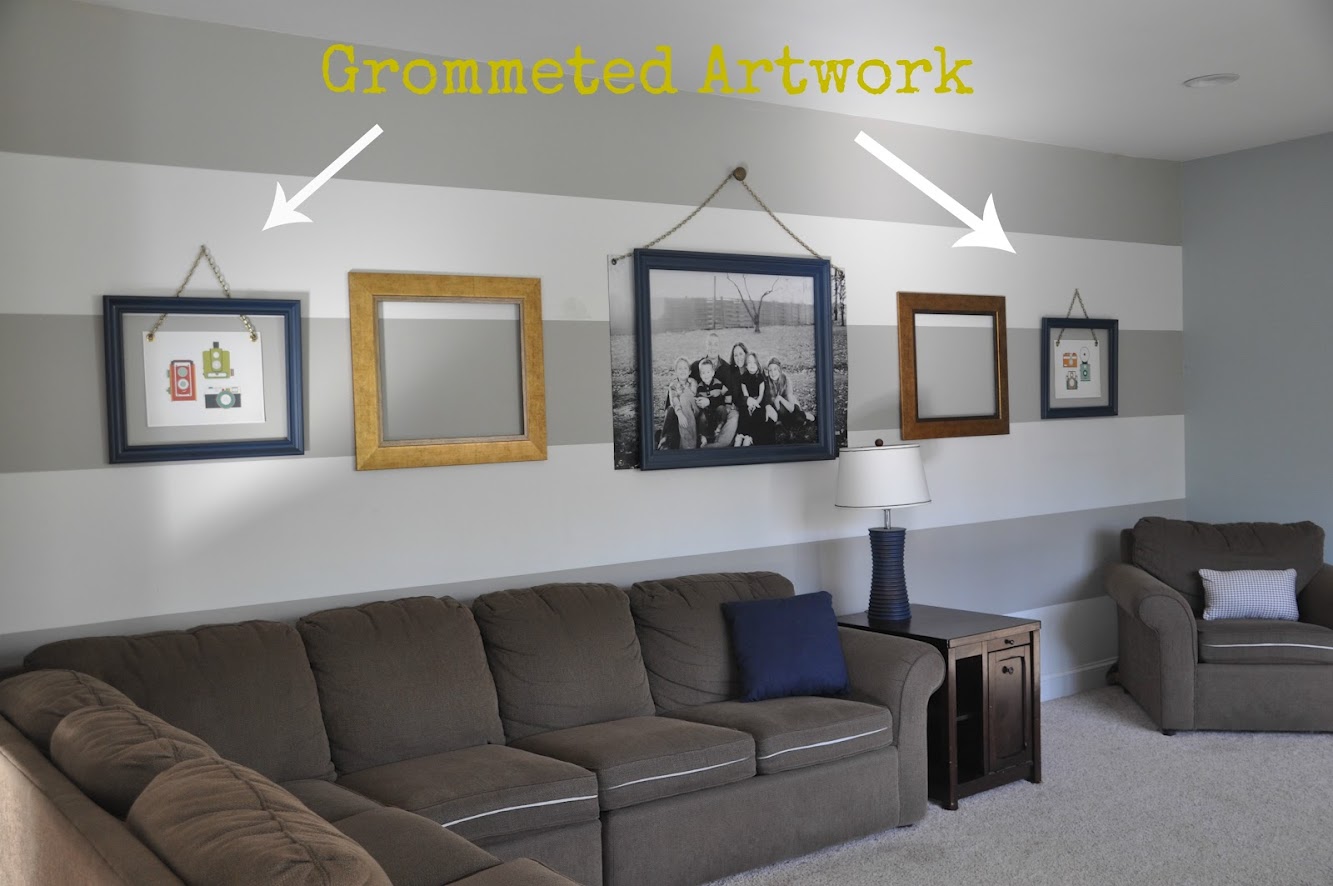
    Family Room Art & How To Add Grommets!

    {If you didn't hear, The Real Housewives of Bucks County are now East Coast Creative (Get the story here). You'll still be getting all the DIY, Design, and Monica & Jess that you love, but change your favorites to www.eastcoastcreativeblog.com Thanks!}

    You might remember that one of my 2012 goals was to make our family room reflect my style more this year. I still am convinced I don't really have a style… I more or less, just take lots of things I like and smush them all together, hoping it works out okay. Recently, I took one more step in the right direction for the room.

    I was browsing on Etsy a few weeks back and came across a shop I loved! Project Type has so many graphic art prints that I immediately fell in love with. This one in particular caught my eye.

    I had been toying around with the idea of vintage cameras in our family room and this picture was too cool to pass up. I contacted the artist to see if I could have a few custom tweaks made (it was vertical and I needed horizontal) and she said YES! I was so stinkin' excited when she agreed!
    I ordered two prints and honestly even the packaging they came in was super cool! Now, you might remember what was on the wall already. My ginormous family picture with the smaller frame…

    Ginormous

    Well this time, I was going for the reverse. Tricky aren't I? Bigger frame smaller picture.
    Once again I used my prized possession, AKA grommeter from Nate. I'll admit I was a tad nervous putting holes in fabulous artwork, but I wanted it to have the same feel as the large print.
    Want to know how to use a Grommeter??

    Add Grommets

    I keep my grommet tools in the little bin Nate gave me. Who knew one could love Tupperware?

    IMG_0545

    Take one of the female grommets and determine your placement. I traced it with a pencil (a very fancy pencil I might add!)

    IMG_0548

    Next place the cutting tool (might have an official name, but I don't know it) on your traced circle, and put the mini block of wood under it. The wood comes with your kit.

    IMG_0553

    Give it a solid pounding with a hammer and you have a nice little circle cut-out

    IMG_0554

    Pop the male piece through the opening. Make sure the pointy end is on the back of your artwork.

    IMG_0555

    Now start stacking. Add the female part to the back…

    IMG_0559

    Here' the order…The large metal ring goes on the bottom (part of the tool kit), then the male grommet, then paper, then female grommet, then the big mama tool (that's the really official term). Now Hammer, Hammer, Hammer. (Don't do it on your granite counter. I took mine outside in the garage)

    Ta-da! Perfectly adorable grommet!

    IMG_0560

    I took my art to the wall and hung it with plain nails. I'll use decorative ones to cover 'em up.

    IMG_0565

    I added my chain, which again only cost me about $1.45 at Lowes

    IMG_0566

    And vioila! I'm also going to add a fun door nob to the peak of the chain. I didn't quite get to Architectural Antiques this weekend as I planned to. Now, here's the question of the day… What should I put in the open gold frames??

    Here's the room to give you the full picture…

    Side note: Does anyone else have a weird husband that flips the cushions backwards? He does it when we don't have company over because the kids make a mess of the cushions. Sometimes I forget and then it's an awkward, mad rush as people are walking in the door. Weird. I know.
    So let me know what you think of my retro camera art, and what I should do to finish off this wall!

    Follow Me on Pinterest
  • A Plain Pot: 3 Ways

    A Plain Pot: 3 Ways

    Sometimes spring decorating stumps me. I'm always so excited to lighten and brighten, but since one day can be warm and the next day is rainy and cold, I never quite know how to decorate. This year, I came up with a super inexpensive idea that makes my decor really versatile and easy to swap out.

    Enter the simple terra cotta pot. I bought it at Lowes for less than a dollar. I decided to create three completely different looks that I can swap out whenever it suits my fancy.

    DIY Idea # 1- Washi Tape & Whitewash The first step for this option is to tone down the orange clay color. I watered down some white paint, applied a thin coat, and then used paper towels to wipe it off, which left me with a white, weathered look. I had this adorable ruler washi tape and thought it went perfectly with the idea of spring growth! I love washi tape because it's inexpensive and comes in so many fun patterns.

    DIY Idea #2- Faux Metal Metal containers can be really expensive, but I love the industrial look they have. Using metallic spray paint, I was able to get the look of metal, but still spend under a dollar! I think a grouping of these in varying heights could look really neat!

    DIY Idea #3- Chalkboard Paint Oh, how I love chalkboard paint! Did you know I actually have chalk paint as my kitchen back splash? It's pretty awesome. I love the matte finish it gives the pot and I was able to add a fun little doodle. If you're thinking of planting any starter plants or herbs, you could use chalk to label what you're growing. Here's an insider tip… to get the crisp, clean writing lines like I did, use a chalk marker. You can order them online or from restaurant supply stores. They are much easier to draw with and still wipe off with water!

    Don't get me wrong, I'm all about big room makeovers, but sometimes a simple project like this one can make me just as happy!

    The options are endless with this one- which one do you like best??

    Monica

  • Honey-Do # 1- DIY Wall Hooks & Letters

    Honey-Do # 1- DIY Wall Hooks & Letters

    I mentioned Eric's Honey-Do list in my last post, so I thought I'd give a little project update. We made these bathroom hooks in our old house and I wanted to be sure that we added them to the new house as well. Here's how we did it…

    You can buy these little wooden plaques at Michael's for about.99 each.

    I used leftover dark brown paint (I'd recommend a different finish if you have one.) Once they were painted and dry, I used a clear spray paint sealant with a satin finish.

    I picked up four hooks at Lowes for about $4.00 each. The installation was Eric's job, but he tells me that all he did was level the wood on the wall and use one screw in the middle. Then, he used the holes on the hook to add two more screws. Easy Peasy!

    Four little hooks all ready for my kiddos wet towels and whatever else they stick there!

    The towels looked good, but they were missing something…

    I ordered the kids' names from Uppercase Living

    They came horizontally, but I wanted to put them vertically, so the first thing I did was to cut the letters apart

    These are my very professional tools… laser level (a must have for any DIYer), a wooden spoon from my kitchen, and scissors.

    When working with vinyl decals, you first need to flip them over and rub the back so the letter temporarily adheres to the thin paper backing.

    Now comes the high tech tools…

    I found the centerpoint and then used chalk from Kaden's chalkboard to create a guide… I clearly was a little wobbly with my line, but I had the general idea.

    The thin paper backing is sticky and you can position the letters and reposition them until you have it"almost perfect"

    Then, I brought out the professional tools again and just rubbed the letters on the wall

    The thin backing pulls off leaving the vinyl. Sometimes you have to do a little more rubbing on the corners.

    Kenzie's… as I said,"almost perfect"… I didn't gett all crazy with measurements, I just eyeballed it.

    And Kaden's…

    UGH! My son's name is not K-A-D-N-E… I am a moron! Here I am taking pictures and thinking of blogging my project and I can't even spell his name. So, the moral of the story is… if I can DIY… ANYONE can!

    I was able to peel off the N and E and fix his name. I'm happy with the finished product! Now, I just need to find a shower curtain. If you recall, Kira spilled an entire gallon of the yellow wall paint, and I had to throw out the curtain that I loved… Here's one option I found- what do you think?

    While it makes me laugh, I think I'm gonna pass on this curtain. I did find one curtain I loved, but it had a hefty pricetag!

    So much to Eric's dismay, I've added another DIY project to my list and I'm going to recruit Grandmom Bunney to help me make a patchwork curtain of fabrics I love. I can't wait! So what's on your Honey-Do list? What DIYs do you have up your sleve?

    The Lettered Cottage
    Tip Junkie handmade projects
  • Making the Master our Own

    Making the Master our Own

    I've decided that it's about time I dedicated some of my decorating/reorganizing energies to our master bedroom. I am in love with our Nautica paisley bedding (a Christmas gift from my parents), and I even like the paint colors in the room, but the artwork, flooring and disorganized closets are just not working for me. Let's start with the artwork, shall we? Nothing in our room says"Kevin and Jess". It doesn't capture our personalities, or even our design style. Most of what I have hanging on the walls were gifted to us for our wedding, and while they are lovely, almost seven years have gone by and I'm ready for something new.

    Artwork above bed: BEFORE

    Baby on the left is my daughter at about 1 month old, and baby on the right is my son at about the same age. (The colors are sort of wierd- must have been a different time of day. The colors on the right are more true to life.) The babies are adorable, but take a look at the artwork. Too country-ish. And the picture really is a nice picture of lilies, but I was over it. (Also, if you are wondering, my husband made our headboard from an old door that he cut down, painted and mounted to the wall. I love its simplicity and the fact that it was FREE, since we had removed the door from another area of the house to open it up a bit. It's a really easy DIY project for those of you looking for a headboard.) Right before Christmas, Monica and I went to Hobby Lobby, which, sadly, is all the way in Easton. If you are in to crafting/decorating, you will want to plan a day trip to this store. We planned a special trip where we had dinner and then meandered throughout the store for hours. I was so giddy at the checkout counter that I rambled on and on about my love for Hobby Lobby and how far we travelled to get there. I'm sure the lady thought I was crazy and wanted me to move on, but I didn't even notice so high was I on all the possibilities of this amazing store. Anyway, one my purchases was two chipboard letters, a K and a J. They cost $1.77 each, and I knew I could use them for artwork above the headboard.

    The first thing you may notice is that I'm extremely impulsive. I didn't really think this project through, and so I took many, many steps to get to the finished product. But I'm a trial and error kind of girl, and I've accepted that. My first thought was to decoupage a really cool french script paper to the letters. They looked awesome and I was thrilled. Until…

    …I held them up against the wall. I hated the color of the paper against the color of the wall, and it wasn't working hung next to the awesome brassy-gold ampersand that I also bought at Hobby Lobby.

    So, I decided to rip the paper off, and try spray-painting the letters in a metallic finish. Turns out that ripping off paper that has been decoupaged is no easy task, so I decided to stop that, and sand the paper (really? Sand paper? Yes, I told you I'm impulsive and not always sure of what I'm doing.)

    The metallic finish was equally awesome, but again I didn't like the finish of it against the wall, in the dark brown frames, or next to the brassy ampersand. So, what did I do? I painted the darn things the same color as the headboard.

    Artwork above Bed: AFTER

    I love it! It's just a touch modern, which is fun against the more traditional lamps and bedding. And you can't tell from the picture, but the"&" really brings out the goldish color in the bedding. I'm super happy with the finished product.

    Just to keep it real, here's an up-close picture of my bedside table.

    Eeeeww! Dust much?
    I have a few other projects up my sleeve for our master bedroom that I hope to start in the next few weeks. (I guess I should add dusting to that list.) It may take some smooth talking and the perfect timing to get the hubby onboard, so we'll see!
    Next up: the floors

    We have disgusting carpet that was disgusting before we moved in, and is even more disgusting now since we've lived here for 3 years. We are planning on ripping it out and then painting the subfloors, ala Ashley. Not exactly traditional, but it's cheap and pretty!

    We won't be doing an elaborate stencil, though. We're thinking big, broad horizontal stripes in muted colors. I can't wait and I'll keep you posted on the progress. I also have a few other ideas for art for the other walls that includes some of my favorite photos of the hubs and me. Time to get crackin'!

    So, we're one step closer to ma king the master our own.

    Posted by Picasa
  • How to Spray Paint a Chandelier

    How to Spray Paint a Chandelier

    Spraypainting a chandelier is REALLY easy and it's a super cost-effective way to change things up in your home. Back in January we shared our home goals with you, and one of mine was to start redecorating our dining room space. ALL of the furniture pieces in this room were bought on clearance (hooray for a $60 dining table!), through Craig's List (the hutch was $100) or from a family member (the red chairs were my grandmas!). Even the art was upcycled! Anyway, it's just not fitting in with that lighter, brighter, coastal-cottage look I'm going for, so I figured it was time to get moving.

    I have had a light fixture in mind for this room for months, and I guess I've gotten stuck on that idea. Because it's not in the budget right now, I had just resigned myself to wait until the time was right. Then, inspiration struck after seeing Kelly's pinteresting home, and I realized that taking stuff I already own and making it better is what I DO! Duh. So, you guessed it, I took that baby down (by myself!) and spraypainted it. Here are my go-to tips:

    1. Take your chandelier outside and find a tree with a low-hanging branch. Throw a dropcloth down under the area you'll be painting.
    

    2. Using rope or wire, tie the chandelier firmly to the branch. Hanging your chandelier allows you to spraypaint the entire thing at one time. No spraying the top, waiting for it to dry, doing a second coat, waiting for it to dry, turning it over, painting etc etc etc. (I'm such an idiot and forgot to take before pictures of the process, so you'll notice my chandy had already been attacked by spraypaint!)
    

    3. Stuff cottonballs down into the stems (where the lightbulb screws in), so you don't damage it with paint.
    

    4. Pick your poison favorite paint and start spraying! I am embarrassingly in love with this color I found from Valspar called Hacienda Tile. It's a mix between pink, red and orange that is absolutely perfect, and satisfies my longing for an infusion of coral in my home. Also, this spraypaint is awesome for this project because it can spray at all angles, so you can easily get down under the chandelier to spray the undersides. Spray 3 light coats, with some drying time in between, for the most even coverage without drips.

    5. Hope that your neighbors don't turn you in to the association for being white trash. (Yes, that is my FRONT yard!).

    I'm thankful I have such nice neighbors. Anyway, I can NOT wait to show you how this has one little change has inspired a major makeover of our dining room. Yay for more projects!
    How many of you spray painted something this weekend?
    

    jess
  • DIY Hanging Frames {Tutorial}

    DIY Hanging Frames {Tutorial}

    A few weeks ago during round 4 of Creating with the Stars, I showed you guys the bathroom makeover we did for our kids. I love this happy, colorful room- it feels so fresh and clean. One of the little projects in the room that I never mentioned were the hanging frames on the wall as you enter the bathroom.

    This was a super easy project that took about 30 minutes total to complete and it's so darn cute. Let's take a look at how I made it, shall we?

    I went to a World Market for the very first time while vacationing in Hilton Head, SC (we don't have one near us- boooooo) and immediately noticed these hanging frames, but they were $49.99!! I knew that with just a few cheap frames from Ikea, I could recreate this look for less!

    Here's what you'll need to make your own:
    - Plain frames (I got mine for 3.99 each at Ikea) — Braided rope — Staple gun (optional) — Hot glue gun — Level — Measuring tape

    Step 1: Pull the arm off of your frame, if they have them, so that the frames lay flush against the wall.

    Step 2: Roughly estimate how long you want the rope to be by placing the frames the same distance apart (mine are 3 inches apart) and looping the rope up and over the top and down the sides. Cut the rope. Don't worry about being exact here, you just want to make sure you have more than you'll need.

    I found this awesome multi-colored rope at the Dollar Tree and am in love. (Remember? You've seen it right here before) For only a few bucks, I have more than I need so I can use it in lots of different ways!

    Step 3: Place a knot a few inches down from the top so that you can easily hang your frames when you're ready. I also think this adds a fun detail to the frames!

    Step 4: Lay your frame upside down on a flat surface and line it up with a straight edge. I used the edge of my countertops as my guide. This ensures that the frame will be level when you hang it up. Using your hot glue gun, dab some glue to the upper corner of your frames and hold it in place. Do this on both sides. Then run a line of glue down the sides of the frame, pulling the rope tight as you go.

    Step 5: Line the next frame up and masure your desired distance (my frames are 3 inches apart) and hot glue in the same places as above. This part gets tricky, so try to keep a steady hand! But the nice thing is that if you mess up, you can just pull the rope off and do it again! (Not that that happened to me or anything:) Repeat with the remaining frame.

    Step 6 (optional): Use your staple gun to shoot a few staples in the corner to secure the rope.
    Step 7: Fill your frame with cute pics and hang it up! I used a large knob I had to hang the frame- I love the way it looks!

    That's it! For under $10, I created a fun piece of wall decor for my kid's bathroom! Can't beat that.: )

    And now I just have to ask…is there anything you can't do with a little hot glue??; )

    jess
  • Get Organized!

    Get Organized!

    I'm so happy to introduce you to Robin Harisis. She was roomates with my older sister at Messiah College, so I sort of know her by association. She is the founder of Room Service Personal Organizing, LLC and a member of the National Association of Professional Organizers and Faithful Organizers. Robin believes that everyone can learn to be organized and she finds satisfaction in teaching organizational skills to others. In the summer of 2010, Robin became a Certified Family Manager Coach. Family Manager Coaches help families learn to work together to achieve organizing goals and live more fulfilling lives by modeling proven business practices. Robin lives in Ontario, New York with her husband, her son and daughter, and two crazy dogs. She enjoys the outdoors, reading, gardening, and of course, organizing. You better believe that I had ulterior motives when I asked her to be a guest blogger- I need these organizing tips more than anyone!
    Top Three Organizing Tips

    Define a Starting Point
    The question that is most often asked of me is “Where do I start an organizing project?” Sometimes the project is so overwhelming or habitual it is hard to define a true starting point. I equate it to asking a child to pick up his toys in a room scattered with his belongings. Most of the time, the child will stand there, staring at the mess, arms at his side, still as can be. The child cannot do what he is asked because it is too overwhelming. He cannot identify a starting point.

    We can be just like the child when we are staring at an organizing project. Here are some ways to help define a starting point:

    • Deal with the project that would make the most meaningful change in the shortest amount of time
      • Set up a bill payment system as the first step to a paper management system
      • Organize the foyer or entryway as a start to organizing your home
    • Cup your hands around your eyes and pan the room. This limits your view of the project, allowing you to see it in smaller portions and giving the project some definition. Choose a section and begin your project.
    • Determine a main or final goal for your organizing project. Break the project into steps working backward from your goal. This will not only help you find a starting point, but will give you a plan to follow until your project is complete.

    Buy Containers Once You Know What to Contain

    Many times, we buy containers BEFORE we start an organizing project. But why would we buy containers if we don’t know what has to go in them? How do we know it’s the right size or will function correctly? Buy containers after you have sorted your items, you know what has to go in them, and where the container will be stored. This will give you a much better chance of choosing the appropriate container for the job.

    Sort and Label According to You


    Organizing is a very personal activity. Organizing systems work best when they are created specifically for the person or people using them. Here are two ways to customize your organizing system:

    • Sort like with like
      • If a pile of seemly random objects were dumped on a table in front of a group of people, each person might sort them differently. One person may sort by color, another by shape, and yet another by use. Each way is correct, showing the difference in how people view “like with like.” Sort your items according to what like with like means to you
    • Label according to you
      • Labeling can be straight-forward. For example, a box of Christmas decorations are labeled “Christmas.” However, there are times creative labels can be helpful in classifying items. “Financial Documents” may not mean anything to you, rendering the papers hard to find. But when the same papers are labeled in a file called “Papers that make me money,” they are located in a snap. Label items according to what makes sense to you and forgo the traditional titles, if need be.
    If you want to get a hold of Robin, or have her help you organize your life, here's her info: Robin Harisis Room Service Personal Organizing, LLC Office Phone: 315.524.7151 Cell: 585.727.2005 E-mail: robinharisis@organizingcompanion.com Website: www.organizingcompanion.com
    Thank you so much, Robin! Now, ladies, get to work!: )


  • Photobooks

    Photobooks

    This guest blogger just so happens to be my personal favorite… I'm allowed to be a little biased because I think he has a crush on me, and I think he's kinda cute too. Make sure you leave a comment and like the post on Facebook because I need lots of positive feedback for this blogger!

    This is Eric, husband of the oh-so-talented

    Monica. I got word that Jess and

    Monica would be having"guest bloggers" and I jokingly asked why I can't be a guest blogger. Well, she called my bluff and told me to put together a post.
    Now the conundrum, I am not housewife and as my WHOLE family can vouch for, I am NOT crafty. So what can I post on?
    Ah-ha… probably the most important thing (not living) in my whole house would be our photo books! And this is one quasi-crafty thing that I am totally in charge of. So here goes.
    If all of you crazy blog-stalkers with kids are anything like my wife, you take thousands (if not millions) of pictures of your kids, your house, your family and really just your whole life. These pictures sit on your camera or computer, occasionally they get dropped into a blog or facebook, but for all intents and purposes, they sit – lost and wasted.
    In 2007, I got tired of seeing

    Monica take so many awesome pictures without ever doing anything with them. That's when we discovered Blurb. Ever heard of it? The beauty of Blurb is that they offer"book-store quality printing and binding" at incredibly reasonable prices.
    Everyone I've talked to seems to get overwhelmed with idea of doing a photo book. But trust me, it's not hard. The longest, hardest, most time-consuming part is just sorting through the tens of thousands of pictures stored on your camera and computer and organizing a years worth of pictures. But… and this is a big but… it's so rewarding going through a full year, seeing all that you've done, re-living all the fun events, seeing how your family has grown over the course of a year.
    Ok, so what I do, (and this is just preference), is I go month-by-month, sorting pictures mainly by events. I drop all pictures into folders on my desktop with a name of the even. For example, I'll have folders such as"snow fun,""baking with mommy,""bath-time,""field trip to the farm,""fun with playdough,""Kenzie's soccer," etc., and then I always have a folder for each kid with all the best pictures that we have for them. Then when it's time to actually put the book together, it really just flies!
    The great thing about doing a photo book like this versus just printing photos and putting them in an album is that you get to tell stories, explain the events, and actually add personality to your photos. It's a great place to remember some of the crazy things your kids have said or done. With the craziness of moving over this summer, I got way behind on putting these books together. I sat down to do a book for the 2nd half of 2009 a couple weeks ago and I was amazed at how much I forgot! I saw all these pictures and couldn't quite place where we were, or what we were doing, or some of the fun stories behind the pictures. My goal is to do 2 books per year as soon as that year is finished. There are so many types of books that you can do –

    Monica scanned all of Kenzie's art work from a full year of school and made an art book, she made several small books documenting things such as birthday parties or Christmas. We've even given a book to my parents after a week on vacation with them (yes, these books make great presents for the grandparents!)
    Enough talk. Here is what Blurb actually looks like (screen shot from our ancient desktop). You log in and all the Blurb books you've created are listed.

    Once the book is created, I import all the pictures that I have from a given folder on my desktop (i.e. beach with the Motts). There are dozens of picture/text layouts to choose from and all you have to do is drag-and-drop your pictures wherever you want them and then add the text. The view below is during the editing process.

    You can also preview your book to see how it will actually look once published.

    I mentioned in the beginning that it's"book-store quality printing and binding" at incredibly reasonable prices. For a 200 page book, with a hard-bound cover, it's only $48.95. A 200 page book can easily hold 600-800 pictures. I know Blurb is not the only company doing this – it just happens to be the one we use. I searched for photo-book reviews and this website seems pretty accurate. It rated Blurb as 4 starts (out of 4) for quality, but lower scores for features and ease of use. Other sites have higher scores for ease of use/features but slightly lower scores for quality. I'm not looking for anything too crazy, so I'll sacrifice a little on the crazy layouts and customizability for quality.
    That's it. Now if only I could find a way to do something similar to the hours upon hours of home-videos we have, I'd be all set! Any suggestions?
    -Eric (Monica & Jess)
    Linked Up to: The Stories of A2Z

  • Free Printable Invasion

    Free Printable Invasion

    I'm serious when I say that I think one of the best things about blogging and the internet is free printables! They add so much character to your home without having to spend lots of money. Thank you to all you who provide little ol' me with free stuff for my home! I've talked about a few different places you can find free printables here, but I decided that for my open shelves in the kitchen I wanted something specific and custom-matched to my color scheme. What's a DIYer to do? Why, make one herself!

    I wanted to create something that was meaningful to me, but that also had some connection to eating and the kitchen. While searching around, I came across 1 Corinthians 10:31 and knew that it was perfect for this!

    I found a pattern that I loved by Moo & Puppy (it's the morrocan trellis pattern that comes in a bajillion colors), uploaded it to Picnik and went to town. Why doesn't everyone buy digital paper? Seriously, there are SO many uses for it and it's so darn cheap! Plus, you can get 15% off if you use the code RHBC15. ----------------------------------------------------------------------------------------------------------------------Anyway, back to the printables. I have three identical frames in the kitchen that I spray-painted turquoise, and needed to fill them with something. I made this one using a great Julia Child saying…

    …and printed this beautiful peacock from The Graphics Fairy!

    Three cheap thrift store frames + free printables = one happy girl! And since I'm so happy, I decided to share the love. Free Eat, Drink, Glory of God Printable

    It's a 5 x 7 print and you can choose from three different colors: mustard yellow, turquoise and lime green.

    Click here to Download Printables I'm excited to finish accessorizing my open shelves, but you got a little glimpse today of how they're shaping up. What do you think?
    Have you ever made your own printable? Do share! 

    jess
  • Faux Industrial Metal Letters {Tutorial}

    Faux Industrial Metal Letters {Tutorial}

    Man, it feels so great to be back writing a tutorial of my own this week! I've been on a mission to finish the living room/dining room on our first floor and this project got me one step closer. I'm absolutely in love with the way this came out, and I have to say, I'm pretty thrilled with the sentiment, too- I have been so blessed!

    I'm a big fan of mixing in some industrial elements in my home. Since I just added these lights to my dining room that connects to the living room, I thought it would be fun to mimic the tone of the lights somewhere in the living room.

    I had ordered this phrase from one of our favorite shops, 163 Design Company, and had originally painted them three different shades of yellow before finally decided that yellow was going to be the death of me. Thankfully, having a best friend with a good eye (*ahem, Monica) came in handy when she suggested trying a metallic look. Since I didn't want just a flat metal look, I decided to try my hand at faking that awesome, full-of-character industrial look. Here's what you need to do to bring some metal into your life: 1. Lay your letters on a drop cloth and spraypaint them in Krylon's Stainless Steel. It took about 3 light, even coats to cover all that hideous yellow. (Sidenote: I'm a huge fan of using spraypaint whenever possible, since it's fast and easy and I'm lazy. )

    2. Using Valspar Brown Velvet Spraypaint, lightly spray the letters from a good distance. You don't want to be up real close to the letters when you do this. Splotchy and imperfect are the looks we're going for here! This step takes away a bit of the shine from the stainless steel.

    3. Using a makeup sponge or paint applicator, dab black acrylic craft paint on the edges and corners of each letter. There is no exact science to this. I just dabbed it on, rubbed it in and on some occasions, used a damp cloth to wipe it down. If you'd like to add a rust effect, use Burnt Sienna craft paint on the corners and areas that would naturally rust. I didn't do this as it made it a bit too warm for me. That's it!

    To hang my letters, I used picture hanging command strips. After measuring, leveling and measuring some more (that's a whole OTHER tutorial), I was finally happy with the arrangement!

    I'm loving the look of my new"old" metal letters. Other surfaces in my house, better watch out! I'm on an industrial metal rampage!

    Monica used 163 Design Company to create a unique statement in her entryway, too!

    So now, what will YOU give this industrial metal look to? P.S, We're the ones in a contest now and if we win, we get to give $5000 to the charity of our choice! We need your help, though- you can learn more about our project and the charity we chose here, or go vote for us every day for the next two weeks right here. Thank you!

  • Guest Room Spoilers!

    Guest Room Spoilers!

    Last week we mentioned that we've been really busy working on this Pepto Bismol pink room. Trust me, I love me some Pepto once in a while, but on the walls… not so much.
    Does this guest room make you want to come and visit? I mean, look, it has it's own personal gym, cable TV, and extra pillows! What more could you want? We're talking 5 Stars Baby!

    Ha! It's okay, I know the anonymous homeowners of this guest room and they don't mind a little teasing. Trust me, with how awesome the room is looking, last night Jess and I told them that we definitely want a sleepover once it's all finished!
    The grand reveal with come on April 24th, but until then here are some major spoilers!
    Drool-worthy hardware We are sooo crushing on the furniture upscale we did. It was incredibly simple, but makes a BIG impact!

    IMG_0227

    Perfect Colors Have you ever walked into the paint department and felt like certain colors were just screaming for you to notice them? That's completely how this pallette came together. Jess and I met at Home Depot one night and honestly within 3 minutes we had our minds made up.

    IMG_0229

    Umm Gears? Just wait and see. We're actually not 100% sure about all the details for this project, but we know it's going to be awesome. As we told the homeowners…"Trust Us"

    IMG_0230

    Industrial Flair Notice a trend? One of the coolest things about this room is the awesome juxtaposition of styles. We're pairing some funky modern pieces with an amazing 18th Century find. Can't wait to see it all come together!

    IMG_0231

    Honoring Service The homeowners really wanted to incorporate this picture of their grandfather, who served our country. I'm totally a non-emotional gal, but this picture sort of gets to me. One of my good friends Jane, would be so proud of me (she's uber emotional and loves all things military)!

    IMG_0232

    Did We Mention Juxtaposition? Haha! From Army to Blue Birds in a single bound. Don't worry, we're not crazy (okay, maybe a tad) and this will all work out nicely!

    IMG_0236

    Examples of Love & Commitment We have a very cool gallery project for the room. The homeowners (which btw it's really weird to refer to them as"the homeowners" and not just Connie and Mark… Oops! Did I just accidentally reveal their secret identity!) Anyhow… The homeowners had a collection of old wedding pictures from both sides of their parents and grandparents. They've had some amazing examples of what it takes to make a marriage work for the long run. They're going to have a special place to recognize that commitment and how God has blessed those couples in awesome ways.

    IMG_0237

    Have you heard Jason Mraz's new song? I Won't Give Up is one of my top ten favorites right now and it's a great reminder that the road isn't always easy, but it's always worth it. Go listen to it and I'll warn you right now, that it will be stuck in your head, but it's a pretty good thing to be singing all day!
    So how's that for some spoilers? What do you think of the direction we're headed in? Did you love the Song as much as I did?

    Monica

    Only following on the blog? You're missing out. Use the buttons below to join in on all the fun!

    Follow Me on Pinterest
  • Playhouse Loft Bed {Little Girl's Room}

    Playhouse Loft Bed {Little Girl's Room}

    My daughter turned four a few weeks ago, and as her gift, we promised that Daddy would build her a new playhouse loft bed, and then Mommy would decorate it. We love our girl and were more than thrilled with how excited she was about her new bed. Every day of the week we built it, she would ask us if it was done and could she sleep in the loft? My hubs could not be more proud of the work he did (he did a seriously amazing job!), and I'm so excited to share it with you today! Playhouse Loft Bed

    This is not a tutorial, because we basically followed Ana White's plans word for word, although we did make some minor adjustments to the bars at the top of the bed. Check out her plans here for more information.

    We cleared the bed out of Campbell's room in preparation for the building process. Because of the size of this bed, my hubs had to build it in pieces and assemble it right in the room because it wouldn't fit through the door.

    Poor girl slept in a sleeping bag the entire week! (Find out more about the family tree mural here).

    I can honestly say that I have the best in-laws ever. They willingly help out whenver they can and we so appreciate them! My hubs called in my father-in-law for reinforcements, and we were thankful for his expertise!

    The biggest expense is obviously all the wood you need to build it. Since my hubs has such a limited amount of free time (he works 6 days a week!), we decided to have Home Depot make all the cuts for us to save some time. It worked perfectly- in about an hour, the really helpful Home Depot guy had all the cuts done, whereas we would have had to set up a work area, do all the measurements, make the cuts and clean-up which would have taken loads more time. They didn't charge us for any cuts since we bought so much wood (about $250 worth), so it was totally worth it.

    Ana's plans are pretty extensive, but my hubs and father-in-law quickly threw them around on the floor in a haphazard manner. I'm not really sure how much they actually followed the directions, now that I think of it…

    But after a few nights of building, a few more of painting and decorating, we had this:

    Pretty adorable, right? One of my favorite parts of the house is the faux"siding" (which is pretty hard to see in pictures). We saved a bit of money on a couple sheets of plywood since we already had them on hand, so I splurged on two sheets of faux wood panelling ($24 each) that we hung horizontally on the outside walls. The guys used wood glue and clamps to hold it in place until it was secure. It adds such a cute touch and I'm so happy we decided to go for it.

    The inside walls are painted an in-your-face pink that made it ridiculously hard to get a good picture. Note to self: 1) Turn off Christmas lights before taking pictures next time, 2) Straighten picture frames after the kids attack that area, 3) Don't try and take pictures with the kids around because they immediately mess things up. Ah well…life with kids!
    I wanted a place for Campbell to play dress-up and also a spot to corral all her jewelry and makeup, so I created a little vanity area with a simple mirror from Walmart ($4) that I spray-painted and a shelf that was already in her room that I spray-painted white. The two little patterened boxes are from Walmart, as well, and were only $.99 cents each. Score!

    I found the super-cute flower hook at Joann's on clearance for $2.00 and used two Ikea hooks I had on hand to create a place to hang her princess dresses. The flower hook was already blue, but I spraypainted the other guys a similar blue for a cohesive look.

    My wonderful mom bought fabric from Joann's and whipped up some curtains for the windows and door. I still need to make some tiebacks, but I love the polka dots and sweet flower prints!

    Our original plan was to build stairs, but we didn't have enough space, so Kevin built a ladder, which she actually loves. She did fall all the way down once, on her very first try, but she's gotten used to them, by now!

    All in all, this playhouse loft bed made one little girl very happy, and that's just what we wanted. Woohoo!

    Did you have an awesome play area when you were little? What was it like?

    jess
  • Green China Cabinet: {Dimples and Tangles}

    Green China Cabinet: {Dimples and Tangles}

    We are so happy to have Janenifer from Dimples and Tangles here today sharing all the details on this stunning china cabinet transformation that she linked up last week in our final round of Creating with the Stars. Janenifer has great taste and impeccable style. We know that once you take a look at her blog, you won't be able to stop! ---------------------------------------------------------------------------------------------------------------------
    Well, here she is!

    After almost two full weeks of work (off and on), it's finally done, and I'm going to make you scroll through way too many pictures.
    Let's remember the very sad before…

    And the oh so fun after!

    I wanted to create a glam, sophisticated look and lighten up the inside, so I used my wedding china, crystal, some other white dishes and thrifted milk glass I've collected to style the shelves.

    I like symmetry.

    Now for the details, I sanded, filled in gouges, sanded, wiped, and primed before painting three coats of color. Yes, I can confirm that dark colors are tricky and take more paint. The color I used was Behr's Pine Scent in semi-gloss. I used a good Purdy brush for the corners and a foam roller for the rest. Also, a huge trick I've learned when painting with latex paint is to use a coat or two of poly on the flat surfaces that will have something sitting on top of them. Latex paint can stay tacky for up to a month, but with a layer of poly it's ready to go after 24 hours or so…no tackiness!

    . One of the knobs on the bottom doors was missing, and a few of the pulls on the top doors. I kept and cleaned up the brass backplates on the glass doors, and found these perfect glass knobs at Hobby Lobby. They are an oval shape rather than round so they fit nicely together where the doors meet.

    I also gave you a sneak peak at the chunky hardware on the bottom. The oversize glass knobs were out of my stash. Did you guess what the backplate was? I knew I wanted something big and was coming up empty looking online, and then I remembered I had these…

    They started their lives as…Christmas ornaments! I bought them and used them as hangers for an old window treatment (seen here). My handy husband drilled a hole in the middle and they were perfect! Along with the original drawer handles, they got a coat of Rustoleum's Metallic Brass spray paint, and then a coat of Rub-n-Buff in Gold Leaf.

    I had planned to add height by adding an extending shelf in between the two pieces to house some cubbies for storage baskets, but I ended up just needing to get this piece d.o.n.e! I probably will still add that piece in the future.

    With this project completed, I'm down to artwork and a new table for this room. I have the table but it needs some work so I am waiting for a streak of warm-enough days outside to work on it. That probably won't be happening until later in the spring. Artwork, though, coming up!

    Isn't that gorgeous? We're totally digging the kelly green and gold together and how smart was it to use Christmas ornaments as part of the knobs??!! If you think that piece is awesome, you just have to see the Accent panel wall in Janenifer's office…it is to die for!

    Thanks so much for sharing with us today, Janenifer! Check back tomorrow for an AWESOME Mother's Day giveaway that you don't want to miss!

    jess
    Monica

    P.S, We're the ones in a contest now and if we win, we get to give $5000 to the charity of our choice! We need your help, though- you can learn more about our project and the charity we chose here, or go vote for us every day for the next two weeks right here. Thank you!

  • A Pinteresting Home! {Meet Kelly}

    A Pinteresting Home! {Meet Kelly}

    We all love Pinterest… there are so many ideas and cool people to be inspired by. I wish I took the time to do more of the projects I see, but honestly this lil' old blog takes a lot of time, so I don't do as many as I'd like to (sounds weird that a DIY blog would take time away from DIYing, but it's true!)

    Today I'm excited to introduce you to two people I adore. Meet my adorable sister-in-law Kelly and my awesome brother-in-law Bryan. This cute couple lives in Ohio, so we miss them 24-7, but we have a blast when we're together.

    I also have to introduce you to their little stud Jax. He's our one and only nephew and we think he's the best!

    Okay, so why are we having this Mangin Family blog reunion?? Well, Kelly is not just a Pinterest addict, she actually does what she pins! {Gasp!}
    On our recent visit to Ohio, I felt like I was walking through a Pinterest Museum. It was too awesome not to share. Kelly has some creative friends and family, and between them all they have done so many fun projects for her home. So without further ado… Welcome to Kelly's Pinteresting Home! State Artwork Kel is from OH and Bry is from PA.

    IMG_0012

    Aqua Painted Pedestal Table Kel got her table and chairs at goodwill for $75 total. Add aqua and white paint and you have an awesome statement piece!

    IMG_0013

    Funky Pendant Light This was one of the first changes Kelly made to her kitchen when she moved in!

    IMG_0014

    Crossword Names Takes 2 seconds, but is so cute as an accessory. It's just a frame turned chalkboard.

    IMG_0015

    Kitchen Office Space She removed the wall cabinets, added open shelving, and did some adorable accessorizing. Kelly claims she can't decorate, but I'm pretty sure you'd all beg to differ!

    IMG_0017

    Spray Painted Faux Antlers Kel is super lucky to have a Hobby Lobby right around the corner. These beauties came from there and got a coral spraypaint treatment.

    IMG_0018

    Simple Printables She doesn't just PIN free printables, she actually uses them… imagine that! A simple piece of twine, some clothespins, and voila!

    IMG_0019

    Modern Painted Chandelier Bye Bye Brass, hello funky green. The circle bulbs are just right and add a cute modern flare.

    IMG_0020

    Window Frame Kel found this awesome salvage shop in Springfield, OH. They have windows galore!

    IMG_0021

    Family Rules and More Printables Kelly and Jess both have the Be Happy print. You can get it at Sprik Space.

    IMG_0022

    Magazine Paper Frame & Vase These two were purchases, but I liked them too much not to include them. If you're patient enough you can make your own!

    IMG_0023

    House Numbers and Hooks There are so many things you can do with frames, and digital paper. Our favorite site is Moo & Puppy!

    IMG_0024

    Yarn Wreath You know I'm the"anti-wreath," but this one is really cute! I love the homemade pompoms

    IMG_0025

    Paper Flowers Kelly's friend Amy made these for her and they match her aqua table so well. Jones Design Company has tons of paper flower tutorials!

    IMG_0026

    Clip Hooks Are you seeing a clothes pin trend? They're affordable, easy to use, and cute!

    IMG_0027

    Fabric Lined Shelves Kel took plain bookshelves from drab to fab with this blue fabric. Her shelves always look so cute! Her sister gave her the frame with the subway art and has it loaded up with a print for every season/holiday.

    IMG_0028

    Unique Gallery Wall These cool rounded frames are from Ikea and the doorknob is from Hobby Lobby.

    IMG_0029

    Growth Chart I love this growth chart that Kelly's sister made for her. It's exactly like this one from Miss Natalie. No time to make one? You can buy one on Etsy for $56.00.

    IMG_0032

    Last but not least, check out this fabulous fabric choice for a DIY headboard!

    IMG_0035

    What do you think? Are you inspired to go look at your pin boards and actually do a project? I know I have a list a mile long that I want to do now! I also have to tell you that Kel had no idea I was snooping around her house taking pictures, so none of this was staged or cleaned… this is real-deal, everyday life and I think it's great!
    Have you turned a pin into a project? Share the link, we'd love to see!

    Monica

    Only following on the blog? You're missing out. Use the buttons below to join in on all the fun!

    Follow Me on Pinterest
  • How to Build a Custom Headboard with Arms {Sarah M.Dorsey Designs}

    How to Build a Custom Headboard with Arms {Sarah M.Dorsey Designs}

    If you missed all the amazing projects of our first annual Creating with the Stars, be sure to check them out below!

    Round 1 Projects & Winners Round 2 Projects & Winners Ro und 3 Projects & Winners Round 4 Projects & Winners -------------------------------------------------------------------------------------------------------------------------- Sarah is back today with another awesome tutorial from the home decor project that won her the grand prize in Creating with the Stars. I love the way she built this headboard and broke it down for us- it makes any custom headboard within the realm of possibility! Plus, it looks unbelievable with that grasscloth and nailhead accent wall!

    To complement the accent wall, we wanted to create a headboard that wouldn't compete yet wouldn't get lost against the nailhead and grasscloth.
    We made a plan and gathered our supplies.
    1/2" plywood (1 sheet cut to width of bed frame, ours was 62.5") 2x8" (x2) 1x8 (x2) 1x3 (x4) coral curtain panels from Target heat n' bond batting
    I drew a few diagrams for the basic construction and dimensions of the headboard. See below for some the specifics on the upholstery. Measurements are for a queen bed frame. Note: make sure to measure your bed frame first, in case yours is different! You want to make sure that the frame will fit inside of the arms.

    For the arms, we screwed a 1x8 and a 2x8 together, measured and drew the circle with a lid. We then followed the line with a jigsaw to cut it out (we did remove any screws that were in the way first!).

    For the foam, we cut a 3" camping pad in half and attached to the plywood with spray adhesive.
    Next we upholstered the back piece by wrapping in batting and then fabric. To make sure that the top was pulled evenly, we attached a thin strip of scrap wood and pulled tight. This made it much easier to get an even look!

    Next, we cut the fabric to wrap around the entire arm, starting at the inner part of the arm, we put a few staples in (on the inside so it stays in place while you attach the arm), we cut little holes in the fabric at the pilot holes (where arms attach to the frame). We then installed the arms with heavy duty screws (we used cabinet anchors) and attached it to the 1x3 frame.
    Then we finished upholstering! We pulled the fabric tight around the arm and stapled, leaving it loose at the top. We cut the angles, almost to the edge, but not close enough so that it frays to the side of the arm, pull tight and staple. It doesn't have to be pretty on the top because that will be covered next. We cut a band of fabric the total height of the arm (accounting for the bends) plus a few inches and the width (2.5") of the arm plus enough fabric to fold under (at least.5" on each side, so at least 3.5" total). We folded the raw edges under and pressed with a hot iron so that the edges were crisp and attached the band to the arm with no-sew adhesive (my preference is Heat n' Bond) and a hot iron, staple to secure the ends.
    That's it!

    I finished the bed off with a few DIY pillows. The euro pillow shams are made from a white table cloth and a scarf from World Market. Since the scarf was translucent, I doubled it up with the white table cloth. The throw pillows are white shams from Ikea, I then painted a border using painters tape and latex paint with fabric medium. The bolster pillow is a kitchen towel from World Market and the left over headboard fabric.

    I love how the grasscloth slightly shimmers depending on the lighting.

    The nightstand is from World Market, the sphere from TJ Maxx and I picked up little letters (to spell his and hers) from a local antique store. Books were wrapped in paper from the Paper Source.

    Hydrangeas and Ranunculus are two of my favorite flowers!

    This week was sponsored by Home Goods, and if you've read my blog, you probably know that I'm pretty obsessed with the Home Goods/TJ Maxx/Marshalls brand! I love the thrill of the hunt, designer names and the affordable prices!
    I picked up a cute accent chair, fluffy white rug (my puppy love it too!) and the white sphere!

    Finally, here's where we got everything!
    Headboard: Fabric Coral drapery panel from Target (x2), Batting,

    3" camping foam from Home Depot only $20!
    Feature Wall: Grasscloth wallpaper,

    Nailhead (we used about 2.25 boxes),

    Trim- I found 2.5"wide synthetic trim from Home Depot on clearance for $4/8ft board
    Accessories: Night stand (World Market — not on website), decorative sphere (TJ Maxx), His and Her letters (local antique shop), Throw pillow on chair, chair (TJ Maxx), lamp and lamp shade, duvet cover
    I'm crazy about our new transformation and I hope you love it too!

    We totally love it too! Well done, Sarah! We 're ready for you to make a trip to good ol' Bucks County to fix up our master bedrooms. Any time.: )

    jess
    Monica

    P.S Have you linked up yet?

  1. laptop case - made from old shirts - creative textiles - textiles work - textile art
  2. Ideas for sewing projects - Block printed file cover
  3. Simple projects using wooden printing blocks
  4. laptop case - creative textiles - textiles work - textile art
  5. laptop case - made from old shirts - creative textiles - textiles work - textile art
  6. Zac Posen: Pre-Fall 2011 | Mode: Fashion
  7. ASOS | Mode: Fashion
  8. Bar Refaeli | Mode: Fashion
  9. Leighton for InStyle | Mode: Fashion
  10. Ashley Olsen for Marie Claire | Mode: Fashion