My Creative Blog:
creative

  • Temporary Accent Wall with Grass Cloth & Nailheads {Sarah M. Dorsey Designs}

    Temporary Accent Wall with Grass Cloth & Nailheads {Sarah M. Dorsey Designs}

    If you missed all the amazing projects of our first annual Creating with the Stars, be sure to check them out below!

    Round 1 Projects & Winners Round 2 Projects & Winners Ro und 3 Projects & Winners Round 4 Projects & Winners
    --------------------------------------------------------------------------------------------------------------------------
    Sarah's unbelieveable bedroom transformation blew us away. The color combinations, details and style of the room were simply perfect and we fell in love immediately. She had a few awesome tutorials for her projects, so we decided to break them into two posts. Today, you'll see how she made that removeable accent wall that is a great solution for you renters out there, or those of you who have Design ADD like us!: )
    When I heard that this week's theme was home decor I instantly knew that I wanted to do a bedroom feature wall and a dramatic headboard! With my amazing diy partner and husband, David, we got straight to work!

    Living in a rental makes it nearly impossible to install classic wallpaper and nailhead, so we decided to build a separate feature wall! We wanted to incorporate two of my favorite materials, nailhead and grasscloth wallpaper. I love the texture of the wallpaper and the dimension of the nailhead!
    Want to know how we built the wall? Here we go!

    We purchased three sheets of plywood from Home Depot and had them cut to 7' high. Since the feature wall is 12' long, it would need to be built inside of the room. We designed it so that it could easily be dismantled into three pieces to be removed. We tied the seams together with 1x3s and built a frame on the back with 1x3s so it was extra sturdy and straight. We then flipped it over and primed it so that they wall paper adhesive wouldn't soak in.

    Once dry, we cut the wallpaper to the correct height, placed it to the side and rolled wallpaper adhesive over the primer. We then used a wallpaper smoothing tool to remove any bubbles. The steps were repeated with 4 rows across, lining up the seams. It was helpful to have two people so that it could be adjusted as needed!

    For the design, I was inspired by this fantastic headboard by Annie Selke. We created the design in Illustrator, and calculated the distance between the nailhead and printed it on two sheets of 11x17 which were taped together. We then punched little holes through the dots and used a felt tip pen to lay it out on the wallpaper.
    Nailhead isn't the most fun thing to apply, but once you hit a rhythm you move pretty fast! Here are a few tips that I found helpful as I went.
    1. To help protect my fingers from the hammer and to grab the nailhead more easily, I used rubber finger tips on my thumb and index finger (you know the ones that they sell in the office supply stores for sorting paper and such?) When I did hit my fingers, it hurt a lot less, and they weren't even sore when I was done!
    2. If your wood is soft enough, push a few in with your finger first and then hammer. This saves time since you are putting the hammer up and down less frequently. Since our plywood was soft and hard in different spots, this wasn't always possible, but it helped when we could!
    3. Lastly, this feature wall took about 2,250 nails. Wow, that's a lot of nails! So it was helpful to have two people or if you have the time, break it up over a few days. Total install time for the nailhead with two people was about 8 hrs.

    It was helpful to install the trim (we painted first) before the nailhead reached the edge, so we knew exactly where to stop it. We used finish nails to secure the trim and then filled the holes with wood filler, sanded and painted once dry.
    Next, we decided that we wanted the wall to sit just above the trim, so we cut legs to height out of a 1x12 and secured it to the back frame. We then installed a few cabinet anchors through the trim into the wall to make sure that it was firmly attached.
    This wall was pretty massive! Almost the length of the room, but I LOVE the impact that it has on the space! Just because we are renting doesn't mean that without a little creative thinking we can't have a statement wall!

    I mean, c'mon. That is genius, and we don't mind saying we wish we had done it first! Ha! Check out Sarah's fabulous blog, and then come back tomorrow to learn how to make that coral headboard!
    Oh yeah! One more thing! Have you linked up your favorite home decor project yet? You can do that here for a chance to be featured on EC2 and win some great prizes. Fun for everyone!: )

    jess
    Monica
  • Creating Custom Artwork

    Creating Custom Artwork

    I recognize that DIY art projects are not for everyone. My love for custom art was born out of necessity (read: lack of funds). Creating my own artwork works for me, and I've found out why:
    1. I don't worry about ruining something I already have. With the exception of a few things, everything I own was bought second-hand or for a low price. I don't fear repurposing things, because the originals cost me almost nothing!
    2. I am not afraid of change. Actually, I crave it.

    3. I am not a perfectionist. Little imperfections in my art/craft projects are endearing to me. They say"I was handmade, and therefore may be flawed, but a lot of thought and care went into making me". I'm not saying perfectionists can't create art (because I'm sure most real artists are perfectionists), it's just easier for me to say this picture is"good enough", than someone who wants everything to be perfect.
    Ok, that's that. Recently I bought a yard of fabric for a project (stay tuned for more on that!) that I fell in love with. I ended up having some extra fabric left over that I wanted to use somewhere- anywhere!- in my house. I was feeling inspired by a gift bag in which my husband had wrapped my birthday present. I decided to combine my fabulous fabric, the cute bird, old frames, and some patterned scrapbooking paper into one art project!

    First, I started with the bird stencil (the bag had a 3D bird on it, so I just ripped it off to use as a stencil). I laid it onto the back of the fabric in the opposite direction I wanted it to face, and then traced it. After that, I carefully cut along the line, flipped it over, and then mounted it to the scrapbook paper, using regular, old tape!

    My husband insisted that this poor bird needed legs, so I drew two legs freehand and cut them out of the fabric, as well. Then I put the whole thing together and…

    Voila!

    I used the same method with my second art piece, but used the fabric as the background and the scrapbooking paper as the bird. I didn't have a smaller stencil, so I again, I freehanded the bird.

    Then I had Kevin hang them on an empty wall in our living room. (I promise that these two pictures are level, it's just a wierd angle)

    I love the way the pictures look as I enter the living room, and that I can see them from my kitchen table. Makes that room feel one step closer to completion, or until I'm ready to redo the entire room again for the third time.: ) I may not keep these pictures forever, but for now, they are a cheap solution. Below are some images from a few other bloggers of artwork they created using what they had on hand, or a few inexpensive items they purchased. Click on link under the image for specific instructions on how they made these beautiful pieces of art.

    The Nester
    The Nester simply scoured her home for items that would look good grouped together in a frame. This could easily be done finding stuff on a hike out in the woods, or on a trip to the beach.

    Martha Stewart
    These prints were made using memorabilia from trips (like tickets, maps, postcards etc) that were blown up and then framed.

    Ashley Ann Photography This is not everyone's style, but these two canvas prints were made for a nursery, and were created using a canvas, scrapbook paper, mod podge (amazing stuff!), and a little paint. Adorable and easy!

    Isabella & Max
    This look is much more sophisticated and elegant. This piece of art hung above the couch was made using a canvas, paint and a few different paint brushes, and nail heads. My sister who regularly tells us that she is not creative, painted three canvases in varying shades of colors that now hang above her fireplace, that are similar to this one.

  • Family Room Art & How To Add Grommets!
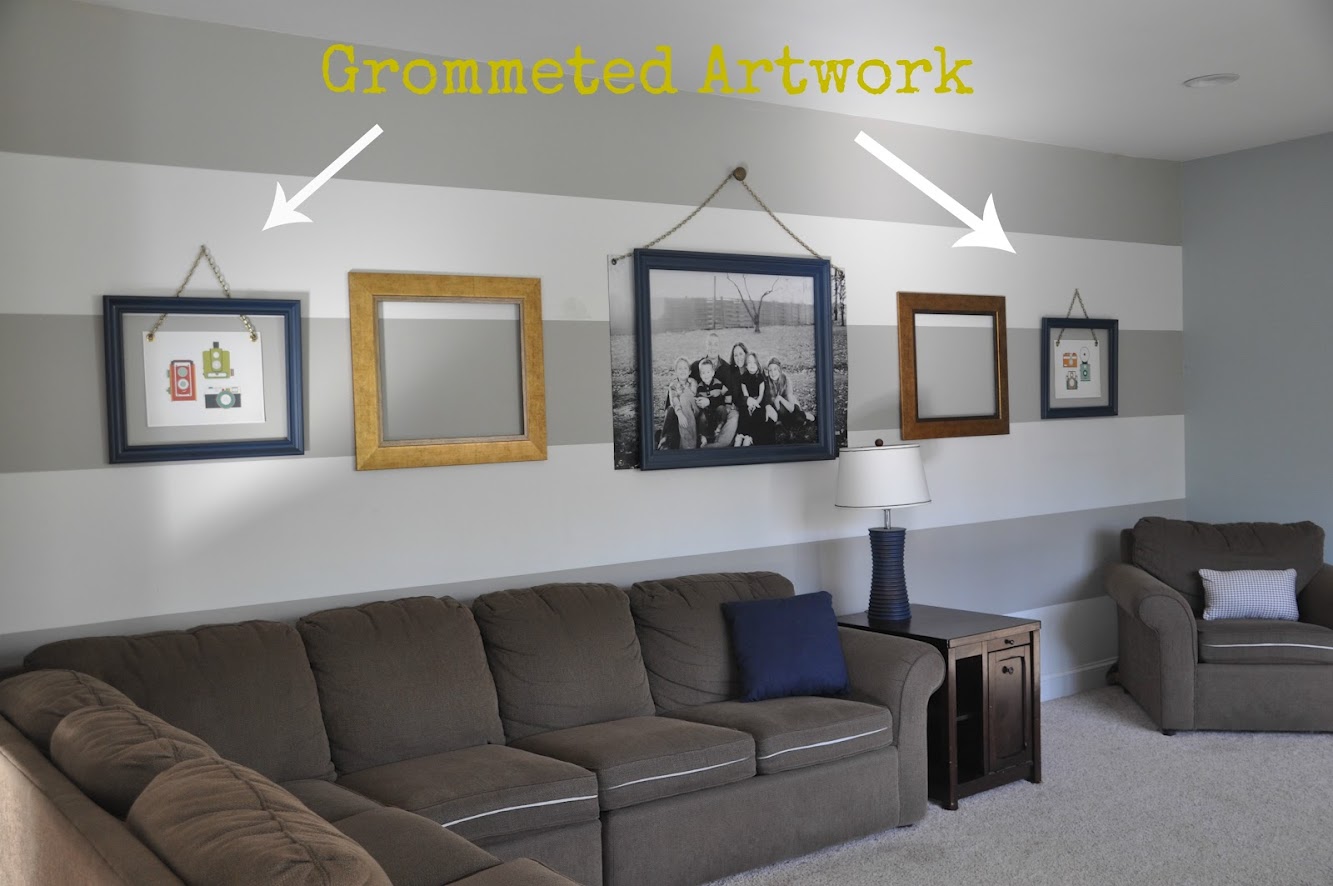
    Family Room Art & How To Add Grommets!

    {If you didn't hear, The Real Housewives of Bucks County are now East Coast Creative (Get the story here). You'll still be getting all the DIY, Design, and Monica & Jess that you love, but change your favorites to www.eastcoastcreativeblog.com Thanks!}

    You might remember that one of my 2012 goals was to make our family room reflect my style more this year. I still am convinced I don't really have a style… I more or less, just take lots of things I like and smush them all together, hoping it works out okay. Recently, I took one more step in the right direction for the room.

    I was browsing on Etsy a few weeks back and came across a shop I loved! Project Type has so many graphic art prints that I immediately fell in love with. This one in particular caught my eye.

    I had been toying around with the idea of vintage cameras in our family room and this picture was too cool to pass up. I contacted the artist to see if I could have a few custom tweaks made (it was vertical and I needed horizontal) and she said YES! I was so stinkin' excited when she agreed!
    I ordered two prints and honestly even the packaging they came in was super cool! Now, you might remember what was on the wall already. My ginormous family picture with the smaller frame…

    Ginormous

    Well this time, I was going for the reverse. Tricky aren't I? Bigger frame smaller picture.
    Once again I used my prized possession, AKA grommeter from Nate. I'll admit I was a tad nervous putting holes in fabulous artwork, but I wanted it to have the same feel as the large print.
    Want to know how to use a Grommeter??

    Add Grommets

    I keep my grommet tools in the little bin Nate gave me. Who knew one could love Tupperware?

    IMG_0545

    Take one of the female grommets and determine your placement. I traced it with a pencil (a very fancy pencil I might add!)

    IMG_0548

    Next place the cutting tool (might have an official name, but I don't know it) on your traced circle, and put the mini block of wood under it. The wood comes with your kit.

    IMG_0553

    Give it a solid pounding with a hammer and you have a nice little circle cut-out

    IMG_0554

    Pop the male piece through the opening. Make sure the pointy end is on the back of your artwork.

    IMG_0555

    Now start stacking. Add the female part to the back…

    IMG_0559

    Here' the order…The large metal ring goes on the bottom (part of the tool kit), then the male grommet, then paper, then female grommet, then the big mama tool (that's the really official term). Now Hammer, Hammer, Hammer. (Don't do it on your granite counter. I took mine outside in the garage)

    Ta-da! Perfectly adorable grommet!

    IMG_0560

    I took my art to the wall and hung it with plain nails. I'll use decorative ones to cover 'em up.

    IMG_0565

    I added my chain, which again only cost me about $1.45 at Lowes

    IMG_0566

    And vioila! I'm also going to add a fun door nob to the peak of the chain. I didn't quite get to Architectural Antiques this weekend as I planned to. Now, here's the question of the day… What should I put in the open gold frames??

    Here's the room to give you the full picture…

    Side note: Does anyone else have a weird husband that flips the cushions backwards? He does it when we don't have company over because the kids make a mess of the cushions. Sometimes I forget and then it's an awkward, mad rush as people are walking in the door. Weird. I know.
    So let me know what you think of my retro camera art, and what I should do to finish off this wall!

    Follow Me on Pinterest
  • What's in a Name? {Introducing East Coast Creative}

    Well lookie here… a new blog name and a whole new look! {Eeek!} Let us tell you that this has been one crazy journey. If you’re new around here or missed the drama he’s the low down…
    We’re a DIY and home décor blog. We’re Housewives. We’re Real. But, now we’re East Coast Creative… the bloggers formerly known as “The Real Housewives of Bucks County.” Hey, if Prince can do it, so can we! Change stinks, but we love our new name! So, our name is different, but everything else is the same. We’ll still be bringing you awesome DIY projects, cool design trends, and plenty of goofy Monica and Jess tossed in. Here’s where you come in… 1. We need help letting people know that East Coast Creative is still us! Facebook it, Tweet it, give us a shout out on your blog, whatever it takes. We want the world to know we’re still here!
    2. For now, the old address will work, but (as soon as it's functional, hopefully sometime today) try to get in the habit of using
    www.eastcoastcreativeblog.com
    *will be working soon!
    3. Let’s all just put RHBC behind us and move on. {Excuse us while we weep in the corner}
    On another note… none of this would be possible without the amazing talent of Kim at 733 Designs. She put up with a lot of our crazy ideas, slight breakdowns, and was super helpful and fast in making this all happen.
    Finally, we are so thankful for all of YOU! The positive feedback we get from you (especially in response to yesterday’s post) is so encouraging. We love this blog no matter what the name,(wait… what’s the name again??) and we’re so glad you do too.

    Soooo…what do you think?!
    With love, The Bloggers Formerly Known as The Real Housewives of Bucks County
    ** Other blog post titles that were considered:-How not to get sued-East Coast What???-The Housewives are Dead to us-Crap we need a blog name-A Case of Mistaken Identity

  • Pallet Possibilities

    Pallet Possibilities

    I didn't know Jess was going to mention one of our favorite blogs yesterday, but it was the perfect lead-in for my post today. Layla and Kevin from The Lettered Cottage have a wall that I love and want to create something similar to.

    Now, their wooden walls were hiding out under the drywall, because they have an old home, but I'm going to have to bring in wood to create this look. Eric and I were talking about where to get inexpensive old, wood flooring, but then we thought about pallets. They're free, they're easy to aquire, and I think they just might work. Thus began my search for pallet inspiration.

    This wall is not my style and I think the TV is completely out of place, but I was able to get some good tips from this DIY project. I'm pretty sure I want to whitewash or colorwash my wood.

    Moma and Her Drill During my pallet search I found tons of other ideas and creative uses for pallets… I'm learning that they're all the rage right now! Children's Headboard

    Apartment Therapy I really love this headboard. I'm not sure if I love the headboard or just the fact that it's in my favorite colors and my style bedding.

    House Tweaking This reading nook is adorable! I need to find a spot in my house to create one for my kiddos! I might need to wait until we finish the basement, but I'm saving this project idea for sure!

    Kojo Designs I'm not a big coffee table fan (perhaps because we have four kids and have had a toddler around for the last 9 years) but this is a cool idea and I think you could give it a rustic or very polished look.

    DIY Ideas A Sweedish company makes interrlocking furniture that doubles as art. This is just a sample of their colors, but check out the link below to see how it's used functionally. So cool!

    Sibylle Stœckli How fun are these bright outdoor chairs? This company sells them, but there are tons of DIY directions online. They would be fabulous in an urban backyard or patio.

    Inhabitat Lastly, an adorable idea that my kids would love! Seriously, what little kid wouldn't love to play inside this… of course I'd add some fun accessories and a pop of color, but the idea is awesome.

    Tiny Pallet House
    What do you think of these Green building ideas? I think I'm all about it and I just need to decide which room I'm going to attempt it in… I'm between Callen's bedroom and the Master Bathroom. We're leaning towards Cal's room because the master bathroom has really high ceilings and is a much bigger project for the hubs. Currently"Pallet Wall" is about # 4 or 5 on the Honey-do-list… Eric's Honey-do-list… 1. Hang DIY hardware in kids bathroom (I'm pretty sure he's doing that now. I hear banging!) 2. Build Dining Room Table (we're in the planning and researching stage still, but making progress) 3. Assemble the kids' new swingset (a Christmas present, but we've been waiting for grass to grow) 4. LANDSCAPE this crazy yard (the builder is re-seeding this week and then we can start!) 5. Create Pallet Wall I'll keep you posted on our projects, and until we get to #5 on the list, I'll just keep being inspired by other people's DIY ideas. What cool Pallet Possibilies can you think of?

  • Get Organized!

    Get Organized!

    I'm so happy to introduce you to Robin Harisis. She was roomates with my older sister at Messiah College, so I sort of know her by association. She is the founder of Room Service Personal Organizing, LLC and a member of the National Association of Professional Organizers and Faithful Organizers. Robin believes that everyone can learn to be organized and she finds satisfaction in teaching organizational skills to others. In the summer of 2010, Robin became a Certified Family Manager Coach. Family Manager Coaches help families learn to work together to achieve organizing goals and live more fulfilling lives by modeling proven business practices. Robin lives in Ontario, New York with her husband, her son and daughter, and two crazy dogs. She enjoys the outdoors, reading, gardening, and of course, organizing. You better believe that I had ulterior motives when I asked her to be a guest blogger- I need these organizing tips more than anyone!
    Top Three Organizing Tips

    Define a Starting Point
    The question that is most often asked of me is “Where do I start an organizing project?” Sometimes the project is so overwhelming or habitual it is hard to define a true starting point. I equate it to asking a child to pick up his toys in a room scattered with his belongings. Most of the time, the child will stand there, staring at the mess, arms at his side, still as can be. The child cannot do what he is asked because it is too overwhelming. He cannot identify a starting point.

    We can be just like the child when we are staring at an organizing project. Here are some ways to help define a starting point:

    • Deal with the project that would make the most meaningful change in the shortest amount of time
      • Set up a bill payment system as the first step to a paper management system
      • Organize the foyer or entryway as a start to organizing your home
    • Cup your hands around your eyes and pan the room. This limits your view of the project, allowing you to see it in smaller portions and giving the project some definition. Choose a section and begin your project.
    • Determine a main or final goal for your organizing project. Break the project into steps working backward from your goal. This will not only help you find a starting point, but will give you a plan to follow until your project is complete.

    Buy Containers Once You Know What to Contain

    Many times, we buy containers BEFORE we start an organizing project. But why would we buy containers if we don’t know what has to go in them? How do we know it’s the right size or will function correctly? Buy containers after you have sorted your items, you know what has to go in them, and where the container will be stored. This will give you a much better chance of choosing the appropriate container for the job.

    Sort and Label According to You


    Organizing is a very personal activity. Organizing systems work best when they are created specifically for the person or people using them. Here are two ways to customize your organizing system:

    • Sort like with like
      • If a pile of seemly random objects were dumped on a table in front of a group of people, each person might sort them differently. One person may sort by color, another by shape, and yet another by use. Each way is correct, showing the difference in how people view “like with like.” Sort your items according to what like with like means to you
    • Label according to you
      • Labeling can be straight-forward. For example, a box of Christmas decorations are labeled “Christmas.” However, there are times creative labels can be helpful in classifying items. “Financial Documents” may not mean anything to you, rendering the papers hard to find. But when the same papers are labeled in a file called “Papers that make me money,” they are located in a snap. Label items according to what makes sense to you and forgo the traditional titles, if need be.
    If you want to get a hold of Robin, or have her help you organize your life, here's her info: Robin Harisis Room Service Personal Organizing, LLC Office Phone: 315.524.7151 Cell: 585.727.2005 E-mail: robinharisis@organizingcompanion.com Website: www.organizingcompanion.com
    Thank you so much, Robin! Now, ladies, get to work!: )


  • A Pinteresting Home! {Meet Kelly}

    A Pinteresting Home! {Meet Kelly}

    We all love Pinterest… there are so many ideas and cool people to be inspired by. I wish I took the time to do more of the projects I see, but honestly this lil' old blog takes a lot of time, so I don't do as many as I'd like to (sounds weird that a DIY blog would take time away from DIYing, but it's true!)

    Today I'm excited to introduce you to two people I adore. Meet my adorable sister-in-law Kelly and my awesome brother-in-law Bryan. This cute couple lives in Ohio, so we miss them 24-7, but we have a blast when we're together.

    I also have to introduce you to their little stud Jax. He's our one and only nephew and we think he's the best!

    Okay, so why are we having this Mangin Family blog reunion?? Well, Kelly is not just a Pinterest addict, she actually does what she pins! {Gasp!}
    On our recent visit to Ohio, I felt like I was walking through a Pinterest Museum. It was too awesome not to share. Kelly has some creative friends and family, and between them all they have done so many fun projects for her home. So without further ado… Welcome to Kelly's Pinteresting Home! State Artwork Kel is from OH and Bry is from PA.

    IMG_0012

    Aqua Painted Pedestal Table Kel got her table and chairs at goodwill for $75 total. Add aqua and white paint and you have an awesome statement piece!

    IMG_0013

    Funky Pendant Light This was one of the first changes Kelly made to her kitchen when she moved in!

    IMG_0014

    Crossword Names Takes 2 seconds, but is so cute as an accessory. It's just a frame turned chalkboard.

    IMG_0015

    Kitchen Office Space She removed the wall cabinets, added open shelving, and did some adorable accessorizing. Kelly claims she can't decorate, but I'm pretty sure you'd all beg to differ!

    IMG_0017

    Spray Painted Faux Antlers Kel is super lucky to have a Hobby Lobby right around the corner. These beauties came from there and got a coral spraypaint treatment.

    IMG_0018

    Simple Printables She doesn't just PIN free printables, she actually uses them… imagine that! A simple piece of twine, some clothespins, and voila!

    IMG_0019

    Modern Painted Chandelier Bye Bye Brass, hello funky green. The circle bulbs are just right and add a cute modern flare.

    IMG_0020

    Window Frame Kel found this awesome salvage shop in Springfield, OH. They have windows galore!

    IMG_0021

    Family Rules and More Printables Kelly and Jess both have the Be Happy print. You can get it at Sprik Space.

    IMG_0022

    Magazine Paper Frame & Vase These two were purchases, but I liked them too much not to include them. If you're patient enough you can make your own!

    IMG_0023

    House Numbers and Hooks There are so many things you can do with frames, and digital paper. Our favorite site is Moo & Puppy!

    IMG_0024

    Yarn Wreath You know I'm the"anti-wreath," but this one is really cute! I love the homemade pompoms

    IMG_0025

    Paper Flowers Kelly's friend Amy made these for her and they match her aqua table so well. Jones Design Company has tons of paper flower tutorials!

    IMG_0026

    Clip Hooks Are you seeing a clothes pin trend? They're affordable, easy to use, and cute!

    IMG_0027

    Fabric Lined Shelves Kel took plain bookshelves from drab to fab with this blue fabric. Her shelves always look so cute! Her sister gave her the frame with the subway art and has it loaded up with a print for every season/holiday.

    IMG_0028

    Unique Gallery Wall These cool rounded frames are from Ikea and the doorknob is from Hobby Lobby.

    IMG_0029

    Growth Chart I love this growth chart that Kelly's sister made for her. It's exactly like this one from Miss Natalie. No time to make one? You can buy one on Etsy for $56.00.

    IMG_0032

    Last but not least, check out this fabulous fabric choice for a DIY headboard!

    IMG_0035

    What do you think? Are you inspired to go look at your pin boards and actually do a project? I know I have a list a mile long that I want to do now! I also have to tell you that Kel had no idea I was snooping around her house taking pictures, so none of this was staged or cleaned… this is real-deal, everyday life and I think it's great!
    Have you turned a pin into a project? Share the link, we'd love to see!

    Monica

    Only following on the blog? You're missing out. Use the buttons below to join in on all the fun!

    Follow Me on Pinterest
  • A Transformation Story {Be Intentional}

    A Transformation Story {Be Intentional}

    We've been crazy excited about this post since our friend Staci agreed to partnering with us! From time to time, we revisit our Be Intentional series. Staci's story is one that we hope encourages you to set goals in your life (in any and all areas) and then take intentional steps to achieve them. We love this girl, we're so proud of her, and are honored to share her story today!

    Meet our friend Staci… ********************************************************************************** I am going to be honest. I am"no good" at home decorating and DIY design and crafting. To be brutally honest, I flat out stink! Oh, believe me, I have dreams about a beautifully decorated bedroom and a warm and cozy living room with amazing wall colors and fresh flowers in beautiful vases accented on my tables and shelves. But, I am just not good at putting everything together to transform a room. So, thankfully, I am NOT writing this post to give you tips about DIY design! Really…you should be thanking me!!! Haha! On the other hand, I thank God for making us all unique and designed for the purposes HE designed us for. So, you may be wondering who am I and why have I been given access to writing to an audience of DIY pros and creatives?!?! I may not be good at DIY design and transforming the rooms of my living space, but I have been on a little DIY transformation…in my body and in my life. My name is Staci. This is me in January of 2010.

    I know what you are thinking. Oh goodness. Yikes. I am thinking it, too. "Did she stuff her shirt with melons?" "Did she put pillows in her pants?" "Is she a really grouchy person?" "She looks angry." All to which I can reassure you…NO. I did not put melons in my shirt. I didn't add pillows to my pants. And no…I am not grouchy nor angry!!! Okay, maybe you weren't thinking"exactly" that, but when I look at these pictures of who I was 2 years ago, I can hardly believe that was me.
    The reality is, I was 260 lbs. of hurt. 260 lbs. of frustration. 260 lbs. of failed diets. 260 lbs. of zero confidence. 260 lbs. of someone I never, ever wanted to become. Sad, unhealthy, embarrassed, lonely and hopeless.

    Have you ever been at your rock bottom? The place where you feel that you are never going to get out of? The place where you feel that no one understands? The place where you feel so far away from where you truly want to be? That was me 2 years ago. I don't exactly remember what it was that sparked a deep desire in me to change once and for all, but I was really starting to think that God didn't create me to be any of the things I was becoming. And he surely didn't desire for me to be trapped in a body that I was ashamed of, embarrassed about and so hurt to be in. Although, one post is not nearly enough to share with you all that has gone on in my life and my transformation over the past 2 years; I will share with you where I am today and the main reasons I am where I am.

    I reached my final goal in November 2011. This is me today at 135 lbs.:

    Never in a million years did I believe that this was possible. I still look at my before and after photos and I cannot believe that was me and now this is me. You can only see the images, but I can see the hurt and defeat in the before photos. And I can see the strength and hope in the after photos. I haven't just transformed physically, I have transformed emotionally as well.

    This picture of my old jeans is a clear reminder of where this journey started! Staci would love for her story to reach and help anyone that might need encouragement. So, you have her permission to Pin her pictures and share it with anyone that could use some encouragement and motivation!

    When people hear of my success or they see it for themselves when they see me, there is always one question that gets asked:
    WHAT DID YOU DO TO LOSE THE WEIGHT?!?! At first, I used to give people my simple cookie cutter answer of what I did: I started eating right and exercising daily. And I prayed. Sometimes minute by minute. But, after seeing the sometimes disappointed looks back at me because for some reason or other, when people give us the straight up hard truth (even though it is common sense), we somehow think that we could never do that. We believe the lies: "I could never do that."

    "I don't have that kind of willpower." You know what? I am not crazy motivated. I don't have any more"willpower" than you. I don't have a magic formula and I sure don't have a magic potion. But, I do have intention and a God who never gives up on me. Even when I give up on myself. Jess and Mon talk often about"Being Intentional". For me, being intentional means doing things even when I don't want to because it is what I need to do. Being intentional means having a plan at all times. Being intentional means setting goals. I am not speaking of having plans and setting goals because I believe I have my future all figured out or that I can truly control what happens tomorrow or next week, but I desire to have a plan and set goals because it is one of the ways that lives can change. It is one way that people can move from an undesirable place in life to a place of freedom and the ability to fully live the life they were designed for! By setting goals, I had to make choices as to"how" I could get to that goal. I set a 6 -week, 90-day, 6-month and"end of year" goal. If the scale wasn't moving, I had to assess what I was doing. And change something immediately. There was no time to go off the path I needed to take if I wanted to meet my goals.
    This was me about 1/2 way through… I was around 190lbs.

    In addition to setting goals, I also had to learn what I needed vs. what I wanted. Monica and Jess have talked about wants vs. needs in decorating. Well, I may have wanted to go out to my favorite restaurant for a big burger and fries, but I truly didn't need a big burger and fries. See the difference? I know, I know…it still seems like it is a willpower thing. But it really isn't. It's looking at my plan. If I want to weigh 10 lbs. less in 6 weeks, a burger and fries isn't what I need. Does it mean I will never be able to have a burger and fries? Not at all. But right now, that isn't part of the plan.

    Bottom line, I am not here to tell you what to do and how to do it. I am merely trying to tell you that you CAN do it. Do what works for you. Do what you know you need to do. Even if you don't have to lose weight, it is still important to fuel your body with healthy, nutritious foods. And it is so important to take some time out of your day to get moving. Find something that you enjoy and get moving! Be intentional. And above all else, remember that you were created for a purpose. By taking care of your body; physically, emotionally and spiritually…you are unleashing a power within that no one can take away. And you are unleashing the power to connect and encourage others around you! When I am struggling or having a day where my wants seem to be trying to overpower the intention of my needs, I cling to the words below. Maybe it is with eating, maybe it is trying to get through an intense workout, maybe it's facing the daily pressures of life. Here is what I hold on to:

    " I know how to live on almost nothing or with everything. I have learned the secret of living in every situation, whether it is with a full stomach or empty, with plenty or little. For I can do everything through Christ, who gives me strength." ~Philippians 4:12-13

    In the midst of the depth of all of this; the tears, hard work, the defeats and the triumphs, I have made every effort to maintain a attitude of openness and realness with others as well as a level of humor. So, I will leave you with one last photo. It is my favorite one of all!!! This is my mom and I in my old pants…yes, two of us!: -) 125 lbs. lost and gone forever!!! I am forever changed!!!

    P.S. I must share that I am a recovering sweets & desserts addict! So, I will share one of my absolute favorite treats that I make almost daily for myself! Enjoy! Quick Chocolate Oatmeal (adapted from my absolute favorite dessert blog Chocolate-Covered Katie) 1/2 cup quick oats 1 small banana (broken up into small chunks) 1 1/2 Tbsp Unsweetened Cocoa 2 Tbsp Unsweetened Applesauce 15-20 drops of Liquid Stevia 1 tsp. vanilla extract 3/4 cup of Light Unsweetened Vanilla Almond Milk or Light Vanilla Soy Milk dash of salt 2 Tbsp. fat free cool whip (optional) Spray small saucepan with cooking spray. Combine all of the ingredients together in the small saucepan. Stir everything together until thoroughly mixed. Turn heat to high and continue stirring oatmeal until oatmeal starts to bubble slightly and thicken. After oatmeal starts to slowly boil, turn heat off and continue stirring for another minute or so to finish heating all the way through. Pour into a bowl and enjoy! For an extra treat, add some fat free cool whip on top! *You can also add a Tbsp of Peanut Butter to the above recipe for a Chocolate Peanut Butter Cup bowl of oatmeal! My husband's favorite!: -)
    ***********************************************************************************
    So how's that for some intentional living? I don't know about you, but Staci has encouraged, inspired, and motivated us big time! Staci recently started blogging about all things health,fitness, and nutrition, so check out Musings of a Wellness Hopeful for all kinds of recipes, motivation, and more!

    Got questions for Staci? Leave a comment and she'll get back to you!

    jess
    Monica

    Only following on the blog? You're missing out. Use the buttons below to join in on all the fun!

    Follow Me on Pinterest
  • An Angelina Ballerina Birthday Party

    An Angelina Ballerina Birthday Party

    Well, I'm not sure how this could possibly be true, but my little girl turned three a few weeks ago.

    I'll leave all the sappy stuff to my personal blog, but I wanted to give you a glimpse of the details of the party. Campbell is really into Angelina Ballerina and, a few weeks before her birthday, decided she wanted to have an Angelina birthday party. I scoured the internet and could not find really cute Angelina party supplies, so I decided to be creative and make some of my own and decorate the way I wanted to.

    First off, Kevin and I created a"party room" in our basement. We decided to use the area of the basement that normally houses our ping pong and air hockey tables. We just moved those aside and got to work. The color scheme was pink, silver and white. We created a fun entrance to the party room, but hanging a streamer garland across the doorway and then hung regular streamers from the garland so the kiddos had to walk through to see the rest of the room.

    Then, we hung pink and white balloons, as well as, paper stars that I had cut out of stock paper and embellished with glitter paint, from the ceiling. This was actually really easy, but a little time consuming. We used large plastic pink tablecloths to cover the far wall, and to create a backdrop for pictures and a few of the games. The round tablecloth on the floor helped the kids easily sit in a circle for the"Pass the Ballet Slipper" game, and was a convenient spot for them to eat lunch and not make a mess all over our carpet!

    I made the favor bags using regular old paper bags and a tag that I created on Picnik. I punched holes in the tops of the bags and threaded sparkly ribbon through to close them. These are so simple and cheap, but looked adorable!

    I found an awesome tutorial on DIY printable cupcake toppers, which, again I embellished with some silver glitter paint.

    The very simple menu consisted of pigs in a blanket, mac & cheese, carrots, fruit salad, cheese puffs (Campbell's request), and snickerdoodle trail mix. The star on the far left was an indestructable pinata that none of the kids could open. Kevin ended up breaking it over his knee.

    One of the games was"Pin the Mouse Ears on Campbellina". I mounted an 11x14 picture of Campbell on poster board. Then I framed the picture with a pink polka-dot ribbon.

    I made sure to take a picture of each guest with Campbell for a sweet thankyou card we sent after the party.

    I just had to include a picture of the pretty ballerina herself!

    And this is the best picture of the day, taken by Monica. Jane B., you need to frame this!

    Happy 3rd birthday, sweetie! We love you.
    

  • Creating with the Stars Round 4 Results {Grand Prize Winner!}

    Creating with the Stars Round 4 Results {Grand Prize Winner!}

    If you missed all the amazing projects in the first three weeks of CWTS, be sure to check them out below!

    Round 1 Projects & Winners Round 2 Projects & Winners Ro und 3 Projects & Winners Round 4 Projects
    Before we do anything else, we want to say thank you to all of our sponsors! This fabulous contest was made possible by them and we are ever so grateful! Also, a HUGE shout out to Homes.com and HomeGoods for sponsoring the Grand Prize round this week! You guys are the best!
    The Grand Prize Winning Team will EACH receive: $500 from Homes.Com $500 Gift Card to HomeGoods Project featured by HomeTalk

    undefined

    ------------------------------------------------------------------------------------------------

    We just can't keep you guys waiting in suspense any longer! Without further ado…
    The Grand Prize Winner of
    The 1st Annual Creating with the Stars Contest is…

    1. Sarah { Sarah M. Dorsey Designs } & Brooke { All Things Thrifty }

    (Sarah, her hubs, and cute pup!) Colorful, Texture-filled Bedroom Makeover

    Congratulations Sarah and Brooke! Sarah has delivered such amazing projects throughout this contest. Let's take a look back, shall we? Round 1: Statement Light Fixture

    Round 2: Custom Cornice, Drapes and Bench

    Round 3: Painted Secretary Desk and Accent Wall

    We have LOVED having Sarah in the contest and have been continually inspired by her. Well done, girl!
    Make sure you keep up with all of Sarah's DIY awesomeness- Follow her on Facebook!

    ------------------------------------------------------------------------------------------------------------------

    Melissa and Amanda have been awesome competitors too! They worked hard, stretched their DIY limits and came up with some super fun and stylish projects. Thanks for being a part of the contest, ladies! We also want to thank Beckie and Sherry for being amazing blog stars! Their partners loved working with them, and we already love them (duh!)

    2. Melissa { 5 foot 12 Creations } & Sherry { Young House Love } Guest Room Makeover

    3. Amanda { Love and Renovations } and Beckie { Infarrantly Creative } Reading Room Makeover

    Here's the official vote tally…

    This contest has been absolutely amazing and we're so thankful to all of you for playing along! Tomorrow we'll share how Sarah put her room together and then Friday we have a fun wrap up post for ya… think David Letterman top ten meets Monica and Jess. We know… you can hardly wait right?!? We'll also be sharing our favorite home decor project from the link up party (you have until Friday at 10 PM EST to link up right here).
    The good stuff just keeps on coming!: )

    jess
    Monica
  • Frame your own HUGE Photo for Under $20!

    Frame your own HUGE Photo for Under $20!

    We're so excited to finally share this project with you. We wrote it for Infarrantly Creative last week, and now we can reveal it to you! We're going to give you an awesome, low cost way to frame a humongous photograph that will totally be a traffic-stopping scene-stealer! Not only that, this project is super easy and takes very little time. We were actually very surprised at how quickly it came together. You know when you have a creative idea, and you think it should be easy, but it almost never is? You won't have that problem here!

    Main Pic

    Here's our cast of characters:

    IMG_1376

    1 Piece 4x9 Underlayment/Luan 24x36 Engineer Print (from Staples!) Spray paint Spray adhesive Modpodge Mini-projector (or a regular one will work too!) Picture hanging hardware

    IMG_1382

    Luan, otherwise known as underlayment, is a type of plywood usually used in flooring. Not today, folks! It's ultra-light (I don't know maybe 5 pounds for the whole sheet?!), and so was the perfect medium for making a frame. We chose it because we were planning on hanging it high on a wall in Jess' entryway that has vaulted ceilings. We wanted something that would be light enough to stay put on the wall so that it didn't accidentally knock off one Jess' guests as they entered the house. Plus, because it's so thin, it was really easy to cut using a jigsaw (more on that later), and cost only $10 for the whole sheet. -------------------------------------------------------------------------------------------- We recently introduced you to engineer prints from Staples? Remember Monica's Industrial Art?

    Ginormous

    Oh.My.Goodness. They have completely changed us for the better. Just wait, you'll feel the same way. Take your favorite picture into Staples and ask for an oversized print (they come in multiple sizes, but the largest is 3 feet by 4 feet. That's huge!) They'll make a copy right there for you, and the best part…it costs less than 5 bucks for a print! You're only able to get the picture in black and white, but who cares?! It's 5 bucks! The tricky thing is that the picture is printed on very thin paper, so you have to be careful not to bend it or mark it.

    Engineer Print

    Here's where having a crafty best friend comes in: Monica has an adorable mini-projector that was perfect for this project. She brought it over and set it all up using the image of the shape we pulled off of Google images.

    IMG_1386

    If you can't get your hands on a projector, We're pretty sure you can make your own using this fun little tip. Monica downloaded the image of the shape onto the projector (you just use"save as" to save any file format you'd like to the drive)

    IMG_1385

    Then we turned out the lights, and voila!

    IMG_1401

    The perfect shape to trace!

    IMG_1403

    Then, we took that bad boy out to the garage and started cutting out the shape using our trusty jigsaw. We use this thing more than is normal for a pair of moms, but what can we say? We love this tool!

    Make sure you take a cheesy picture of yourself holding the frame for posterity.

    IMG_1412

    See what we mean about how thin the luan is? I would say it's about 1/2 inch thick.

    IMG_1413

    The next step is to sand all the rough edges so it's smooth. We recommend using a sanding pad vs. an electric sander because of how fragile the underlayment is.

    IMG_1415

    Because my framed picture is going to hang high on a wall, I wanted our faces to be large so you could see them, so I printed the picture as 3 feet by 4 feet, and then cut off the extra space using an Xacto knife. You could avoid this step by cropping your picture close before printing. Make sure you're using a high-quality photo so that it prints clear. Our photo was taken by the fabulous Salvatori Photography, so we knew it would turn out great! (Need pics? Totally check her out!)

    IMG_1418

    We used Rustoleum Painter's Touch spray paint in Satin Lagoon. It's such a pretty shade of blue- almost like a peacock blue.

    IMG_1426

    It took a few coats, but the underlayment takes the paint really well.

    IMG_1428

    Before adhering the picture, Monica added the hardward to hang the frame. We didn't want the picture to get messed up, so we made sure to do this first. You should definitely use actual picture-hanging hardware, but this is what we had on hand and it worked well. We screwed them in about a 1/4 of the way down from the top of the frame and then threaded picture-hanging wire through.

    IMG_1434

    After determining the placement of the photo on the frame, we marked the corners in case we had any slippage during this next step. Since the picture is so big, we decided to place one hand squarely in the middle of it, and fold one half back towards the middle, spray the spray adhesive all over wood on that half and then smooth outward from the middle. You can use a rolling pin to help get all of the air bubbles out, but we didn't find it necessary. Having a friend help you with this is very helpful, though!

    IMG_1441

    Finally, we brushed matte Modpodge all over the picture to seal it and keep it from fading over time. It just makes it look more finished, too. The Modpodge should be applied in a really thin coat to avoid any bubbling. Actually, if it's going to be in a place where it won't be touched, you could skip this step.

    IMG_1444

    Then it was time to hang our beauty up!

    IMG_1448

    Told you it was high! I'm not sure how Monica got this job because she's afraid of heights, but hey! She did it like a good best friend.: )

    IMG_1451

    We're so in love with it, and can't get over the beautiful pop of color it brings to the entryway.

    IMG_1457
    IMG_1465

    The total cost for this project was exactly $20, and the impact it makes is HUGE!

    So what do you think?
    How many of you are heading to Staples ASAP?

    jess
    Monica

    Only following on the blog? You're missing out. Use the buttons below to join in on all the fun!

    Follow Me on Pinterest

    Linking up to: TT&J

  • Painted Wall Mural and Dresser {Love and Renovations}

    Painted Wall Mural and Dresser {Love and Renovations}

    We loved Amanda's project this round because they did some things we're totally into… Everyone knows I have a thing for yellow (check out my yellow dining room buffet here). We also use our projector any chance we get (check out Jess' gigantic shaped frame), and we just love that they were willing to stage their garage to get the PERFECT look! Well, it paid off, Amanda! Now, tell us how you made it happen… ----------------------------------------------------------------------------------------------------------------
    I have to admit, I was pretty stumped with the paint round at first. I'm not super creative when it comes to thinking up wall art or paintings, and I didn't have a lot of ideas in mind for what I could do. But then, I remembered this little guy sitting out in my garage:

    Corey and I have had this Bjursta sideboard from Ikea in our garage for a few weeks now — my sister was getting rid of it and asked if I wanted it, and I rarely turn down free furniture, so I said yes even though I didn't really have a plan for it. Corey and I figured it could live in our garage when we convert it into a family room (which we fully plan to do ASAP!), but that was the end of the plans we had for it. So, after a brainstorming session one night, Corey and I landed on a plan — we'd give this guy a makeover and set it up in a high-contrast room. The goal was punchy, modern, and fun. After some debate, we landed on this color palette, with paint from Home Depot.

    (The colors are Sunny Side Up by Behr, Cordite by Home Decorators Collection and Totally Black by Home Decorators Collection) We started off with a black wall…

    We just painted one of the walls in our garage for this particular project — down the road once we convert it, we'll probably do the rest of the walls black as well (or 1-2 black and the rest white), but I didn't want to go there yet. So, if you back up from our shot a little bit, you'd see…

    Just Keeping it real, y'all. For contrast, we picked out a super rich, mustard yellow for the sideboard.

    (Obviously this is not the finished sideboard — just with one coat on it! Just a reminder that things look crazy before they start to look good!) On the walls, we originally planned on just hanging a gallery wall, but when I got the idea to paint a world map on it, we knew it was the way to go. We pulled up a good map online and used our projector to get it up on the wall.

    I was surprised by how quick it was to get the map painted — we just used some small paintbrushes and I outlined while Corey filled in. It took about an hour and a half from start to finish, which is way better than I expected.

    (Yes, we do DIY projects in our pajamas. Don't you?)

    Once everything was all finished and dry, we decided the sideboard needed a little something extra. So we grabbed some paint in the same color but a different finish (the main part is high gloss, the details are flat), and used the projector again to add some numbers. It's a super subtle detail, but we love that about it — when you're looking from straight on, the map is totally the star. But if you shift yourself a little to either side, the numbers suddenly jump out at you.

    After the numbers were finished, it was just time to style! We added an Ikea rug to hide the concrete floor (and to add some pattern)…

    .added a lamp for some height…
    .

    .
    …and then we finished it off with a few accessories and books. And it looks a little something like this:

    I'm pretty head over heels with this little set-up, and I'll admit — I'm sad it's in our garage because I can't gaze at it every day! But, hopefully we'll be able to tackle the rest of this room pretty soon and I can go stare at it anytime I want to! --------------------------------------------------------------------------------------------------------------------- Talk about dramatic! Amanda's garage is now the prettiest one we've ever seen! It has been so much fun to browse Amanda's blog. One thing that caught our eye is this China Cabinet makeover. The chalkboard paint is such a fun surprise at the back and we loooooove that hardware.

    Plus, this little table-length succulent trough is too cute!

    We have two more awesome tutorials from Melissa and Sarah tomorrow and Saturday, so be sure to come on back. Also, if you haven't linked up your favorite paint project, you can do that until tomorrow at 10 PM EST. We LOVE seeing all the incredible things you guys do in your homes! We'll pick our favorite and feature it here on EC2 on Sunday!

    jess
    Monica
  • Creating with the Stars Round 3 Results!

    Creating with the Stars Round 3 Results!

    If you missed all the amazing projects in the first two weeks of CWTS, be sure to check them out below!

    Round 1 Projects & Winners Round 2 Projects & Winners
    -----------------------------------------------------------------------------------------------------------------

    This is so exciting, isn't it? We're almost into the final round of our first ever Creating with the Stars contest which is crazy! We know that the contestants are putting in hours and hours of work on their projects each week so that they are the best they possibly can be, and we just have to say that the caliber of their projects is blog star-level!

    This week was Sponsored by The Home Depot, and isn't it amazing what a huge impact a little paint can have? Ah-mazing! Here's a little reminder of the epic prizes our Round 3 winner will receive…
    $500 Gift Card to Home Depot (Contestant & Blog Star!!) $100 worth of Martha Stewart supplies from Plaid Crafts $125 Gift Card to Lucent Lampworks Project featured by HomeTalk

    The votes were neck and neck again this week, with only a few votes separating the top two spots. Only three contestants move on to the finals, so the pressure is really on! Ok, enough of our chatting, let's get those results!

    1. Amanda { Love and Renovations } and Beckie { Infarrantly Creative }
    Painted Wall Mural and Dresser

    This is Amanda's second week in a row in the top spot…for good reason! You just can't ignore that yellow dresser (Monica has a similar painted dresser in her dining room!) and set against that black wall, it's just stunning! Congrats again, Amanda!

    2. Melissa { 5 foot 12 Creations } & Sherry { Young House Love }

    Painted Chalkboard with Map and Games

    3. Sarah { Sarah M. Dorsey Designs } & Brooke { All Things Thrifty }

    Painted Desk and Accent Wall using Custom Stencils

    Ack, this is just so hard to do (does it ever get easier?!!), but we have to say goodbye to these three amazingly talented women.
    4. Sarah { While They Snooze } & Sarah { Thrifty Decor Chick }

    Painted Map Coffee Table

    5. Nancy { Owen's Olivia } & Kari { Ucreate }
    Painted Couch featuring a Custom Horse Stencil

    6. Janel { Nellie Bellie } & Brittany { Pretty Handy Girl }

    Aztec Wonder Painted Rug

    Seriously, we could cry about having to let Nancy, Sarah and Janel go! You guys are welcome back here anytime. And, now we know who to call when we need something awesome painted!
    Here's the voting break down… the first and second place projects were separated by under 50 votes!! Insane!

    ---------------------------------------------------------------------------------------------------------------------
    Ok, it's the finals now, people- the last chance these bloggers have to show what they're made of!

    The prizes are stinkin' awesome this round (and the Blog star gets them too!)
    The Grand Prize Winners (Contestant and Blog Star) will each receive:
    $500 from Homes.Com
    $500 Gift Card to HomeGoods
    Project featured by HomeTalk

    undefined

    Next week the challenge is Home Decor- so anything (even a room makeover) is fair game! Tomorrow we'll be sharing the tutorial for that amazing mural and yellow dresser! We'll be so sad when this contest is over and we don't have these incredible tutorials on our blog anymore!

    jess
    Monica
  • Spring Things {Bring the Outdoors In}

    Spring Things {Bring the Outdoors In}

    Well, Spring is in full-force here in Bucks County, with trees and flowers beginning to bloom like crazy (although this weekend we experienced a bit of a set-back with 50 degree-gasp!-rainy weather!) A great way to enjoy Spring, especially when the days are still a bit too cool to be outside, is by bringing the outdoors in. A nature walk with your kids, husband or on your own will provide you with loads of opportunities for adding some spring color to your homes. For me, it's not enough to just look at Spring through a window, I've got to get that stuff inside my house!

    Probably my most favorite sight in spring are the millions of forsythias that bloom in all their mustardy-yellow glory. As soon as I saw buds on our forsythia, I cut a few branches, plunked them down in a vase and they immediately brought sunshine to my new white kitchen. {Sigh}

    Remember my Garden Wall? I felt that my house was in dire need of greens last spring, and guess what? These little fellas are still going strong. Hooray for me!

    Centsational Girl

    Don't even get me started on all the things I dig in this picture. Let's just focus on those beautiful pink (don't quote me on this) peonies. Am I right on the flower, anyone? Whatever they are, they're lovely.

    Source: brittanyanddylan.blogspot.com via Jessica on Pinterest Ever thought about making your own terrarium? Not sure why, but these things are mega-popular right now. It could be that it's almost impossible to kill succulents, which is awesome for plant-killers like me.

    I am in love with growing your own wheat grass. It sounds super easy to do, and is a really versatile spring decoration. I'm thinking I might give this a try this week! -------------------------------------------------------------------------------------------------------------------------- Blog Name Update We're making progress very slowly. So slowly, in fact, that it's been a torturous process for us. Thank you all for your support and suggestions for names. We so appreciate you taking the time to give us your thoughts! Since we are two extremely decisive girls, not being able to decide on a name has thrown us for a loop! All day long we call each other with new name ideas. We think we've narrowed it down to a few that we like, and now we need your help! Please vote on your favorite name (FYI- they're very similar to each other!), and if you're so inclined, leave us a note with why you voted for that one!

    We've toyed around with a million variations, like: BC Design (for Bucks County), Designing Reality, East Coast Creative, just to name a few. Do any of them jump out at you? Argh! It's driving us crazy. Help a few girls out, will you?; )

    Create your free online surveys with SurveyMonkey, the world's leading questionnaire tool.
    --------------------------------------------------------------------------------------------------------------------------

    Again, thanks for all your help! Now, go outside and bring some of that glorious Spring inside!; )

    jess
  • Creating with the Stars Round 2 Winners

    Creating with the Stars Round 2 Winners

    We thought Round 1 was pretty impressive, but Round 2 officially blew us away. Apparently all of blogland was pretty excited too, because we had a bajillion of votes over the last two days (yes, that's the official number, FYI). This round was the closest one yet, with 1st and 2nd place only separated by around 20 votes the entire time! Let's see who ended up on top!

    The Winner of Round 2 {Knockoff} is…
    1. Amanda { Love and Renovations } and Beckie { Infarrantly Creative }
    West Elm-inspired Wood Tile Dresser

    We thought this project was amazing and it's actually been on our list of"Knockoffs to Try" for a while now! Thanks, Amanda, for showing us how it's done! Congratulations on the Round 2 Win!
    Who else made it to Round 3, you ask?
    2. Sarah { While They Snooze } & Sarah { Thrifty Decor Chick }
    Anthropologie-inspired Sharpie Plate Art

    We want to give Sarah a shout out for her project too. It was incredible and so many of you loved it and voted for it, too! Congrats Sarah!
    3. Melissa { 5 foot 12 Creations } & Sherry { Young House Love }
    Anthro-inspired Ikat Console

    4. Sarah { Sarah M. Dorsey Designs } & Brooke { All Things Thrifty } Schumacher Zimba-inspired Drapes, Anthro-inspired Bench, Custom Cornice

    5. Janel { Nellie Bellie } & Brittany { Pretty Handy Girl } Anthro-inspired Wall Lamp

    cwts2 collage side by side

    6. Nancy { Owen's Olivia } & Kari { Ucreate } Restoration Hardware-inspired Lighted Sign

    Ok, so now we totally know how Len, Carrie-Ann Inaba and Bruno feel on Dancing with the Stars each week…saying goodbye to talented people is HARD!! We're sorry to let the next three incredible DIYer's go, but wish them tons of success with their blogs. We've loved having them! 7. Jane { Life, Crafts & Whatever } & Jamielyn { I Heart Naptime } Horchow-inspired Mirrors

    8. Ann Marie { White House, Black Shutters } & Shaunna { Perfectly Imperfect } Anthro-inspired Duvet

    no-sew Anthropologie Corin Duvet knockoff

    9. Karianne { Thistlewood Farms } & Whitney and Ashley { Shanty 2 Chic } Faux Chair Slipcover

    Faux-Chair-Slipcover-Label

    Once again, to keep things legit, here are the official results…

    And here's a reminder of the awesome prize package that Amanda won from this round…

    $100 Gift Card to Royal Design Studio A pair of $120 Robert Allen pillows from Chic Decor Pillows Project featured by HomeTalk

    ------------------------------------------------------------------------------------------------------------------------------------------------
    Congratulations to the 6 contestants moving on! Are you ready to get your paint on? We hope so, because Round 3's theme is Paint!

    Round 3 is our Semi-Finals Round, so this is when things really get serious! This week both the Contestant and their Star partner are in it to win it!
    The Semi-Finals Winner will receive:
    $500 Gift Card to Home Depot (Contestant & Blog Star!!)
    $100 worth of Martha Stewart supplies from Plaid Crafts
    $125 Gift Card to Lucent Lampworks
    Project featured by HomeTalk

    Voting for Round 3 will begin on Monday March 25th at 12AM EST. Don't forget that you can link up your own Knockoffs through this Friday at 10PM EST…the winner will get an awesome prize pack and have their tutorial featured here on EC2 this weekend. Click here to link up!
    Make sure you check back throughout the week! Thurs, Fri, and Sat we'll have the full tutorials for the top three projects and Sunday we'll share the Link Up winner's tutorial!
    Thanks so much for making this contest awesome so far!

    jess
    Monica
  • Creating with the Stars Round 2 Voting

    Creating with the Stars Round 2 Voting

    Ok, time for Round 2, and let's just say we're back and better than ever. Well, not us, but the contestants. Their knockoff projects are killer this week!

    We can tell that they really want to win the awesome prizes from our fabulous sponsors this week! Let's just recap what they are, shall we?

    1. $100 Gift Card to Royal Design Studio .
    RDS is our go-to source for all of our stencil projects and our run on CWTS last year was where we were first introduced to them!

    2. A pair of $120 Robert Allen pillows from Chic Decor Pillows
    These pillows are hand-made and absolutely gorgeous. We're sorta jealous that we don't get them.

    3. Project featured by HomeTalk , which, come on, is kind of a big deal.

    These are pretty fabulous prizes, but let's not forget that one contestant and their star partner will win the Grand Prize at the end of these four weeks! Woohoo!

    $500 from Homes.Com
    $500 Gift Card to HomeGoods
    Project featured by HomeTalk

    --------------------------------------------------------------------------------------------------------------------------

    We are so impressed with how these ladies took these famous, really pricey items and put their own spin on them to make them unique and fabulous. Let's get this party started!

    1. Anthro-inspired Wall Lamp

    When I heard this week was knock-off week I knew immediately what I wanted to do. See, I've been seeing this lamp I wanted in the Anthropologie catalog. It makes my heart happy but…my budget doesn't allow for it. Well, could you afford $2800.00 for a lamp? I know, right?!? Ridiculous! So, I took it upon myself to figure out how to make this lamp accessible to mere peons. Or simply those that have a budget.

    cwts2 collage side by side

    Granted, I had to change things up a bit. I used pipes more than wooden spindles. And Rub n Buff to achieve some of the finishes. I also wasn't about to do the whole thing in copper piping (have you seen the cost of copper pipes?) so I sprayed pvc pipe with copper paint and Rub n Buffed it to get a nice shiny look. All in all, I have to say that this ridiculously expensive lamp just got beat. Oh yeah Anthro…you hear me??…you are charging too much!

    cwts2 collage1

    I'll agree that mine isn't exactly the same as Anthro's. True. But, let's see mine is…about 3% of the cost of their's. Okay, I'll make do with not exactly! Truthfully, I love this lamp. It's so quirky, fun, stylish, and feels like an art piece! I'm so glad this contest pushed me to create it, I'm in love with it!

    cwts on and off

    2. Restoration Hardware-inspired Lighted Sign

    When I think of knock off, I think copy cat (in a good way). I think of anything duplicated to the T, but is much less expensive. For this round, I chose not to duplicate, but rather I was inspired by this Restoration Hardware arrow and created something a little different. I'll tell ya… with the basic process, you can create just about anything you can imagine. A state, a letter, a number, a symbol, a phrase. It's totally up to you.

    Perfect for outdoors.

    Perfect for indoors.

    3. Schumacher Zimba-inspired Drapes, Anthro-inspired bench and Cornice

    I love designer fabric and furniture, but the high prices make it hard to justify (especially when I change my mind frequently!) I like to get a high end look at a fraction of the price by putting a little, time, effort, and creative thinking to work!

    I've been obsessing over Schumacher Zimba fabric forever, it is absolute perfection for draperies! But, at about $100 a yard (that means about $300 just for ONE panel), it is definitely not in the budget. By creating my own stencil and buying pre-made white draperies from Ikea, I was able to get two panels for about $25!!

    Ever since seeing one doubling as a window seat, I have been dying to build an upholstered bench ottoman. Inspired by Anthropologie's bench ottoman that costs $1,700, I built this ottoman for under $100. I cut costs by using an inexpensive comforter in lieu of foam, upholstry webbing as a top support, and a drapery panel for fabric. It's perfect for extra seating or a place to rest your feet.

    Custom cornices can be very pricey especially when topping a large window. For this window, I wanted a 95" length which can cost over $850. I built this cornice using 1x12 and 1x6 to create the frame and a long tablecloth for fabric for under $25.

    These three diy projects transformed this window area and cost me only $150. The time and effort was definitely worth it over paying over $3,000 for all of the originals! 4. Faux Chair Slipcover

    Faux-Chair-Slipcover-Label

    It looks like a chair, but kinda like a slipcover too…
    Well, that's because it's a chair covered by a slipcover! Who knew this chair had such high ambitions? I did, that's who!

    PicMonkey Collage-Faux Chair-Slipcover

    I saw this faux chair cover on this Danish website and I knew these covers would be perfect for my house. I drew a template and took it to a copy center to have it enlarged. Then I cut it out and appliqued each individual piece to a plain chair cover to create a faux chair on a slipcover.

    Faux-Chair-Slipcover-Project

    It's a fun easy project that takes an afternoon. And now all my other chairs are a little jealous!
    I had fun making that plate wall, too. Just plates and a few vinyl birds. I think they're perfect with my"fancy, new" chairs!

    5. Anthro-inspired Ikat Console

    ANTHROPOLOGIE. I LOVE this store. I love the colors, the design, the textures, the ambiance, and inspiration that I always find there. When I saw this gorgeous ikat hand painted console, I knew it was the perfect piece of inspiration for my CWTS Knock off. (and at $1698--it's a great piece to knock off; )

    Using a cabinet base from IKEA and an ikat stencil from Olive Leaf Stencils, I recreated the console, choosing a similar color palette, with some color adjustments to fit my own house and decor scheme.

    They say"imitation is the sincerest form of flattery." Well, Anthro, you most certainly have mine. In honor of my love for this store, I styled the console using some Anthropologie treasures, in addition to some old wooden spools & candles, books and beautiful orange tulips. 6. Anthro-Inspired Sharpie Plate Art

    Woo… week 2! After the crazy, hectic, eating-cereal-for-dinner kind of week last week was I was hoping for a"knockoff" project I could knockout quickly. Apparently, I don't know how to do that. I chose to knockoff Lost Arcadia By Molly Hatch sold by Anthropologie for $7,500! Since that's about $7,450 over my budget, I decided to see if it could be done on the cheap.

    It's basically 30 plates hung together with a painted scene going across all the plates. At $7,500, that's $250 per plate. Luckily Dollar Tree sells white plates for a buck. And, since I was pretty sure painting freehand on the plates wasn't going to look all that great, I used a Sharpie and a projector. All you have to do is trace… easy.

    I chose to trace a botanical print on my plates since I felt it looked a little more modern, but tried to keep the style and overall feel the same–very loose and all black and white. The plates are hung using Command Strips. At 5 feet wide and 6 feet tall, it makes quite the impact on the wall, not the bank account.

    7. Horchow-inspired Mirrors

    So, here we are at round 2 (Did you see all of the awesome projects in round 1?). This week's theme is Knock-Off, which I love. I'm cheap frugal, and just can't spend the money that some of the big name websites want for their stuff. Plus, I'm sure my husband would think I'm certifiably insane if I bought a $300 vase or $100 throw pillow. But just because I'm designing on a budget doesn't mean that I can't have nice things, right?

    I saw these mirrors over at Horchow, and loved them. I'm one of those ladies that thinks that you can never have enough mirrors in your house. Mirrors to make your room look bigger. Mirrors to reflect light and brighten up your space. Mirrors to make sure you don't have food in your teeth. The more, the merrier. But $1095 shipped? Yikes. No thank you. But looking at them, I figured I could make them.
    A quick stop at Hobby Lobby for the wooden plates and big mirror, a not so quick stop by Home Depot for the rope and other supplies, and a call and stop by the local mirror place for the smaller mirror size that I couldn't find pre-cut anywhere. Then it was time to go home to paint, sand and assemble.

    I did have to get creative with the black caps that Horchow has on the ends of their ropes. My solution? PVC end caps, simply spray painted black. Some black BBQ & Stove spray paint on the metal (which is holding nicely as long as you don't bang around the metal) and voila! Drill a hole in the PVC, hot glue the hooks and rope, and BOOM.

    Slightly smaller, slightly lighter in color, but perfectly me.
    8. West Elm-inspired Wood Tile Dresser
    It didn't take long for me to figure out what I wanted to do for this week's challenge. I've been lusting after this wood-tiled dresser from West Elm for months and months, but at a whopping $900, it just wasn't going to happen. So, this challenge gave me the perfect excuse to try and re-create it on my own! And I think it turned out pretty awesome.

    I found this gorgeous antique dresser at a local flea market and knew it would be the perfect piece for this project. It's not quite as modern as the original, but it has some nice clean lines and wooden casters, which make me a little weak in the knees. With a fresh coat of paint, some DIY-ed hardware, and a whole bunch of whitewashed, hand-cut wood tiles it looks pretty dang close to the original.

    Really, if I'm being honest, I like my version just a little bit better.; -) 9. Anthro-inspired Duvet When I first saw the Corin Duvet from Anthropologie, I fell in love with its details. Hand stitching, gathered fabric, pure gorgeousness. But it also came with a price tag that was way out of my league.

    no-sew Anthropologie Corin Duvet knockoff

    I wanted this look for our room but didn't want to spend $400 (and I didn't want to sew anything) so I bought a white duvet cover and a bottle of puffy paint. PUFFY PAINT?! Yes, I said puffy paint.

    no-sew Anthropologie Corin Duvet knockoff

    I used a picture of the original and a steady hand to paint the details onto my duvet.

    But don't worry, the look is nothing like those cheesy tee shirts you used to make!; )

    no-sew Anthropologie Corin Duvet knockoff

    --------------------------------------------------------------------------------- It's time to vote! You guys have a ridiculously hard job- we don't envy you a bit! You can only vote one time, but you can vote for your favorite 3 projects. In order to vote, please LIKE EC2 on Facebook. Thanks!


    Thanks for voting! Check back tomorrow to see Monica's Knockoff that saved her over $1500! Did you miss the Round 1 projects? You can see them all here. Want to know the results of Round 1? Click here!

    jess
    Monica
  • The Real Housewives- An Announcement!

    The Real Housewives- An Announcement!

    Time for Our Big Announcement!
    Here's the deal, plain and simple. We've been contacted by NBC Universal, which owns Bravo and all of The Real Housewives Shows… Guess what?? The want to do a show about us! KIDDING! Nope, they actually contacted us because they want us to cease and desist… that means stop using Real Housewives in our name. Major Bummer. Although in 2012 Jess and I did make a goal of talking behind each others' backs, wearing tighter, low cut clothing, and making millions of dollars, we're sort of lost as to the"possible confusion" that NBC was worried about with this little old DIY blog.
    Well, we've talked about it, prayed about it, sought legal advice, and in the end we decided it's not worth the huge costs we'd incur to keep our beloved"Real Housewives of Bucks County" name. (We technically could try and fight this one under fair use law, but we're not looking for a battle)
    Of course we're"Look on the Brightside Girls" so we're going to make the most of this re-branding! We're looking for a new name that totally reflects our personality and style. Who knows us better than YOU, our readers? So we need your help!

    Pin It So, start thinking! We want our Facebook, comments, and email flooded with amazing ideas from you. Honestly, Jess and I just keep saying RHBC in our heads because it's been our baby for the past 12 months. We totally need your creative help in this process.
    Here's How we Need Your Help: #1- Tell us you'll still love us even as"the bloggers formally known as The Real Housewives!" #2- Share ANY and all name ideas with us through comments, Facebook, or email (don't worry about us not liking it, we want to hear any ideas!) #3- Consider sharing our dilemma on your blog, or Facebook… the more help the merrier!
    **Update: We love the ideas we're getting so far. Some of them are cracking us up! We just wanted to let you know that we plan to move away from"housewives" at all… just to be on the safe side. So keep the fab. ideas coming!**
    Just keeping it real, of course we're nervous about this change over. We've worked really hard this past year, and a little piece of us is worried about losing readers, people not being able to find us etc… BUT, we're trusting that this will work out for good and who knows, maybe even catapult us towards awesome new opportunities!
    Thanks so much and sorry we didn't have some awesome announcement like our own show! Ha! We're still workin' on that one!

    jess
    Monica

    Only following on the blog? You're missing out. Use the buttons below to join in on all the fun!

    Follow Me on Pinterest
  • Creating with the Stars: Link Up Winner {Round 1}

    Creating with the Stars: Link Up Winner {Round 1}

    Today is the last day of Round 1… That was an intense amount of DIY awesomeness for one week… One night this week, Jess and I had a text conversation that went something like this… Jess: Did you see all those awesome projects? Me: Yes! They're insane Jess: I think I'm mildly depressed from it all- these girls are amazing. Me: Yes, I believe I will quit blogging, go eat cookie dough, and mope around my house. Well, thankfully we didn't quit blogging, I didn't eat too much cookie dough, and we got over it, and are ready for Round 2 tomorrow! Before we say goodbye to Round 1, we are super excited to share our favorite Upcycle that was Linked Up this week!

    Jessica blogs over at Dear Emmeline and we loved her Embroidery Hoop Pendant Light! We are definitely going to try this upcycle soon! Check out how she did it and don't forget to link up your favorite Knock off starting Tuesday! --------------------------------------------------------------------------------------------------------------
    Ever get inspired by someone else's work to create something similar yet so completely different?
    When I saw View Along the Way's Dodecahedron Pendant Light I fell in love but I also knew that not only did I not have the tools to recreate it but it would be a TON of work.

    Then I had the thought,"Is there anything I could use to create a pendant with a similar feel with a lot less work?"
    A thought sprang to mind, and here is the result!

    It took us about 30 minutes of actual work time to make this fixture!
    If you want to make your own here's what you'll need:

    2, 14" quilt hoops (we bought ours at Jo-ann Fabrics, original price $4.99 each) stain or paint 3/4" square dowel pendant light kit 7, 8-32 x 3/4 flat head Hillman knurled screws 7, 8-32 hex nuts drill wood glue clamps spray paint

      Before we began assembling the fixture we gave the hoops and 3/4 dowel a coat of vinegar and steel wool oxidation stain to give them a weathered finish and used oil rubbed bronze spray paint to paint the cement colored part of the pendant fixture.

      Next, line up the 3/4 dowel with the hoop connectors (outer piece of hoop) and mark a cut line. Drill a hole down the middle of the dowel. This will be the place that you feed the pendant cord through.

      Remove the hoop fasteners and center your 3/4 dowel between the hoop tops. Glue and clamp each hoop to the dowel.

      Feed the inner piece of each quilt hoop into the ball overlapping them to make an X shape.

      Starting with the bottom, drill through each hoop overlap (there should be 7). Feed the screw through each hoop and fasten with a hex nut.

      You could cut down the screws if you want the to end up being flush with the nut but we chose to leave them as is since the piece has an industrial look to it already.

      I recommend drilling and fastening in the following order.

      Feed the pendant cord through the 3/4 dowel and you're ready to hang it up!

      We purchased an antique look filament bulb from Lowes to complete the look.

      Isn't that such a creative idea? Amazing work Jessica! We can't wait to see what you link up this week!
      Don't forget that voting on the Round 2 Projects starts bright and early tomorrow!

    • From Fluorescent Diffuser to Statement Pendant {Sarah M. Dorsey Designs}

      From Fluorescent Diffuser to Statement Pendant {Sarah M. Dorsey Designs}

      If you missed the announcement about which nine contestants made it through to Round 2 of Creating with the Stars, click here! We're dying to see what those ladies come up with for this week's Knockoff theme!

      -------------------------------------------------------------------------------------------------------------------------- We didn't think it could get much cooler than Sarah's 80's Chandelier to Glass Mirror project, but man, were we wrong! This light fixture is a show-stopper and we were both completely in awe of Sarah's creative vision for old fluorescent light covers. I'm not sure I would have ever thought of this project, but I wish I did, because it's stinkin' awesome. Kudos to you, Sarah!

      Walking through Habitat ReStore I spotted a few egg crate diffusers — you know those grates that cover fluorescent lights in basements across the country. It's the last lighting fixture I would consider for a project, but once I got around my thoughts of drop ceilings, I began thinking how neat it would be to use the grid to create any square geometric shape that I wanted. At $2 each, what could I lose?

      Browsing Pinterest I found this amazing light, Lolita — Shine by SHO and fell in love with the arms. It's lines are simple, but make a big impact! Perfect for a statement piece!

      Once we decided on the shape, we measured and marked the edges with a permanent marker. The egg crate diffuser was cut into the shape of the arms with small clippers (clipping as close to the edge as possible).

      Next we taped the bottom with painters tape and filled with plaster of paris (mixing it on the thinner side so that it would level itself at the top). You want it as level as possible to reduce sanding. Any excess was leveled off with a spackle knife.

      Once firm, they were placed in the sun to fully cure (I ended up letting it sit overnight)
      Then excess was sanded off. Some of the squares fell out during sanding, so I used a little craft glue to get them back in place. Then I patched the imperfections with drywall spackle and sanded again once dry. This part was pretty messy — so I was definitely glad to be done with sanding!
      We wanted a simple fixture so that it wouldn't compete with the arms. Looking through thrift shops, all we could find were ones with curves (very '80s) we needed something more mid-century modern. So we ended up building our own electrical housing out of old chandelier parts, PVC, and brass tubing.
      Here's how we did it:

      Honestly, this wasn't the easiest task, but definitely doable. It required modifying (mostly cutting holes in the PVC) so that all the parts would fit snugly.
      To assemble all of the pieces we used Gorilla Glue Epoxy

      We followed the directions by mixing equal parts of the resin and the hardener (in small batches so it wouldn't harden too fast). This stuff worked SO well! It set up fairly quickly and was SUPER strong!

      All parts were lightly sanded to remove any gloss, and dust was removed with a microfiber cloth. Then it was primed, and painted with Sherwin William Rivulet (2 coats).

      We finished it off with 2 coats of Krylon Lacquer to give it a super glossy finish.
      Turning off the electricity first, we installed the light and held our breath as we flipped the switch.
      Success! It works!

      We also installed trim and painted 8" stripes on the ceiling to frame the fixture.

      and a gallery wall with a few fun prints, paintings, and some fabric mixed in!

      I love this fun addition to our office area!

      Here's the price breakdown:
      (2) Fluorescent diffusers: $4 (Habitat ReStore) Plaster of Paris: $5 (with coupon at Michaels) Gorilla Glue Epoxy: $5 Chandelier: $5 (Habitat ReStore) PVC parts: ~$3 (Home Depot) Brass parts: ~$10 (Ace Hardware)
      Total = $32
      Not bad for a statement piece! So next time you see a plastic diffuser don't just pass it by, think about what you can create with it! -------------------------------------------------------------------------------------------------------------------------- You guys, Sarah has unbelievably good taste and mad DIY skills. I was browsing her blog and this Fabric-wrapped parsons table just jumped out at me! Would you believe that she made that with hollow-core doors??

      and take a look at this tufted headboard with nailhead trim. She had to have bought that, right? Nope! she made the entire thing. Gorgeous!

      Don't forget to check back tomorrow because one of YOU might be featured here on EC2! We've picked our favorite upcycle project from the link party and will share the tutorial for that project! Get excited, peeps! Also, start thinking about which project you want to link up for Round 2's link party theme: Knock Off! Beginning Tuesday, you can link up any knock-off project you've done in the last year for the chance to win more prizes and a feature here on our little ol' blog!

    • Trendy Tire Table: {While They Snooze}

      Trendy Tire Table: {While They Snooze}

      If you missed the announcement about which nine contestants made it through to Round 2 of Creating with the Stars, click here! We're dying to see what those ladies come up with for this week's Knockoff theme!

      -------------------------------------------------------------------------------------------------------------------------- There are some nice end tables out there, but this one ranks way up there on the coolness scale (is there such a thing? If not, we just made one.) We love how Sarah, from While They Snooze, used something free to create something totally fabulous for her home. Booyah to pricey furniture everywhere. Let's take a look at how she made this bad boy…

      On a run a week or so back, I passed a house in my neighborhood with 6, count 'em 6, old tires on the curb (Where you at HOA??). My slightly hoarderish brain immediately tried to think of projects I could use them for. Alas, as Beyonce blasted in my ears, I thought of nothing and ran past. Fast forward a few days to when the Creating with the Stars announcement was made and I learned theme one was Upcycle. In the midst of picking my jaw back up off the floor, I remember those grimy tires. Early Saturday morning, still bra-less and in my PJs, I drove to that house and hurled the one tire that was left into the back of my car. Let's hope the morning fog prevented most from seeing that. Don't be fooled, though the kids look excited, they are confused as to why mommy threw garbage in the car.

      As the tire lay in my garage, it dawned on me that it was the perfect size/shape for a side table. 24" round. Just needed some legs and some (a boat load of) prettying up. Here's what I did.
      Supplies:

      • Old tire — Mine still had the rim… it will still work if it doesn't.
      • Plywood — One circle for the base and one for the top. My plywood is 1/2" thick.
      • Legs — Get creative! I used wood but you could use an upside down flower pot, metal, or buy pre-made legs from Ikea. This tutorial will show you how to make wood legs.
      • Rope — to disguise the tire. I used 350 feet (yikes!) of 1/4" sisal and manila rope sold in little bags at Home Depot.
      • Glue/Screws/hardware to attach the legs — This will vary depending on what legs you get.
      • Construction Adhesive — To glue the tire to the base and the rope to the tire. I used Liquid Nails.
      • Basic tools - This will vary depending on what your base is made from. I used a jig saw to cut the circles. A chop saw, table saw, and jig saw the cut the legs. Drill to attach the legs.
      Step 1: Scrub your tire. Chances are it's going to be really grimy. Give it a scrub with some dish soap to cut the grease. This will also help your adhesive stick better. Let it dry.

      Step 2: Cut out two plywood circles. First circle should fit in the center of your tire to make a flat surface to form the table top. I measured, then nailed a piece of string into the center of my plywood, attached a pencil, and drew the circle. I had to sand the edges of the circle here and there to make it fit in the tire. The second circle is the base that the tire will sit on. Trace your tire and cut the circle one or two inches smaller than that.

      I bribed the hubs with lunch so he would cut them out for me.: )

      Step 3: Cut out some legs. Since this table will be replacing another (ugly) table in my living room, I measured the height of that existing table. It was 20". The tire is 9" high, so I needed 11" legs. Side tables vary in height though. They should work well with the seating they will be next to. So measure your tire and then figure out how high you need your legs.
      I must confess, my husband came up with the idea of using the rocker slats from our rocking octopus, cut in half, for the legs.

      Since I didn't want to destroy the octopus (poor Ollie!), we took them off, traced them onto some scrap pine from the garage, and cut them out. If you don't have rocking octopus legs to trace: ) rectangles would be fine!
      Trace.

      Cut out.

      Cut in half and sand smooth.

      Step 4: Assemble the legs. Take your larger base circle and arrange the legs equally spaced around the perimeter. To make the table a little more sturdy, I cut some small blocks from the scrap pine to use as supports for the legs. I glued the blocks to the legs with wood glue and clamped overnight. Once they were dry, I glued them to the wood circle, attached L brackets, and put a screw in through the top of the wood.

      At this point I stained the legs and the rim of the base circle. However, they didn't turn out that great. I'll fix that in a minute.

      Step 5: Glue tire to base. Once the legs are secure and dry, flip the base over, apply generous blobs of construction adhesive, and set your tire in the center.

      Step 6.: Glue smaller circle to top of tire. The smaller circle should fit slightly inside the inner curve of the tire so when it's in place, the whole surface is flat… or close to flat. Since my tire has the rim, I just glued to that.

      Step 7: Glue rope to tire. Attention: hot glue does not stick to tires just incase you were considering it.: ) I tried… no go. Stick with the liquid nails. Bonus: Liquid nails is the same color as rope. Some of it bled through. You can't even tell. Turn the table over, start around the base, and work your way to the top of the table.

      Keep going! Once you get around the lip it's e asier if you flip it back over. I used a combination of sisal rope (the lighter color) and natural manila rope (the dark color). Both are sold in 50' sections at Home Depot.

      Once you get to the top rim it gets tricky. The rope kept wanting to pop off so I had to keep it taped down with painter's tape as I went until the adhesive dried.

      Then, when I hit the plywood, I switched to hot glue. Much easier! (Does anyone else have toys mixed in with their projects?)

      Step 8: Paint the legs. Remember how the stain on the legs came out kind of meh? Sarah from Thrifty Decor Chick had the great idea to"dip" them. Basically, I painted the bottom half of the legs bright citrus yellow. Not meh anymore!

      And that's it. You can put the rope down. You're done. I can't wait to have people over and see if anyone knows it's an upcycled tire!

      My staging assistant.; )

      And so you know last week was one CRAZY week… here's a lovely shot I took of myself, gluing rope to a tire at midnight while the rest of the family snoozed. Enjoy.

      Ahhh, so fun! You guys have to see the behind the scenes look at Sarah's round 1 project. You know we love it when people keep it real! Sarah is super talented with a sewing machine, but we totally dig these fun DIY Chevron Curtains she made from Ikea curtains.

      Be sure to check back tomorrow to see how Sarah created that who-would-have-ever-thought-you-could-do-that-with-egg-crate-insulation light fixture. Omw. Soooo creative. Also, do you want to be a part of Creating with the Stars yourself? You can link up your favorite upcycle project right here until tonight at 10 PM EST for a chance to win a great prize package and be featured on EC2! Happy Friday, friends!

    1. Art and Textiles = textile arts
    2. In Textile Arts, What is Lutradur?
    3. Discharge paste and block printing
    4. How to Patchwork - with Mary Gamester
    5. Stitch Craft with Marilyn Pipe
    6. "Handsome Devils" by G.P.P.R. [men's fashion]
    7. Horiyoshi III & Tattoo-inspired Styles [men's fashion]
    8. Aneeth Arora: Mixing Paris and London with India [men's fashion]
    9. Teaming with “AI” Marks Wade’s First Design Hire [men's fashion]
    10. Domingo Rodriguez 2016 Spring/Summer Collection [men's fashion]