My Creative Blog:
Crafting with the Stars

  • Pallet Possibilities {How to Build a Wooden Pallet Wall}

    Pallet Possibilities {How to Build a Wooden Pallet Wall}

    This room makeover all started with a pallet and became the coolest pallet wall ever. This free project made a huge impact with its wooden walls and white wash technique.
    We're so excited to share it with you today! ******************************************************************
    When the hubs and I moved into our house 12 months ago (holy moly it's been 1 year already!) we decorated 3 out of 4 kid's bedrooms. I wanted to wait until the little man was out of his crib and into a"big boy bed" before tacking the room.

    Well, the crib is history and we were ready to make this tiny space small, but mighty!
    Jess and I have a thing for pallets. We've written a Pallet Possibilities post and Jess shared a pallet shelves post. Well, this time we thought we'd take it to the next level and do an entire wall of pallet wood!

    Here's how we did it: (Shhh… don't tell, but this was super easy and the wood was free!)
    We called around and found places that were okay with us taking their pallets. The hard part is taking them apart and not cracking the boards. We started with a hammer or two or three… TIP: don't buy cheap hammers. Then, we moved to a sawsall. It worked okay, but not great. Finally, the hubs pulled out his circular saw and we were in business!

    We separated out the keepers and made sure we had a good blend of various lengths and widths. We took out most of the nails for safety, but left a few for character (we put those pieces up high on the wall so the little man would be safe and sound)

    Thankfully my hubs is pretty darn smart and helped me and Jess figure out the layout. We placed each piece on the wall temporarily (one nail in each board) just to see the layout and get all the cuts out of the way. We don't have any great tips on this step, just find someone that likes doing puzzles and invite them over to help! (You might notice that between breaking apart the pallets and doing the wall that I moved from a blonde to a reddish brunette. 2 hair colors in one post… is that a blogger foul?)

    Once we had the layout, we took each piece down and labeled it so we'd know where to put it back. We gave each row a number and a letter going from left to right… 1A, 1B, 1C, 2A, 2B etc… Then we brought all the wood down to the garage to begin the fun part… sanding and whitewashing!

    We sanded the wood lightly… we didn't want to lose cool character, but we didn't want splinters for the little man either. We arranged the wood as it would look on the wall, so that we could figure out how we wanted to whitewash the wood.

    Some of the"blonde" pieces of wood needed some grey stain to make them look a bit more weathered, so we put in on randomly and rubbed it in a bit.
    To make our whitewashing colors we just filled cups with water and added a few dabs of paint. It was trial and error. We used the grey-blue wall paint, white paint, and some navy (which we used full strength). We wanted cool tones, not the warm honey ones it originally had. (Will I ever remember NOT to wear sweatpants for all our projects?)

    Once it was all dry, we were so thrilled with the colors and couldn't wait to put it back on the wall!

    Before putting the pallet wood on the wall, we added some industrial looking lights. The hubby did this part of the job because these girls don't mess with electric- we have our limits!

    To adhere the pallet wood to the wall we just used nails. You could use liquid nails, screws, etc. I thought nails would be the easiest just to spackle over when we we want to change the room (which I don't know if I'll ever will want to). Once we had the wall installed we got busy decorating and then pretty much fell in love with the finished product! How do you like it?

    There are so many fun details in this room! You can read about the message board made from reclaimed barnwood here! (Yup, we're still lovin' the reclaimed barnwood!)

    Not too shabby for a FREE statement wall eh? My son loves his new room and my only complaint is that we didn't try this fabulous project in one of our master bedrooms! We love it!

    So there you have it! Free pallets transformed into a crazy, cool statement wall! It was free, simple, and we totally think you should try this at home! So, what pallet possibilities are you thinking of trying?

    P.S. Did you see our second Nate episode? How'd we do? We're counting down the days to Cancun and of course will take you all with us through the blog!

  • Board & Batten Love

    Board & Batten Love

    Board and batten has been all the rage for a while now, but I'm still surprised at how many people haven't heard of it or ask, "What was it that you did below your fabric wall?" So, we figured it was high time we did our very own post on the infamous b & b.

    So, funny thing… being the English teacher that I am I thought I'd look for the official definition of board and batten, but it wasn't easy! So, here's the RHBC definition… Really awesome molding that is sort of chunky, with clean lines, and is arranged in fun rectangular shapes. Sweet! Send that one to Mr. Webster for sure!
    So, rather than walk you through a step by step tutorial about B & B, we'll just tell you to check out Censational Girl or The Nester's tutorials on how to install it.
    Instead, we're going to share with you another board and batten project that we helped out with. Our gal pal Connie needed some design inspiration for her crazy outdated dining room. Don't blame her, this was how it was when she moved in. YIKES!

    Connie was picking my brain for ideas and I suggested b & b. We jumped onto Pinterest and started getting inspired! Here are a few of the pins that got us all jazzed up!

    Source: None via Amy on Pinterest
    We love the extra rectangles in this style!

    Source: lh6.ggpht.com via Lydie on Pinterest
    For Connie's room, she decided on a tall board and batten with a ledge for pictures.

    The construction was in process, but we needed to pick a wall color. Connie was thinking some kind of chocolate color, so Jess and I went over to help her make the final decision. Here's what we ended up with…

    Ha! Doesn't look like chocolate does it? We convinced Connie to trust us and she forged ahead with Olympic's Antique Moss green! The first coat was a little scary, but we knew it would be fabulous at the end!

    Here's the finished room… pretty darn cool eh?

    Just in case you're wondering… the C and empty frame are from Hobby Lobby. We made a little accessorizing trip for the room.
    It's a pretty drastic before and after…

    The ledge is just wide enough to rest picture frames on- nice planning! We chose lots of wood frames in complimentary tones and did a combo of resting and hanging.

    So, between the bold, green dining room and my yellow office, are you feeling the board and batten love?

    Maybe, just maybe you'll be seeing a little B and B love in our episode of The Nate Berkus Show tomorrow?? (Spoiler Alert!!) Make sure to set your DVR and message us if you see it before 2pm! We have to wait all day to watch, so be sure to give us the play by play!

    *******************************************************************************
    Wait! Don't Go! Did you vote for the Final Round of Crafting with the Stars? Check out the final 3 projects, vote, and cross your fingers that it's for our project! Thanks so much!

  • Fabulous Fabric Wallpaper

    Fabulous Fabric Wallpaper

    We'll be getting back to our regular Fab Find Fridays next week, but today we want to share the project that won Round 3 of CWTS! We love it so much and I'm kind of jealous that Monica gets to enjoy it every day. (The next big project better be at MY house.; ) Enjoy!
    -------------------------------------------------------------------------------------------------------------
    What are girls to do when they CAN'T SEW and are part of a fabric challenge? Hmm… well, we're kind of lovin' wallpaper lately, so we thought we'd use fabric in a non-traditional (and non-sewing) way!
    Fabric Wallpaper I had ordered some fabric a few months back, but never used it. Amazingly there was just the right amount to cover the width of my office wall. While we're talking about my office… this is a judgement free zone, so go easy on me about the state of my office. Yikes!

    There wasn't enough fabric to cover the whole wall, so we came up with the idea to put board and batten below the fabric. The big decision was what color to paint the moulding… Grey, White, or Yellow. We kind of hold to a"Go Big or Go Home" mentality, so we went with yellow! Darn that the color paint we bought wasn't made correctly and looked like Sunshine Yellow, not a cool muted color.

    Once the paint was dry (ok, well almost dry) it was time to start working on the fabric. We measured the height and cut accordingly. We left about 6" extra that we trimmed later.

    This is NOT a glamorous process… it's a lot of holding & pinning and really would be great with two people, but with only one ladder, Jess got to give advice from below and take awesome pics of me!

    There are lots of methods for hanging fabric, but we thought the pin & staple was our best option. We used pins to get it lined up correctly.

    Somehow we forgot to take a picture of the stapling process, but it's simple… just staple along the edges. After stapling, we used a razor to trim the edges.

    Once again we were wrapping up a project at midnight… Jess is awesome at styling, so before she headed home, she got to work on the desk accessories. The Love sign is something we made for our etsy shop, but I kinda love it, so I haven't listed it!

    The next morning we finished all the painting and got to work on the rope. Unfortunately, rope doesn't come in many colors…just rope color. So, we decided to stain it grey. I had no idea my table stain would get so much use! It gave the rope just the look we were going for!

    We used a hot glue gun to adhere the rope around the outside edge. We liked the idea of adding a cool detail, and we also had to hide the staples!

    We couldn't be happier with the finished product! The total cost was under $50.00 (and most of that was for the gallon of paint we didn't even use!)

    It totally looks like wallpaper and at a fraction of the cost. I'm so glad this challenge inspired us to finish my office!

    So, how's that for a fabric project from two girls that can't sew?
    Monica & Jess
    Linking up to: TT & J, Show & Tell Saturday, Tips & Tutorials Tip Me Tuesday, Sundae Scoop, Sunday Showcase

  • Antique Table Turned Vanity {Bathroom Redesign Update}
    Antique Table Turned Vanity {Bathroom Redesign Update}

    Oooh, I so wish you could see my hallway bathroom right now. It is coming along exactly how I had envisioned. Mostly because I finally found the perfect piece of furniture for my new custom vanity. This vanity earned us a spot in Round 3 of Crafting with the Stars over at Sew Dang Cute, and although she's pretty darn cute in pictures, she's absolutely gorgeous in real life. So, here's the breakdown of the transformation this little table underwent:
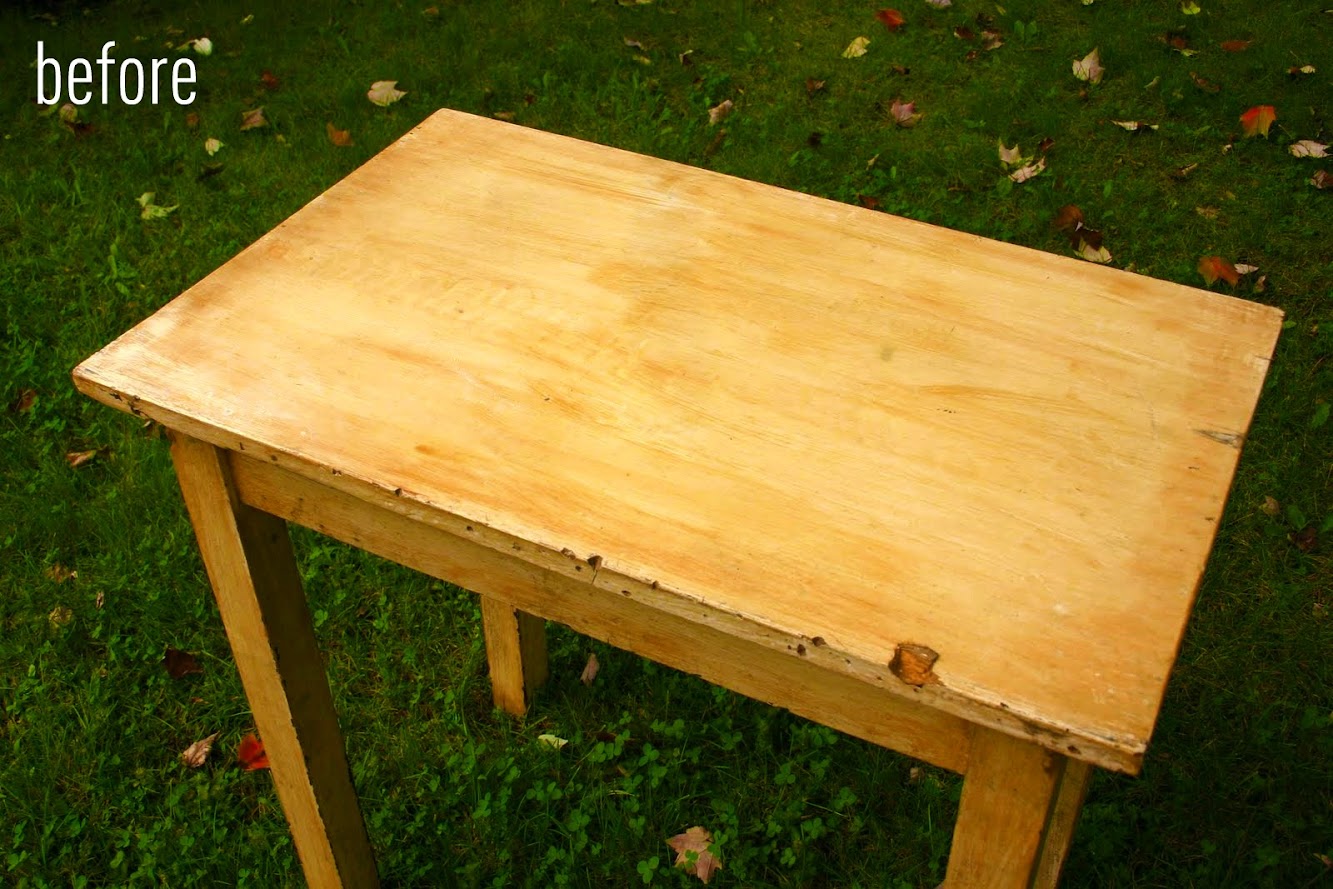
    Antiquated to Awesome Table Transformation While browsing one of our local antique stores, I stumbled across this table in an out-of-the-way-spot covered in loads of other stuff.

    Now, she doesn't look like anything special, but I could see through her battered, yellowing self to see the potential in her simple lines and aged charm. My initial thought was to sand the yellowish tones off to hopefully reveal a distressed white/wood look. After what seemed like an eternity of sanding with two palm sanders, I realized that this piece probably really was an antique and that the paint had mostly likely been there forever. I hesitate to reveal this information for fear of the antique-lovers out there giving me a hard time about sanding such an old piece, but hey, a girls gotta do what a girls gotta do.

    So anyway, the chippy paint look I was going for totally didn't happen because sanding it made the paint appear the color of a peach and that just was not at all the look I was going for.

    So, on to plan B. Monica came over to help out and she brought the custom gray stain they used on their farmhouse table and also a mahogany stain she had. We had some walnut stain left over from when we originally stained our kitchen cabinets, so we tested all three on the top of the piece. We knew we could always sand out the stains we didn't like, but we made sure to place the sample stains in the middle where the vessel sink would go, anyway.

    In the end, we decided on doing a custom mix of walnut and gray stains.

    I brushed on the walnut stain first in long even strokes.

    After about a minute, Monica wiped the stain off with a staining pad.

    Even with just the walnut stain, it was absolutely beautiful, but I knew that the addition of the gray stain would make it match the colors in the bathroom even better, so again, I brushed the gray stain overtop of the walnut in long even strokes.

    After wiping it off, we had this:

    Note to self: Do not stain a piece of furniture in your kitchen. If you're not careful, stain will get everywhere leaving you in a slight panic and making lots of extra work for yourself.

    Ahh! Let me stop here to point out how crazy our work environment was that evening:

    How we got anything done is a mystery to me. Monica and I work very quickly and as a result, leave a trail of disaster in our wakes. We were simultaneously working on the table, painting a custom destination sign with coordinates for a customer, planning our posts for the next few weeks and drinking our favorite Pumpkin Spice Cappuccino from Wawa. Craziness, I tell you. But I digress… on with the project:

    After the hours of sanding the top, I really REALLY didn't want to sand the legs, so we came up with the idea of doing a whitewash treatment. Basically, whitewashing is a combination of paint mixed with water that creates a translucent glaze of color.

    You can see that adding the whitewash took away the yellow tones, but kept all that yummy aged character of the piece.

    Finally, we broke out the power tools and got ready to make our holes for the new sink and faucet. This is a lot easier than you probably think it is. After measuring the center of the table where the sink would go, we used a drill with a 1 1/2" circle bit to make a hole for the pipes to run through.

    This creates a lot of sawdust which for us was a problem. DESIGN BLOGGER FOUL! We should have drilled the holes FIRST before we stained!

    Brushing off the saw dust on stain that hadn't dried yet gave us a minor heart attack, but we recovered after restained the parts that needed it. Phew! No big deal. (But if you attempt this project, drill first, stain second!)

    We added the sink that we bought at Lowes so we could determine the placement of the hole for the faucet. We didn't use any scientific method here; we simply placed the faucet next to the sink and eyeballed where it should go. Remember folks, I don't claim to be a perfectionist.: )

    In pictures, the faucet looks kind of goldish, but in reality it has a brushed nickel finish that adds just a touch of modern that is perfect.

    We wanted to add some detailing to the piece to make it more unique, so I picked up some oil-rubbed bronze knobs from Lowe's. Monica pre-drilled a few holes, and then we screwed them right in. They look so cool and give the affect of a drawer on the front.

    So, at the end of night one, this is how the table looked. Pretty sweet, huh? But the fun part was putting it all together the next day after I (and my mom who wanted to save me some time while I was coaching my tennis team) added 6-7 layers of a water-based polyurethane to the top to prevent water damage that may occur from my very messy wonderful family. We went with a water-based poly because it doesn't change the color of the wood tones. I'm not 100% sure this will be enough protection, and I'm paranoid about anything marring the surface of this beauty, so I'm going to be doing a bit more research on protecting the wood before we use it. Any suggestions?
    So now that all is said and done, this is how my beautiful vanity looks:

    I am so in love with this table, and am thrilled to death that it turned out just like I was hoping. It looks amazing in the bathroom, and pictures just don't do it justice. Next week, I'll be showing you the final reveal of our hallway bathroom after I add some finishing touches and I can't wait!
    What do you think of my table-turned-vanity? Have you ever turned a thrift or antique store find into something fabulous?

    Now, on to Round 3!

    Linking up to: TT & J, Show & Tell Saturday, Tips & Tutorials Tip Me Tuesday, Sundae Scoop, Sunday Showcase

  • Short & Sweet

    Short & Sweet

    Well, folks, today's post will be short and sweet. We figure you might need a break from all our crazy ramblings once in a while, so today's your lucky day.: )
    First Order of Business If you haven't already voted this week for the Crafting with the Stars competition, there's still time. Head on over to Sew Dang Cute and try to guess which one is ours, then vote for it!

    We are thrilled with the way our project turned out for Round 2! We're really hoping we make it to Round 3, because the idea we have is super cool. So, vote, people, vote!: )
    2nd Order of Business We may or may not be somewhere really fun, working on something totally cool. We're dying to share more about this top-secret project, but here's a glimpse of stuff we may or may not be using.

    Clockwise from top left: 1. Mason Jar Chandelier 2. Tissue Paper Art 3. Newspaper Wall 4. DIY Faux Buck 5. DIY Zebra Painted Rug 6. Benjamin Moore Sunburst 
    Ok, this meeting is adjorned. Have a great Tuesday!

  • Anthro Ordinal Dresser {Knock Off Style}

    Anthro Ordinal Dresser {Knock Off Style}

    Anthro Ordinal Dresser Knock Off So, I have to be honest… When Jess and I told my hubs that we were taking his"Toolbox Dresser" he wasn't thrilled (it's been holding his tools in our garage for 5 yrs) and he might have been a tad skeptical that we could turn it into Anthro's Dresser. We're a wee bit competitive, so he gave us just the challenge we needed.

    Step 1: Sanding There were many layers of paint to remove. Don't be intimidated. We got through white paint and the original glossy finish. We did use some 60 grit sandpaper because the higher numbers were just taking too long. Yes, it was 11 pm and yes, it was dark, but a girl's gotta protect her eyes!

    Each drawer needed to be sanded and then all of the framework for the dresser. Every trace of creamy white paint needed to go! (And No, we didn't plan to wear matching, frumpy outfits…)

    We used an orbital sander and a little mouse sander as well. The mouse is great for getting into the nooks and crannies! We did have one minor injury, but that's kind of expected when crafting at 11pm.

    Step 2: Template & Cut We just free-handed a template of the little shape that we needed to cut on each drawer. It was a bit annoying and took us a few tries to get it centered and even, but once we did, we just traced around it and were ready to cut. For the bottom of the dresser, we needed to get rid of any scrolly-ness, so we drew on some straight lines and said,"bye bye old school scrolls!" as we cut.

    Sometimes we're a little intimidated by power tools, but the more we use them, the easier it gets. We did all the cutting with a jigsaw. It's as simple as tracing a line (well…with a quickly moving blade!)

    Step 3: Create a Faux Metal Finish While I was busy doing a jig (AKA jigsawing), Jess used a few spray paints to get the faux metal finish we were going for. We used Rustolium's Hammered Metal and Valspar's Metallic Finish.

    At first, it looked like graffiti gone wrong… So we added more of the metallic spray and then we used Martha Stewart acrylic paints in copper and metallic turquoise.

    And we liked the results much better.

    This is where we called it a night for work night number one. It was about 1am… bedtime!

    Step 4: Fill the Holes The Anthro dresser didn't have any holes, but unfortunately ours had 6 holes per large drawer. Have no fear… mod podge is here! Using a little woodworkers trick, we took sawdust from the sander and added modpodge (glue was recommended, but I only had glue sticks). Just mix it up until it's nice and thick and can be molded with your hands. The ratio was about 3:1 dust to modpodge.

    We used the end of a kids paintbrush to neatly push it into each hole. Two reasons this method rocks: #1- it's FREE and # 2- it almost perfectly matched the wood because we were using sawdust from the same piece of wood.
    Step # 5: Stain the Wood Stain always scares me! It can ruin all your hard work. BUT… at least we knew we could just sand it down again if we made a mistake (which we did). The Anthro dresser had amazing wood tones and we needed to replicate that, so we used a grey stain that we had left over from the Farmhouse Table Remix.

    And now for the mistake we made… See the big, globby brush mark of stain on the left? FAIL! We quickly learned that if we held the brush completely parallel to the wood and just barely touched it, we'd avoid ugly blobs. When the staining was done, we did a quick sanding with some 120 and 220 grit, just to make it seem more natural.

    Step 6: Poly Time This is such a fun step because it gives instant gratification. The second you brush it on it reveals all the rich, woody, goodness!

    Step 7: Add Numbers We had purchased a stencil, but the font wasn't a perfect match, so instead we printed letters using our printer and then traced them firmly with a pen to leave a tracing indent. Oh, you think it's hard to see? We did too! I think I went a little blind trying to paint inside the lines. We know there are other methods to do this, but once again it was past midnight and we were in"Get-er-done" mode.

    The numbers looked a little bold at first, but the next morning we gave it a final sanding and made them look more weathered. We also did a final coat of Poly once the numbers were finished.

    Step # 7- Hardware We had two extra drawers, so we decided to grab some cool hardware at Lowes. We love how it fit with the style, but still made our piece a little unique.

    Phew! That was a lot of work! Two very tired bloggers! (Yes, we make our husbands take cheesy pics of us at midnight… poor guys!)

    So there you have it… Ugly Dresser turned Anthro Ordinal! We hope this has inspired you to look past what you see at first and unlock the potential in something you might already own! My hubs openly admits he was wrong and he was pretty impressed with what we did to his"Toolbox Dresser" (and don't worry, we'll buy him a new toolbox!)

    Follow Me on Pinterest

    Linking up to: Tutorials & Tips, Tip Me Tuesday TT & J, Show & Tell Saturday, Sundae Scoop, Sunday Showcase

  • New Curtains {REAL Confessions}

    New Curtains {REAL Confessions}

    So I've confessed that I'm impulsive, but have I mentioned that I'm a procrastinator? Yup, it's true. I never return library books on time… this is awful, but I actually owed over $100 in fines after completing my senior thesis in college (Sorry to any librarians reading our blog!) Anyhow…try as I may, I still put things off all the time occasionally. This week it was my new family room curtains. Since this blog is committed to keepin' it real, I'm going to show you my project anyhow! Painted Curtains
    Remember my journey to the perfect stripe? Well, now I needed to journey down the road to painted curtains. It's really simple, so here's what you need to do… Get your Suzie homemaker on… you need to iron! {GASP} People that know me, knowt that I don't iron! Honestly, before our Nate Show appearance a friend ironed for me (she's the best!) I did do this project's ironing all by myself! Go Me!

    You need a big open space to complete this project, I wouldn't do it outside though because bugs and dirt could end up as part of your curtains- gross! (Oh, and ignore the wrinkles… I didn't say I ironed well!)

    Determine the width of your stripes. I used 19 inches (almost the same as the wall stripes). Then, measure across the stipe and put a few pencil marks to use as guide lines when you're taping it off.

    Make sure you get your tape nice and flat and seal it down with your hands a few times

    Ta-da! (I swear, they're"wear wrinkles!!")

    Now, I took my own advice from Journey to the Perfect Stripe and I used Mod Podge to seal the edges. I'd rather have a clear liquid sneak through than paint. That's the idea with the Mod Podge.

    I waited about 10 minutes and then took my handy-dandy foam roller and got to work. I really need to invest in some"decent" looking paint clothes. These pink plaid pants and inside out tee are not the rockin' blogger look I should be going for!

    Don't worry if the fabric is a tad bunchy… it will dry fine. I needed to do two coats, but if your curtain will be having any direct light shine through, you'll probably need at least 3.

    I heart crisp lines!

    Well hello awesome curtain… welcome to my room!

    WAIT… Did she say curtain doesn't she mean curtains? Don't you need two panels for the window? Ugh, now we're back to confessions time… I only finished one panel! The other is hung, but plain white!

    Maybe you're wondering what's going on with the rods? Well, I didn't measure the window… I bought a rod… it was too short… so I ran with plan B! We're just going to cut down the rod and just have a little mini rod on each side. Even though it was born out of a mistake, I really love how it's going to look… when it gets done…

    Now the million dollar questions… how long have they been hanging that way? 9 Days. How long will they remain that way? Either 3 days or 14 (I'm headed out on a little trip soon, so we'll see if I get it done first)
    So there you have it… Custom Striped Curtains. This is a totally doable DIY. Ok, well I can't really vouch for that, but half of it is totally doable!

    PS One thing we didn't procrastinate on was our Crafting with the Stars Entry! Head over to the contest to see the winners from the first round. We are so excited about the results!! Check it out HERE! We'll give you a little hint…

    :)

  • At the Foot {Master Bedroom Redesign}

    At the Foot {Master Bedroom Redesign}

    Now that we have our hallway bathroom redesign almost completed, I've already moved on to my next big project (because life is not complete without some sort of project going on, am I right?)! I'm just in the daydreaming, inspiration-pic collecting phase, but there are two things I know I want: A neutral color pallette (surprise!) and a bench at the foot of the bed. We recently rearranged our bedroom on a whim one night (say goodbye to the simple door headboard!) and I'm totally digging the new layout. All of a sudden it feels like we have a lot more room, and so now the wheels are turning about a major overhaul to the whole space. Am I excited? Oh yeah. So, back to the bench: There is something so appealing to me about using the space at the foot of the bed that often goes overlooked. Plus, I can't wait to have a spot to throw all my clothes on sit down and put on my shoes, or pull up my stockings. Who the heck am I kidding? I don't wear stockings. Anyway, here's a little round-up of some of my favorite benches at the, you guessed it, foot of the bed. There are so many different design directions I could go in, but I think I've narrowed down my top four categories: Rustic & Simple, Upholstered & Chic, A Double Ottomon, and Completely Non-traditional. Take a peek:

    Simple & Rustic This obviously fits the coastal cottage feel I'm going for, but I also want to be careful I don't go overboard with the"theme".

    Source: None via Jessica on Pinterest

    Source: valdirose.blogspot.com via Jessica on Pinterest

    Source: scotchandscones.tumblr.com via Jessica on Pinterest
    Gorgeous, gorgeous, gorgeous! Who knew a bench could make your heart stop beating?!

    Upholstered &Chic I kind of like the idea of the element of surprise this could bring to the room- a little more modern (or at least, transitional) than the rest of the space.

    Source: housebeautiful.com via Jessica on Pinterest
    Isn't that bench just plain awesome? I love that it has a back and it just looks cozy!

    Source: crateandbarrel.com via Heather on Pinterest
    This had me at the nailheads, for sure.
    The Double Ottoman This is so clever. It definitely breaks up the space at the end of the bed instead of seeing one solid piece, and so, creates the look of a little more space. Plus, you could totally use these somewhere else if you ever needed extra seating.

    Source: granvillehouse.blogspot.com via Jessica on Pinterest

    Source: bhg.com via Jessica on Pinterest
    My personal fave of the bunch are the ones above. Glorious color, lines and detail.
    Completely Non-traditional I'm pretty sure I won't be entering this territory, but it's so fun to see the options out there. People are so creative, aren't they?

    Source: imminentenvironment.tumblr.com via Jessica on Pinterest
    Of course, I love a good basket, but I have a small bedroom and visually this looks huge to me and takes up a good amount of space. I'm looking for something a little sleeker, but isn't it perfect with the nautical vibe? And did you see that vintage map wallpaper? I die. Source: buzzfeed.com via lila on Pinterest

    Source: housebeautiful.com via Peanut Butter Fingers on Pinterest
    I could turn my old suitcase into a bench, but doesn't this scream beauty-and-the-beast-household-item-that-came-to-life? I'm afraid I'd wake up to it singing to me or something.

    Source: bucketsofburlap.blogspot.com via Amy on Pinterest
    Now who would of thought to put a vintage bathtub at the foot of the bed? Not me, that's for sure. I'm obviously not that creative. But it's beautiful in all it's rusty, chippy glory.
    So, can you see the beauty in a foot-of-the-bed bench? Are you digging it like I am? 

    Oh yeah, there's still time to vote for our knock off project for Round One of Crafting with the Stars. Polls are open until 8 PM tonight, so please take a trip over to Sew Dang Cute and vote. Thanks a million! Click Here to Vote

  • Doggy Style…

    Doggy Style…

    No… I'm not getting all creepo on you… this is a PG blog-Our moms read it! What I'm talking about it this adorable ball of fur that's now a part of the Mangin family…

    I'm seriously head-over-heels in love with her! She's a Bernese Mountain Dog that will be eight weeks old today and she has the sweetest disposition ever! Jess came over to meet her the other day and was surprised at how smitten I am, so she said,"I didn't think you were a dog person?" to which I replied,"I'm not! I just like my dog!" Ha! What can I say? It's true!
    So in honor of Miss Pennlyn (AKA Penn) I'm sharing some Doggy Style projects…
    Four Post Bed… Puppy Luxury! I first saw this bed a few years ago in a Lowe's Creative Ideas magazine, and immediately loved it. I don't think the size will work for Penn, but I love the look and idea of it.

    Source: lowescreativeideas.com via The Real Housewives on Pinterest
    You could also just find a coffee or end table, flip it over and get your DIY on, turning it into a bed. And of course, I'm loving the yellow!
    Crate Bed Since Pennlyn will be a pretty big dog, I'm thinking this style bed is a bit more her speed. I'm loving this DIY bed made by Home Frosting and I can't wait to make one. She used leftover 1x4s, but I think I might use some free pallets. The finish she created is fabulous!

    Source: home-frosting.blogspot.com via The Real Housewives on Pinterest
    DIY Pet Tags Leave it to Martha to come up with these adorable tags.

    Source: marthastewart.com via The Real Housewives on Pinterest
    I was about to order a generic tag from the pet store, but I plan to try this DIY this week before going the generic route. I just need to make sure it's heavy duty enough. I'll let you know how it goes!
    Pet Art I'm not really a huge fan of having pet pics all over the place (remember… not a"dog person") but I do think some pet art might be cool in the kids' playroom.

    This took me about 30 seconds to create on Picnik. I used the"Posterize" effect and voila… Pet Art! I think I'll order it as a canvas this week.
    Hungry Puppy? Since we've only had Penn for 5 days, her food is just in the bag, but I do have ambitious plans to create some kind of cool looking container. The hubs thinks I'm insane and wants to know why the dog food container needs to be cute, but he knows who he's married to, so he's cool with it. Here's one fun idea…

    Source: tidymom.net via The Real Housewives on Pinterest
    The style isn't mine, but I think I could add some of my own modern flair to it. I sorta had something wooden and rustic in mind, so we'll see…
    Custom Stuffies These are the funniest things ever! I think they'd make such an awesome gift! This seller on etsy makes custom stuffies for your pet. Just send a picture of your pooch and you'll get a look-a-like stuffie in a few weeks! I've contacted the seller, because she doesn't have this as an active listing right now, but I'm hoping she'll be back at it soon! Pennlyn definitely needs a mini-me stuffie!
    WAIT! Hold the press! Shevon contacted me and you can now buy a custom stuffie!
    Here's the link: Custom Stuffies (Soooo stinkin' Cool!)

    Source: etsy.com via The Real Housewives on Pinterest

    So, it looks like I have a lot of projects to get working on! Although, before I get working on my puppy projects I think I need to get Penn house-broken and doing fancy tricks (can I teach her how to go get my laptop for me?) I'll keep you posted on Miss Pennlyn and any cool projects we make for her!
    Oh, one last thing… She WILL NOT be owning one of these… Thundervest…No Comment!

    Source: thundershirt.com via The Real Housewives on Pinterest
    Thanks for letting me introduce my little lady to you!

    WAIT! Don't stop reading! The voting for Crafting with the Stars is now open! We've entered our first project and we need your votes. We obviously can't tell you which project is ours, but we can give you a hint… look for the coolest one… that'll be ours! Nah, we really do have some stiff competition, so head over and vote for your favorite 3 projects. The winners will be announced Wednesday. Thanks! Click HERE to see the entries and vote!

  • Fab Find Friday

    Fab Find Friday

    Well, after all the hoopla with the Nate Show, you'd think Monica and I would be ready to take a break and relax for a while, but because we're completely crazy we love a good challenge, we're jumping in head first to our next big thing. And that big thing is…

    That's right, Crafting with the Stars!. We entered the Barnwood Artwork into the contest last week and were chosen in the top 12 out of 200 entries to compete in this season's Crafting with the Stars. It's a really fun DIY/home decor competition where we'll be paired up with a blog celebrity and will have to compete in several different categories. We just found out today that we've been paired up with Linda, from Craftaholics Anonymous! Woohoo- this is going to be awesome!

    Linda Craftaholics Anonymous

    There are 4 rounds and the first one is Knockoffs.

    We are super excited, and feel totally honored that we were chosen. You can check out our fabulous competition and their entries here. Of course, we'll keep you posted along the way with all the fun details! -------------------------------------------------------------------------------------------------------------
    And, just in case you missed our segments on The Nate Show yesterday, take a peek:
    (We're not mean people, Mon just appears to be scowling!)
    {How Nate used the same items in the crate.}

    To see the in-process renovations, check out our Nate's Crate Challenge Here, and to see the Big Reveals, click here. To see the before and after photos of both spaces and also more pics of our fun projects, click here. -------------------------------------------------------------------------------------------------------------
    Thank you so much for ALL of your kind words about our TV debut, and for your support along the way! We appreciate each and every one of you and have loved sharing the journey with you.

  1. Craft Holiday - Fiber Art with Beryl Taylor
  2. Creative Holiday
  3. Textile Holidays
  4. Fabric Art Beads - recycled fabric
  5. How to sew - with Angie Hughes
  6. The Men of Colonial Williamsburg and Jamestown [men's fashion]
  7. "Handsome Devils" by G.P.P.R. [men's fashion]
  8. Horiyoshi III & Tattoo-inspired Styles [men's fashion]
  9. Aneeth Arora: Mixing Paris and London with India [men's fashion]
  10. Teaming with “AI” Marks Wade’s First Design Hire [men's fashion]