My Creative Blog:
Guest Post

  • Adios Amigos Day 2 {Hannah Kate Flora}

    Adios Amigos Day 2 {Hannah Kate Flora}

    First of all, our guest poster today, Hannah, is stinkin' adorable. She is the only blogger we've met IRL, (in real life) and totally exceeded our expectations! Funny story: When we met Hannah, we were in NYC getting ready for our Nate Show taping and she had just finished hers. Needless to say, she looked amazing, and we looked like we had just rolled out of bed (what can we say? We hadn't been to hair and makeup yet!:) Take a look at what I mean:

    Note: Faces appear blurry to protect the innocent.
    Secondly, Hannah is soooo talented. She has been featured twice on The Nate Show and has impeccable taste. She chronicles her designs and awesome street finds in NYC on her blog, Hannah Kate Flora. (And ohmygoodness, you HAVE to see the kitchen table she just made! Unbelievable!) So, without further ado, here she is!

    ------------------------------------------------------------------------------------------------------------

    Hi there! I'm so thrilled to guest blog for my sweet new friends, the Real Housewives of Bucks County. I met these darling girls backstage while we were filming seperate segments for the Nate Show. I told them, cheesy as it is, I'm so encouraged by them! Such strong, faithful, clever women! I racked my brain on what to post and was politely reminded by Brooklyn Boy, my soon to be husband, that I should write about Street Merch — left behind furniture found on the streets of New York (or anywhere for that matter) that just need a new life! You see, I'm a Texas girl who's lived in New York for the past 4 years. It's always been important to make my home (i.e. tiny apartment) feel warm, personal and lived in, but I haven't always had the budget to go crazy. But I noticed something living here, when you live in New York and move apartments or get rid of things, you don't have a car to throw your stuff in for a Goodwill trip. No sir. The street is your own personal Goodwill. Whatever you can't fit in your apartment goes to the curb. To put it plainly — this means you can find amazing pieces on the street, with nothing wrong except that there wasn't room for it in its previous home. There's one piece I want to tell you about in particular — the bar cart.

    I had just wrapped an interior design job on the Upper West Side, when I saw this on the street curb..
    and this cell phone conversation with my mom ensued: Hannah: Well I just had my final meeting with Erin and it went really great! Mom: Oh good! I can't wait to see more pictures. I'm glad everything worked out! What are you doing now? Hannah: Me too! Oh, I'm just walking home and wait… what is… hold on mom… Mom: What is it? Hannah: Well I think… hold on, let me move the bags of trash… Mom: What??? Hannah: Street Merch. Mom: Oh! What is it?? Can you take a picture? Hannah: Yea. Hold on, let me just get this bag of trash moved over. Sick. Ok. It's a retro looking bar cart. Or a really crazy overhead projector cart thing. Hm. Shoot. Should I get it? Mom: Well?? Maybe. Do you see a cab? Hannah: No. I have to get it, don't I? Ughhhhhhhh. (At this point, my mom is dying laughing at me. These Street Merch phone exchanges happen all the time between us.) Mom: Hahaaaa. Just get a cab! (I rustle around and end up manhandling the cart.) Hannah: Well now I've picked it up and am walking down the street. Damn Street Merch. I feel RIDICULOUS!!! Mom: Hahahahahahahahahahaha Hannah: Why do I always do this?! I look like a freak carrying this cart under my arm, down the street, in the freezing cold, while I'm on the phone. Mom: Hahahahahahahahahahahahahahahaa Hannah: Goodness gracious. TAXI!!!!! gottagoloveyoubye!!!

    And here's my cramped view of the bar cart on my lap in the cab. No big deal.
    Anyways — I believe that everything has a purpose and I knew this piece had potential. My plan was to revive it with new paint & fabric! First step was to prime it. Don't worry about the sketchy area I'm spray painting in — you have to make do with cramped cement courtyards when you live in Manhattan.

    I chose Navy Blue Spray Paint in high gloss. I gave it two even and thorough coats of paint.

    And here it is all dry and sitting in our foyer! Apologies for the iphone pictures, these images are pre new Canon camera.

    For the two shelves of the cart, I decided to use some preppy and bright Robert Allen fabric from fabric.com.

    After measuring the fabric to fit neatly inside each shelf, I painted a coat of Matte Medium (which you can find at any craft store) directly onto the shelf. Then I laid the fabric onto the shelf and painted a 2nd coat of Matte Medium directly on top, wipping excess clean. I made sure there were no bubbles and the medium was equally distributed.

    Once totally dry, I loaded the cart up with goods!

    This bar cart has taken on many different forms — sometimes we use it as a side table and sometimes we use it for drinks and treats during parties! It's very functional, and has casters that make it easy to move.

    Thats it!! Bonus: This piece was featured on my first Nate segment which you can watch here! Thanks Real Housewives of Buck's County! Loved visiting.
    ------------------------------------------------------------------------------------------------------------

    That looks awesome, Hannah! Thanks so much for sharing your project with us. And best of luck with your wedding and new married life: )

    jess
    Monica
  • Adios Amigos Day 1 {Infarrantly Creative}

    Adios Amigos Day 1 {Infarrantly Creative}

    We're secretly hoping that we are introducing you to Beckie for the first time, but chances are, you're already addicted to her sites, like us. Beckie must be one of the hardest-working women in the blogosphere because she writes THREE blogs! I know, crazy, right? But she is just that awesome. Plus, we are super-excited to be monthly contributors on Infarrantly Creative beginning this month, so you'll be hearing a whole lot more about Beckie here on our blog. Lucky you!!
    Take it away, Beckie!
    ------------------------------------------------------------------------------------------------------------
    Hi, my is Beckie and I am the mommy to three babies…

    Yes I am a tri-blogger. But these are actually my real babies!

    Farrants-62

    Yes I am a mom to two, wife of one, spray paint addict and Roadkill Rescue hero! What is that, you ask? No I don’t scoop dead animal carcass off the side of the road, but rather rescue discarded furniture and turn it into usable and beautiful décor for my home.
    Here is the lighted end table I made for my husband’s office. You will never guess what this originated from…

    lighted end table

    Our church was remodeled last year to accommodate more people. Along with tearing out pews and adding new theatre seats they upgraded their lighting, which meant tearing down the dated chandeliers.

    The chandeliers are HUUUGE! They took them down and before they hauled them off to the dump I snagged a bunch of the arms.
    Here is what one of them looked like.

    IMG_1377

    On the inside was 8 sockets for lights.

    IMG_1379

    So after tugging, twisting, turning, clamping, and unscrewing I had everything taken apart.

    IMG_1384

    I decided it would be fun to make one of the arms of the chandies a lighted end tables for my husband’s office. See my husband is a pastor at the church. It is kind of symbolic for him in a sense, since he is such an integral part of the growth and change happening right now. I lightly sanded all the brassiness with my 3M Sandblaster Pad and then wiped it down. I sprayed it with Clean Metal Primer by Rustoleum. After it was dry I sprayed it with some Oil Rubbed Bronze Metallic spray paint by Krylon.

    IMG_1368

    I purchased a pine tabletop at Menards for $9.44.

    IMG_1370

    In order to accommodate the threaded pipes I needed the tabletop to be drilled a bit so it would fit in place.

    IMG_1371

    So I flipped it upside down and had my husband press it down so that it made an indention into the wood top. Since pine is a soft wood it worked pretty well.

    IMG_1372

    Then I marked the spots and used a drill press to drill down into the table top. Then I placed the tabletop on top. Perfect fit!

    IMG_1370

    I primed and painted the tabletop (Krylon’s Oil Rubbed Bronze) as well.
    I wanted there to be a light still inside the table. So I asked my licensed electrician friend to show me how to use the parts I had to created a light fixture inside with an attached cord. After cutting some of the wire and removing the extra sockets. It went from this…

    IMG_1381

    to this…

    IMG_1410

    I measured the bottom harness and cut a circle out of a piece of scrap wood to fit perfectly inside.

    IMG_1409

    Then I drilled a hole in the middle of the wood circle and added the light fixture securing it at the bottom with a nut.

    IMG_1411

    Then I set my light into the harness and added 3 fifteen watt bulbs.

    IMG_1412

    Then I put the white plexiglass in place and the top of the fixture.

    IMG_1413

    Then I dabbed some Gorilla Glue onto the thread pipes and then pressed the wood tabletop in place. I weighted it down and let it dry.

    IMG_1414
    IMG_1418

    And there it is… from church chandie to hub’s new end table.

    IMG_1417

    And here it is plugged in…

    IMG_1416

    Roadkill Rescue… success! Do you love trash to treasure projects? Well come check out all my Roadkill Rescues here.
    Guess what?! I had another chandelier arm that I turned into something fabulous as well. Come check it out!

    Thanks, girls, for having me and Happy 30th Birthday my friends! ------------------------------------------------------------------------------------------------------------

    Aren't some people just so creative??!!! Thank you so much, Beckie, for stopping by our blog! We're hoping you leave a little more inspired today.

    jess
    Monica

    P.S. Don't forget to"like" us on Facebook for all the up-to-date details on our Mexico trip!

  • Creamy Guacamole with Homemade Tortilla Chips {Guest Post}

    Creamy Guacamole with Homemade Tortilla Chips {Guest Post}

    We're so happy to welcome Becca from Home Beccanomics (isn't that a fabulous name?) here at RHBC. She's the mastermind behind loads of amazing recipes that have been tested by the toughest critics: kids! That's right, she's a Family and Consumer Science Teacher, so you know her recipes have been tried and tried and tried until they passed the test! Clean up the drool after looking at this guacamole and head on over to her blog for tons of other delicious recipes!
    Creamy Guacamole with Homemade Tortilla Chips

    When I introduce the homely avocado to my high schoolers, some girl inevitably raises her hand and states, “avocados are super fatty and bad for you”. Gasp! You lie, little girl, and I won’t have you speaking badly of the avocado.
    Avocados DO actually have a lot of fat, but it’s the GOOD for you fat that you can eat as much as you want of; true story, as much as you want. It’s called monounsaturated fat and it lowers your bad cholesterol and raises your good. Also, Oprah said it reduces belly fat (and we know she probably has some intense fact checkers).
    Buy your avocados when they’re hard and let them ripen at room temperature (to speed up this process put them in a brown paper bag with a banana). When one of your avocados “gives” when you press on it, put it into the fridge. When all four avocados are in your fridge, you’re ready to guac it up.
    My husband likes guacamole. He is, in fact, crazy about it. I have made eggs with guac, guacamole chicken salad; sometimes I just give it to him in a bowl and he eats it with a spoon. I pretty sure he’s not alone in his love affair. I bet you don’t know anyone who dislikes the green happiness that is guacamole. If want a crowd pleasing appetizer, this wins every time. As long as the avocados are ripe and you add enough salt, guacamole is SUPER easy to make. The add-ins are really up to you. Love cilantro? Or lime? Add in small amounts and taste as you go. If you prefer to just follow a recipe then I can assure you, this one is legit.
    Creamy Guacamole with Homemade Tortilla Chips Serves 8

    Chips: 8 Medium Flour tortillas ¼ c. extra virgin olive oil ¼ tsp. salt 1/8 tsp. black pepper ¼ tsp. garlic powder Sprinkle chili powder or paprika, to taste
    Dip: 4 ripe avocados ¼ c. minced onion 2 garlic cloves, pressed through garlic pressed or minced 2 c. quartered cherry tomatoes 2 partially seeded jalapenos, minced ¼ c. sliced green onions (or scallions, same thing) ¼ c. nonfat plain Greek yogurt ¾ tsp. kosher salt Pinch cayenne pepper, or to taste Pinch garlic salt, or to taste Tomatoes and green onions for garnish

    1. Preheat oven to 350 degrees. Brush olive oil over tortillas.

    2. Stack tortillas and cut into 8 wedges.

    3. Grease two cookie sheets or cover with parchment paper. Arrange wedges in an even layer on cookie sheets.Sprinkle salt and spices over wedges.

    4. Bake for 15-18 minutes or until starting to turn light brown. Let cool, and store in a Ziploc bag at room temperature. These chips will be good for several days.
    5. Cut avocados in half vertically. To remove pit, chop your knife into it and give it a twist. Remove any part of avocado that is brown.

    6. Scoop out flesh of the avocado and place in a mixing bowl. Mash with a fork, breaking up the large chunks.

    7. Add onion, garlic, tomatoes, jalapenos, and green onions. Mix to combine. To prep the jalapeno, slice in half vertically. You must remove the white part of the pepper. Leave seeds if you like a lot of heat; remove all seeds if you don’t. I usually keep about half.

    Here’s a tomato tip: Take two Tupperware lids and put your cherry tomatoes in the middle in an even layer. Slice across with a sharp, serrated knife, while pressing down on the top lid. A great way to slice them all at once! If your tomatoes are small you might only need to halve them; if they are large like mine were, quarter them.

    8. Add Greek yogurt, salt cayenne, and garlic salt. Stir. Taste, and add more salt and cayenne according to how you like it.

    9. Scrape mixture into a serving bowl. Garnish with tomatoes and green onions, if desired. Guacamole is best served the day it’s made. If planning to serve it several hours after making it, store in the fridge with a sheet of plastic wrap pressed against the surface.

    Mmmmm…We can't wait to try this! Thanks so much for stopping by today, Becca!
    Have a GREAT weekend, everyone! Any fun plans that include guacamole?

  • Welcome to the Real Housewives of Bucks County U Create Readers!
    Welcome to the Real Housewives of Bucks County U Create Readers!

    Welcome, U Create Readers! We're super glad you're here! If you want to see some of our favorite DIY projects, click on the picture below to go to our our DIY page.

    john cena

    If you want to know more about us, click the picture below to know the inside scoop on what being a REAL Housewife is all about around here.

    john cena

    Well, look around, make yourself at home and come visit us again! Thanks!
    ***Oh and while you're here… We just found out that our Fabric Wallpaper project is in the Top 6 over at Not Just a Housewife. If you think we're pretty okay, do you mind heading over and voting for us? Thanks a million!
    Vote Here!

  • DIY Photo Block Display {Shanty 2-Chic}

    DIY Photo Block Display {Shanty 2-Chic}

    Good morning, everyone! It's very rare to meet other blogging duos in this blogland, so when we met Ashley and Whitney of Shanty-2-Chic at Haven last summer, we were thrilled! True story: when we were checking in to the hotel in Atlanta, we were told they didn't have a room for us. So we were sitting like total dorks in the lobby (we were even dressed in scrubby outfits!), waiting for a room, when two gorgeous, personable, cheerful girls entered the lobby. We were clueless as to who they were (what? Were we living under a rock?), but it turns out they were the Shanty girls! These two are the sweetest and prettiest women you'll ever see wielding power tools. Super-talented, down-to-earth. and uber-wecoming to the two of us newbie bloggers. If you haven't been to their site, please do so immediately (after reading about their awesome project!) and you won't be disappointed. Enjoy!
    --------------------------------------------------------------------------------------------------------------------------
    Hey guys! We are the Shanty Sisters, and we are so excited to be blog swapping with the ECC girls today! We had the pleasure of meeting them in Georgia last year, and we hit it off from the start! They are sweet girls, and we love that they are a blogging duo just like us!; -)

    With Christmas just around the corner, we thought it would be fun to share a quick DIY gift idea! I love photo gifts. This is a super simple, cheap and cute way to display photos. It cost me under $3 a piece to make these… Woohoo! It makes a great gift for friends and family. Here is how mine turned out…

    And, here is how I made it!

    For those of you that don’t have a saw… This is one you need to have. You can EASILY cut this project and so many others on our site using this. Cheap and easy… Promise! That’s a stocking stuffer gals! Come on… You will thank me! This is a perfect ‘craft’ saw, and you would be shocked at how many projects you can do with it! You can also have the hardware store cut the wood for you. HD has a handsaw just like this one in the wood section at all times.

    That's it for the building part! Now you are ready for the printable! I made a few printables for this project. Today I am sharing the 'So Very Blessed' printable. To print it, just click the photo below. Once it opens, just click print from your top browser bar. I printed mine on cream colored cardstock. I like the weight of cardstock paper for this project, and you can get it super cheap at any craft store.

    I chose to use upholstery tacks to hold my paper in place. These can be found at any craft or hardware store. They are really cheap and cute. They are also really easy to remove by using a small screwdriver under the head of the nail. This makes changing out your printable really easy!

    Your final step is adding photos! I like to print my photos out on photo paper at home. This saves me lots of money, and keeps me from dragging my 5 kiddos to Walmart to pick up photos… Win win! I cut my photos out, put them on the display and I was DONE. So quick, so cheap, but still so cute! My kind of project! And… Did I mention I made these babies for under $3 a piece?? Just making sure! Today I shared the 'So Very Blessed' Printable, but be sure to come visit Ash and I over at Shanty2Chic where I will be sharing the other 3 printables for this project! Here are a few more shots…

    A little bit more about the Shanty Sisters…

    We are 2 sisters sharing how we transform our homes on a budget! With 8 kiddos between the two of us, we put every naptime to good use; -)! From building projects like this $65 farmhouse table

    To transforming things like this $15 mirror made from a Walmart mirror

    And even offering free printables like our latest free alphabet banner!

    We would love for you to come check us out anytime at our site, Shanty-2-Chic.com!

    You can also follow us on Facebook! And keep up with all of our posts by following us on Pinterest!

    Thanks so much again for having us girls! We are honored; -)!! ~Whitney & Ashley
    -------------------------------------------------------------------------------------------------------------------------- Seriously, isn't that adorable?! We love us some cheap projects and this is one of the best ideas we've seen this year! Thanks so much for being here, girls!

  • Jewelry Organizer {The Ugly Duckling House)
    Jewelry Organizer {The Ugly Duckling House)

    Because we're always slightly afraid you'll get bored of our crazy antics, we have a treat for you today in the form of a guest blogger! If you don't already know her, Sarah from The Ugly Duckling House is stinkin' hilarious and super talented. We love the design of her blog (which she did herself), the adorable pics of her splattered with paint, and her magical touch with liquid gilding. Enjoy! --------------------------------------------------------------------------------------------------------------------------
    Hi there! I'm Sarah from The Ugly Duckling House, and I'm thrilled to be guest posting today on East Coast Creative! I met Monica and Jess at the Haven conference earlier this year, and I think they come up with some of the most amazing projects!

    A little more about me: I'm awkward. I can't cook. I hate cleaning. But I love tearing my house apart and putting it back together again. I've been working on my"Ugg-Duck" for nearly three years now, and I'm determined — hissy fits and all — to turn my 1980s eyesore into a home I can be proud of. DIY-ing on my own isn't easy (especially with a full-time job and grad school on my plate), and I have had my fair share of weird stories with my house — like finding fingernails in my fridge. Or 4 A.M. catfights. Or freaking out that I had a water leak in my brand new powder room… and realizing it was (possibly) a guest missing my toilet. Yes, that happened.
    Right now, I'm working on remodeling my bathroom. But at any given moment, I have at least five other unfinished projects around the house. Sometimes when I'm in the middle of finishing up a full renovation, I use that momentum to give myself an extra push and do something smaller that I might otherwise put off — like my master bedroom jewelry organizer.

    Ikea hack jewelry organizer

    I've been spotting a lot of creative jewelry organization ideas on Pinterest, and even though I've been storing my jewelry neatly in a drawer in my closet, I realized I forget to throw on accessories when rushing off to work. These Rationell inserts from Ikea are meant to add storage space to pantries and other cabinets, but I saw the decorative pattern on top and thought it could really look snazzy (& functional, too!) as a jewelry holder.

    It was so easy, I could even (sort of) hold my camera steady while putting the project together with one hand. Ha. I just measured…

    Marked (simply pushing the tip of the screw into the wall will save you extra pencil marks)…

    mark wall with screw

    … and sunk the first screw into place.

    And this is where I realized I'd forgotten my level in the bathroom! Ugh. Thankfully, I had a nifty iPhone app with a level that I could use to make sure I kept things straight and even.

    Use iPhone level app

    By placing the organizer in between my remodeled master bedroom closet and the master bath, I have a great new spot for my jewelry — and less of an excuse to bypass the accessories in the morning!

    Ikea hack jewelry organizer

    There you have it — a simple and inexpensive way to get your jewelry in a prime notice me and wear me spot.
    Thank you so much to Jess and Monica for letting me stop by, and I hope you visit me (and whatever current mess I'm making) over at The Ugly Duckling House soon! Sarah Psst: Want more? I love to post sneak peeks on Facebook and Instagram. You can also find me on Hometalk and Twitter at uglyducklingDIY.
    --------------------------------------------------------------------------------------------------------------------------
    Thanks so much for visiting, Sarah! You're welcome back in our houses anytime.: )

  • DIY Decorative Flower Trough {Christina's Adventures}
    DIY Decorative Flower Trough {Christina's Adventures}

    Ok, are you ready for our last guest post for the Summer? We are thrilled with all of the projects our bloggy friends have shared with us, and this one from Christina of Christina's Adventures, is no exception! Christina is a local girl and has a sweet heart and some serious DIY skills. And oh my goodness, this nautical summer wreath of hers made my heart skip a beat. A.dor.a.ble.

    She's a regular commenter on our posts, for which we are eternally grateful! Welcome, Christina!

    Hey East Coast Creative readers! I’m super excited to be here! I live just a short drive away from Jess & Monica – and I share so many of their DIY passions! I have a blog (Christina’s Adventures) where I share my stories about thrifty decorating, DIY upcycling, and creative living.

    I am a former Autism Support teacher (just resigned from my job in June!) who lives with my husband & “dog baby” in an apartment attached to my parent’s house while we save money to buy our own house (so we can have real babies)! This summer has been filled with all things wedding! I am a bridesmaid in one wedding, attending a great friend’s wedding next weekend, and my brother is getting married in a few days! We hosted a shower for my brother and his fiancée, and I had a lot of fun decorating for the shower. One of the guest’s favorite DIY items was this trough:

    And YOU can easily make your own! Seriously! Added bonus – no power tools are required. Here’s how I made mine: I have been dying to make a trough for flowers for ages, and then I saw this one from Thrifty Décor Chick and I fell in love! I just needed the occasion/space to put the trough. When we were looking for something to fill the space at the kitchen table for the bridal shower, I knew this was my opportunity! I first planned out how big I wanted to make it. Our table was just about 6 feet long, so I decided to make this trough 4 feet long. I went to Lowe’s, and found some cedar wood in their lumber section. What I love about Lowes, is they will cut your wood for you! Just give them the measurements, and they’ll cut it. Seriously – best thing ever.

    Here were the measurements I used:

    • 2 planks: 3/4” x 7 1/2” – 4 feet long
    • 1 plank: 1 1/2” x 5 1/2” – 4 feet long
    • 2 squares (cut from the thicker piece): 1 1/2” x 5 1/2” – 5 1/2” long
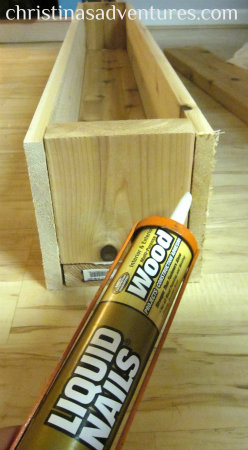
    I will be honest – the awesome lumber man from Lowe’s helped me out a lot with this part – he made sure they all fit together correctly and “shaved” off parts so they were even. I first glued them together with some Liquid Nails, and let that sit overnight:

    In the morning, I hammered in some nails at the seams, just to make sure it was secure. I then roughly filled in some of the bigger cracks with wood filler, and sanded it down. I didn’t want this to look perfect – I knew I was going to paint and distress it, so I wanted imperfections.

    I picked out a blue color I had in my stash (originally an “oops” can for $3). I didn’t prime the surface since I painted right onto the bare wood.

    I let that dry, and then I painted with a very light gray over top (the same gray I used on this desk). I did not do this meticulously – I tried to leave some spots where you could see some of the blue coming through:

    I then had some fun with glaze and sandpaper. There’s no science to this – I sanded down in certain spots, glazed over areas, and wiped down with a damp cloth. I like to use this glaze, which can be found at Lowe’s or Home Depot. Finally – I let it dry, and it was ready to be filled! I would have *loved* to fill it with fresh flowers, but it just wasn’t practical. We knew we wanted to keep the decoration in my mother’s living room after the shower, so she bought fake flowers from Michaels. I usually hate fake flowers, but these look surprisingly pretty!

    What I love about this project is that it wasn’t just a “shower decoration”, but we are now able to use it in my mother’s living room (come follow my blog to see the full make-over of her room – coming soon!)

    A few more glamour shots:

    What are your thoughts? Have I convinced you that you can easily make yourself one of these as well? If you want to see more projects like this, come follow my blog! We have so much fun over there, and I’d love to get to know you better!

  • Antique Doorknob Decor {Being Brook}

    Antique Doorknob Decor {Being Brook}

    We are thrilled to have the opportunity to introduce you to sweet Brook of Being Brook. She's a fellow contributor to Infarrantly Creative, and was a part of our Blogging 2 Better group. She's insanely talented and her projects are sooo beautiful! Her incredibly adorable fabric wall map happened to be our favorite project from our summer challenge!

    Hi East Coast Creative Readers! I'm Brook and I blog at BeingBrook where I share tips and tutorials on building, sewing, crafts and home decor! I'm a military spouse so I move frequently and am always striving to Create Awesome wherever our family ends up!

    Today I have a tutorial on how to make a keepsake hanger out of an antique doorknob!

    Supplies: 2 pieces of pine 1"x4" cut into a square Annie Sloan Chalk Paint & Clear Wax Antique Door Knob Epoxy Resin (I used Envirotex Lite) Screw

    I needed something to screw into and antique door knobs don't usually take standard screws. So I started by taping off my antique door knob and mixing up some resin to fill the old screw hole. Beckie from Infarrantly Creative has an in depth tutorial if you need more help with this part. Then I painted my two pieces of pine with Annie Sloan Chalk paint in French Linen which is the same color as my daughter's dresser.

    On one of the wood pieces I used my keyhole bit on my router to make a spot to hang the little doorknob shelf from the wall. The other piece of wood I marked the middle and then 1/2 inch down on each side and traced two lines to give the front of the wood a little angle.

    I used a miter saw to cut the angles out and then nailed the top of the shelf to the bottom piece with a nail gun and finish nails. You could totally glue and hammer this with regular nails too.

    Now it's time to drill a pilot hole in the wood for your doorknob and drill a pilot hole into your doorknob where the resin is.

    Then crew a screw through your wood into the doorknob. Once my little shelf was all built I touched up the paint and waxed it with some soft wax.

    Finished! I am using my little door knob shelf to display my daughter's keepsake baby dress and a little cup that was a special baby gift.

    Thanks so much for having me Monica and Jess! I'd love it you came by and visited me at BeingBrook to see some of my other projects! Little Girl Aqua, Red and Gray Bedroom

    Build a Rustic Headboard for only $35

    Organize the Laundry Room with Basket Dressers

    Isn't she amazing?! We seriously envy that girls talent and creativity. Thanks, Brook!

  • Repurposed Art into Bulletin Board {Cleverly Inspired}
    Repurposed Art into Bulletin Board {Cleverly Inspired}

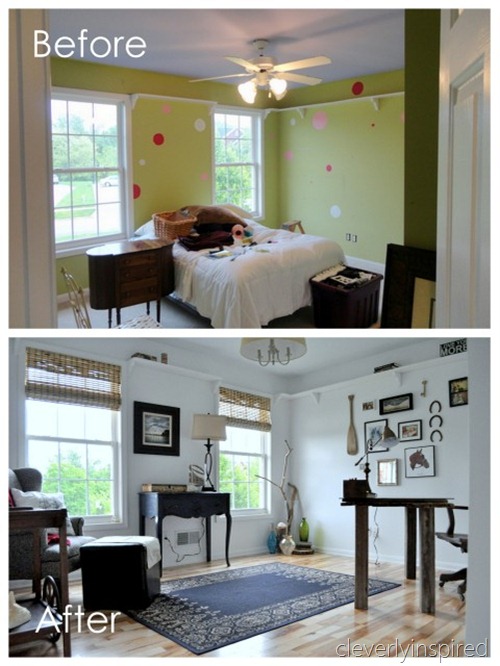
    Tracie from Cleverly Inspired is a blog rockstar, in our opinion. Not only is her blog fabulous, she is effortlessly beautiful and stylish, which we got to see firsthand when we met her at Haven in June. She has been super supportive of us from the get-go, and offers such sweet encouragement to us. Plus, she has great taste! Just check out the office makeover she did for her husband:

    office reveal post

    Please give her a big EC2 welcome and show her some love!
    Hello there East Coast Creative readers! I am thrilled to be here today!! I was so excited when Monica and Jess asked me to share a project with you. It was a joy to meet them at Haven this summer! They are creative clever girls! My name is Tracie and I am author of CleverlyInspired. I share all sorts of projects, crafts and recipes to help you be clever in your own home. I hope you can stop by and see me sometime!

    DSC_0005
    logo_whitebg
    bulletin board

    Back when I was making over the peanut’s room… I found this old art in our storage room. It was a piece that was rather outdated… but I had a feeling I could repurpose it somehow… just wasn’t sure what it would become. The artwork and frame was one piece. The art was actually painted on a thin piece of wood or veneer… so it was nice and smooth. My wheels started turning… :)

    ba

    The first thing I did was tape off the edges and spray half of the artwork with chalkboard paint. I did 2 coats and let it dry according to the directions. When it has cured… you take the side of a piece of chalk and “season” the chalkboard. Erase… now it’s ready to use!

    bulletin board 2

    For the other side… I used some tacky glue and adhered some cork. I bought a 4 pack of cork at Wal-Mart. Get the pieces as close to each other as possible. Place some books on top and let it dry. Then… take some favorite fabric and use spray adhesive to adhere the fabric to the cork. I cut my fabric with pinking shears so that the edges were pretty; )

    repurpose art into bulletin board (4)
    repurpose art into bulletin board (5)

    Finish off the edges with some trim… if you choose to.

    bulletin board

    There you have it! Custom bulletin board/chalkboard… on the cheap! Now go look for some really outdated art and make it sing again! Thanks again for having me visit!! I would love for you to come by CleverlyInspired to see me!! Here are a few past popular post (say that 10 times fast!)

    cinnamon toast muffins (12)

    Cinnamon Toast Muffins

    DSC00280

    Garage Sale frame Twig Art

    office makeover

    Girls bedroom becomes office
    Ok, everyone, go ahead out to your local thrift store and pick up some framed artwork! You have a project to do!: ) Thanks so much, Tracie!

  • DIY Fabric Flower Bouquet {My Girlish Whims}

    DIY Fabric Flower Bouquet {My Girlish Whims}

    Happy Monday, everyone! We are working our tails off this week on lots of Fall projects and fun blog stuff, so to help us out, we've asked a few of our bloggy pals to share some of their projects with you. But get ready, because next week, we'll be back in full force!: ) We're so pleased to introduce you to Rebecca from My Girlish Whims. We've been communicating the past several months through email and were fortunate enough to share our top wedding planning tips with her readers in February when Rebecca was busy getting married and going on her honeymoon. Rebecca is a really talented jewelry designer (make sure you check out her anthro jewelry knockoffs!), but we're in love with this Paper Fan Banner she made. Isn't it darling?

    Ok, take it away, Rebecca!

    Hello East Coast Creative Readers!

    My name is Rebecca and I blog over at My Girlish Whims

    My blog is all about beading, crafting, and general life as a girl!

    I'm so excited to be guest posting over here today, because I live very close to Jess & Monica! We haven't met in"real life" yet but I'm sure one day we will: )

    I just got married in February and have been trying to repurpose a few of the items I DIYed for my big day so I don't waste them! I had a ton of these fabric flowers left over:

    Which I had made to hang off the pews in the church.

    My hubby and I recently bought our first house and so I've been working on collecting/making some home decor accents. I thought I could use the silver flowers from the pew cones for up in our bedroom, which is eventually getting a grey/silver color scheme.

    I got this bucket from the"as-is" section of IKEA for $1.50. There was nothing wrong with it…I think they just aren't selling them anymore!

    I spray painted it silver with leftover spray paint from another wedding project

    I poured in some glass marbles (that were actually left-overs from my bridal shower!) and then stuck in my fabric flowers (this post has a full tutorial on how to make them if you are interested)

    Here's the finished product:

    Yay! I think it turned out so cute, and all it cost me was the $1.50 for the bucket!
    I put my little flower bucket up in our bedroom on our IKEA TV-holder-thing-a-ma-whatsit. Yes, that is the technical term.

    Other side has a picture of us from our big day: )

    And there are the flowers!

    Slowly our house is becoming more decorated…and slowly I'm using up some of my wedding decor too: )

    Thanks so much to Jess and Monica for letting me guest post! Please stop by my blog sometime to say hi, I'd love to meet you!: )

    Thank YOU, Rebecca! You can't beat a cute project with that price tag!

  • 5 FREE Home Decor Projects {Free Stylin' Beth)

    5 FREE Home Decor Projects {Free Stylin' Beth)

    We have another treat for you today! Meet Beth, from Free Stylin'. She is a girl after our own hearts, since she LOVES decorating with style on a budget, and is pretty darn good at it, too.: ) We had the priviledge of meeting her at Haven, and she is so sweet and bubbly! We're sure you'll love her-after reading her post today, and then head on over to her blog to check out the fun stuff she does in her neck of the woods!
    ---------------------------------------------------------------------------------------------------------------------

    Hey East Coast Creative Fans!! My name is Beth, and I blog over at Free Stylin'. You can find all kinds of posts about"living a stylish life without the expensive pricetag!" I've been big fans of Jess and Monica's since seeing them on The Nate Berkus Show. Those girls have some talent! It was such a blessing to meet them in person last month at Haven. (And yes, they are as sweet and friendly and beautiful in person!!)

    Haven Conference

    Me, Jess, Monica, and our cute friend Jamie

    I was so excited when they asked me to visit with y'all about something I love to talk about…Decorating for FREE!! I am all about using what you've already got to make your space beautiful. I'm also way into projects that I can do right now. (I love instant gratification.) So today I want to show you…

    5 FREE Home Decor Projects You Can Make TODAY!

    Would you like a little more glamour in your bedroom? New sheet sets and pillow cases can get expensive, and if you try to save a little in price, it could cost you in comfort. BUT!! You CAN make pretty bedding pieces out of the"underutilized"; ) lingerie in the back of your closet. Choose the items that have the most material and add the satin fabric to a pillow case you already own. Or make a throw pillow using pillow fill you aren't currently using. Learn how to make your own HERE.

    Trays are a decorating must-have, and they are as functional as they are decorative. A pretty tray can help complete a look, and you can make one for your home in about 15 minutes using an old cookie sheet and a piece of fabric. My tray, above, was made from a shirt I was about to give to the Goodwill. Instead I cut it up and glued it to the cookie sheet. Find out more about it HERE.

    Sometimes you just need to see something in a new way. Take a piece of artwork for example. I could no longer even look at the Monet painting on our mantel. So, I sprayed the frame another color and painted my own abstract art instead. You can paint directly to the back of your artwork or buy a poster board for just pennies. See how HERE.

    If you don't have paint, or can't because you rent, but you want a change today, try"wallpapering" a wall with maps or book pages or sheets of music. All you need is a stapler and some Mod Podge (or watered down glue) to seal the edges. The paper isn't permanent, but it makes a huge statement in your home. Check out how I papered my boys' bedroom HERE.

    Decorating with plates is such a fun and interesting way to bring in color and shapes into a room. And don't feel like you have to limit the plates to just a dining room! Hanging plates on any wall in your house is quick and free…just raid your own kitchen cabinets! You can hang your plates with hot glue and paperclips, too. No fancy plate hangers needed. Go HERE to see how I used plates in my own living room.
    I hope I've inspired you to try something new and FREE in your home today, using the items you've already got around you. It really does feel great to have a new look for nada lotta. Come stop by Free Stylin' for more tips and tricks like these.: ) Thanks SO much, Jess and Monica, for having me! Hope you're having a fun vacation!
    ---------------------------------------------------------------------------------------------------------------------

    So much amazing inspiration in one place! I don't know about you, but I'm totally loving that abstract art she DIYed. Add that to my ever-growing list of projects! Thanks for being here, Beth!

  • How to Make a Pallet Crate {the space between}

    How to Make a Pallet Crate {the space between}

    Hey everyone! It's your lucky day. While I'm on family vacation this week, we've asked a few of our favorite people to guest post for us! One of the highlights of our trip to Haven was meeting Karah, from the space between. She's super cool, fun, easy to talk to, talented and oh yeah, lives in Curacao. Not fair. We loved hanging out with her while we ate breakfast at McDonalds (don't judge). Anyway, she does some amazing projects (just wait until you get the sneak peek of her rooftop bedroom!), so be sure to give her some
    EC2 love!
    ---------------------------------------------------------------------------------------------------------------------

    Well, hello East Coast Creative readers! How are you? I'm Karah from the space between and I really can't even tell you how excited I am to be here today.

    Ummm, let's not tell the husband I used a photo of our wedding day to try to express my excitement over guest posting for EC2 today. K? Thanks. ;) I am a total blog stalker of these lovely gals, and when I got to

    stalk
    meet them in real life … Holy Caloni, I couldn't help but take random paparazzi like pics.

    It truly is an honor for me to be here today. And I'm going to share with you how I made a perfectly functional and, I think adorable, storage crate out of a pallet.

    One important thing to mention here is that we live in a rental property that is approximat ely the size of a breadbox, so I need to get creative with storage. Oh, and one other fun fact, although not relevant to the outcome of this story … is that we live in the Caribbean. Here's our new rooftop bedroom.

    pallet bed

    Aaaanyway, back to the crate.

    I didn't actually take a before picture … but … it was a pallet.; ) Similar to this one. And I used the same technique to remove the slats, a hammer and pry bar along with some cursing and a blister on my forefinger. Those last two are totally optional.: ) I knew where I wanted my crate to go in my kitchen, so I measured my space and cut my slats to size (14 inches long). Based on the height I wanted, I needed 3 slats per side (one wide one and two narrow ones), so I cut 12 pieces the same length. I took a little piece of scrap wood (maybe a 1 x 1) I had and cut it so I could use it as the brace to attach each of the sides of my crate together. The height was measuring about 12 inches so I cut my little brackets, if you will, about 10 inches long. Just long enough so I could get one screw into each of the three pallet slats on each side of the soon-to-be-crate.

    Ok, here's the thought process … I wanted the front to be only a view of the slats, meaning the front and back slats would overlap the slats on the sides. So, in the picture above, you see how I lined my brackets up flush with the edge of the slats for the sides of the crate. I attached the 4 brackets to both ends of the slats for both of the sides. Then, by lining up the slats for the front (and then back) of the crate, I was able to attach the brackets to the slats creating a bottomless and topless box. Confused yet? This pic is of the 2 sides with the brackets attached … ready to be attached to the front and the back sides of the crate.
    .

    Why yes, I do work construction on the coffee table.: ) Which makes now seem like a good time for a few tips: 1. Don't do construction on the coffee table unless you're ok with a sawdusty mess.: ) 2. Drilling pilot holes for your screws (like I did here) is always a time saver … for those interested in saving time

    and sanity and maybe a little bit of finger flesh.
    3. One might want to wash their pallet with some sort of disinfectant cleaner. 4. Sanding the slats before working with them, or wearing gloves while handling the slats would probably be a good idea. But, I'm not one to judge so if you happen to forego any of these tips your crate is still cool with me.: ) Ok, where were we … once I had all of the sides connected, I added a bottom. This is probably backwards carpentry, but that's how I roll. AND, so I didn't have to rip down the width of any of the pallet slats, I spaced them so they aren't wide enough apart for any canned goods to fall through, but not exactly a solid wood bottom. Like so.

    Then I drilled holes on either side of my crate to run some rope through for handles.
    .

    And because I didn't want people peaking at my canned goods (that's what she said), I added a top by just cutting more pallet slats the length I needed and adding a few pallet slats to the underside to attach them all together. Like so.

    And because I love me some driftwood, I just screwed on a piece that I thought would work as a handle. I didn't even use the same color screws. And then added some not-so-random stenciling.

    Thank goodness, because there is someone who doesn't like random stenciling around here. I finished her off by hand sanding the whole crate to distress the stenciling and smooth out the finish a bit. Oh, and just to clarify, all of the nail holes you see on the outside of the crate of from it's previous life as a pallet. Building the crate with the brackets on the inside eliminates any new visual nail or screws. And I really like the rustic look of the open holes from it's former life. And I really like that this project didn't cost me a penny! Score!
    Here is a little wider shot of the corner of our kitchen. If you want, you can learn how to make a little landing zone out of an old clipboard and wooden bin here.

    So, what do you think? Do you like pallet projects? Do you like unique storage ideas? Do you live with anyone who doesn't like random stenciling?
    And, on a completely random note … do you watch the show the Bachelorette? I know, I know … I say, answer the question first, judge me later.; ) Anyway, the finale of the show is tonight and over at my blog today I have am giving a tour of the house where the final

    drama
    rose ceremony went down. What can I say, it's a small island.: ) If you have a chance, stop on over to the space between, it'd be great to meet you. Thank you, thank you so much to Jess & Monica for letting me come by today. Hopefully you are all enjoying your space today! ~Karah --------------------------------------------------------------------------------------------------------------------------

    Karah, you're awesome. End of story. You're welcome here anytime!: )

  1. Fabric Art with Velvet
  2. Hand Embroidery with Fay Maxwell
  3. Fabric Book Covers
  4. Colouricious Creative Embellishing Day
  5. Velvet Wonder
  6. Constance Jablonski | Mode: Fashion
  7. H&M 2010 Fall: A First Look! | Mode: Fashion
  8. Georgia May Jagger: Vogue China | Mode: Fashion
  9. Isabeli Fontana | Mode: Fashion
  10. Eniko Mihalik | Mode: Fashion