My Creative Blog:
print

  • Temporary Accent Wall with Grass Cloth & Nailheads {Sarah M. Dorsey Designs}

    Temporary Accent Wall with Grass Cloth & Nailheads {Sarah M. Dorsey Designs}

    If you missed all the amazing projects of our first annual Creating with the Stars, be sure to check them out below!

    Round 1 Projects & Winners Round 2 Projects & Winners Ro und 3 Projects & Winners Round 4 Projects & Winners
    --------------------------------------------------------------------------------------------------------------------------
    Sarah's unbelieveable bedroom transformation blew us away. The color combinations, details and style of the room were simply perfect and we fell in love immediately. She had a few awesome tutorials for her projects, so we decided to break them into two posts. Today, you'll see how she made that removeable accent wall that is a great solution for you renters out there, or those of you who have Design ADD like us!: )
    When I heard that this week's theme was home decor I instantly knew that I wanted to do a bedroom feature wall and a dramatic headboard! With my amazing diy partner and husband, David, we got straight to work!

    Living in a rental makes it nearly impossible to install classic wallpaper and nailhead, so we decided to build a separate feature wall! We wanted to incorporate two of my favorite materials, nailhead and grasscloth wallpaper. I love the texture of the wallpaper and the dimension of the nailhead!
    Want to know how we built the wall? Here we go!

    We purchased three sheets of plywood from Home Depot and had them cut to 7' high. Since the feature wall is 12' long, it would need to be built inside of the room. We designed it so that it could easily be dismantled into three pieces to be removed. We tied the seams together with 1x3s and built a frame on the back with 1x3s so it was extra sturdy and straight. We then flipped it over and primed it so that they wall paper adhesive wouldn't soak in.

    Once dry, we cut the wallpaper to the correct height, placed it to the side and rolled wallpaper adhesive over the primer. We then used a wallpaper smoothing tool to remove any bubbles. The steps were repeated with 4 rows across, lining up the seams. It was helpful to have two people so that it could be adjusted as needed!

    For the design, I was inspired by this fantastic headboard by Annie Selke. We created the design in Illustrator, and calculated the distance between the nailhead and printed it on two sheets of 11x17 which were taped together. We then punched little holes through the dots and used a felt tip pen to lay it out on the wallpaper.
    Nailhead isn't the most fun thing to apply, but once you hit a rhythm you move pretty fast! Here are a few tips that I found helpful as I went.
    1. To help protect my fingers from the hammer and to grab the nailhead more easily, I used rubber finger tips on my thumb and index finger (you know the ones that they sell in the office supply stores for sorting paper and such?) When I did hit my fingers, it hurt a lot less, and they weren't even sore when I was done!
    2. If your wood is soft enough, push a few in with your finger first and then hammer. This saves time since you are putting the hammer up and down less frequently. Since our plywood was soft and hard in different spots, this wasn't always possible, but it helped when we could!
    3. Lastly, this feature wall took about 2,250 nails. Wow, that's a lot of nails! So it was helpful to have two people or if you have the time, break it up over a few days. Total install time for the nailhead with two people was about 8 hrs.

    It was helpful to install the trim (we painted first) before the nailhead reached the edge, so we knew exactly where to stop it. We used finish nails to secure the trim and then filled the holes with wood filler, sanded and painted once dry.
    Next, we decided that we wanted the wall to sit just above the trim, so we cut legs to height out of a 1x12 and secured it to the back frame. We then installed a few cabinet anchors through the trim into the wall to make sure that it was firmly attached.
    This wall was pretty massive! Almost the length of the room, but I LOVE the impact that it has on the space! Just because we are renting doesn't mean that without a little creative thinking we can't have a statement wall!

    I mean, c'mon. That is genius, and we don't mind saying we wish we had done it first! Ha! Check out Sarah's fabulous blog, and then come back tomorrow to learn how to make that coral headboard!
    Oh yeah! One more thing! Have you linked up your favorite home decor project yet? You can do that here for a chance to be featured on EC2 and win some great prizes. Fun for everyone!: )

    jess
    Monica
  • Creating Custom Artwork

    Creating Custom Artwork

    I recognize that DIY art projects are not for everyone. My love for custom art was born out of necessity (read: lack of funds). Creating my own artwork works for me, and I've found out why:
    1. I don't worry about ruining something I already have. With the exception of a few things, everything I own was bought second-hand or for a low price. I don't fear repurposing things, because the originals cost me almost nothing!
    2. I am not afraid of change. Actually, I crave it.

    3. I am not a perfectionist. Little imperfections in my art/craft projects are endearing to me. They say"I was handmade, and therefore may be flawed, but a lot of thought and care went into making me". I'm not saying perfectionists can't create art (because I'm sure most real artists are perfectionists), it's just easier for me to say this picture is"good enough", than someone who wants everything to be perfect.
    Ok, that's that. Recently I bought a yard of fabric for a project (stay tuned for more on that!) that I fell in love with. I ended up having some extra fabric left over that I wanted to use somewhere- anywhere!- in my house. I was feeling inspired by a gift bag in which my husband had wrapped my birthday present. I decided to combine my fabulous fabric, the cute bird, old frames, and some patterned scrapbooking paper into one art project!

    First, I started with the bird stencil (the bag had a 3D bird on it, so I just ripped it off to use as a stencil). I laid it onto the back of the fabric in the opposite direction I wanted it to face, and then traced it. After that, I carefully cut along the line, flipped it over, and then mounted it to the scrapbook paper, using regular, old tape!

    My husband insisted that this poor bird needed legs, so I drew two legs freehand and cut them out of the fabric, as well. Then I put the whole thing together and…

    Voila!

    I used the same method with my second art piece, but used the fabric as the background and the scrapbooking paper as the bird. I didn't have a smaller stencil, so I again, I freehanded the bird.

    Then I had Kevin hang them on an empty wall in our living room. (I promise that these two pictures are level, it's just a wierd angle)

    I love the way the pictures look as I enter the living room, and that I can see them from my kitchen table. Makes that room feel one step closer to completion, or until I'm ready to redo the entire room again for the third time.: ) I may not keep these pictures forever, but for now, they are a cheap solution. Below are some images from a few other bloggers of artwork they created using what they had on hand, or a few inexpensive items they purchased. Click on link under the image for specific instructions on how they made these beautiful pieces of art.

    The Nester
    The Nester simply scoured her home for items that would look good grouped together in a frame. This could easily be done finding stuff on a hike out in the woods, or on a trip to the beach.

    Martha Stewart
    These prints were made using memorabilia from trips (like tickets, maps, postcards etc) that were blown up and then framed.

    Ashley Ann Photography This is not everyone's style, but these two canvas prints were made for a nursery, and were created using a canvas, scrapbook paper, mod podge (amazing stuff!), and a little paint. Adorable and easy!

    Isabella & Max
    This look is much more sophisticated and elegant. This piece of art hung above the couch was made using a canvas, paint and a few different paint brushes, and nail heads. My sister who regularly tells us that she is not creative, painted three canvases in varying shades of colors that now hang above her fireplace, that are similar to this one.

  • Family Room Art & How To Add Grommets!
    Family Room Art & How To Add Grommets!

    {If you didn't hear, The Real Housewives of Bucks County are now East Coast Creative (Get the story here). You'll still be getting all the DIY, Design, and Monica & Jess that you love, but change your favorites to www.eastcoastcreativeblog.com Thanks!}

    You might remember that one of my 2012 goals was to make our family room reflect my style more this year. I still am convinced I don't really have a style… I more or less, just take lots of things I like and smush them all together, hoping it works out okay. Recently, I took one more step in the right direction for the room.

    I was browsing on Etsy a few weeks back and came across a shop I loved! Project Type has so many graphic art prints that I immediately fell in love with. This one in particular caught my eye.

    I had been toying around with the idea of vintage cameras in our family room and this picture was too cool to pass up. I contacted the artist to see if I could have a few custom tweaks made (it was vertical and I needed horizontal) and she said YES! I was so stinkin' excited when she agreed!
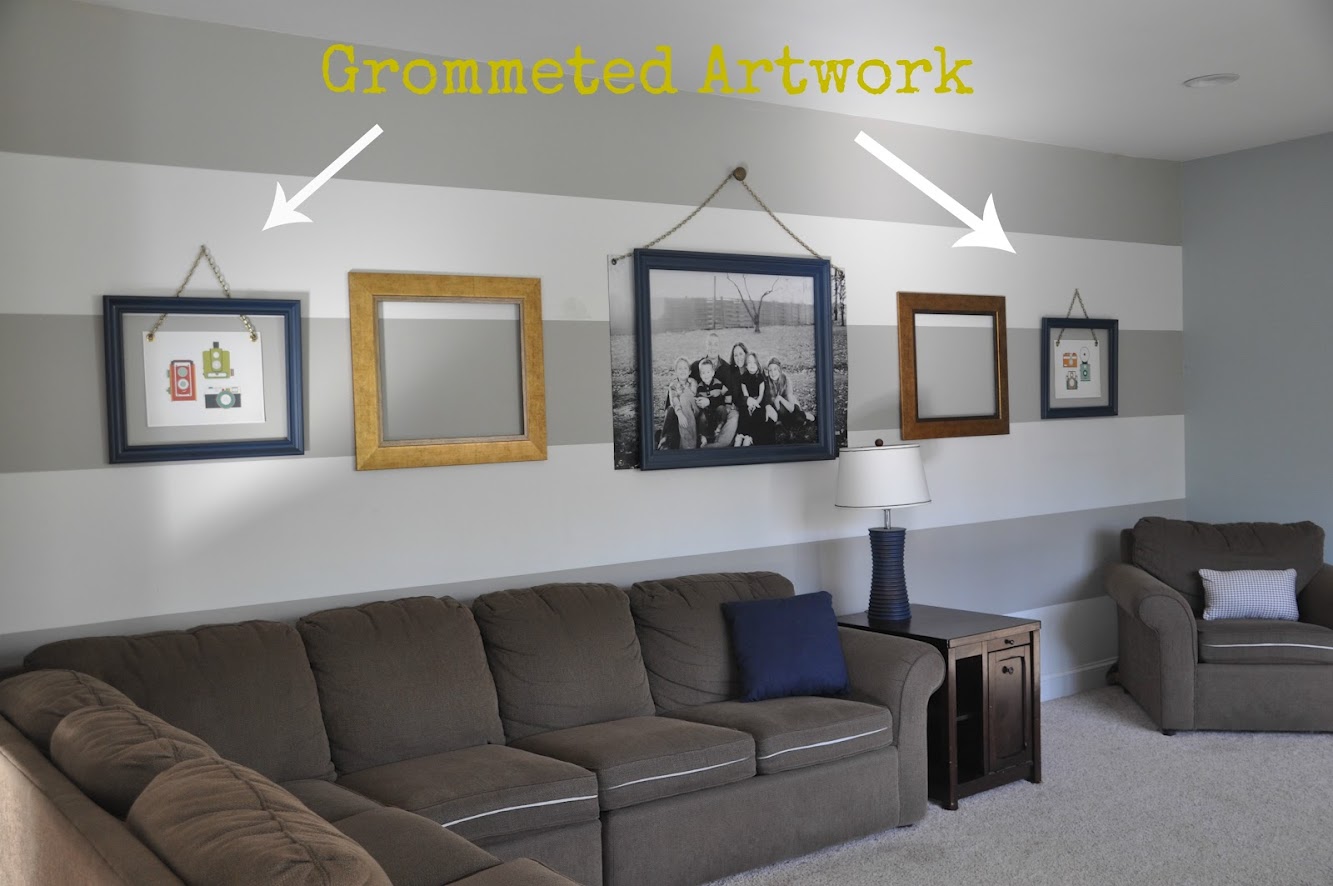
    I ordered two prints and honestly even the packaging they came in was super cool! Now, you might remember what was on the wall already. My ginormous family picture with the smaller frame…

    Ginormous

    Well this time, I was going for the reverse. Tricky aren't I? Bigger frame smaller picture.
    Once again I used my prized possession, AKA grommeter from Nate. I'll admit I was a tad nervous putting holes in fabulous artwork, but I wanted it to have the same feel as the large print.
    Want to know how to use a Grommeter??

    Add Grommets

    I keep my grommet tools in the little bin Nate gave me. Who knew one could love Tupperware?

    IMG_0545

    Take one of the female grommets and determine your placement. I traced it with a pencil (a very fancy pencil I might add!)

    IMG_0548

    Next place the cutting tool (might have an official name, but I don't know it) on your traced circle, and put the mini block of wood under it. The wood comes with your kit.

    IMG_0553

    Give it a solid pounding with a hammer and you have a nice little circle cut-out

    IMG_0554

    Pop the male piece through the opening. Make sure the pointy end is on the back of your artwork.

    IMG_0555

    Now start stacking. Add the female part to the back…

    IMG_0559

    Here' the order…The large metal ring goes on the bottom (part of the tool kit), then the male grommet, then paper, then female grommet, then the big mama tool (that's the really official term). Now Hammer, Hammer, Hammer. (Don't do it on your granite counter. I took mine outside in the garage)

    Ta-da! Perfectly adorable grommet!

    IMG_0560

    I took my art to the wall and hung it with plain nails. I'll use decorative ones to cover 'em up.

    IMG_0565

    I added my chain, which again only cost me about $1.45 at Lowes

    IMG_0566

    And vioila! I'm also going to add a fun door nob to the peak of the chain. I didn't quite get to Architectural Antiques this weekend as I planned to. Now, here's the question of the day… What should I put in the open gold frames??

    Here's the room to give you the full picture…

    Side note: Does anyone else have a weird husband that flips the cushions backwards? He does it when we don't have company over because the kids make a mess of the cushions. Sometimes I forget and then it's an awkward, mad rush as people are walking in the door. Weird. I know.
    So let me know what you think of my retro camera art, and what I should do to finish off this wall!

    Follow Me on Pinterest
  • Fab Find Friday

    Fab Find Friday

    That's right. In honor of our trips to Disney this week, we are highlighting our favorite things about this magical place. We had two totally different experiences here- Monica had no kids which meant sleeping in and staying out late and taking in all the"adult" rides and activities. I was with my family and some extended family which included 5 kids, so we were up early, getting home early and hitting up all the kid-friendly attractions. So, don't be jealous- just take some notes on things you do NOT want to miss next time you're in Disney World.: )
    Jessica's Top Picks

    1. Disney Photo Pass. This pass is ingenious! There are the usual photographers posted strategically around the parks (you know, in front of Cinderella's castle, with the characters etc.), but instead of having to go to a booth to pay for a picture and take it home with you, they scan your pictures onto the photopass card. You'll want to keep that card and have it handy any time you get your picture taken. When you get home, you can input the information into the photopass website, and all your pictures can be found in an album. From there, you can order and buy prints, or share the photos on facebook or through email, at no cost! We were told that if there are 9 or more prints that you love and want to have to use as you wish, ordering a CD of the prints is the easiest and cheapest way to go (however buying the CD will set you back $150!)

    Festival of the Lion King

    2. Disney Live Shows. Honestly, these shows are Broadway quality, but cost nothing (after you pay to enter the parks). The talent is amazing, the costumes and backdrops are so colorful and amazing, and the music is phenomenal! Our favorites include The Festival of the Lion King at Animal Kingdom, Beauty & the Beast at Hollywood Studios, and Finding Nemo-the Musical at Animal Kingdom. Plus, the kids love all the colors and lights and music. It really is a fun-for-the-whole-family event!

    3. Camp Minnie-Mickey at Animal Kingdom. If your kids are into meeting all the characters, this is the best place to do it! The three older kids in our group had autograph books and nearly filled them at Camp Minnie-Mickey. We met Mickey Mouse, Minnie Mouse, Goofy, Donald Duck, Pluto, Chip & Dale, Pocahontas and a bunch more. Definitely get there as it opens at 9:00 AM to avoid the lines.

    Monsters, Inc. Laugh Floor

    4. Monsters, Inc. Laugh Floor at Magic Kingdom. This interactive show is hilarious and incorporates real people from the audience into the show. The technology truly is amazing- the characters (ie: Mike Wazowski) are animated, but somehow they can interact with the audience. The kids (and my husband) thought this was hysterical.

    5. We used the book Birnbaum Guides: Walt Disney World 2011 to help us navigate the parks successfully with kids. It has a suggested game plan of action if you have kids which didn't steer us wrong. I highly recommend this book!
    Monica's Top Picks

    1. FastPass. Basically, the best thing at Disney since sliced bread! FastPass removes the one complaint people used to have about Disney… long lines. With this system, you can reserve a spot in line for a ride while you visit other areas of the park. You go to the ride, use the Fastpass ticketing area and are given a slip of paper which gives you a one hour window that you can return during to go on the ride with a very minimal wait (our longest was 10 mins max.) All of the most popular rides have FastPass, but if you're thinking of going early in the morning to get reserved spots for all of your favorites, think again. You're only allowed so many FastPasses within a certain amount of time, so you can get one and then your ticket will tell you when you can go and reserve another one elsewhere. It's just plain old awesomeness!

    2. Test Track at Epcot is a high-speed vehicle-simulation ride that I loved! It's one of Disney's longest (5 mins) and fastest rides. It takes you through a series of driving simulations (heat, corrosion, anti-lock breaks, etc.) but, the fun starts when you head out onto the open road. The speed and smoothness of the ride is amazing. Definitely check out this ride and of course use a FastPass to avoid an eternal line.

    3. IllumiNations at Epcot. Every night this show is done at 9pm and I think I just happened to catch it on the best night ever. It was a warm night with an almost full moon, and the music, lights, and fireworks made"Disney Magic" come to life. It's a 14 minute show and it's not overly loud if your little ones aren't huge fans of the crazy loud fireworks. I recommend dinner in China and then watching right outside of Japan for an amazing viewing spot.

    4. Downtown Disney. I like this part of Disney for many reasons, but the top two are that 1. It's free and 2. It has great shops and restaurants and isn't grossly overpriced. Earl of Sandwich was perfect for a midday lunch and in my opinion rivaled Panera (which is impressive in my book.) The Lego store (and the amazing Lego displays outside), the huge Disney Store, and the specialized Disney Toy Store were my favorites.

    I also had the pleasure of meeting Jess for dinner at Downtown Disney's Rainforest Cafe. We were laughing about the fact that we rarely get to go out for dinner just the two of us and had to go to Orlando to do it.

    The famous hold the camera ourselves shot…

    Do you see the size of that dessert?

    Ahh…Vacation 
    My favorites list is a little shorter, but that might be because one of my very favorite parts of this trip was just sitting poolside reading for hours! Being able to get through three books in five days was just a little bit of paradise for me.
    So, we hope you enjoyed hearing our Disney Fab Finds. Now, do tell… what are your Disney Favorites?

  • Industrial Faux Canvas Collage

    Industrial Faux Canvas Collage

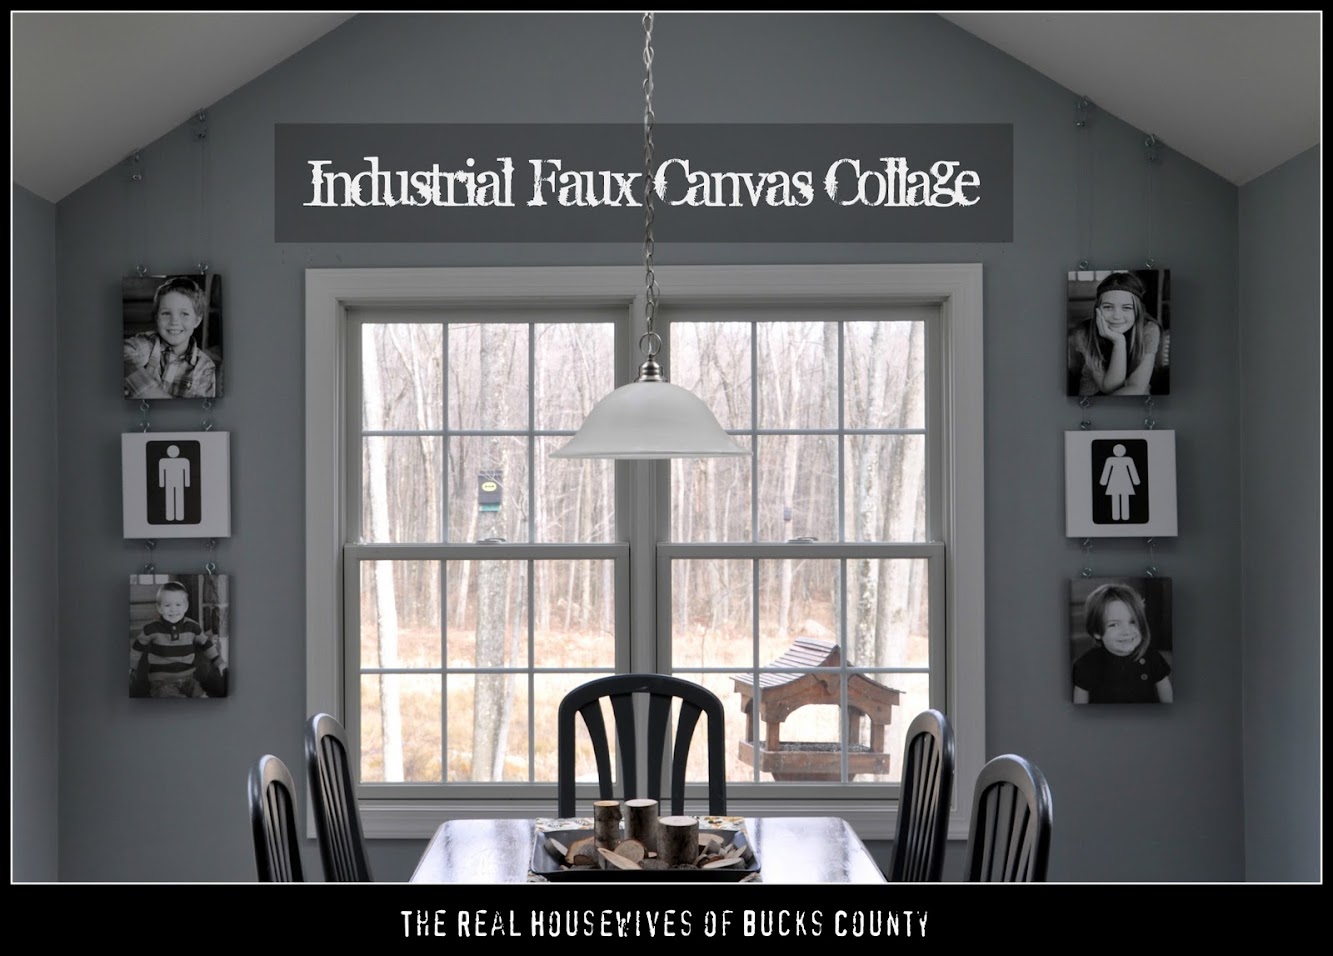
    Happy Friday to our favorite readers ever! I've been really excited to share this tutorial with you! I wanted to hang canvas prints of my kiddos in a unique way. Add some wire, screws, and clamps, and I think I came up with something pretty cool!

    Industrial Faux Canvas Collage

    Everyone loves gallery-wrapped canvases these days, and why wouldn't you? They're fabulous! Although, we don't know about you, but sometimes $60.00+ for one print is a wee bit hard for us to swallow. We were super excited to hear that WalMart came out with a faux canvas:

    Now what, you ask, is a faux canvas? Well, we were wondering the same thing, so of course we tried it out. What they do is print your photo on heavy, dimpled paper (canvas look-alike) and then wrap it around a cardboard box. Sounds glamorous, huh? Let me tell you that for the price, we were thrilled!

    And, of course, we didn't pay full price… and neither should you! We used a coupon that brought the total down to $9.96 each but… it's expired. BOO! Have no fear, we've got your back! Canvas People will give you a FREE 8x10 canvas and it's not even cardboard! lol. Just use this link to get the deal.

    So, you should know by now that I have 4 kids, yup FOUR, and so we got prints of each of the kiddos. We thought it would be fun to add a little boys vs. girls flare, so, inspired by Mandi's Epic Room Makeover we made two graphic canvases as well. We just used some images we found online and Picnik to create them. Sadly, Picnik is actually closing (today in fact!) but PicMonkey is the perfect replacement!

    The first step was to add the screw eyes to each canvas. Just measure to the center and screw them in. Since they're made of cardboard it was crazy simple to do. (Umm, please ignore my creepy monster looking hands)

    Add screw eyes to the top and bottom of each canvas except for the one which will be at the bottom of your display. The bottom canvas will only get top screw eyes.

    Next, add screw eyes to the ceiling. This will require a little measuring, but you'll want them to be even. My vaulted ceiling required some additional math, but we made it work.

    Here's where it got a bit tricky. The nice man at Lowe's gave us these clamps to lock the wire in place. Have you ever felt like your hands were made of stone? It's very clear that we're not surgeons. It took about 30 minutes to clamp the first side. Ugh! The hubs finally got home and it took him 30 seconds. We were just happy to have it done!

    Now for the fun part! Weave the wire through the screw eyes on the top, behind the back and out the bottom. Repeat for the remaining canvases. Ok, we're all about keeping it Real on our blog, so we'll be honest here too… This is a two person job and preferably with a person you really like, because it's a tad frustrating. The canvases tend to slip down a bit and did we mention our stone hands? We promise it's all worth it in the end.

    Once your canvases are threaded through, you'll want to secure the bottom one first. We used a staple gun to hold the wire in place and then added some hot glue (because they were slipping and because Jess is slightly obsessed with the stuff!)

    Determine how far apart you want your canvases and adjust them accordingly. The tension of the taut wire should keep the upper canvases in place, but if you want extra support you can add some glue to each one.

    The end result is a unique, industrial-looking display that we love!

    I couldn't be happier with this project and the unique way to share pictures of my kids! I have to give a shout out to our photographer and friend at Salvatori Photography. These pictures are SO my kids!
    This was just the first project in my breakfast room makeover, we have lots more planned. I've switched out the light fixture (thankfully!) and this weekend I'm adding avocado chairs, stenciling my table top, and more! I hope to have more to reveal next week!

    So, what do you think? Is the wire style workin' for you?

    Monica
    Follow Me on Pinterest
  • Photobooks

    Photobooks

    This guest blogger just so happens to be my personal favorite… I'm allowed to be a little biased because I think he has a crush on me, and I think he's kinda cute too. Make sure you leave a comment and like the post on Facebook because I need lots of positive feedback for this blogger!

    This is Eric, husband of the oh-so-talented

    Monica. I got word that Jess and

    Monica would be having"guest bloggers" and I jokingly asked why I can't be a guest blogger. Well, she called my bluff and told me to put together a post.
    Now the conundrum, I am not housewife and as my WHOLE family can vouch for, I am NOT crafty. So what can I post on?
    Ah-ha… probably the most important thing (not living) in my whole house would be our photo books! And this is one quasi-crafty thing that I am totally in charge of. So here goes.
    If all of you crazy blog-stalkers with kids are anything like my wife, you take thousands (if not millions) of pictures of your kids, your house, your family and really just your whole life. These pictures sit on your camera or computer, occasionally they get dropped into a blog or facebook, but for all intents and purposes, they sit – lost and wasted.
    In 2007, I got tired of seeing

    Monica take so many awesome pictures without ever doing anything with them. That's when we discovered Blurb. Ever heard of it? The beauty of Blurb is that they offer"book-store quality printing and binding" at incredibly reasonable prices.
    Everyone I've talked to seems to get overwhelmed with idea of doing a photo book. But trust me, it's not hard. The longest, hardest, most time-consuming part is just sorting through the tens of thousands of pictures stored on your camera and computer and organizing a years worth of pictures. But… and this is a big but… it's so rewarding going through a full year, seeing all that you've done, re-living all the fun events, seeing how your family has grown over the course of a year.
    Ok, so what I do, (and this is just preference), is I go month-by-month, sorting pictures mainly by events. I drop all pictures into folders on my desktop with a name of the even. For example, I'll have folders such as"snow fun,""baking with mommy,""bath-time,""field trip to the farm,""fun with playdough,""Kenzie's soccer," etc., and then I always have a folder for each kid with all the best pictures that we have for them. Then when it's time to actually put the book together, it really just flies!
    The great thing about doing a photo book like this versus just printing photos and putting them in an album is that you get to tell stories, explain the events, and actually add personality to your photos. It's a great place to remember some of the crazy things your kids have said or done. With the craziness of moving over this summer, I got way behind on putting these books together. I sat down to do a book for the 2nd half of 2009 a couple weeks ago and I was amazed at how much I forgot! I saw all these pictures and couldn't quite place where we were, or what we were doing, or some of the fun stories behind the pictures. My goal is to do 2 books per year as soon as that year is finished. There are so many types of books that you can do –

    Monica scanned all of Kenzie's art work from a full year of school and made an art book, she made several small books documenting things such as birthday parties or Christmas. We've even given a book to my parents after a week on vacation with them (yes, these books make great presents for the grandparents!)
    Enough talk. Here is what Blurb actually looks like (screen shot from our ancient desktop). You log in and all the Blurb books you've created are listed.

    Once the book is created, I import all the pictures that I have from a given folder on my desktop (i.e. beach with the Motts). There are dozens of picture/text layouts to choose from and all you have to do is drag-and-drop your pictures wherever you want them and then add the text. The view below is during the editing process.

    You can also preview your book to see how it will actually look once published.

    I mentioned in the beginning that it's"book-store quality printing and binding" at incredibly reasonable prices. For a 200 page book, with a hard-bound cover, it's only $48.95. A 200 page book can easily hold 600-800 pictures. I know Blurb is not the only company doing this – it just happens to be the one we use. I searched for photo-book reviews and this website seems pretty accurate. It rated Blurb as 4 starts (out of 4) for quality, but lower scores for features and ease of use. Other sites have higher scores for ease of use/features but slightly lower scores for quality. I'm not looking for anything too crazy, so I'll sacrifice a little on the crazy layouts and customizability for quality.
    That's it. Now if only I could find a way to do something similar to the hours upon hours of home-videos we have, I'd be all set! Any suggestions?
    -Eric (Monica & Jess)
    Linked Up to: The Stories of A2Z

  • Free Printable Invasion

    Free Printable Invasion

    I'm serious when I say that I think one of the best things about blogging and the internet is free printables! They add so much character to your home without having to spend lots of money. Thank you to all you who provide little ol' me with free stuff for my home! I've talked about a few different places you can find free printables here, but I decided that for my open shelves in the kitchen I wanted something specific and custom-matched to my color scheme. What's a DIYer to do? Why, make one herself!

    I wanted to create something that was meaningful to me, but that also had some connection to eating and the kitchen. While searching around, I came across 1 Corinthians 10:31 and knew that it was perfect for this!

    I found a pattern that I loved by Moo & Puppy (it's the morrocan trellis pattern that comes in a bajillion colors), uploaded it to Picnik and went to town. Why doesn't everyone buy digital paper? Seriously, there are SO many uses for it and it's so darn cheap! Plus, you can get 15% off if you use the code RHBC15. ----------------------------------------------------------------------------------------------------------------------Anyway, back to the printables. I have three identical frames in the kitchen that I spray-painted turquoise, and needed to fill them with something. I made this one using a great Julia Child saying…

    …and printed this beautiful peacock from The Graphics Fairy!

    Three cheap thrift store frames + free printables = one happy girl! And since I'm so happy, I decided to share the love. Free Eat, Drink, Glory of God Printable

    It's a 5 x 7 print and you can choose from three different colors: mustard yellow, turquoise and lime green.

    Click here to Download Printables I'm excited to finish accessorizing my open shelves, but you got a little glimpse today of how they're shaping up. What do you think?
    Have you ever made your own printable? Do share! 

    jess
  • Sugar & Spice {And Winner of Giveaway}

    Sugar & Spice {And Winner of Giveaway}

    A few weekends ago, my younger sister, Chrissie, my mom and I had the pleasure of throwing my older sister a baby shower. She is due on May 16th and I can NOT wait to lay eyes on that sweet little baby girl. My big sis does not like surprises, so she knew about the whole thing. We kind of went with a"sugar and spice" theme, although not everything fit into that box.

    The shower was held at The Lucky Cupcake Company in Plumsteadville. This little shop is just too cute, and they serve some delicious cupcakes! Actually, the owner, Joanne, was recently on the show Cupcake Wars on the Food Network. We were even more excited to throw the shower here because her whole store is decked out in our shower colors- pink and gray. Score one for us! That means less decorating.: )

    She even had a sign that fit the theme perfectly!

    I haven't yet shared my love for Produce Junction on this blog, but now is the time! I seriouly love this place for fresh flowers. I got two dozen pink antique-looking roses for $6.50, big white carnations and some other purple flower things (I am sooo not a florist, as you can tell). All for about $10! These made about 8 arrangements, which were absolutely beautiful.

    We purchased simple mason jars at Giant and then worked the flowers into them until they looked pretty. The plates, silverware, cups and napkins came from Dollar General. I was really impressed with their huge selection and really cute designs.

    Joanne from the Lucky Cupcake made us a 5 dozen cookies in different varieties for our cookie bar favors. She made sugar cookies shaped as onesies (for the sugar part) and chocolate chip and oatmeal spice cookies (for the spice part) and each guest took a bag and filled it with their choice of cookies.

    Chrissie had two friends with her that helped us out with the cute frames. I explained to them how to easily decoupage the scrapbooking paper to the frames (tutorial on that to come late- so easy!). We made one to hold the cookie bar favor instrucations and one for the scrapbook instructions. My sister took them home and will be able to put them in the nursery! Adorable and easy.

    We bought the favor bags from Michael's, as well as the labels. Once home I printed the labels that said"Sugar and Spice and Everything Nice- Baby W 5-16-11". Then I folded the top part of the bag, punched holes in the front flap (so they could open them and put the cookies in) and threaded a ribbon through the holes and tied them in a knot.

    We requested Joanne to make her pink champagne cupcakes-which actually have champagne and real sliced strawberries in them!- and they were to die for. She also included some vanilla buttercream cupcakes as well.

    Our friend, Stephie, made my sister this diaper cake. The top held some of the sweetest little white shoes I have ever seen.

    Loved all the details!

    Some of you may know that the Lucky Cupcake store is now in the space where the Dream Dinners strore my mom and I started was. This pendant light used to have the DD logo on it, but Joanne had it changed to include her logo. So resourceful!

    My best friend and awesome party-throwing partner!

    And how could I not include a picture of my beautiful niece, Leah. I just love that face. Everyone went so well and I think Rachel had a great time. Time to come out, Baby W!: )
    And now for the $10 Chubby's Gift Card Winner:

    Congratulations, Chrissie Duncan ! (I promise this is not rigged!: ) She wrote: My fav kind of icecream is PB Cup Perfection…Coldstone.: ) Or anything that is edible.
    Have a great Monday!

  • Playhouse Loft Bed {Little Girl's Room}

    Playhouse Loft Bed {Little Girl's Room}

    My daughter turned four a few weeks ago, and as her gift, we promised that Daddy would build her a new playhouse loft bed, and then Mommy would decorate it. We love our girl and were more than thrilled with how excited she was about her new bed. Every day of the week we built it, she would ask us if it was done and could she sleep in the loft? My hubs could not be more proud of the work he did (he did a seriously amazing job!), and I'm so excited to share it with you today! Playhouse Loft Bed

    This is not a tutorial, because we basically followed Ana White's plans word for word, although we did make some minor adjustments to the bars at the top of the bed. Check out her plans here for more information.

    We cleared the bed out of Campbell's room in preparation for the building process. Because of the size of this bed, my hubs had to build it in pieces and assemble it right in the room because it wouldn't fit through the door.

    Poor girl slept in a sleeping bag the entire week! (Find out more about the family tree mural here).

    I can honestly say that I have the best in-laws ever. They willingly help out whenver they can and we so appreciate them! My hubs called in my father-in-law for reinforcements, and we were thankful for his expertise!

    The biggest expense is obviously all the wood you need to build it. Since my hubs has such a limited amount of free time (he works 6 days a week!), we decided to have Home Depot make all the cuts for us to save some time. It worked perfectly- in about an hour, the really helpful Home Depot guy had all the cuts done, whereas we would have had to set up a work area, do all the measurements, make the cuts and clean-up which would have taken loads more time. They didn't charge us for any cuts since we bought so much wood (about $250 worth), so it was totally worth it.

    Ana's plans are pretty extensive, but my hubs and father-in-law quickly threw them around on the floor in a haphazard manner. I'm not really sure how much they actually followed the directions, now that I think of it…

    But after a few nights of building, a few more of painting and decorating, we had this:

    Pretty adorable, right? One of my favorite parts of the house is the faux"siding" (which is pretty hard to see in pictures). We saved a bit of money on a couple sheets of plywood since we already had them on hand, so I splurged on two sheets of faux wood panelling ($24 each) that we hung horizontally on the outside walls. The guys used wood glue and clamps to hold it in place until it was secure. It adds such a cute touch and I'm so happy we decided to go for it.

    The inside walls are painted an in-your-face pink that made it ridiculously hard to get a good picture. Note to self: 1) Turn off Christmas lights before taking pictures next time, 2) Straighten picture frames after the kids attack that area, 3) Don't try and take pictures with the kids around because they immediately mess things up. Ah well…life with kids!
    I wanted a place for Campbell to play dress-up and also a spot to corral all her jewelry and makeup, so I created a little vanity area with a simple mirror from Walmart ($4) that I spray-painted and a shelf that was already in her room that I spray-painted white. The two little patterened boxes are from Walmart, as well, and were only $.99 cents each. Score!

    I found the super-cute flower hook at Joann's on clearance for $2.00 and used two Ikea hooks I had on hand to create a place to hang her princess dresses. The flower hook was already blue, but I spraypainted the other guys a similar blue for a cohesive look.

    My wonderful mom bought fabric from Joann's and whipped up some curtains for the windows and door. I still need to make some tiebacks, but I love the polka dots and sweet flower prints!

    Our original plan was to build stairs, but we didn't have enough space, so Kevin built a ladder, which she actually loves. She did fall all the way down once, on her very first try, but she's gotten used to them, by now!

    All in all, this playhouse loft bed made one little girl very happy, and that's just what we wanted. Woohoo!

    Did you have an awesome play area when you were little? What was it like?

    jess
  • Wood Shim Wall Art {Crafting for Charity with Homes.com)

    Wood Shim Wall Art {Crafting for Charity with Homes.com)

    If we win, Homes.com will give Worthwhile Wear Five Thousand Buckaroos! For a new organization like theirs, that could be a major game changer and we really hope we can win it for them! (If you want to skip the project and just vote you can! lol Click HERE to Vote)
    You can read all about our project first, but then you have to pinky promise to follow the voting directions at the bottom of the post okay? Ok! Thanks!
    Wood Shim Wall Art I (Monica) have had this project in my mind for a few months now. It was inspired by a printed pattern I had seen in the window of a shop. I couldn't remember exactly where I saw it, but I was pretty sure it was a cool shop we had passed when we were in London in November. Great story right? Crafty DIY project inspired by a European city… Then, two weeks ago it hit me… It was JCrew at our local mall! I just about died laughing when I put it all together! Well, JCrew or London, I sure am glad it inspired me…
    For under $20 we created the coolest DIY Wood Shim Wall Art

    (You could go vote NOW since you've seen it! Click Here!)
    I wanted something with BOLD color, and a modern feel, that married well with a bit of industrial flare!

    How's that for a Before and After?
    Who knew our dumpy oak piano could be such a show stopper?

    Here's a peek at the details- the DIY light isn't my entry, but man I love how it works with the Wood Shim Art! (Light tutorial coming soon!)

    (Or you could vote now?)

    Want to know how we did it??
    You've gotta head over to Homes.com for the full tutorial (but only after you've voted!)
    Click HERE for the full tutorial

    There were a lot of DIY elements around our Crafting for Charity project, and we'll post about all of them over the next week or so!

    And now for the really important stuff! We're blogging for a charity that we love and are so proud to support. Worthwhile Wear was founded by our close friends Dan & Steph and they've committed their time and talents to make it their life's work.

    Jess and I both have daughters and we couldn't imagine any of them having to endure human trafficking. We love Worthwhile Wear's mission…
    Worthwhile Wear exists to rescue and restore girls from forced prostitution, and more importantly help prevent girls from ever entering it. We target highly trafficked areas both internationally and domestically, and offer women the opportunity to overcome two primary factors which are at the root of sex trafficking; poverty and lack of education. This solution is offered through vocational training centers which teach women how to make wears, such as jewelry, handbags, and clothing, which are sold to provide them employment. Additionally, the women are offered free education, a safe place to stay, and restorative programs geared toward encouraging personal growth and re-establishing self-worth.

    We had the honor of working on the planning committee and doing all the decor and design for Worthwhile Wear's launch in 2012. The following images and statistics were used as artwork at the launch benefit-A Worthwhile Evening.

    Those beautiful faces are not stock images. They're from Dan's last trip to India a few months back. The work Worthwhile wear is doing is critical and we hope you'll check out their site and follow along with them on Facebook.
    Now it's Time to Vote!
    There are 8 bloggers in this competition and some of them have a lot of followers, but none have the amazing fans we do! We know you guys have our back!
    All voting will be done via Homes.com's Facebook Page
    (On their Facebook Page, there's a little button that says Crafting for Charity. Click there)

    Click HERE to Vote

    A HUGE Thank You to Homes.com for sponsoring this awesome contest and for spreading the word about amazing charities like Worthwhile Wear. If you'd like more information about the organization and how you can help, click here.

    Thanks so much!
    Now, Go Get Your Vote On!

    jess
    Monica
  • A Pinteresting Home! {Meet Kelly}

    A Pinteresting Home! {Meet Kelly}

    We all love Pinterest… there are so many ideas and cool people to be inspired by. I wish I took the time to do more of the projects I see, but honestly this lil' old blog takes a lot of time, so I don't do as many as I'd like to (sounds weird that a DIY blog would take time away from DIYing, but it's true!)

    Today I'm excited to introduce you to two people I adore. Meet my adorable sister-in-law Kelly and my awesome brother-in-law Bryan. This cute couple lives in Ohio, so we miss them 24-7, but we have a blast when we're together.

    I also have to introduce you to their little stud Jax. He's our one and only nephew and we think he's the best!

    Okay, so why are we having this Mangin Family blog reunion?? Well, Kelly is not just a Pinterest addict, she actually does what she pins! {Gasp!}
    On our recent visit to Ohio, I felt like I was walking through a Pinterest Museum. It was too awesome not to share. Kelly has some creative friends and family, and between them all they have done so many fun projects for her home. So without further ado… Welcome to Kelly's Pinteresting Home! State Artwork Kel is from OH and Bry is from PA.

    IMG_0012

    Aqua Painted Pedestal Table Kel got her table and chairs at goodwill for $75 total. Add aqua and white paint and you have an awesome statement piece!

    IMG_0013

    Funky Pendant Light This was one of the first changes Kelly made to her kitchen when she moved in!

    IMG_0014

    Crossword Names Takes 2 seconds, but is so cute as an accessory. It's just a frame turned chalkboard.

    IMG_0015

    Kitchen Office Space She removed the wall cabinets, added open shelving, and did some adorable accessorizing. Kelly claims she can't decorate, but I'm pretty sure you'd all beg to differ!

    IMG_0017

    Spray Painted Faux Antlers Kel is super lucky to have a Hobby Lobby right around the corner. These beauties came from there and got a coral spraypaint treatment.

    IMG_0018

    Simple Printables She doesn't just PIN free printables, she actually uses them… imagine that! A simple piece of twine, some clothespins, and voila!

    IMG_0019

    Modern Painted Chandelier Bye Bye Brass, hello funky green. The circle bulbs are just right and add a cute modern flare.

    IMG_0020

    Window Frame Kel found this awesome salvage shop in Springfield, OH. They have windows galore!

    IMG_0021

    Family Rules and More Printables Kelly and Jess both have the Be Happy print. You can get it at Sprik Space.

    IMG_0022

    Magazine Paper Frame & Vase These two were purchases, but I liked them too much not to include them. If you're patient enough you can make your own!

    IMG_0023

    House Numbers and Hooks There are so many things you can do with frames, and digital paper. Our favorite site is Moo & Puppy!

    IMG_0024

    Yarn Wreath You know I'm the"anti-wreath," but this one is really cute! I love the homemade pompoms

    IMG_0025

    Paper Flowers Kelly's friend Amy made these for her and they match her aqua table so well. Jones Design Company has tons of paper flower tutorials!

    IMG_0026

    Clip Hooks Are you seeing a clothes pin trend? They're affordable, easy to use, and cute!

    IMG_0027

    Fabric Lined Shelves Kel took plain bookshelves from drab to fab with this blue fabric. Her shelves always look so cute! Her sister gave her the frame with the subway art and has it loaded up with a print for every season/holiday.

    IMG_0028

    Unique Gallery Wall These cool rounded frames are from Ikea and the doorknob is from Hobby Lobby.

    IMG_0029

    Growth Chart I love this growth chart that Kelly's sister made for her. It's exactly like this one from Miss Natalie. No time to make one? You can buy one on Etsy for $56.00.

    IMG_0032

    Last but not least, check out this fabulous fabric choice for a DIY headboard!

    IMG_0035

    What do you think? Are you inspired to go look at your pin boards and actually do a project? I know I have a list a mile long that I want to do now! I also have to tell you that Kel had no idea I was snooping around her house taking pictures, so none of this was staged or cleaned… this is real-deal, everyday life and I think it's great!
    Have you turned a pin into a project? Share the link, we'd love to see!

    Monica

    Only following on the blog? You're missing out. Use the buttons below to join in on all the fun!

    Follow Me on Pinterest
  • Spring Must Haves

    Spring Must Haves

    I'm not a huge fan of spring, mainly because I LOVE summer and get a tad impatient for the hot pool-weather days. However, I do love seeing all the new spring trends, products, and ideas. Today we're sharing a few Spring Must Haves from our fabulous sponsors. We so appreciate our sponsors. They make this blog possible and we're so grateful for that! Make sure you check them out and tell them RHBC sent you! ********************************************************************************** Remember the awesome artwork we made for Jess' house? Well, it wouldn't have looked half as amazing without the mad-photo-skills of Stacy Salvatori. She's local to Bucks County and would be a great choice for your family pictures or next big event. Visit Stacy's Website

    Main Pic

    I'm love with the Just for Girls Collection from Red Letter Words. How fun and springy are these prints? I plan to order a few for Kenzie's room in the next few weeks. I love art that looks cool and will also daily encourage my tween (holy cow that is the first time I've written that. I can't believe I have a ten year old!) Visit Red Letter Words

    #1- Make 5 Dinners in One Hour… that's NO JOKE! These crazy affordable meal plans with shopping lists and directions will rock your world. Head over to their Facebook page to try one week for FREE!

    #2- We're so glad that 31 Gifts jumped on the Grey & Yellow bandwagon and came out with this adorable line! I'd love an organizing utility tote in this pattern! Contact Mandy to get yours (you can get me one too!)

    #3- Have you visited My Best Friend's Hair yet? You definitely need to. If you have a stylist you love, go let the world know by leaving a review or if you have yet to find the right stylist for you, head to their site to read other users reviews and find yourself a rockin' stylist today!

    #4- I require a perfect spring candle in my kitchen this time of year. CJ's EcoChic Candles smell amazing, and because they're soy they last forever! (ok, not literally, but figuratively). They best part… you're not going to pay $25 like you would at the big chain stores and you're supporting a great small business.

    #5-This is a spoiler alert! Remember the SuperFab room makeover we're currently working on? Well, we have Royal Design Studios to thank for one of the amazing design elements in the room. They have the best stencil selection around! Check out their new and improved website and they have an idea blog with all kinds of inspiration. Guess who was featured there for our Nate Show stencil project? Visit their new website!

    #6- Kotton Pickin' Kute is more than just hats! For Spring you need to check out the fun headbands she offers. Seriously, that baby is adorable!

    #7- Guess what?? Liberty Thrift listened to its shoppers and extended their hours! Woohoo! It's now open M-Sat 9-7pm. We have a fun outing in the works with Liberty and can't wait to share the details with you!

    #8- Moo & Puppy is our favorite digital scrapbook company out there! We love the preppy look of this madras paper pack. (I'll confess that in the 90s I loved and wore lots of Abercrombie before they went all half-naked. But man, I do love me some preppy styles!) Moo & Puppy is giving you 15% off with the code RHBC15.

    #9- Jet Upholstery is more than just chairs and cushions! Look at that amazing bed! Even for these DIYers some projects are better left to the pros! Visit Jet's Website for more info!

    Those links should keep you busy for a while! I actually have about 15 tabs open on my computer right now, because I want to place a ton of orders! Thanks again to our sponsors! You're the best!

    jess
    Monica
  • An Angelina Ballerina Birthday Party

    An Angelina Ballerina Birthday Party

    Well, I'm not sure how this could possibly be true, but my little girl turned three a few weeks ago.

    I'll leave all the sappy stuff to my personal blog, but I wanted to give you a glimpse of the details of the party. Campbell is really into Angelina Ballerina and, a few weeks before her birthday, decided she wanted to have an Angelina birthday party. I scoured the internet and could not find really cute Angelina party supplies, so I decided to be creative and make some of my own and decorate the way I wanted to.

    First off, Kevin and I created a"party room" in our basement. We decided to use the area of the basement that normally houses our ping pong and air hockey tables. We just moved those aside and got to work. The color scheme was pink, silver and white. We created a fun entrance to the party room, but hanging a streamer garland across the doorway and then hung regular streamers from the garland so the kiddos had to walk through to see the rest of the room.

    Then, we hung pink and white balloons, as well as, paper stars that I had cut out of stock paper and embellished with glitter paint, from the ceiling. This was actually really easy, but a little time consuming. We used large plastic pink tablecloths to cover the far wall, and to create a backdrop for pictures and a few of the games. The round tablecloth on the floor helped the kids easily sit in a circle for the"Pass the Ballet Slipper" game, and was a convenient spot for them to eat lunch and not make a mess all over our carpet!

    I made the favor bags using regular old paper bags and a tag that I created on Picnik. I punched holes in the tops of the bags and threaded sparkly ribbon through to close them. These are so simple and cheap, but looked adorable!

    I found an awesome tutorial on DIY printable cupcake toppers, which, again I embellished with some silver glitter paint.

    The very simple menu consisted of pigs in a blanket, mac & cheese, carrots, fruit salad, cheese puffs (Campbell's request), and snickerdoodle trail mix. The star on the far left was an indestructable pinata that none of the kids could open. Kevin ended up breaking it over his knee.

    One of the games was"Pin the Mouse Ears on Campbellina". I mounted an 11x14 picture of Campbell on poster board. Then I framed the picture with a pink polka-dot ribbon.

    I made sure to take a picture of each guest with Campbell for a sweet thankyou card we sent after the party.

    I just had to include a picture of the pretty ballerina herself!

    And this is the best picture of the day, taken by Monica. Jane B., you need to frame this!

    Happy 3rd birthday, sweetie! We love you.
    

  • Spring is FINALLY here! {The Home Depot Gardening Club}

    Spring is FINALLY here! {The Home Depot Gardening Club}

    Holy Cannoli Batman… could Spring have taken any longer to come this year? Finally, we're getting some warmth up in here!

    I really love spring (once it gets here)… it means flowers, outdoor projects, and flip-flops (do you remember those days in college, when you'd have a warm-ish spring day, so you'd put on flip-flops, a tank, shorts, and act like it was 100 degrees out? Yup, that was me!)
    This Spring, I have a ton of projects I want to work on in our yard. Last summer we finished up our huge patio project, but we didn't have much time or budget left to tackle the landscaping and some other fun projects to make the space complete!

    Landscaping around the patio and building a shed are our first two orders of business! I've successfully taken over 3/4s of our huge garage with all my DIY projects and materials, so the hubs has decided it's time for a shed for our mower, yard tools, etc.

    User-added image

    Since these are two pretty hefty sized projects, I need all the help and advice I can get. I visited the Garden Club on The Home Depot's website to get some expert advice, inspiration, and I got an awesome coupon just for signing up as part of the community. SCORE!

    Check out who else is part of the Garden Club Community…

    I mean if Martha is doing it… I'm so there!

    I was browsing the site looking for landscaping ideas, but got completely distracted by all the awesome project inspiration ideas! Have you heard of Envirotile? If I had an old, cement slab patio, I would do this in an instant… I found an awesome step-by-step guide that seemed so simple!

    One of the other things I loved once I became a member of the Garden Club community, was their Monthly to-do lists! Once I click on where I live on the map, it provides me with a list of what I should be doing when, based on my zone!

    Especially with how cool this spring has been, it's easy to forget about some of the outdoor things I need to be taking care of now! I printed out my list for March and it's right on the fridge for the hubs and me to tackle! (Actually, he's outside working in the yard, as I'm writing this!)

    We love the Home Depot (and not just because they're one of our CWTS sponsors!!), and I'm so glad I checked out their site and became a member of the Garden Club

    To join yourself & get your coupon (c'mon, all the cool kids are doing it)- click HERE

    Happy Spring and Happy Gardening!!

    ---------------------------------------------------------------------------------------------

    It's home improvement time, and The Home Depot has everything you need for spring. No matter what projects you want to tackle, The Home Depot has you covered and can help you #DigIn to spring.

    Spring is the perfect time for all your outdoor home renovations. Shop The Home Depot for terrific values on new patio furniture, landscape supplies such as fertilizer and potting soil and outdoor grills. Keep your lawn and garden looking great, too, with the huge selection of lawn mowers, edgers and trimmers, and garden tools.

    Visit The Home Depot Garden Club for product ideas from kick-starting your Spring with seed starter kits to building a window birdfeeder.

    This is a sponsored post written by me on behalf of The Home Depot.

    Monica
  • Frame your own HUGE Photo for Under $20!

    Frame your own HUGE Photo for Under $20!

    We're so excited to finally share this project with you. We wrote it for Infarrantly Creative last week, and now we can reveal it to you! We're going to give you an awesome, low cost way to frame a humongous photograph that will totally be a traffic-stopping scene-stealer! Not only that, this project is super easy and takes very little time. We were actually very surprised at how quickly it came together. You know when you have a creative idea, and you think it should be easy, but it almost never is? You won't have that problem here!

    Main Pic

    Here's our cast of characters:

    IMG_1376

    1 Piece 4x9 Underlayment/Luan 24x36 Engineer Print (from Staples!) Spray paint Spray adhesive Modpodge Mini-projector (or a regular one will work too!) Picture hanging hardware

    IMG_1382

    Luan, otherwise known as underlayment, is a type of plywood usually used in flooring. Not today, folks! It's ultra-light (I don't know maybe 5 pounds for the whole sheet?!), and so was the perfect medium for making a frame. We chose it because we were planning on hanging it high on a wall in Jess' entryway that has vaulted ceilings. We wanted something that would be light enough to stay put on the wall so that it didn't accidentally knock off one Jess' guests as they entered the house. Plus, because it's so thin, it was really easy to cut using a jigsaw (more on that later), and cost only $10 for the whole sheet. -------------------------------------------------------------------------------------------- We recently introduced you to engineer prints from Staples? Remember Monica's Industrial Art?

    Ginormous

    Oh.My.Goodness. They have completely changed us for the better. Just wait, you'll feel the same way. Take your favorite picture into Staples and ask for an oversized print (they come in multiple sizes, but the largest is 3 feet by 4 feet. That's huge!) They'll make a copy right there for you, and the best part…it costs less than 5 bucks for a print! You're only able to get the picture in black and white, but who cares?! It's 5 bucks! The tricky thing is that the picture is printed on very thin paper, so you have to be careful not to bend it or mark it.

    Engineer Print

    Here's where having a crafty best friend comes in: Monica has an adorable mini-projector that was perfect for this project. She brought it over and set it all up using the image of the shape we pulled off of Google images.

    IMG_1386

    If you can't get your hands on a projector, We're pretty sure you can make your own using this fun little tip. Monica downloaded the image of the shape onto the projector (you just use"save as" to save any file format you'd like to the drive)

    IMG_1385

    Then we turned out the lights, and voila!

    IMG_1401

    The perfect shape to trace!

    IMG_1403

    Then, we took that bad boy out to the garage and started cutting out the shape using our trusty jigsaw. We use this thing more than is normal for a pair of moms, but what can we say? We love this tool!

    Make sure you take a cheesy picture of yourself holding the frame for posterity.

    IMG_1412

    See what we mean about how thin the luan is? I would say it's about 1/2 inch thick.

    IMG_1413

    The next step is to sand all the rough edges so it's smooth. We recommend using a sanding pad vs. an electric sander because of how fragile the underlayment is.

    IMG_1415

    Because my framed picture is going to hang high on a wall, I wanted our faces to be large so you could see them, so I printed the picture as 3 feet by 4 feet, and then cut off the extra space using an Xacto knife. You could avoid this step by cropping your picture close before printing. Make sure you're using a high-quality photo so that it prints clear. Our photo was taken by the fabulous Salvatori Photography, so we knew it would turn out great! (Need pics? Totally check her out!)

    IMG_1418

    We used Rustoleum Painter's Touch spray paint in Satin Lagoon. It's such a pretty shade of blue- almost like a peacock blue.

    IMG_1426

    It took a few coats, but the underlayment takes the paint really well.

    IMG_1428

    Before adhering the picture, Monica added the hardward to hang the frame. We didn't want the picture to get messed up, so we made sure to do this first. You should definitely use actual picture-hanging hardware, but this is what we had on hand and it worked well. We screwed them in about a 1/4 of the way down from the top of the frame and then threaded picture-hanging wire through.

    IMG_1434

    After determining the placement of the photo on the frame, we marked the corners in case we had any slippage during this next step. Since the picture is so big, we decided to place one hand squarely in the middle of it, and fold one half back towards the middle, spray the spray adhesive all over wood on that half and then smooth outward from the middle. You can use a rolling pin to help get all of the air bubbles out, but we didn't find it necessary. Having a friend help you with this is very helpful, though!

    IMG_1441

    Finally, we brushed matte Modpodge all over the picture to seal it and keep it from fading over time. It just makes it look more finished, too. The Modpodge should be applied in a really thin coat to avoid any bubbling. Actually, if it's going to be in a place where it won't be touched, you could skip this step.

    IMG_1444

    Then it was time to hang our beauty up!

    IMG_1448

    Told you it was high! I'm not sure how Monica got this job because she's afraid of heights, but hey! She did it like a good best friend.: )

    IMG_1451

    We're so in love with it, and can't get over the beautiful pop of color it brings to the entryway.

    IMG_1457
    IMG_1465

    The total cost for this project was exactly $20, and the impact it makes is HUGE!

    So what do you think?
    How many of you are heading to Staples ASAP?

    jess
    Monica

    Only following on the blog? You're missing out. Use the buttons below to join in on all the fun!

    Follow Me on Pinterest

    Linking up to: TT&J

  • Interactive Playroom Wall {Five Foot Twelve Creations}

    Interactive Playroom Wall {Five Foot Twelve Creations}

    If you missed all the amazing projects in the first three weeks of CWTS, be sure to check them out below!
    Round 1 Projects & Winners Round 2 Projects & Winners Ro und 3 Projects & Winners

    -------------------------------------------------------------------------------------------------------------------------
    We love when someone takes a current trend and puts their own unique spin on it! This interactive wall by Melissa scores major points with us for creativity and major points with her kids for hours of fun! I don't even want to show my kids these pictures because I know for sure that they'd think Melissa is a much cooler mom than I am!

    Our basement is better known as"the kid cave." When we arranged it, we set it up in"stations"--kitchen area, dress-up area, puppet theater, arts & craft studio and a"school room"for my future teacher. I love the way chalkboard paint looks and although it is not a new concept, I have always wanted to use it in our basement. The wall I chose for this project is approximately 21 feet long and I thought it would be neat to create an interactive chalkboard wall.

    First, I painted the wall using Rustoleum Black Chalkboard Paint. While it recommends two coats of paint, I went ahead and gave it three coats, as the wall seemed to really soak in the first coat. In designing the chalkboard wall, I knew I wanted lots of space for the kids to draw and create, but I also wanted to put some things that would be permanent, instead of just having a 21 foot chalkboard. I decided to include a map of the U.S.A…I love the way it looks and will be fun to track the different states we go to as a family. I printed a map of the U.S. onto an overhead transparency and used an overhead projector to trace the map onto the wall. I used a permanent white paint sharpie marker to trace the map.

    I also wanted to have some fun and whimsical frames on the wall as well. So using the same method as the U.S.A. map, I chose the following"hanging doodle frames" from PrintCandee.com:

    Next, I designed a large interactive tic-tac-toe board. Similar to the map and frames, I traced the board onto the wall. Here is the board I used…you can download the template here.

    I bought five"X's" and five"O's" from the craft store…you may have to go to a few craft stores--they have plenty of"O's" but don't stock many"X's"! Also at the craft store, I bought self-adhesive magnet strips. At Home Depot, I bought nine two-inch washers. After painting the"X's" and"O's", I super-glued the washers onto the letters, and fastened the magnet strips onto the wall.

    For the title of the game and the map, I created stencils on my Cameo. Here is a great tip for stenciling… once you get the stencil arranged onto the wall (or wood, object, etc.), before stenciling with the color(s) you want the word/objects to be…first paint a light coat of the background color…in this case I used the black chalkboard paint. This creates a seal with the stencil and I have found that it prevents bleeding of the paint--making your stencil look very crisp.

    (I forgot to take picture of painting on the red and blue! Sorry!)

    Speaking of paint…it was a blast picking out all the fun paint colors at Home Depot! Because I was using so many colors and didn't need a gallon of each color…Home Depot made my day when they told me that they can mix any color in a small, 7.5 oz jar…perfect!!

    I picked the step-stools up at IKEA and painted them in fun colors…

    Not only are they great for setting the game pieces and chalk on, but they are extremely sturdy stools and perfect for giving little kids a boost for drawing and playing on the wall.
    I have always adored these giraffe and elephant hooks from Anthropologie…and I love the way they add a fun (and helpful!) detail to the chalkboard wall:

    Finally I added some framed artwork courtesy of the kids…they were so excited to help with this project!

    Mom of the year, folks!: ) If you haven't stopped over to say hello to Melissa, what are you waiting for? She's got a bunch of cute things going on over there on her blog including this adorable"Wizard of Oz" subway art she made for her daughter:

    Don't forget to link up your favorite paint projects right here until 10 PM EST tonight! Also, Sarah will be here tomorrow sharing how she completely transformed that chunky bookshelf into an awesome functional and beautiful secretary desk- you won't want to miss it!
    Happy weekend!

    jess
    Monica
  • Spring Things { How to Clean Windows like a Pro}

    Spring Things { How to Clean Windows like a Pro}

    With the return of Spring comes the dreaded Spring Cleaning (at least, it's dreaded for me)! One of the most satisfying cleaning habits for me is window cleaning! There is nothing like a window that's smeared with dog drool, kids fingerprints, snow residue and all sorts of other things being cleaned to reveal the sunshine and the beautiful outdoors. Today, I'm sharing three tips from a professional window cleaner that will make cleaning windows so much easier and a whole lot more satisfying!

    Most of you don't know this, but my hubs owns a company called Jackson Home Services that specializes in residential and commercial window cleaning. He cleaned windows professionally for 4 years before taking another job (darn that the economy tanked!), and now runs his window cleaning business on the weekends. He has generously offered to share his"insider" secrets with all of you, just so you don't dread the process any more.: )
    Tip #1: Invest in a Squeegee.

    Honestly, this one makes all the difference in a window with streaks and without streaks. You can find these at Lowes or Home Depot for cheap, and you won't regret it. My hubs does a tricky"S" move with his squeegee, but for your purposes, after getting the window wet, running the squeegee across the window from one side to the next will work.

    Tip #2: Don't use Windex!

    It's silly to spend all that money on window cleaning solutions when the pros just use an ounce of Joy Dish Soap (or any other dish soap, but my hubs prefers Joy) in a bucket half-full of warm water. Dip a towel/cloth in the water and wipe it all over the window and then use the squeegee to clean it off.
    Tip #3: Use a Lint-free Cloth & Steel Wool to finish it off!

    After using the squeegee, take the lint-free or microfiber cloth, and wipe around the corners and base of the windows to dry any remaining water. If you encounter a stubborn spot on the glass, like a paint splatter, screen residue etc, rub it with a piece of steel wool to remove. Make sure your window is wet when you do this! Don't worry, this won't damage or scratch your glass, but will easily remove the spot. Then, start over with the squeegee.
    Tip #4: Hire a Professional to make your life REALLY easy! (Bonus tip from ME!: )) If you're in the Bucks, Montgomery or Chester county areas, consider hiring Jackson Home Services to completely eliminate the windown cleaning hassle. My hubs is super resposible, courteous, honest and polite. (And I'm not biased at all!) He does a great job, can give you references, and is offering 20% off for all RHBC readers. To schedule a cleaning, email Kevin Jackson at jacksonhomeservices@gmail.com with RHBC20 in the title.

    Happy Spring Cleaning!

    jess
  • Creating with the Stars Round 3 Voting

    Creating with the Stars Round 3 Voting

    Ok, guys, we are in the last two weeks of competition with Creating with the Stars and to say that the contestants exceeded our expectations would be the understatement of the century. We have six competitors still fighting for a spot in the final 3 and no one is going down without a major fight. If you missed the first two weeks of projects, check them out below: Round 1 Projects & Winners Round 2 Projects & Winners

    This week some amazing prizes are at stake. The semi-finals winner will take home…
    $500 Gift Card to Home Depot (Contestant & Blog Star!!) $100 worth of Martha Stewart supplies from Plaid Crafts $125 Gift Card to Lucent Lampworks Project featured by HomeTalk

    -------------------------------------------------------------------------------------------------------------------

    Now, we know you're all dying to see what amazing projects our contestants have come up with this week with paint! Let's go!
    1. Painted Couch Featuring a Handmade Horse Stamp

    We have all seen these couches before in someone's grandma's house. This vintage couch is not the good kind of vintage, but I may have some of you convinced that this traditional style can be made more modern. I painted the couch white, carved out a horse, and stamped the living daylights out of it with black paint from Home Depot. Enjoy!

    2. Painted Map Coffee Table Painting! I'm not going to lie, I was pretty stoked about this week… and amazed I made it here. Painting is one of the easiest and cheapest ways to transform almost anything. And my table was in need of some transforming- big time. I picked it up at a flea market type place for $40… peeling, chipping, splinters, dirt and all.

    I sanded and scraped (forever) until no more paint chips fell off when you walked by. Then I gave the entire table a coat of latex paint from Home Depot (mixed with a little plaster to make chalk paint), leaving some of the peeling paint texture on the legs. After that was dry, I taped off a large"X" pattern on the smaller shelf and added a painted stripe detail to IKEA storage boxes for the bottom.

    On the top, I made my own basic map stencil by cutting away the continents on a large world map I printed out. I stuck the map to the table with painter's tape, then painted over top with blues and greens. Once that was"roughed in", I removed the paper map and spattered the rest of the painted detail free hand using mostly a plastic spoon and really watered down paint. The last step was to give the entire table a coat of protective finishing wax.

    I kind of think the end result is out of this world… hehe, get it?

    3. Painted Desk and Accent Wall Using Custom Stencils

    I love paint! It sets the mood of a space and has the power to completely transform a piece. I found this large bookcase at Goodwill and loved the detail on the doors, arch at the top, and the drop panel but didn't like choppy layout, worn finish, and heavy bottom. Luckily, all of my dislikes were easy to fix with a little paint and reconfiguration of the layout.

    With a little help from the Home Depot, I was well on my way to getting started. Thanks Chris!

    Fix #1 — I moved the drop panel down to 30" so that it can now be used as a secretary desk. Goodbye choppy bookcase, hello new desk!
    Fix #2- Paint! The finish was worn and it had a few areas that needed to be filled with wood filler so painting was the perfect solution! I chose a classic ivory and paired it with a deep turquoise stenciled background. I created the stencil based on one of my favorite Farrow and Ball wallpapers.
    Fix #3-the thick base and doors made this piece look bottom heavy. To fix this, I added small feet to lift it off the ground and create a little visual space at the base.
    I also created a large stencil based on one of my favorite rugs. The large scale and contrast provides a lot of visual impact and adds variety from the small scale stencil used on the back.

    With the help of paint and a few power tools, this bookcase has been given a new life and I love the way it looks in my new space! 4. Painted Chalkboard with Map and Games
    This week's theme was my favorite so far…I love the many many ways that paint can be used to make an instant change and impact on a space or an object. I also love chalkboard paint. This week's project is dedicated to my kiddos who surprise, surprise…love to get that their craft on too!; )

    In designing the chalkboard wall, we decided to have a map of the U.S.A…I love the way it looks and it will be fun to track the different states we go to as a family. After coloring in the states my kids have been to, they commented"well that's not very many", so I let them each choose a state they would like to go to someday…which explains why Hawaii and Alaska are colored.: )
    Lately my oldest child has loved playing tic-tac-toe, so I thought a large, interactive wall version would be super-fun! I also included many"frames" for the kiddos to draw their masterpieces in. I picked the step-stools up at IKEA and painted them in fun colors, and the animal hooks holding our chalk and erasers came from Anthropologie.
    It was a blast picking out all the fun paint colors at Home Depot! Because I was using so many colors and didn't need a gallon of each color…Home Depot made my day when they told me that they can mix any color in a small, 7.5 oz jar…perfect!!!

    And after a super-busy week painting…I'll go to bed tonight and dream about being on a beach in…

    ;)

    5. Aztec Wonder Painted Rug I have been in love with the Aztec inspired rugs that I have been seeing in catalogs and online lately. The drool kind of love. But alas, rugs can be expensive. They are not something I can change an a whim. So, when the paint round came about I decided that it was time for me to get my hands on my latest crush and do it in a budget-friendly way. In DIY style, of course.

    Isn’t she beautiful?! This rug was a labor of love. And a lot and lot of sponges cut into stamps…applied one by one. Fabulous colors, a gentle application of paint from Home Depot, and lots of patience made this rug come together into something lovely.

    My rug is more then happy living with me. And, I am so pleased to have my own version of this latest craze. And… you know what? I’m glad we’ve moved on from Chevron to Aztec. I’ve got my Aztec rug and I’m ready to go!

    6. Painted Wall Mural and Dresser
    I have a thing for maps right now — doesn't everyone? So, when it came time for the"paint" challenge, I was pretty excited to hop right in and paint a giant world map on my wall. Because who doesn't need one of those?!

    I used a projector to hand-paint the whole thing, and then for a bit of contrast (and fun!) I added an old Ikea sideboard we had laying around that I painted Sunny Side Up by Behr from Home Depot. For a couple more little touches, I added bicycle drawer pulls (because, why not?) and numbers to the door fronts — you can barely see them from straight on, but if you look at it from a different angle, they suddenly show up. It's a subtle touch, but I didn't want anything to compete with the map above it!

    I love how the black and yellow work together, and I'm pretty excited to finally achieve my dream of covering a wall with the entire world. And, really, I find it hard to believe that this bright and sunny sideboard was once a plain, boring black Ikea piece — don't you love how big of a transformation paint can make?!


    It's time to vote! You guys have a ridiculously hard job- we don't envy you a bit! You can only vote one time, but you can vote for your favorite 3 projects. **The voting glitch for Round 3 has been corrected and voting will be adjusted accordingly. Thanks!
    In order to vote, please LIKE EC2 on Facebook.

    jess
    Monica
  • Creating with the Stars: Link Up Winner {Round 2}

    Creating with the Stars: Link Up Winner {Round 2}

    One of the most fun parts of the CWTS contest is getting to see the fun projects linked up in our weekly link party! The girls in this contest are seriously talented, but guess what?! So are YOU! If you want to get a burst of inspiration, check out the fab upcycle projects that were linked up right here.

    We were immediately drawn to this end table when we saw it in the party since we're both HUGE fans of rustic industrial style furniture. Allison from The Golden Sycamore put some serious effort and time into this piece and it tells! It's absolutely gorgeous! Well done, girl.; )

    the-golden-sycamore-knock-off-industrial-end-table
    The Golden Sycamore: DIY Industrial Side Table Tutorial

    As I mentioned a few weeks ago on my blog, I'm really into the industrial look right now. I seriously can't get enough of it! While I was playing around online one day, showing my husband all these cool industrial tables, he got an idea in his head: Why not build one ourselves? One thing led to another and now we have our own custom industrial end table for our living room! (You can see the reveal post {here}). This was our inspiration for the table …

    308 Vintage Industrial Shelf111

    My husband and I are really happy with how our table turned out and I'm excited to share this project with you, but I want to warn you, this particular DIY project is not for the faint of heart. This project is a bit of a process and can be dangerous if you don't know what you're doing and aren't careful. PLEASE do not attempt this unless you feel very confident in your abilities. Please be sure you take all safety precautions when using a power tool or dangerous chemicals or objects and read the instruction manuals before using them. I am not a trained professional. If you are uncertain, please consult an expert before attempting this or any projects on this blog. I will not be responsible for any injuries or damages caused by any attempts to recreate this or any projects posted on this blog.

    The Golden Sycamore: DIY Industrial Side Table Tutorial

    Alright, now that that's out of the way, onto the tutorial. Aging Galvanized Metal

    The Golden Sycamore: How to Age Galvanized Metal

    SUPPLIES: 8 — 3/4" x 10" galvanized pipe ($29.60) 16 — galvanized floor flanges ($116.16) 48 — 1/4" x 1" galvanized lag screws ($22.08) HCl / toilet bowl cleaner Plastic container Small map gas torch ($41.97) Heat safe gloves ($4.46) Vegetable oil Beeswax Metal pan Metal pliers PROCEDURE: Start by putting your galvanized metal plumbing supplies in a plastic container. Add enough HCl / toilet bowl cleaner to cover all the metal and let sit for 2-3 hours. This process will remove the zinc coating off the galvanized metal. **DO THIS PART OUTSIDE OR IN A VERY WELL VENTILATED AREA — YOU DON'T WANT TO BE BREATHING THESE CHEMICALS IN!! (This is a picture of the screws in toilet bowl cleaner. We did them separately, but you can just put everything together.)

    The Golden Sycamore: How to Age Galvanized Metal

    After a few hours, rinse all your metal pieces off. Pour some vegetable oil in a metal container. Wearing heat safe gloves and holding your piece of metal with a pliers, heat metal with torch until it is hot enough that it turns orange. Once it is thoroughly heated, dip in vegetable oil. Then reheat the piece of metal to orange hot. Once it is hot enough, set in oil to cool for about 30 seconds. **AGAIN — USE CAUTION. DO THIS PART IN A SAFE AREA AND HAVE A FIRE EXTINGUISHER NEAR BY IN CASE OF FIRE!!

    The Golden Sycamore: How to Age Galvanized Metal
    The Golden Sycamore: How to Age Galvanized Metal

    The metal will still be very hot, so take the piece of metal out of the oil with a pliers.

    The Golden Sycamore: How to Age Galvanized Metal

    Cool the metal with water.

    The Golden Sycamore: How to Age Galvanized Metal

    Once it's cool to the touch, scrub off burned oil residue with water and a wire brush.

    The Golden Sycamore: How to Age Galvanized Metal

    Lightly heat metal again with torch (about 30 seconds) and coat with beeswax. Once coated, rub with cotton rag while still warm.

    The Golden Sycamore: How to Age Galvanized Metal

    Let cool before handling. Metal will still be hot for a while.

    The Golden Sycamore: How to Age Galvanized Metal

    And that's it! Haha! I know the process is intense, but if you really want the aged look, it's worth it! Here is what your finished product should look like. Repeat process for all your pieces of metal.

    The Golden Sycamore: How to Age Galvanized Metal

    Now onto the wood shelves.

    The Golden Sycamore: DIY Industrial Side Table Tutorial

    SUPPLIES: 1 — IKEA Numerar oak butcher block countertop ($129.00) — we used a little over half the length, so the cost of what was used was roughly $70 Tape measure and pencil Circular saw Straight edge clamp Router Orbital sander and sand paper Stain Silhouette Cameo and stencil Paint and paint brush Mineral oil PROCEDURE: Start by measuring your Numerar butcher block to the size you want your shelves and mark where to cut. Our shelves measure 19.5" wide x 24" deep.

    The Golden Sycamore: DIY Industrial Side Table Tutorial

    Set up your straight edge clamp so that your saw will cut on your measured line. You'll probably have to set it to about a half inch over to allow for the width of the saw.

    The Golden Sycamore: DIY Industrial Side Table Tutorial

    Cut butcher block with circular saw. Repeat this process for second shelf.

    The Golden Sycamore: DIY Industrial Side Table Tutorial

    Run orbital sander along the edges to ensure a smooth finish. Then router the edges of each shelf — remember to do the top and bottom sides to keep the look cohesive.

    The Golden Sycamore: DIY Industrial Side Table Tutorial

    With your orbital sander, sand the finish off the top and bottom of both shelves.

    The Golden Sycamore: DIY Industrial Side Table Tutorial

    Using Minwax Dark Walnut stain, wipe on stain and immediately wipe off to get a slightly darker color, but not too much penetration. If you desire a darker stain color, either leave the stain on longer before wiping off or apply more layers of stain to darken it.

    The Golden Sycamore: DIY Industrial Side Table Tutorial
    The Golden Sycamore: DIY Industrial Side Table Tutorial

    I don't have pictures of this part, but if you wish to add numbers to your top shelf, here's how to do it. Choose the style and size of numbers you want and cut them out using your Silhouette Cameo. If you don't have a Cameo, you can always print numbers out on your printer and then cut them out by hand. Once you have your numbers, arrange them on the shelf the way you want them and then trace around them using a white or black colored pencil. Once your numbers are traced, use craft paint and a small paint brush to paint inside the lines. Let paint dry and sand lightly with sand paper to desired distressed look.

    The Golden Sycamore: DIY Industrial Side Table Tutorial

    Once you are done with your numbers (or if you skipped that step) wipe both shelves with mineral oil (or some other sealant like wax or polyurethane) to seal the shelves.

    The Golden Sycamore: DIY Industrial Side Table Tutorial

    Now to put it all together. SUPPLIES: Drill Wrench or impact driver All your metal pieces Both shelves Level PROCEDURE: Drill pilot holes in each shelf. You'll drill four holes per flange. Drill holes in the bottom of the top shelf. The bottom shelf will get holes drilled in both sides — top and bottom. Make sure to stagger your holes on the bottom shelf so that they don't meet up with each other through the wood. Using your wrench or impact driver, on the bottom shelf, attach 4 flanges with your lag screws on the top side of the shelf. Screw pipe into the four flanges. Attach flanges to the bottom of the top shelf with lag screws. Screw those flanges to the pipe that is already attached to the bottom shelf. Attach flanges to the bottom side of the bottom shelf. Screw pipe into flanges and screw final flanges to the bottom of the pipe — these are the table's"feet". Check to make sure the table is level. If it isn't, screw or unscrew pipes until the table is level.

    The Golden Sycamore: DIY Industrial Side Table Tutorial

    Alright, if you've made it to the end of this post, I applaud you! I told you it was intense! I definitely can see why our inspiration piece was almost $700! Not only are the materials relatively expensive, but it is also quite labor intensive! In the reveal post, I said that the table cost us about $300 to make. We had a lot of the tools on hand, but we had to purchase most of the supplies. In this post I've added up the supplies we bought and calculated our total cost (using about half the countertop cost since we can use the remainder of the countertop for another project). The total came to $284.27. If you add MI tax, it comes to $301 and some change. That's a pretty good estimate on our part, if you ask me!: ) If I didn't explain something well enough or you have any questions, PLEASE feel free to ask! I'll do my best to help you out! Thanks so much for reading my loooong tutorial!: ) -------------------------------------------------------------------------------------------------------------------------- Isn't that incredible?! Seriously, so good. Thanks for linking up, Allison! Don't forget to check back at midnight tonight to see the Contestants Round 3 projects!

    jess
    Monica
  • A Favorite

    A Favorite

    This picture is an absolute favorite of mine, for several reasons. First, it perfectly captures the way Kevin feels about C1 and the love he has for her. It also clearly shows how much C1 enjoys being with him. Secondly, it brings back such great memories of the boating trip we went on last year on our family vacation; the weather was perfect, the scenery was idyllic (we saw dolphins!), the kids were well-behaved, and we were getting to spend quality time with my family. It's just priceless to me!

    I want to do something with this picture, but I haven't felt any particular inspiration as to what, yet. Here are two possibilities: Modern Bird Studios- Sleek and Modern Modern Bird Studios creates personalized, modern art from your photographs. Each work is a one-of-a-kind, original studio piece created with a combination of digital, hand, and painting processes on an Oak composite, or, for the extreme modern enthusiasts, on acrylic mounted to Oak.

    These prints are really fun, and would be a great addition to our basement game room/play area.
    Canvas People- Traditional and Timeless

    I do love the simplicity and beauty of a wrap-around canvas.
    That's as far as I've gotten. Maybe you can help me. Suggestions, please!
    Do you have a favorite photo? What is it and why do you love it so much? *When you comment, if you are able, add a link to a location where we can see your favorite picture (facebook, blog etc.) We'd love to see them!

  1. Stitch Craft with Marilyn Pipe
  2. Quilting Arts Magazine - block printing
  3. Downton Abbey Costumes to see...
  4. Hot Textile Artist!
  5. Crafts for Children - with Janome
  6. sooo into headbands... | Mode: Fashion
  7. Laura & Whitney from the Hills: Teen Vogue | Mode: Fashion
  8. ♥ for Adriana Lima | Mode: Fashion
  9. H&M: In Stores now | Mode: Fashion
  10. ZARA: TRF Lookbook November | Mode: Fashion