My Creative Blog [Search results for creative]
Fab Find Friday {Random Pinterest Edition}

Free Canvas for You!

Creating with the Stars on EC2!

Submissions are Open! {Creating with the Stars}
Monster Mash Candy"Bowl" with Martha Stewart Crafts

Antique Doorknob Decor {Being Brook}

What's in a Name? {Introducing East Coast Creative}
East Coast Creative 10k Fan Giveaway!

Adios Amigos Day 1 {Infarrantly Creative}

Advice for the Part-time-Blogger {Part-Time Bloggers Dilemma Part 2 }

Party Planning the Mangin Way…

Solar Terrarium Tutorial
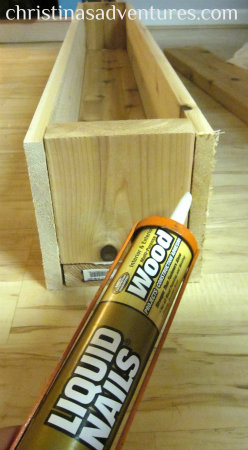
DIY Decorative Flower Trough {Christina's Adventures}
Jewelry Organizer {The Ugly Duckling House)

At the Foot {Master Bedroom Redesign}

How to Build the Easiest Coat Rack Known to Man

Come Meet Nate with Us! {Giveaway}

Shape Tape™ Painted Lamp Shade DIY

How to Make a Pallet Crate {the space between}

Behind the Scenes of a Small Business {Lucent Lampworks}


