Today is the last day of Round 1… That was an intense amount of DIY awesomeness for one week… One night this week, Jess and I had a text conversation that went something like this… Jess: Did you see all those awesome projects? Me: Yes! They're insane Jess: I think I'm mildly depressed from it all- these girls are amazing. Me: Yes, I believe I will quit blogging, go eat cookie dough, and mope around my house. Well, thankfully we didn't quit blogging, I didn't eat too much cookie dough, and we got over it, and are ready for Round 2 tomorrow! Before we say goodbye to Round 1, we are super excited to share our favorite Upcycle that was Linked Up this week!

Jessica blogs over at Dear Emmeline and we loved her Embroidery Hoop Pendant Light! We are definitely going to try this upcycle soon! Check out how she did it and don't forget to link up your favorite Knock off starting Tuesday! --------------------------------------------------------------------------------------------------------------
Ever get inspired by someone else's work to create something similar yet so completely different?
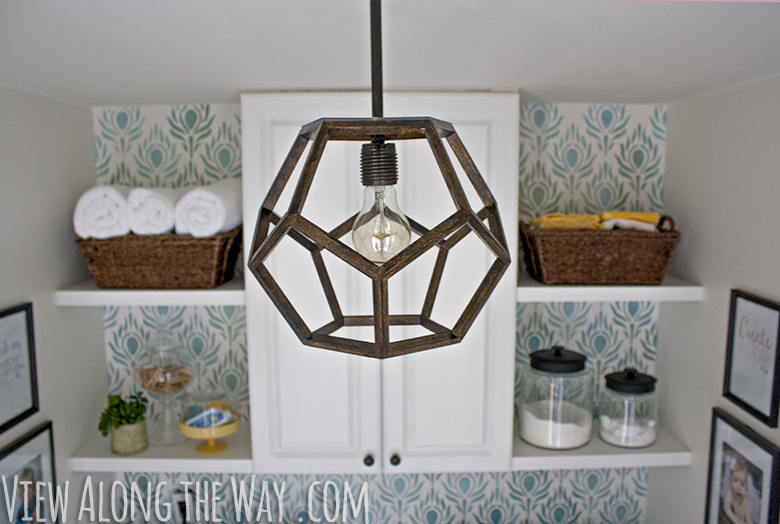
When I saw View Along the Way's Dodecahedron Pendant Light I fell in love but I also knew that not only did I not have the tools to recreate it but it would be a TON of work.
Then I had the thought,"Is there anything I could use to create a pendant with a similar feel with a lot less work?"
A thought sprang to mind, and here is the result!

It took us about 30 minutes of actual work time to make this fixture!
If you want to make your own here's what you'll need:
2, 14" quilt hoops (we bought ours at Jo-ann Fabrics, original price $4.99 each) stain or paint 3/4" square dowel pendant light kit 7, 8-32 x 3/4 flat head Hillman knurled screws 7, 8-32 hex nuts drill wood glue clamps spray paint

Before we began assembling the fixture we gave the hoops and 3/4 dowel a coat of vinegar and steel wool oxidation stain to give them a weathered finish and used oil rubbed bronze spray paint to paint the cement colored part of the pendant fixture.

Next, line up the 3/4 dowel with the hoop connectors (outer piece of hoop) and mark a cut line. Drill a hole down the middle of the dowel. This will be the place that you feed the pendant cord through.

Remove the hoop fasteners and center your 3/4 dowel between the hoop tops. Glue and clamp each hoop to the dowel.

Feed the inner piece of each quilt hoop into the ball overlapping them to make an X shape.

Starting with the bottom, drill through each hoop overlap (there should be 7). Feed the screw through each hoop and fasten with a hex nut.

You could cut down the screws if you want the to end up being flush with the nut but we chose to leave them as is since the piece has an industrial look to it already.

I recommend drilling and fastening in the following order.

Feed the pendant cord through the 3/4 dowel and you're ready to hang it up!

We purchased an antique look filament bulb from Lowes to complete the look.


Isn't that such a creative idea? Amazing work Jessica! We can't wait to see what you link up this week!
Don't forget that voting on the Round 2 Projects starts bright and early tomorrow!