My Creative Blog [Search results for pallet wall

  • Pallet Possibilities {How to Build a Wooden Pallet Wall}

    Pallet Possibilities {How to Build a Wooden Pallet Wall}

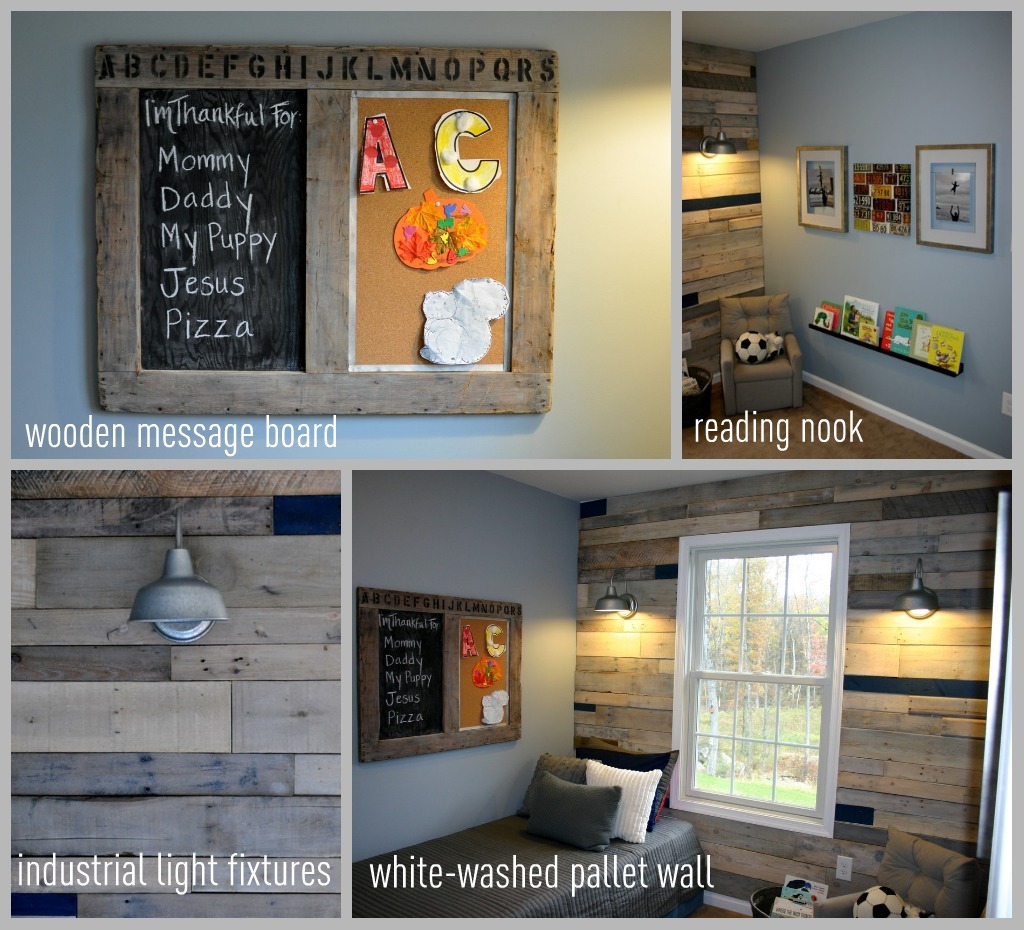
    This room makeover all started with a pallet and became the coolest pallet wall ever. This free project made a huge impact with its wooden walls and white wash technique.
    We're so excited to share it with you today! ******************************************************************
    When the hubs and I moved into our house 12 months ago (holy moly it's been 1 year already!) we decorated 3 out of 4 kid's bedrooms. I wanted to wait until the little man was out of his crib and into a"big boy bed" before tacking the room.

    Well, the crib is history and we were ready to make this tiny space small, but mighty!
    Jess and I have a thing for pallets. We've written a Pallet Possibilities post and Jess shared a pallet shelves post. Well, this time we thought we'd take it to the next level and do an entire wall of pallet wood!

    Here's how we did it: (Shhh… don't tell, but this was super easy and the wood was free!)
    We called around and found places that were okay with us taking their pallets. The hard part is taking them apart and not cracking the boards. We started with a hammer or two or three… TIP: don't buy cheap hammers. Then, we moved to a sawsall. It worked okay, but not great. Finally, the hubs pulled out his circular saw and we were in business!

    We separated out the keepers and made sure we had a good blend of various lengths and widths. We took out most of the nails for safety, but left a few for character (we put those pieces up high on the wall so the little man would be safe and sound)

    Thankfully my hubs is pretty darn smart and helped me and Jess figure out the layout. We placed each piece on the wall temporarily (one nail in each board) just to see the layout and get all the cuts out of the way. We don't have any great tips on this step, just find someone that likes doing puzzles and invite them over to help! (You might notice that between breaking apart the pallets and doing the wall that I moved from a blonde to a reddish brunette. 2 hair colors in one post… is that a blogger foul?)

    Once we had the layout, we took each piece down and labeled it so we'd know where to put it back. We gave each row a number and a letter going from left to right… 1A, 1B, 1C, 2A, 2B etc… Then we brought all the wood down to the garage to begin the fun part… sanding and whitewashing!

    We sanded the wood lightly… we didn't want to lose cool character, but we didn't want splinters for the little man either. We arranged the wood as it would look on the wall, so that we could figure out how we wanted to whitewash the wood.

    Some of the"blonde" pieces of wood needed some grey stain to make them look a bit more weathered, so we put in on randomly and rubbed it in a bit.
    To make our whitewashing colors we just filled cups with water and added a few dabs of paint. It was trial and error. We used the grey-blue wall paint, white paint, and some navy (which we used full strength). We wanted cool tones, not the warm honey ones it originally had. (Will I ever remember NOT to wear sweatpants for all our projects?)

    Once it was all dry, we were so thrilled with the colors and couldn't wait to put it back on the wall!

    Before putting the pallet wood on the wall, we added some industrial looking lights. The hubby did this part of the job because these girls don't mess with electric- we have our limits!

    To adhere the pallet wood to the wall we just used nails. You could use liquid nails, screws, etc. I thought nails would be the easiest just to spackle over when we we want to change the room (which I don't know if I'll ever will want to). Once we had the wall installed we got busy decorating and then pretty much fell in love with the finished product! How do you like it?

    There are so many fun details in this room! You can read about the message board made from reclaimed barnwood here! (Yup, we're still lovin' the reclaimed barnwood!)

    Not too shabby for a FREE statement wall eh? My son loves his new room and my only complaint is that we didn't try this fabulous project in one of our master bedrooms! We love it!

    So there you have it! Free pallets transformed into a crazy, cool statement wall! It was free, simple, and we totally think you should try this at home! So, what pallet possibilities are you thinking of trying?

    P.S. Did you see our second Nate episode? How'd we do? We're counting down the days to Cancun and of course will take you all with us through the blog!

  • Nate's 12 Days of Holiday DIYs {Day 8: Pallet Wall Take 2}

    Nate's 12 Days of Holiday DIYs {Day 8: Pallet Wall Take 2}

    Before I could do any Christmas decorating, I had one major problem to take care of… the huge broken TV and the massive custom shelving built around it. It's funny because this was a HUGE part of my 48 hours, but because it wasn't just decorating, they hardly even mentioned it in the episode!

    I knew that the TV was broken and the little one was being used temporarily, but I didn't know what to do with shelving that was made specifically for a ginormous box TV. I considered building shelving within the shelving and then remembered that I didn't have a clue how to do that and only had about 8 hours… onto plan B. One thing I did know how to do was build a pallet wall. Remember this project we recently finished?

    I thought Jess and Kev wouldn't mind if I covered up the gaping hole in the wall with some cool pallets, and so I went to the garage to see how many they had sitting around and then sent the hubs on a little search for more pallets!
    The first step was removing the molding all around the edges. (Oh, and removing the beast of a TV…good thing I'm super strong! hehe)

    Next, we used 2x4s to create studs that we could nail the pallets into. This wasn't quite as easy as doing it on a normal wall because we had a lot of open space.

    The process we used was exactly the same as our last pallet wall, so if you want all the directions head over to this post. My favorite part of this wall is the awesome pattern that some of the pieces of wood had. I feel like the circles are a great contrast with the natural tones of the wood.

    I think the finished product is just a wee-bit better than before, don't you?

    Once that little challenge was taken care of, I could breathe a sigh of relief and move on to some decorating!

    I hope that seeing another fun wall 'o pallets is sparking your creativity! I think the two walls I've done have turned out to be some of my favorite DIYs in a while!
    And just because it was too fun not to share… Tonight the hubs and I hosted a dinner and cookie decorating night. 35 of us had a blast eating, decorating, and spending time together. Jess and I are so thankful for the awesomely fun people in our lives!

  • Wooden Memo Board

    Wooden Memo Board

    You probably remember (or at least we hope you do) our pallet wall room for my son Callen… If you missed that post, you can check it out HERE, but today I wanted to focus on the Wooden memo board we made.

    We had the room about 95% done and we realized that there wasn't anything over the bed… The original plan for the room was to put the bed on the pallet wall and then use pallet wood to create a platform-style base with all kinds of cool built-ins. It sounded amazing in theory, and looked great when we arranged it that way… BUT I had terrible thoughts of Cal falling out of the window (and it's way up high- Yikes!).

    So, safety over design! We switched the layout and now needed something on the left wall… Hmm… Jess and I had this piece of barnwood sitting in my garage for a while, just waiting for some inspiration… I don't know that either of us really had visions of it being in a toddler's bedroom, but for CWTS, it was totally worth it.

    The first step was to give it the same sort of whitewash we used on the wall, so that the wood tones matched. As you can see, I made about a 50% attempt to cover up my granite countertop… (the hubs wasn't around to see! hehe) See how much a simple whitewash can change the look of the wood?

    Since this was an afterthought project, I used all supplies I already had on hand. This one quart has done so many projects. This one, this one, and this one! I decided one half would be a chalk board for the little man.

    I really lightly sanded down the inside wood and then just slapped it on. It wasn't perfectly smooth, but chalkboard paint is pretty thick and covers a multitude of sins!

    Then I had to come up with something for the other side… I had a leftover roll of cork in the basement, and thankfully it was JUST long enough! Phew!

    I did this the lazy blogger way… I pressed the cork in, made a crease at the sides and then roughly cut it. I DON'T recommend doing it that way… it was really wobbly and way far from perfect. I used my staple gun to attach the cork to the wood. to

    See, you end up with yucky, uneven sides. Now I had to cover the edges up.

    I had this leftover Halloween ribbon, but clearly orange polka-dot wasn't going to match. Have no fear, I'm willing to spraypaint anything and everything! I grabbed some metalic silver paint and went to town (sorry, no pic of that process… I really thought I took one??)

    Originally, I planned on being finished once the ribbon was added, but just before we brought it into the room, we walked past the Anthro knock off dresser and thought adding some stenciling to this piece would be the perfect finishing touch!

    I got these simple stencils at Lowes for under $4! Sweet!!

    Of course I didn't plan out how far in the alphabet I'd get, so we just started and ended where it ended. My hubs thought that was weird, but Jess and I had no problem with it.

    Isn't it super cool? Seriously, I hope this kid understands how awesome his room is. A 2 year old has my favorite pallet wall, our Anthro dresser, AND this wooden memo board! Ah, to be a toddler again…(actually, there is zero part of me that wants to be two, but it just kind of finished the paragraph)

    So there you have it! I think it was the perfect accent for over the bed, and now I don't have nightmares of little children falling from windows! Creepy!

    I wanted to mention, that if you didn't happen to have this exact piece of barnwood floating around (which I'm kind of thinking most of you don't…) you could use some plywood and pallets to trim around the edges and make the divider. It would be easy peasy and then totally match the wall.
    So, how many of you have awesome kids' bedrooms, and blah master bedrooms? (I know my master is still builder white with no furniture!)

    P.S. Jess and I both had family pictures taken last night by the Amazing Stacy Salvatori and we're so stinkin' excited to see all the pics! Here's a sneak peek that we got last night! My oldest (and yes, she's only 9!)

    And Jess' insanely adorable little family. Love those kiddos!

  • Pallet Possibilities

    Pallet Possibilities

    I didn't know Jess was going to mention one of our favorite blogs yesterday, but it was the perfect lead-in for my post today. Layla and Kevin from The Lettered Cottage have a wall that I love and want to create something similar to.

    Now, their wooden walls were hiding out under the drywall, because they have an old home, but I'm going to have to bring in wood to create this look. Eric and I were talking about where to get inexpensive old, wood flooring, but then we thought about pallets. They're free, they're easy to aquire, and I think they just might work. Thus began my search for pallet inspiration.

    This wall is not my style and I think the TV is completely out of place, but I was able to get some good tips from this DIY project. I'm pretty sure I want to whitewash or colorwash my wood.

    Moma and Her Drill During my pallet search I found tons of other ideas and creative uses for pallets… I'm learning that they're all the rage right now! Children's Headboard

    Apartment Therapy I really love this headboard. I'm not sure if I love the headboard or just the fact that it's in my favorite colors and my style bedding.

    House Tweaking This reading nook is adorable! I need to find a spot in my house to create one for my kiddos! I might need to wait until we finish the basement, but I'm saving this project idea for sure!

    Kojo Designs I'm not a big coffee table fan (perhaps because we have four kids and have had a toddler around for the last 9 years) but this is a cool idea and I think you could give it a rustic or very polished look.

    DIY Ideas A Sweedish company makes interrlocking furniture that doubles as art. This is just a sample of their colors, but check out the link below to see how it's used functionally. So cool!

    Sibylle Stœckli How fun are these bright outdoor chairs? This company sells them, but there are tons of DIY directions online. They would be fabulous in an urban backyard or patio.

    Inhabitat Lastly, an adorable idea that my kids would love! Seriously, what little kid wouldn't love to play inside this… of course I'd add some fun accessories and a pop of color, but the idea is awesome.

    Tiny Pallet House
    What do you think of these Green building ideas? I think I'm all about it and I just need to decide which room I'm going to attempt it in… I'm between Callen's bedroom and the Master Bathroom. We're leaning towards Cal's room because the master bathroom has really high ceilings and is a much bigger project for the hubs. Currently"Pallet Wall" is about # 4 or 5 on the Honey-do-list… Eric's Honey-do-list… 1. Hang DIY hardware in kids bathroom (I'm pretty sure he's doing that now. I hear banging!) 2. Build Dining Room Table (we're in the planning and researching stage still, but making progress) 3. Assemble the kids' new swingset (a Christmas present, but we've been waiting for grass to grow) 4. LANDSCAPE this crazy yard (the builder is re-seeding this week and then we can start!) 5. Create Pallet Wall I'll keep you posted on our projects, and until we get to #5 on the list, I'll just keep being inspired by other people's DIY ideas. What cool Pallet Possibilies can you think of?

  • How to Make a Pallet Garden

    How to Make a Pallet Garden

    So you already know we love pallets! You've seen our pallet wall, our other pallet wall pallet shelves, and actually right now we're using pallets in an episode of Knock It Off!

    Funny story, after we first posted Callen's bedroom and the pallet wall, we got an email from someone asking for tips and directions on how they could build an entire home from pallets- haha! We have to draw the line somewhere people!
    Anyhow, this past spring I was wrapping up my projects for the Trend Trio from P&G and I decided I'd try my hand at a super simple Pallet Planter. I know this isn't super original nor complicated, but our P&G audience is way different than hard core DIY blog readers like you! (wink) So, if you want a quick and easy project for summer- this is just for you!

    And since this was originally done for P&G, it's actually a video! You'll get to see how I made my pallet garden and you'll have to deal with hearing me talk about some P&G products that I actually love. Ha!

    See, it was super easy and looks pretty cute too! Since the early spring, (you can tell it was like March beacuse I was white as a ghost in that video) I've moved the planter out back on the patio, swapped out the plants and now it's colorful and fun! Here's a peek at some of the other living stuff going on, on my patio!

    Monday, I'm super excited to share one more gardening project with you- We're growing potatoes and it's so fun!! Make sure you check back because it's a project the kids will LOVE too!!

    Monica
  • Pallet Love {And Giveaway Winner Announced!}

    Pallet Love {And Giveaway Winner Announced!}

    Remember, way back when, we posted about all kinds of pallet possibilities? Ever since then, I've been daydreaming about how I could incorporate pallets into my home decor. A few weeks ago, I stumbled across this shelf made from a pallet on Pinterest:

    Source: diefrauimhaus.com via Jessica on Pinterest
    I mean, honestly, this is an EASY project. There were no written directions, but I knew hubs and I could tackle this, no problem. And need I remind you that pallets are FREE? We got a few pallets on the side of the road right next to a dumpster. If you're looking for cheap projects, I'm your girl.; )

    Not much to look at, eh?

    We actually made this project a little bit harder than it had to be, but the bottom piece was pretty beat up. Hubs took it off using a crowbar and we later added a nicer looking piece in its place. This step is not necessary if your pallet is in decent condition.

    We used a palm sander to lightly sand the wood. This pallet was banged up, but I still loved the grayish, old look it had. We wanted to preserve that at all costs, so a light sanding was all that was called for.

    Hubs cut the bottom two slats away from the rest of the pallet, including the"framing", because that's all we were using.

    We added the other piece of wood (from the same pallet) to the front.

    Another piece of pallet wood was added to make the bottom of the shelf.

    And here she is looking gorgeous. In case I haven't made it clear, I LOVE aged wood. It's beautiful and has so much character. We did add a water-based polyurethane that deepened the color a bit and gave it a more finished look.

    Finshed + Decor = LOVE

    So let's see if I can fill you in on the random stuff I put on the shelf. First we have a vintage coffee sign that, believe it or not, I got in Ocean City, NJ at a vintage sign shop. The lobster plate and silver lobster crackers (I am absolutey positive that is not the correct term for them) are from a gift I gave my hubs which also included a big lobster dinner I cooked for him.

    The right side holds a fish and seafood recipe book that Monica gave me, a Nicholas Sparks book that I don't care about it but had the right color scheme: ), an old olive oil bottle from Trader Joes and a wine bottle from my favorite place in the whole world: Tabora Farm & Orchard.

    My original idea was to put it on the wall behind the bar. So, that's what we did.
    BUT…

    It's totally not the right scale at all for that space. Boo.: ( So, we'll be taking that pretty little shelf down and finding a new home for it. However, I think I know what I'm going to do on that wall, and it includes pallets. Ha!
    And now, what you've all been waiting for! The Kotton Pick'n Kute Giveaway Winner is: Elaine

    Congratulations, Elaine, both on the baby and winning the hat! Send us an email at therealhousewivesofbc@gmail.com and we'll hook you up!
    Happy Monday, everyone!

    Linking up to: Tutorials & Tips Tuesday, Tip Me Tuesday, Pinterest Challenge, How To Tuesday

  • CWTS Updates, Link Up, and some Favs!

    CWTS Updates, Link Up, and some Favs!

    We weren't lying when we said we were floored by the all of the talent that showed up in our Creating with the Stars submissions post. Seriously, you all made us feel a little bad about ourselves.; ) Every single one of the stars said they had a terrible time narrowing their favorites down to the top 11, and we agreed wholeheartedly! So, while there are only 12 contestants vying for the CWTS title this year (you can see them here!), we thought it would be fun to highlight a few of our favorite submissions that didn't quite make the cut.
    DIY Chunky Floating Shelves by Desert Domicile These babies are gorgeous, and just look at how beautifully they're styled!! We're definitely taking some notes.

    Beaded Chandelier by My Simple Obsession Ack, the time and patience that must have gone into this amazing chandelier! Will you make us one…please?

    Custom Painted French Provencal Dresser by J.Rox Designs Hot pink, curvy furniture? Never thought I'd say this, but sign me up! I loooooove this dresser.
    

    Custom Painted French Provencal Dresser by jRoxDesigns

    Painted Dresser (and that fabulous pallet wall!) by Cape 27 You know we love a good pallet wall, and this one is no exception. Plus, that dresser reminds us of Monica's outdoor furniture upcycle, and we're totally digging the fun art!

    .and because we apparently have a thing for painted dressers, this Woodland Dresser makeover by The DIY Village is so sweet and woodsy that it caught our eye right away.

    Stenciled Dresser

    We just didn't want all the fun and inspiration to end for all of you talented bloggers out there that didn't make it as contestants this year, so we're hosting a weekly linkup party throughout the entire contest. Basically, that means you get to play along and win great prizes!

    Here's how it will work: Every Tuesday Monica and I will be revealing our project for that week's theme. Woohoo! We have some good projects up our sleeves.: ) That same day you can submit your own project that meets the criteria for that week (For example, week one is Upcycle, so anything that you've given new life or repurposed in some way in the last year is game). The winner will receive an awesome prize package from Belmonili and Perfectly Imperfect Shop! So fun! We can't wait to be inspired by your creativity each week.; )
    Don't forget to mark your calendars for these important dates next week when things really get moving!

    Have an awesome weekend!
    Want more EC2? Use the icons below to follow us!

  • A Big Day!

    A Big Day!

    Welcome Nate Show Lovers!
    Well, Monica and I are just over the moon today for several reasons (which I'll share in a moment), but we first want to say how flattered, humbled and thankful we are for all of your support, good wishes and super-nice comments over the past several months. We never dreamed our little blog would take off like it has, and we have YOU to thank for that. So, thanks!: )
    So, here goes: 1. Remember that contest we entered called Crafting with the Stars? Well, we won. This contest was one of those things we were dying to do, but we didn't fully realize how much time and effort it would take from us. It was seriously like Design/DIY bootcamp! We are so excited to have won, since we were competing against some pretty fierce competition. In case you were wondering, here's the project that sealed the deal for us:

    Check back tomorrow for all the details on how we made that amazing pallet wall, and how the room came together.

    You can see how we did that fabulous fabric wallpaper here, how we transformed an old dresser into an amazing Anthropologie Dresser knockoff here, and how we took an antique table and turned into a gorgeous bathroom vanity here.
    -------------------------------------------------------------------------------------------------------------
    2. We were on the front page of The Intelligencer (our local Philly paper) today! We were happy to read such a nice article about us, and also share a little bit about our Design it Forward initiative!

    You can read the whole article here, and see the video we shot with them here. ------------------------------------------------------------------------------------------------------------- And 3) Of course, our 2nd appearance on The Nate Show aired today! We know you want to hear all about the behind-the-scenes stuff, so let's get right to it!
    It all started with a crazy hectic arrival into NYC on Tuesday night around 10 PM. Monica and I got to stay at the very nice Lucerne Hotel a few blocks away from the studio. Well, not really stay there… we stopped in for about 2 hours after we redesigned the room.

    We had a million ideas so we jumped right in and worked from 11-3 AM on our room design and then headed back to the hotel for a measly 2 hours of sleep. I must love you guys a lot to let you have a sneak peek at me getting ready that early in the morning!

    Can you say tired eyes?
    Thankfully, after the magic of hair and makeup we looked somewhat presentable…

    I honestly had no idea that Monica and I matched so exactly. We were literally just running on adrenaline at this point, and I guess we're just lucky we remembered to put ANYTHING on under those aprons. Speaking of the aprons…could anything be less attractive? But we were thrilled to have our blog initials thrown in there for all to see. (We're so not afraid of the shameless plug!: )

    So, this is the room in process. This was our first time doing a redesign on the actual set of the show. It was pure madness! There were a million people adjusting the lighting, checking our mikes (mics??!) and moving things around.

    Tada! This is the room after we finished the show. We LOVED the way it turned out. I had the idea to use the foam core they gave us to do a board & batten treatment on the back wall, and Monica made that idea come to life! It added such a nice architectural detail for the focal wall. We also used the newspaper to create wallpaper- this is SO easy to do. Just spray the wall with spray adhesive and then give it a coat of matte mod podge to seal it all in. But forget all the good stuff, let's chat about the elephant in the room; the mason jar disaster in the corner of the room:

    Our goal was to create somthing like this:

    Source: etsy.com via The Real Housewives on Pinterest Unfortunately, with the limited materials we had on hand, our project didn't even come close to looking like that. Even Nate asked us what it was and if it was a place to store macaroni. Ugh. So embarassing. Moving on… (please)

    Using our perfect stripe painting method, we added navy blue stripes to our chair and whipped up two little pillows to throw on there. The stencil was a last-minute addition, which we LOVED.

    And yes, the most exciting part of the whole ordeal was that WE WON and are already planning our trip to Mexico to celebrate our 30th birthdays in February. Woohoo!

    Ignore the fact that we sort of look plastic (tv make up is simultaneously pretty and wierd, isn't it?) and that we look extremely sleep-deprived, and take a look at the gold hard hats and yellow roses we were awarded for our hard work. ------------------------------------------------------------------------------------------------------------- So, if you're new to our blog, thanks so much for stopping by! We hope you'll come and visit us again (and again, and again, and again…:) Have a great day!

  • Colorful Bedroom Makeover {KJ's Bedroom}

    Colorful Bedroom Makeover {KJ's Bedroom}

    November marked 2 years in our"new" house. I can't believe it's already been two years, and at the same time, it feels like we've always lived here! Before we moved in, I quickly painted each of the kids' rooms in a solid color and did very minimal decorating. Last year, I did Callen's room with the fun Pallet Wall, but he's the only one that has a"cool room" as my kids say. Kira was next on the list for a room makeover and thankfully, it's already gotten the"cool room" stamp of approval from my kids!

    This room makeover was part of one of my projects for P&G. It was my first video for those readers, so sorry about the introductions, but this video does give you a great little room tour! (Excuse the creepy freeze frame… why does Youtube do that?)

    Here's a still shot before and after

    Pretty Big Difference isn't it? I can't wait to share all the fun projects and DIY details with you- I'll be featuring one project each day this week, but for now, here's ton of pictures!

    I grabbed this adorable little hooter at Target.
    The mirror was something we DIYed about 8 years ago, yup, we DIYed before DIYing was cool!

    Little Book Nook!

    Spray paint and round bulbs make all the difference!
    All the color details coming later this week.

    And this is the other side of the room! Helloooo… huge whiteboard wall!
    As you heard in the intro video, KJ had a tendency to write all over the walls. We now have a dedicated place for that!
    Wednesday you'll get all the product info and tutorial for this.

    A little DIY took this dresser from boring to custom-ish!

    For P&G I can't have any pictures showing, so I left Kira a little note in this cute frame instead.

    Creative coloring storage!

    Masterpieces from my little artist

    Now that you've gotten the quick tour…
    Here's the plan for the posts for this week… Tomorrow (Tuesday) I'm going to give you all the details on this stinkin' awesome mosaic accent wall. I'm not sure I'm allowed to say something I did was awesome, but man I love it!

    Wednesday, I'm going to tell you all about Idea Paint and how it can turn almost anything into a cool whiteboard surface!

    Thursday, it's more Staples LOVE and I'll give you the 411 on these foam core faux canvases. And to think I almost bought 4 frames at 39.00 each! The entire project ended up costing me under $25!

    There's actually one REALLY BIG step left before this room is finished. You might have been thinking that the walls are a little too plain and white, and I agree! They won't be that way for long! One crazy-talented Art Teacher from my school, who Kira has now titled"The Artist" is coming to doodle on the white walls with paint pens! Kira has all sorts of fun, things she wants doodled… peace signs, butterflies, and flowers are at the top of her list."The Artist" and I are coordinating our schedules, but once we do I'll be sure to do an update post! Until then, make sure you check back this week for all the tutorials and fun details of the room! So what do you think of my colorful bedroom makeover? Any favorite parts? Do tell!

  • Journey to a Vertical Garden {The Home Depot #Digin}

    Journey to a Vertical Garden {The Home Depot #Digin}

    This is a sponsored post written by us on behalf of The Home Depot- We're so thrilled to have the chance to partner with one of our CWTS sponsors! I'll keep it real right from the start… as much as I try, I don't have a super green thumb. I did last week when I was painting my piano green, but that's not quite the same I suppose. When our friends at The Home Depot asked if we'd like to try our hand at creating a vertical garden, I jumped at the opportunity! Last month, I talked about how I joined the The Home Depot Garden Club and saw so many cool projects and ideas. If you missed the post, you can check it out here- they also have a $5.00 coupon-Score! So, after combing through the site, and looking on The Garden Club board on Pinterest I decided to make a vertical garden. I think they look super cool and I've never tried using my carpentry skills with my lack of gardening skills. Here's what I'm hoping to make… Of course with my own fun twist!

    Woman setting up a beautiful vertical garden

    (Hover over the image below… it's like magic!)

    Vertical gardens are all the rage this season! I've seen so many cool ones made out of everything from shoe organizers to soda bottles. Here are some of the awesome ones I've seen on Pinterest… Apartment Therapy

    Ediblewall_rect540

    Pallet Vertical Garden

    Pallet Wall Garden

    Boundless

    Finished planter!

    I'm headed to The Home Depot this week to get all of my materials, but I have to decide a few things beforehand.
    1- What flowers do you think I should add to my vertical garden?
    2- What color scheme should I go for?
    3- How should I add my own fun spin to the style?

    I'd love to hear your input! Next week I'll share my building plans and materials- you can build one right along with me. It'll be like a DIY long distance relationship!

    Monica

    It’s home improvement time, and The Home Depot has everything you need to #DigIn for Spring. No matter what projects you want to tackle, they have great values on all you need. They’re ready to help you with renovation ideas and expert advice too! Get over $300 in email exclusive savings each year, sneak peeks on new products, monthly lawn & garden ideas for your region and access to The Home Depot’s gardening experts.

  • Our Home Goals for 2013

    Our Home Goals for 2013

    Ok, folks. Yesterday we shared our BLOG goals with you and today's the day we publicly lay out our plans for our homes in the hopes that putting it down in writing for the whole world to see will motivate us to actually geterdone. These goals include our big plans for the year, but we'll be sharing lots of little projects and ideas along the way.
    So, here goes:

    1. Finish the dining room, goshdarnit. I'm the worst at putting the finishing touches on a room (ugh, the details!), but that's all I have left to do. Look for the full reveal later this month!

    2. Update the Living Room. This room is attached to the dining room, so it looks a bit drab compared to the new cottagey/coastal dining room. The stenciled fireplace is just waiting for the rest of the room to catch up!

    3. Tackle the Master Bedroom. Oh, this room. It's dark, dingy and in dire need of some love. I'm ready to paint, add an accent wall, change out the bedding, refinish the furniture, and make some art that speaks to my hubs and me. This will be the last room on the main level that gets done! (Oh wait, there's the master bath too…)

    4. Create an organized (but beautiful!) desk area under the stairs in our finished basement. We need a place to keep our files (instead of my husband's underwear drawer. I kid you not!) and house our computer. I'm not entirely sure what I want to do there, but I know it will include this fabulous antique door. We planned to use it in our Guest Room Makeover, but we went with shutters instead.

    5. My baby turns 3 this year and it's time for a big boy room! I'm so torn about the direction I want to go in for Charlie's room: preppy and nautical or vintage baseball. I know he'd go nuts for baseball, but I'd go nuts for nautical! Who will win?!

    Pottery Barn Kids & Source Unknown
    6. Be content to just live in and enjoy our home without constantly scrutinizing it for problem areas. I'll be honest. Sometimes being in the home blogging world feels like everyone has the perfect house. I don't and that's ok. I'm going to try to read a book in my ugly bedroom every once in a while and just enjoy it, instead of wishing it were someone else's gorgeous retreat. You know why? Because I am blessed…ugly rooms and all.

    Pinned Image

    1. Eliminate Wasted Space. Almost everyone has that one room (usually the formal living room) that is just totally wasted space. Either, it looks pretty, but no one uses it or it's kind of an unfinished eyesore… Mine is the later. When you walk into our foyer you see our bold wallpaper, fun word art wall, and then BAM it hits you… to the right is a completely unfinished jumble of a room. I was going to make it a completely predictable formal living room, but I'd never really use it. Jess, the hubs, and I have been brainstorming and I think we just might have a plan!
    (this is part of the current jumbled up mess- don't worry I'll just be relocating this area, because the kids do use the crafting area all the time)

    2. Compromise in the Bedroom No! It's not what you think (geesh you guys!)… Eric and I recently discovered (okay, he knew, but I was oblivious to the fact) that we both have really different styles. He would love a bedroom that's warm and I believe he used the word"Lodgey" (like a ski lodge). If you look at my home for even a second, you will notice that nothing about it fits that bill. So, we're making it a 2013 goal to finally design a bedroom that we both love (Honestly, I'm okay with me loving and him liking… just keepin' it real) and I'm thinking it will be sort of Rustic-Industrial.
    So, as embarrassing as it is to show you… welcome to my current master bedroom.

    3. Details. Details. Details. I am not good at the little details of designing a room. I am a big-picture, big-ideas kind of gal. Once the walls are painted, a few pieces of furniture are in, I tend to walk away and never bring it all together with accessories etc. It's my goal this year to work through each room and make sure it feels finished. So you'll be seeing a lot of thrifted accessory upcycles, fabulous accent pillows, and who knows what else.

    4. Kenzie's Room (Heaven Help Us All!) Man, if you could meet one of my kids, I'd want it to be Kenzie. She's a trip (and I sounds 98 yrs old for saying that)! She's funny, spunky, sassy, and adores animals like no one I've ever met.

    Anyhow, she has been promised a room makeover this year and it's going to push my design skills to the limit. Have you ever seen this guy?

    He's the"TurtleMan" and he has a reality show where he rescues"critters" and it's by far Kenzie's favorite show (sometimes I feel like I live in the Twilight Zone). Anyhow, she would like a combination Turtleman and Equestrian room. I have a strong feeling that will be a first on Pinterest! Ha! So far, her only specific request is a pallet wall ceiling. This project is going to be a challenge to say the least.

    So, there you have it. Our home goals for 2013! We know there will be about 2 million other projects we tackle this year, but hopefully all of these will make the list too!
    Now…who wants to keep us accountable?!!
    What are YOUR home goals this year?

  • DIY Headboards

    DIY Headboards

    Well, many of you have asked, so I thought now was the time to share how my hubs and I made our headboard out of an old door. It truly is a VERY easy project, and like I mentioned before, is super inexpensive! Unfortunately, I don't have pictures of the process, because we did this several years ago before I was into taking pictures of everything just in case it would make a good blog post.: )

    First, I just want to remind you that this project was very low-budget, using items we already had. In addition, neither my husband or I cared what it looked like behind/below the bed. It's not perfect, so if you're looking for something perfect (ahem! Monica and Eric), you won't find it here. Anyway, we started with a plain, interior door that we had removed from another area in the house (read: FREE!) I painted it the color of three of the walls in our bedroom. We measured the ends and cut off the top part of the door using a saw. We held the door up to the wall with the bed in place so we knew how high we wanted it. Then, we took a 2x4 from the random collection of wood in our attic, levelled it, and mounted it to the wall using screws and a drill.

    Finally, we rested the door on top of the 2x4 (making sure that the hole for the door handle was on the bottom), checked to see if it was level, and then put two screws on either end of the top of the door into the wall. I painted the screws the same color of the door so that they blend in and you almost don't notice them.

    That's it! Pretty darn easy, and it cost us nothing. Score!
    Need some other DIY Headboard inspiration?
    I've rounded up my favorite DIY headboard projects and can't wait to share them with you! Just click on the link to be taken to the instructions on how to make them. (And as always, if you attempt to make one of these headboard projects, please send us a picture!)

    Southern Living
    I love this headboard made out of a mantel. So creative, and an awesome spot to showcase some of your favorite treasures.

    Too Much Time on my Hands
    Monica showcased a headboard made from a pallet in this post, but here is another example of how you can turn a boring, old pallet into something fabulous!

    guest1.jpg

    Apartment Therapy Wouldn't it be fun to write love notes to your hubby that he could see when he wakes up (or goes to bed; ) Or, use it as a place to tell your kids how special they are to you. How about writing something you love about them every day for a year? So many possibilities!

     HGTV
    I know I've seen shutters at yardsales or flea markets in the past, but who knew they had so much potential grouped together as a headboard??!!

    HGTV
    This headboard can be made using 1x6 whitewood boards for LESS THAN $100! An added bonus is that you can change the color depending on the color scheme of your bedding.

    Isabella & Max
    This padded fabric headboard makes a major statement and is the focal point of this whole room. Definitely not a beginner's project, but is worth giving it a try.

    Our Vintage Home Love
    And finally, my favorite of all. I love this look so much that I may be attempting it soon. Stay tuned!

    Which headboard can you envision yourself falling asleep under?

    Have a great day!

    Linking up to: Made by You Mondays, Craftomaniac Mondays, Market Yourself Monday, Tip Me Tuesday, Tutorials and Tips

  • Illuminated Deer Art

    Illuminated Deer Art

    Hey Everyone! We're super excited to share this simple, yet majorly cool project with you today! Two weeks ago I got back from my 8 day trip to London and Paris with my hubs (Recap post coming after Christmas). It was an amazing, kid-free trip that allowed us to do adult things like visit museums, eat at fun restaurants, see a musical, and do some shopping.

    Let's be completely honest… Europeans have mad-style! I loved all of their clothes and when Eric and I were shopping at a store called Next, he pointed out a really cool deer silhouette art and said,"You could totally knock that off!"

    Let me tell you, I was so thrilled that A.) my hubs is always on the lookout for blog projects and B.) he knew to call it a"knock-off" I took a cell pic (above) and knew I'd make it as soon as I got home.
    Here's what Jess and I came up with…

    How to Make Your Own Illuminated Silhouette Art: We had a few 1x1s leftover from Jess' planked dining room wall, so we started by cutting them down to size. We made ours a little larger than the inspiration piece, we did a 18x24 rectangle.

    We painted all four pieces with some leftover grey paint.

    While Jess was in the garage painting, I got to work on creating my deer silhouette. I found an image on Google and then used my Silhouette to cut it on black cardstock. If I'm being 100% honest, first I watched about 5 YouTube videos teaching me how to do it! Ha!

    I then measured the light linen-ish fabric down to 18x24

    We laid out our wood in a simple box and measured 1 1/2 inches in for each intersection.

    We started by using simple nails to secure the box, but it wasn't the most sturdy…

    So, we went to a plan B and used a drill. Sorry about the lawn mower in the background- a little evidence that I live on 4 acres.

    Once we had our box secure, we placed the fabric on the back and attached it with a staple gun.

    We had some excess fabric, so we trimmed the edges down a bit.

    One of my favorite things about the inspiration piece was the cording at the intersections. I picked up red and tan at JoAnn Fabrics.

    We put the paper silhouette on the linen using spray adhesive. To light it, I just stood it up near a light, but you could also use a small reading lamp or Christmas lights to illuminate it.

    It looks awesome in my Kaden's room with his Pallet Wall!

    Even though it's perfect in Kade's room, for now it's part of my Christmas decor!

    One of the coolest parts of this DIY, is that you can easily swap out the silhouette. I already have something fun planned for Valentine's Day!
    If you want to see the rest of Jess and my Christmas home tours, you can check them out here.
    My Christmas Home Tour

    Jess' Christmas Home Tour

    We hope you and your family are enjoying these days leading up to Christmas.

  • Nate's 12 Days of Holiday DIYs {Day 6 Ornament Recap}

    Nate's 12 Days of Holiday DIYs {Day 6 Ornament Recap}

    Guess what we have for you today?? Another Video!! Just kidding! Hehe… We're joint posting and will be sharing all about our Nate Show ornaments with you.

    In the midst of our 48 hour challenge, my ornaments were pretty much one of my last concerns. I was pretty focused on building a pallet wall (details coming soon), moving and rehanging Jess' long wall shelves, and some other BIG projects. I had the room 90% done and was like,"Hmm… I guess the tree needs ornaments??" So here are some insanely simple and quick ideas for you to try.

    1. Wooden Ornaments: Jess loves bringing the outside in… (which is sort of funny because she hates outdoorsy stuff and camping and and every year on our annual friends and families camping trip, she brings her family for dinner and s'mores and then leaves! Hehe) Anyhow, enough secret insider info, onto the ornament. If you live in the suburbs (like us) or the country you can find wood I'm sure. Nate reminded me that he can't just grab some wood in NYC (ha! Totally didn't occur to me), but he gets his at Michael's. You'll need to use a chop saw or find a willing friend to help. Slice them about 1/4 inch thick, drill a hole, add ribbon. It's really that simple! I also used some of these as gift tags on the presents I wrapped and just wrote on them with a Sharpie.

    2. Bracelet Ornaments: Time to admit something here… these kind of happened as an accident! We were spray painting some of the bracelets to get rid of the gold color and some of them got tangled. Wait… Could that look amazingly similar to a ball?? A few twists of the hand and we had ourselves bracelet ornaments! All we had to to was add ribbon!

    3. Scrabble Ornaments: Crafty people all around the blogosphere have been using Scrabble tiles for all kinds of cool things! Jules shared some scrabble ornaments she had found at a boutique in one of her blog posts and it got me thinking that it was definitely something to DIY not BUY! All I did was take Scrabble letters and hot glue them onto popsicle sticks that were part of Nate's Crate.

    I just snapped off the extra wood (with my crazy-strong muscles) and then used a little sand paper on the edges to smooth it out. Add your favorite ribbon and voila! I was wondering today, if I sanded the tiles down a bit, if I could whitewash them a fun color?? Hmm… Let us know if you try that!

    4. Accent Decor Balls: You know those balls that people use in vases or bowls for filler decor? Well, we had a bag of them sitting around and I thought, Hmm… I have like no time left and a whole tree staring me down. Let's just use those bad boys as ornaments! All I had to do was jab some wire into them and they were done. I only have a picture of one of them, but it yielded about 12 ornaments in 4 different styles. So grab your filler balls and you have insta-ornaments!

    5. Sweater Ball Ornaments: Okay Monica, behave. Don't write anything embarrassing. You're a grown adult. Please excuse my note-to-self. So, these balls were created just using styrofoam balls from the crate and an old knit sweater. I cut the sweater into strips, wrapped it around the ornament, and tied the top and bottom with twine. I also think it could be fun with some really bold colored sweaters. I might need to try that next year!

    So there you have it, my easy-peasy ornaments! And just to set the record straight… I am not a neat person. The picture of my nice and neat supply table was a"Made for TV" display… Here's what it turned into…

    I had a lot of fun coming up with several different ideas for ornaments. If you haven't figured it out yet, I was going for a natural and organic in my decor, and I'm so happy with the way each one complimented the other. You might remember (if you watched our crazy video) that I had never made an ornament before this show, but it was sooo much easier than I thought it would be! And even if they don't turn out exactly as you had envisioned, once you put the tree up and turn the lights no, no one notices the imperfections! So here's the breakdown:

    1. Jewelry Ornament: This one is a combination of a chunky, metallic bracelet and a pair of really funky earrings, both from H & M. The earring sort of reminded me of a Christmas tree, so it worked. I simply spray-painted the bracelet in our favorite Valspar primer in Red Oxide. (Mo used the same color on her reindeer artwork)

    Then, I altered the earrings until nearly unrecognizable and hot-glued the whole thing together. Add some jute twine and that's it!

    2. Jute-Wrapped Ornament: This one is my favorite ornament of all! Although it takes a lot of patience, it really isn't difficult to do. You also need hands of steel, because trust me, they will get hot glue burns. I found that the easiest way to do this was to start wrapping at the middle of the ornament and wrap the jute around until you get to the top. Then start in the middle and work down the opposite way. Make sure to push the rows together as you go so you don't see the styrofoam, and use hot glue to secure the jute along the way.

    3. Pinecone Ornament: This one wins the reward for easiest DIY ornament. Right now you can get a pack of scented pinecones at Michael's or Joann's for around $3.00, which means loads of cute ornaments for almost nothing! I brushed Mod Podge on the"petals' of the pinecone in a random pattern and then sprinkled epsom salt on top. Pretty and wintery (or is it wintry?)

    4. Burlap Ornament: I love love love this ornament. It was inspired by the ornaments sold here on Esty. Cut the burlap in strips and hot glue around the styrofoam ball. I totally didn't measure the widths, but I figure the messier the better with burlap. And if you don't want to make your own, go ahead and buy them. No shame in that.: )

    5. Scrapbook Paper Ornament: I used the same method as we used on our decoupaged pumpkin, and it worked great! Cut your scrapbook paper into thin strips (about 1/4" thick) and slap a generous amount of modpodge on the back of the strips and wrap them around the ball. Make sure your strips are long enough to go the entire way around the ornament. I also mentioned that I used glossy modpodge for these, and it gave it a really nice sheen- a little bit dresser, if you ask me. Side note: I had a few brown kraft-paper ornaments in my crate that worked a heck of a lot better for this than the styrofoam balls, so use those if you can!

    6. Chalkboard Ornament: There aren't many things better than something you can change and customize year after year, depending on your mood or preferences. I used chalkboard paint on a round, flat, kraft-paper ornament, painted the edges with modpodge (what is this? An advertisement for modpodge? I promise you, we're not getting anything from them, I just use their stuff A LOT!), and rolled it in epsom salt. These are great ornaments, but you could also use them as gift tags for a super cute addition to your presents! Love that.
    I'm sort of in love with the Christmas tree I decorated for Monica's living room (and Monica's isn't half-bad either. Hehe.) I hope this inspired you to try something new, use what you have, and think outside the box!
    Well, there you have it! 2 Full trees of ornaments and not one from the store. DIY to the max! Now, it's your turn- we'd love to see what you come up with!

  • Top 11 Projects of 2011 {Jess' Recap}

    Top 11 Projects of 2011 {Jess' Recap}

    I'm going to keep it real here and first say that I felt like I was in a blogging slump the last few weeks. But a wonderful Christmas break and looking back over our past year has rejuvenated me! I'm so proud of the projects Monica and I completed, and of this blog that we love! I'm going to try to keep it short and sweet (I tend to be a bit wordy, yes?; )

    1. Ever hear of a guy named Nate Berkus?

    I just couldn't do a 2011 recap without mentioning our whirlwind love affair crate challenges with Mr. Nate Berkus, himself. You can see what we did for the show here, here and here.
    2. Barnwood Artwork

    This beauty was, by far, my favorite project of the year. Modern, rustic, simple. Plus it was made with love for my best friend- you can't beat that!
    3. Easy Door Headboard

    This sort of makes me laugh, but this project is one of our most popular. My hubs and I made this headboard on a whim using some very non-traditional methods, but it's a winner!
    4. Antique Table turned Vanity

    I had been wanting to do this for a long time, and the Crafting with the Stars challenge gave me the perfect opportunity to give it a go! Monica and I spent one looooong evening getting it just right, but now I can't even express how much I love this vanity! (That sentence is ridiculous, but oh so true.) You can check out two of the other projects we did for CWTS on Monica's post yesterday.
    5. Modern Typography Meets Reclaimed Barnwood

    Oh barnwood, how I adore thee. Same to you, typography. Why not marry the two and make something fabulous? Well, ok, I will. Thankyouverymuch.
    6. Pallet Shelf Love

    Who loves free projects? This girl (said with thumbs pointing at chest)! This shelf was free, easy and quick. Love that.
    7. DIY Drop-cloth Window Treatments

    Drop-cloth window treatments have been floating around the blogosphere for a while now, but I tried my hand at making some valances for my living room when I heard aforementioned Mr. Berkus was sending a team to my house to film. That sure got my rear end in gear, and boy, am I glad. Those naked windows were in desperate need of some clothes!
    8. From an Oops! to a Yes! Mirror Transformation

    That this mirror turned into something I'm proud of, is an absolute miracle and purely an accident. It made me so thankful that, sometimes, persistance pays off!
    9. Faux-Stained Glass Window

    I have a crush on old things of all kinds, but can't often pay for the real deal, so I came up with this idea of using a wall decal from Home Depot and an antique window from my in-law's barn and making a faux stained glass window! I really liked it then, but liked it even more after Monica used it in my basement makeover! 10. A Garden Wall

    I brought a bit of green into my kitchen by creating a garden wall with succelents. You know, the kind that are ridiculously hard to kill. It's true! I've had these since May, and they're still living, for which I can take no credit!
    11. The Barn

    Monica and I were so excited to combine our talents this year to design and create one-of-a-kind products using reclaimed barnwood. We opened our etsy shop in September amidst all our crazy Nate show stuff/ Crafting with the Stars submission/ and our first appearance on our local news. Can you say bad timing?: ) Even so, we love the items and our shop, so if you are ever in need of a unique gift or item for your home, we'd be thrilled to make one for you! ------------------------------------------------------------------------------------------------------------- So, we've had a GREAT year, and owe you a huge, fat thank you! This year would not have been possible without you and we so appreciate you taking time out of your busy lives to stop by our blog! Here's to another fantastic year in 2012!

    Pin It
  • Philadelphia Home Show

    Philadelphia Home Show

    When Denise emailed and asked us if we'd like to come visit her at the Philadelphia Home Show, we immediately said,"Um, yeah. That would be awesome." And it totally was. Denise from The Painted Home guest-posted for us (and we did for her, too!) a while ago, and we've been emailing back and forth for awhile, but haven't ever connected face-to-face. Until now. She was asked to design a bedroom/office for Greg Murphy, and did an amazing job. Head on over to her blog for all the behind-the-scenes stuff, but here's a glimpse of her great work:

    I know, right? You could look and look and look and still not see all the clever things she did!

    Monica and I both loved the dresser with those pieces of old luggage. Denise has a knack for including vintage and salvaged items in her designs!

    You know that we love pallets, so Denise's pallet wall treatment was a huge hit with us!

    Still liking the old grain sack trend…

    This is Denise.Isn't she cute? And we know how crazy it can be working in within time constraints, (thanks to our old buddy Nate Berkus), but she did such a good job! And you better believe that Monica was eying up that gold, framed mirror in the back there. I was pretty sure she was going to ask me to distract Denise while she stuffed it under her sweatshirt.

    Denise worked with Philadelphia Salvage who allowed her to use some amazing old doors for her giant headboard. They were gorgeous, and sadly, already purchased by the time we got there. All of these reclaimed materials made me weak in the knees. Seriously. I swoon over them.

    We were so not prepared to have our pictures taken, and we might have accidentally made it onto the Home Show facebook page. Ha! Check out Monica's ski cap. Love it. ------------------------------------------------------------------------------------------------------------- The Home Show is really a unique experience. It's filled with so many creative ideas that you can use to improve your homes. We were definitely intrigued by The Smart Masker, which claims it significantly cuts prep time for taping before painting. Has anyone ever tried it? With the amount of painting we do between our two households, it might be worth getting one!

    And, oh my goodness, the best part of the entire show was called Clover Market. It was in a section of it's own and was full of handmade jewelry, skincare, clothing and my favorite, reclaimed materials from NYC. We found out that it's an upscale vintage outdoor market located in Ardmore, which isn't too far from us, and has tons more vendors during the spring. We can't wait to go there when it reopens on April 15th!

    Yes, those are skeleton key necklaces in what might be the cutest display ever by Charms City Company. {Love} We had a great time with two of our girlfriends (heck- any time out with your girlfriends is a good time! Especially when it includes lunch at the famous Reading Terminal Market) Thanks so much for inviting us, Denise! ------------------------------------------------------------------------------------------------------------- We'll be doing some fun stuff today for The Nate Show. Stay tuned for more details on all we have planned!

  • Blogging 2 Better Summer Challenge

    Blogging 2 Better Summer Challenge

    We've been keeping a secret from you. And it's a good one. But don't worry! We're about to let you in on it…ready??…ok, here goes: Six weeks ago we asked several amazing bloggers to join with us in a collaboration group we called Blogging 2 Better. We're a bunch of like-minded home, DIYand crafting bloggers that want to learn as much as we can about blogging, while also sharing ideas, encouraging one another and sharing each other's awesome projects as much as we can. We're so fortunate to be part of a blogging community that encourages sharing! (If you write a blog, we strongly suggest getting a group of girls together to learn from. No one understands all that blogging entails except for other bloggers! You can find more about that in our Part-Time Blogger series here.)

    Anyway, these girls are really, truly talented and it was a lot of fun getting to know them better. For our final week, we had Beckie from Infarrantly Creative give us a list of materials that we all needed to incorporate into an awesome project. It's like our version of a Nate's Crate Challenge! Woohoo! And today is the day we get to see what everyone's been up to!! Once you finish taking a look at what we created, make sure you hop over to the other gal's blogs to see what they made.

    Here's the list of the supplies from Beckie:

    And here's what we came up with:

    We struggled to come up with a clever name for it, but basically it's a rustic/industrial storage bin. A very easy project that turned out adorable, if we do say so ourselves. You know we love a good pallet project (we've done several here and here), but we also keep loads of barnwood on hand, too. We picked one that was already the perfect length (yay! no extra cutting required!)

    We also scored these three wire bins at HomeGoods for four bucks a pop! We didn't love the color, but knew immediately that this is where we could use coral! We spraypainted them with Valspar's Hacienda Tile- the perfect coral.

    Next we found a font that we liked and printed number 1 through 3 large on regular, old paper. With a pen, we traced the number while pressing down to leave the outline on the barn wood.

    Have you tried paint pens yet? They're so easy to use, but they still looks like paint. We carefully filled in the stencilled numbers with a black Sharpie paint pen.

    Once the paint on the bins had dried, we brought them in and laid them down in front of the wood to determind the placement. We measured the board, divided it into thirds and then marked where the hooks would go.

    Monica drilled pilot holes where we had previously marked and then we screwed in the eye hooks …Six hooks for three baskets.

    Then I gently sanded down the numbers to distress them a bit.

    Monica whitewashed the entire board with a mixture of paint and water to give the piece a little more depth. (Side note: working as a team makes the project go faster! We're so fortunate to have each other.: ) (I totally Agree! -Monica)

    The last step for the wood piece is to add a coat of water-based polyurethane (water-based won't change the color of the wood!).

    To hang it, we took chain, cut it to the length we wanted with wire cutters and screwed threw one of the links directly into the wood. Make sure your screw isn't so long that it goes right through to the other side!

    Then we hit a creativity wall. Booo. We could not for the life of us figure out how to incorporate fabric into this project. We toyed with lots of different ideas, but finally decided on a cute hanging pendant banner for one of the baskets. Recently we came across a shop called The Finest Kind and we couldn't get over how cute their stuff is! We decided to purchase three of their typographical tags to use on our pendant. You'll probably catch the significance: EC2.: ) First, we spraypainted the little cuties blue.

    Next, we took apart three 2x3 frames so that we could use the cardboard backing. Wierd, I know, but there's always an untraditional use for everything!

    We wrapped the fabric around the cardboard and mod podged it right on.

    Before the Mod Podge had dried, we stuck our tags on, and voila! An adorable pendant honoring our blog for the basket!

    We were thrilled with the finished product, and it has now made it's home in my dining room. And just so you know, it totally inspired me to rearrange my living room and gave me the motivation I needed to start our dining room makeover!

    To be completely honest, we liked this project better without the fabric banner, but do think it makes a super cute accessory!

    And now for the REALLY fun part! We were so excited to see what our blogging buddies came up with using the same materials, and they did not disappoint!

    Please stop over at these amazing ladies blogs to see what their projects. Share the EC2 love with them and tell them we sent you!
    Clockwise from top right:
    Kim from Sand & Sisal: Surfboard Pallet Art
    Brook from Being Brook: Fabric Wall Map
    Allison from House of Hepworths: Dangle Earring Frame
    Jenna from SAS Interiors: Monogrammed Chevron Pallet Tray
    We had SO much fun putting this project together and consider ourselves lucky to be in the company of these awesome bloggers. If you don't already follow them, shame on you! But it's not too late, go ahead and do it now.: )
    We want to know: What would YOU do with those materials?

    ** And if you're loving up all the wood ideas, this one is one of our favorites! Check it out!

    **If you're visiting from one of the other bloggers' projects, thanks for stopping by! If you like what you see use the links below to stay up to date with all of our projects and ideas!

    Follow Me on Pinterest