My Creative Blog [Search results for modern design

  • Chevron

    Chevron

    
    House of Smiths DIY Chevron Rug

    If you read home blogs at all, you will not be able to avoid the very popular trend of using chevron in decorating. What is chevron, you ask? Chevron is a zig-zag line pattern, sort of like a simplified herringbone. It is absolutely popping up everywhere- from curtains to rugs, to desktops and backspashes! It's a very bold choice and makes a big statement in design.

    Jens kitchen nook modern dining room

    modern dining room design by other metros media and blogs Made By Girl

    Bethesda Renovation Kitchen 2 traditional kitchen

    traditional kitchen design by dc metro interior designer Paula Grace Designs, Inc.
    Notice the chevron pattern in the backsplash?

    Blount Design eclectic dining room

    eclectic dining room design by atlanta architect Blount Architectual and Interior Design

    Even my absolute favorite home decor store, Pottery Barn, has jumped on the chevron bandwagon!

    DIY Chevron Art

    I, for one (and I may be the ONLY one), am not a fan of chevron. {Gulp} I confess that you will not find many geometric, modern patterns in my home. Mostly you'll see paisley or stripes- a little bit more classic in my humble opinion. But if you are digging the chevron, there is no shortage of DIY projects out there in blogland!

    What's your opinion?
    Are you a Chevron Lover or Hater like me?

  • {Grow}

    {Grow}

    I can't really take credit for this post… I have my awesome husband to thank for making me realize that tracking our kids' growth is really important and special. I don't have to tell you that kids grow up way too fast… I'm pretty sure I see a mom a day posting something on Facebook about their kids growing up too quickly.
    Since we can't do anything to reverse the growing process, I figure we should embrace it and take tremendous joy in watching our four children grow (even if it seems to be right before our eyes.) So of course, we take about 1500 pictures a month of our kids (I plan to fill my retirement years with sorting through millions of jpeg files), but one other thing we started about 5 years ago is measuring our kids. We celebrate and measure on birthdays and half birthdays! It's amazing to see how much growth and change there can be in 6 months and, of course, our kids love that we know their 1/2 birthday and make a big deal out of it.
    So this is where Eric comes in… You may or may not know that I struggle with anything to do with routines, organization, and all that mom stuff… Enter the Outlook Reminder! Eric simply sends me a reminder that goes off on each of the kids' measurement days and voila…semi-organized mom!

    We recently moved into our new home and we weren't sure what to do about the measurement door. We knew we could replace the door and take it with us, but it was a weird size door, so that seemed silly. So, we ran a big risk and just took a million pictures of it so that we could transfer the measurements to the new house. We moved in and initially thought we'd put them on another door frame or somewhere in the master bedroom, but then I decided I wanted it to be more a part of our home. I had a plan in my mind, and thanks to Uppercase Living was able to order numbers and make my plan a reality.
    This is in our 2nd floor hallway… We all walk past it every day and from the foyer below you can see the pictures and the M.

    I'm not usually one for artwork with phrases for living, but I saw this tree art at a store in New England and something about it really struck a chord in me. I decided it might not be my style, but the words (I'll stick them in a comment) are simple and something I'd like my kids to read and to see for the next years of their lives. The M was gold from Hobby Lobby, but a little spray paint and she was perfect. The line is just painted on the wall with leftover grey (of course) paint.
    Worked from the photo of the old door… I had close-ups too…

    I love comparing the kids and how tall they were at certain ages… Kaden was about 1 1/2 inches ahead of Kenzie when they were both 5 1/2… Of course that earned some bragging rights!

    The finished product. I've had the chart on the wall for months, but just finally added the measurements this week and, since I did, the kids have been checking to see if they've grown, and have been reading all their measurements. I'm so very happy with the results… even if there are dirty little fingerprints all over it already!

    Even though I have my growth chart already made, I scoured the web to find some of the coolest options for under $100. Most of these are around $60 and would be something really special to add to your home. Even if you've been using a door frame or closet that no one sees, maybe consider transferring it over to a place that your kids and company can enjoy!

    This Miss Natalie jute cloth measurement kit is adorable. This one is super popular, but I think the paper tags would become part of one of Kira's next craft projects!  Miss Natalie Heirloom Growth Chart

    This modern, bold design would make a huge impact on a room. Oh, it also comes in 40 colors! Love it! Etsy Modern Growth Chart

    Add a little whimsy with a modern tree and a little bird ByrdieGraphics on Etsy

    These simple charts have a European flair and I love how the numbers get larger as they go up… Measure Me Stick

    The measurements are in Metric and English Units, which I think adds a little something… I also lean towards modern lines, so this one appeals to me. (slight confession… this one is over $100, but I liked it too much not to include it!)

    Cute for a child's room or playroom Woodland Growth Chart

    Believe it or not, this is a DIY project. Here's the link and everything is free and printable. Score! Coolest DIY Growth Chart Project

    I'll finish this rather long post with a little poem by Dianne Loomans. Yes, kind of unlike me, but it made me stop and think about my role as a parent because before I know it they'll be all GROWN up…
    If I had my child to raise over again I'd build self-esteem first and the house later I'd finger paint more and point the finger less I would do less correcting and more connecting I'd take my eyes off my watch and watch with my eyes I would care to know less and know to care more I'd take more hikes and fly more kites I'd stop playing serious and seriously play I would run through more fields and gaze at more stars I'd do more hugging and less tugging I'd see the oak tree in the acorn more often I would be firm less often and affirm much more I'd model less about the love of power And more about the power of love.
    So whether you make a growth chart or not, still take a moment to stop today and just enjoy the little people God has allowed you to grow for Him.

    Tip Junkie handmade projects

    Let’s Really Support Each Other:
    Linked up to: The Creative Girl Sumo's Sweet Stuff

  • Designer Profile: Victoria Hagan

    Designer Profile: Victoria Hagan

    If you don't already know her allow me to introduce you to Victoria Hagan a New York City designer extraordinaire who owns her own design firm named Victoria Hagan Interiors here that caters to both residential and commercial projects.

    Hagan began designing interiors in 1985, founded Victoria Hagan Interiors in 1991 and established Victoria Hagan Home, a line of furniture, fabrics and accessories, in 2002.

    Her design philosophy is 'keep it simple', 'keep it comfortable', 'keep it interesting' but most important 'keep it fun'. She keeps interiors very clean with a neutral palette and isn't drawn to any period or style but rather goes for versitility in a room. Her interiors look very relaxed and stylish at the same time.

    Love the pop of red, dark wood with the clean crisp white. You get a taste of old with the new. Victoria's interiors are both masculine and feminine.

    Designed by Victoria Hagan
    Victoria's style reminds me so much of Darryl Carter's style, below, I love both. They both use a mix of the traditional and modern, the old and the new with clean lines.

    Designed by Darryl Carter, pictures via Elle Decor

    Designed by Darryl Carter, Washington DC Row House, photo Simon Upton
    Darryl Carter used masculine looking leather-covered doors as a headboard, above. While Victoria designed a feminine leather screen, below, for her home collection here.

    The Carroll leather screen by Victoria Hagan
    Victoria's furniture collection it's so stylish and clean and fits beautifully in today's interiors.

    The James footstool designed by Victoria Hagan

    The Wainscott chair from her home collection

    Enjoy more of Victoria Hagan's Interiors here
    I hope you've enjoyed meeting designer Victoria Hagan and seeing a few pictures of her design work. There are a lot more pictures on her website here of interiors and here of her home collection, I just love her look!

  • Creating with the Stars Round 1 Winners Announced!

    Creating with the Stars Round 1 Winners Announced!

    Phew! The contestants and their Star partners really set the bar high this week with their Round 1 projects. Almost every one of you commented about how hard it was to choose only three favorites and we felt that pain right along with you! We know that you're not really here to read lots of mumbo jumbo from us, so let's get to those results, shall we?
    And the Winner of Round 1 is…

    1. Karianne {Thistlewood Farms} & Whitney and Ashley {Shanty 2 Chic}
    Bicycle Wheel Clock

    Bicycle-Clock-Label

    We loved this project and think it was executed so well! Nice work Karianne!! Can't wait to see what you'll come up with for Round 2.
    Let's see who else made it to Round 2…
    2. Sarah {While They Snooze} & Sarah {Thrifty Decor Chick}
    Trash Pile Made Trendy Table

    3. Sarah {Sarah M. Dorsey Designs} & Brooke {All Things Thrifty}
    Statement Piece Light Fixture

    4. Amanda {Love and Renovations} and Beckie {Infarrantly Creative}
    Televison Stand Upcycled to a Bar

    5. Jane {Life, Crafts & Whatever} & Jamielyn {I Heart Naptime}
    Tin Tile Mirror

    6. Melissa {5 foot 12 Creations} & Sherry {Young House Love}
    Lab Station Turned Dining Room Buffet

    7. Nancy {Owen's Olivia} & Kari {Ucreate}
    Dresser Turned Modern Sandbox


    8. Ann Marie {White House, Black Shutters} & Shaunna {Perfectly Imperfect}
    Floor Board Kitchen Island

    these 77 year old floor boards were upcycled into a rustic kitchen island!

    9. Janel {Nellie Bellie} & Brittany {Pretty Handy Girl}
    Frumpy to On Fire, Fireplace

    CWTS final final5

    We're so sorry to say goodbye to the following three contestants! Boo, we hate this part. Thanks for all your hard work and excellent projects this week, girls!
    10. Jourdan and Ashley {Little Yellow Barn} & Beth {Home Stories A to Z}
    Man Chairs

    11. Jessica {Mad in Crafts} & Mandi {Vintage Revivals}
    Vertical Blinds Headboard

    Upcycling Challenge Headboard

    12. Nat and Holly {My Sisters Suitcase} and Jane {Tatertots & Jello}
    Little League Lounger

    To keep things legit, here are the official results!

    I'm sure she doesn't need a reminder, but here's what Karianne won this week!
    Round 1 Prize Package: $50 worth of 31 Gifts products $60 worth of Twysted Yarn products $70 of Henle Headbands products $100 Blog Re-design from 733 Design (who designed all the CWTS logos!) Project featured by HomeTalk We also want to thank Homes.com for being the Official Grand Sponsor of Creating with the Stars!

    Congratulations to the nine moving on! You have your work cut out for you, for sure! Next week's theme is KNOCKOFF!

    The winner of Round 2 will win the following AWESOME prizes: (to see the entire prize package, click here)
    The Week 2 Winner will receive: $100 Gift Card to Royal Design Studio A pair of $120 Robert Allen pillows from Chic Decor Pillows Project featured by HomeTalk

    Voting for Round 2 will begin on Monday, March 18th at 12 AM EST. Don't forget that you can link up your favorite upcycle through this Friday at 10 PM EST right here for the chance to win prizes and be featured here on EC2!
    Finally, we're super excited because: 1. Tomorrow we'll be sharing Karianne's tutorial for her awesome bike clock. 2. On Friday you'll get to see how Sarah put together that amazing trendy tire table and, 3. Saturday, Sarah will be giving us the step-by-step process behind that insane light fixture!
    Be sure to come on back for loads of inspiration starting tomorrow!!

  • Ombre Painted Dresser {Knock It Off DIY Project}

    Ombre Painted Dresser {Knock It Off DIY Project}

    Got an old dresser that needs some love and attention? Don’t kick it to the curb just yet! Try out this ombre paint method for a fun, modern design that will give your dresser new life!

    *Insider tip: When we're looking for furniture to upcycle, we make sure that the piece is in relatively good condition. That doesn't mean it looks good, just that it's structurally sound. Ideally, we love a piece with clean lines and a classic style, but don't overlook a piece just because it has scroll-work or is ornate. Oftentimes, those things can be removed easily with a jigsaw.
    1. Prep the dresser by giving it a thorough sanding with an orbital sander to get rid of the old finish. Remove any hardware from the drawers for easy painting,, too! After sanding, wipe down the dresser with a damp cloth.

    2. Choose your color and get to work! You can actually achieve the ombre effect two different ways- by buying three or four colors from the same paint swatch, or, if you’re trying to save money like we were, using one paint color and changing the color with white paint! We’ll explain this method, since it’s the one we used. Don’t worry, it’s not hard and it’s worth the little bit of extra work!

    3. Go ahead and paint the bottom row of drawers using a small foam roller (designed for painting furniture) with the undiluted, fully-saturated color. The key to a nice finish is even long, even strokes and several light coats of paint. Set drawers aside.

    4. To thin out your paint for the next color, pour three parts of the original paint color in a small paint tray and add one part white paint (3:1 ratio). Roll onto next row of drawers.

    5. Using the same method, thin out the paint with a 2:2 ratio for the third row up from bottom and a 1:3 ratio for the top row of drawers. Paint and let dry the specified amount of time. 6. Add new hardware- we chose to bling out our dresser with clear, glass and gold knobs for this adorable little girl. Or, put the old hardware back on to save even more money!

    Voila! You’ve easily accomplished the fabulous and trendy ombre effect on your dresser! This style is awesome for a nursery, but depending on the colors you choose, could really be used anywhere in your house!

    We've tried our hand at lots of different dresser upcycles. Our absolute favorite is this Anthropologie- inspired dresser

    But, we also kind of love this outdoor furniture upcycle:

    So, please…for our sake…don't throw out your old furniture! Do something fun with it.: ) To watch the full episode of this nursery makeover, click Here! There were so many fun projects in this room!

    jess
    Monica
  • Wall mounted log holder

    Wall mounted log holder

    If you're lucky enough to have a fireplace and would like a stylish alternative for storing your logs, then maybe this might be an idea? This wall mounted log holder from Nestor Martin combines modern design and functionality, and I think it's gorgeous!

    Image: Euroheat via vineet kaur

  • Amazing Achievements

    Amazing Achievements

    I'm showing you bits and pieces of homes because my best friend Deb's company Village Interiors Inc. made some or most of the furnishings. I am so incredibly honored to be able to call her my friend but also I'm so incredibly proud of her and her achievements. She has worked so hard through the years in the background of others that I thought I would give her a little of her due credit here.
    The "Pierre" French for rock, designed by Tom Kundig of Olson Kundig Architects

    This home in Washington state is amazing, it was built within an outcropping of rocks up on a peak to capture the views, hence the name "Pierre".

    While the custom furniture was designed by Olson Kundig Architects' interiors studio, it was Village Interiors that had to make those dreams a reality.

    Hong Kong Villa designed by Jim Olson of Olson Kundig Architects

    This house was also designed by the same architectural firm of Olson Kundig Architects by Jim Olson who also designed the interiors, two very talented men in that architectural firm. This home is located in Hong Kong overlooking the South China Sea.

    Village made all the furniture in this residence too! Isn't that view something out that wall?

    Auckland, New Zealand Architecture by Pip Cheshire, Interiors by Terry Hunziker

    "Visually the house is intended to be seen as a piece of constructed jewelry amid a natural landscape,' architect Pip Cheshire says of the seaside Auckland residence he built for Sue and Peter Cooper. He collaborated closely on the project with interior designer Terry Hunziker."

    While modern house design is not typically my thing I just love this house and all the elements, that fireplace surround is zinc clad! Yep, more sofas and chairs by Village, they ship far and wide!

    Furniture by Village Interiors for projects of designer Holly McKinley

    Deb does so much more then make furniture she also owns Storage By Design better known as SBD, a high end white lab coat, white glove storage facility for antiques, furniture and specialty furniture installations.

    She also owns a pillow business called Olde World Pillows and is in the process of opening a well-anticipated shop next month. (Nope, no competition between us and our businesses since we don't really sell the same pillows, besides we're best friends!)

    It always amazes me what goes on behind the scenes, like the people who have to take a drawing and create what they see and not get any credit for their efforts such as Village. If you're a designer and live in the Pacific Northwest then Village and SBD is for you but Olde World Pillows will be open to everyone and wait until you see her shop, think jewel box! Be sure to check out some of the homes listed here they're freaking amazing!
    Located in Seattle Washington, conveniently just two blocks from the Seattle Design Center. Village Interiors Inc. 217 S. Findlay Seattle, Washington 98108 (206) 768-9601

  • SuperFab Room Redesign REVEAL {Guest Room}

    SuperFab Room Redesign REVEAL {Guest Room}

    When a close friend asks you to help re-do their bubble-gum pink, non-descript guest room, you can't say no. You almost feel like you need to stage a design intervention immediately. Everyone has a room like this one: a forgotten catch-all guest room/play room/ exercise room/ office. We decided that it was our duty to save the world (and Connie and Mark's parents!) from this room so we spruced the place up a bit. I mean, anything would have been better than that color pink, and we were game for the challenge. So.without further ado, here's our first official SuperFab Room Redesign!
    Update: Welcome YHL Readers!
    For the Stencilled Wall Tutorial and Paint colors click HERE
    To see the room with and without accessories click HERE
    For the Shutter Headboard Tutorial click HERE

    DIY Guest Room Makeover

    Yay! Doesn't it look incredible? Over the next few days we'll be posting the tutorials on everything you see in the rooms, but for now, let's take a look at some beauty shots, huh? Obviously, the scene-stealer is the multi-colored houndstooth stenciled wall. This was a definite labor of love (we even called in some backup assistance), but it makes a huge impact in the room, don't you think? We love the mix of the classic houndstooth pattern with the modern color scheme. It definitely set the tone for the rest of the room: mixing old with new. We'll be posting a tutorial next week, but if you want to get a jump start on your own, you can visit Royal Design Studio to get this amazing stencil for yourself!

    Houndstooth Stenciled Wall

    Just take it all in, people.: ) Another fav is the headboard we made out of old shutters (or are they doors? Not sure!) we found at our favorite salvage place, Architectural Antiques. We needed something that would stand out from the wall, command attention, and add some character and and this baby does that. Gorgeous!

    DIY Headboard ideas

    Another fun part of the design for us was coming up with a unique way to showcase Connie's collection of old family photos. This gallery wall is super simple and allows the photos to be the main focus. We can't wait to tell you how we did it, so you can try it too. And now you know what the gears were for!: )

    Vintage Photo Gallery

    Connie & Mark had this dresser that we knew we could make fabulous with some paint and new hardware, so that saved us some big bucks! That blue may be one of our all-time favorite colors and changed this dresser from one that was ready to be kicked to the curb, to something that they'll never want to part with!

    Dresser Upcycle

    This little vignette makes us super happy, because not only is it adorable, but it's totally functional, as well. Since this is their guest room, we made sure to add some towels and an extra blanket to the cart to make their guests feel at home. An $8 industrial cart never looked so good! The metal cubby shelf was a great find from HomeGoods that completes this corner of the room.

    Guest Room Storage

    And a room makeover is nothing without accessories. Pulling together all of these items was our idea of a good time, and they make a world of difference. We'll show you the proof this week, trust us.

    Room Accessories

    We're already planning a sleepover at Connie and Mark's.; ) We hope you enjoyed our makeover! Be sure to stop back over to see all the juicy DIY details in the next few days. Oh yeah, one more thing: You can see a whole lot more of our DIY escapades on our projects page!

    And don't forget that Monica is in the running to be the New Face of Proctor & Gamble Home! Please head over and vote for her. You can vote once a day, now through October 3rd. We know voting things can be a pain, but this one is simple and man, winning would Rock our World! So thanks so much!
    Want more EC2? Use the icons below to follow us!

  • Creating with the Stars Round 1 Voting

    Creating with the Stars Round 1 Voting

    Voting is closed! To see the winners of Round 1, click here. Check back next Monday, March 18th for Round 2 projects and voting!
    --------------------------------------------------------------------------------------------------------------------------

    Welcome to Creating with the Stars 2013! Let the contest officially begin! This season of CWTS is going to be Epic and these Round 1 projects are a clear indication of the insane talent of these contestants! Just a few reminders before we get to the voting…
    Round 1 Challenge:


    Round 1 Prize Package: We have the Best Sponsors for CWTS2013 and here's a reminder of what our Contestants are playing for this week…
    $50 worth of 31 Gifts products $60 worth of Twysted Yarn products $70 of Henle Headbands products $100 Blog Re-design from 733 Design (who designed all the CWTS logos!) Project featured by HomeTalk We also want to thank Homes.com for being the Official Grand Sponsor of Creating with the Stars!

    Without Further Ado… In No Particular Order, Here are the Round 1 Projects… #1- Dresser Turned Modern Sandbox This dresser had no hope. It was in extremely poor shape. I mostly bought it for the legs, but after learning I was in CWTS, I thought I could do something with it. I decided to turn it into a sandbox filled with sand and dirt. What kid does not like sand or dirt?!
    The issue I have with sand tables is how much of an eye sore they can be. After cutting off an entire level of drawers that brought it down to kid/side table height, I placed sand and dirt inside the top two drawers. When guests come over, I simply place the dresser's top back on covering up the dirt and sand. It is an easy solution that is modern and stylish. Using a friendly exterior paint protects the furniture from the elements. Placing the dresser top on when not in use protects the sand and dirt. The two bottom drawers are functional and can be used for outdoor storage like small plant pots, garden tools, and kid toys. I used a couple of rabbit knobs for fun and green paint for a punch of color.

    #2- Little League Lounger I love taking old, crappy stuff and turning it into something that I will actually use! I found an ugly outdoor folding chair at my local thrift store, and knew it would be perfect for my upcycle project. Now, I have a completely re-done"little league lounger" to use at all my boys' baseball games this summer!

    Here's what the chair looked like before I worked my magic:

    I added all new cream-colored webbing {with a navy pin stripe}, updated the arm rests by re-purposing an old wooden baseball bat, and made a baseball stitch pillow from an old table runner. I love how it all came together!

    I can't wait for baseball season to get started so I can use my new chair!

    #3- Floor Board Kitchen Island

    these 77 year old floor boards were upcycled into a rustic kitchen island!

    I love our kitchen, but I've always wanted a big kitchen island where we could hang out. I wanted to take this unused space in our family room and add a table or counter. I had no idea what to use, but all of a sudden, a light bulb went off in my head. I remembered some old floor boards hidden in the basement rafters. They were dusty and worn and perfect. BAM — perfect for an old rustic island! We washed and sanded the boards, and got to work building our new favorite spot.

    these 77 year old floor boards were upcycled into a rustic kitchen island!

    Add in some painted stools and we now have a space just off the kitchen that is perfect for parties, eating, hanging out, or working on crafts.

    these 77 year old floor boards were upcycled into a rustic kitchen island!

    #4- Man Chairs Often the"dreaming up" of a new project can be done in my sleep, literally. But execution can feel like a trip to the dentist, one in which I go in for a routine cleaning and find I need a double root canal. The trick to any DIY project is COMMITMENT. Commit to your goal and don't let up no matter how many coats of paint are applied in vain. These previously drab, brown, faux-leather club chairs were purchased on sale for $12 each at a local thrift shop.

    A bit of auto upholstery paint, steal tacks, metal coating paint, a couple patinas for good measure and some tough new casters and this thrift store find is ready for"the man".

    #5- Tin Tile Mirror So, I'm still totally in shock that I was chosen to be a part of Creating with the Stars. With the first theme being"Upcycle", I wanted to do something a little different. I hit up a local flea market, hoping to find something that screamed my name, and when I saw these vintage tin ceiling tiles, I knew these were it. The fun color that looks so much like patina, the rust, the texture, the scuffed parts revealing the silvery color underneath. LOVE! They were marked $6 a piece, but I offered her $5, and she accepted. So $40 for all 8. Score!

    The next stop was Home Depot for wood, and I built a simple frame. Each tile was approx 12x12, so the finished size is 36x36. Not all of the tile sides matched up when I nailed them in, so I'm going to blame the tiles and say that they're wonky, rather than my measuring (which is probably more true). A little paint matching, painting in the gaps, building a frame for a mirror that I picked up at Michaels, attaching the mirror and frame with some glue, and we're almost done.

    I had the perfect spot in my hallway that was just begging for some oomph. For under $60, it's a huge statement piece that fits perfectly. I'm thrilled with how it turned out.

    #6- Television Stand Upcycled to a Bar When I saw this ugly, 80’s style television stand at our local Goodwill for a whopping $30, my mind immediately started churning with ideas. I’ve been wanting to set up a bar area in our house, and I knew this would be the perfect piece to turn into a bar. It just needed a little (or, um, a LOT) of love!

    I added legs and a little stand at the bottom to make it a bit taller, and gave it a few coats of navy paint (and, of course, a stencil to add some fun). I turned the drawers on either side that used to be used for VHS storage into the perfect place to stash a few bottles. And, since most alcohol bottles are all different sizes and shapes, I poured our frequently used ones into uniform glass bottles that I etched with the name – that way I can be sure the bottles fit and they look pretty to boot!

    Finally, for a last little touch, I dipped some of our glasses in gold paint to make things a little more sparkly and fun. I’m so happy with how it turned out and I’m loving the extra storage! I can’t wait to put this thing to good use!

    #7- Trash Pile Tire Made Trendy Table Early Saturday morning, still bra-less and in my PJs, I drove to a neighbor's house and hurled an old tire from their curb-side trash pile into the back of my car. My plan for the filthy tire was still foggy… as was my pre-coffee brain, but I was determined to turn it into something cool. After a day of deliberation, trial, and error, I determined side table was to be its fate. Let's get upcycling.

    I started by giving the tire a scrub with some dish soap. Next, I tried to figure out what to use for legs. Since this tire still has the (very!) heavy rim attached, I needed something sturdy. After contemplating many possibilities, I decided to cut them out of a piece of pine left in my garage from another project. The legs were stained and attached to a plywood circle I cut for the base. Then, I glued the tire on top of that with construction adhesive, and added a smaller circle to the top of the tire to act as the table top.

    I covered the entire tire in rope using Liquid Nails and"dipped" the legs in a bright citrus-ey yellow paint. I'm pretty jazzed with how it came out and can't wait to tell people I have an old tire in my living room. Ha!

    #8- Vertical Blinds Headboard Why is it that bedrooms are always the last rooms to get decorated? This room had no artwork, no matching furniture, and a mattress sadly sitting on a cheap bed frame. The only good thing about it was that it was prime for a makeover!

    Headboard made from Upcycled Vertical Blinds

    When my parents upgraded their patio doors from vertical blinds to curtains, my mom saved the blinds for me thinking I could “make something with them.” Does this happen to all creative types? But Mom was right, those old vertical blinds were the perfect material to make an over sized woven headboard for the bedroom.

    Sad bedroom plus vertical blinds equals

    A sleek wooden frame hangs so that the headboard almost reaches our 8 foot ceilings, and two spray painted clamp lights provide adjustable lighting for bedtime reading.

    Upcycling Challenge Headboard

    Similar, but smaller, woven headboards can cost over $700, but since I re-purposed my materials, this statement-making headboard cost less than 1/10th that much. No more sad, bland bedroom for us!
    #9- Bicycle Wheel Clock

    Bicycle-Clock-Label

    There are clocks. And then…there are clocks. There are clocks that tick and tock and ring and jingle and tell time underwater and sound an alarm. And then there are clocks made from a bicycle wheel with yardstick ruler hands perched on a chalkboard surrounded by roman numerals above a table strategically styled with a bicycle seat. That is one fine clock.

    Bicycle Wheel Clock

    And the best part? I got the bicycle wheel for free. Can you even believe it? I walked into a bicycle shop and randomly explained to the resident bike expert that I wanted to make a clock and I needed a cute bike wheel that had preferably been around the block a time or two. Wordlessly he stared at me. I don't really know why. I'm sure they get that request all the time.

    Bicycle-Wheel-Clock-Paint-Can-Label

    And then he went to the back where they keep all the spare wheels for people who come in with clock requests and he handed me this bicycle wheel. I totally wish he could see his wheel now. He'd probably charge me for it.: )

    #10 Statement Piece Light Fixture

    Walking through Habitat ReStore, I spotted a few egg crate diffusers — you know those grates that cover fluorescent lights in basements across the country. It's the last lighting fixture I would consider for a project but once I got around my thoughts of drop ceilings, I began thinking how neat it would be to use the grid to create any square cornered geometric shape that I wanted. At $2 each, what could I lose?

    Browsing Pinterest I found this amazing light and fell in love with the arms. It's lines are simple, but make a big impact! Perfect for a statement piece!
    The egg crate diffuser was cut into the shape of the arms, filled with plaster of paris, sanded and painted. So that the wiring and housing wouldn't compete with the outer arms, I made a simple fixture out of metal tubing, PVC plumbing parts, and a few parts from an existing chandelier. After wiring it (and being elated that it worked!) I installed trim on the ceiling to frame the chandelier, and added a little more interest by painting alternating stripes in ivory and a light gray. Finally, I installed a gallery wall with a few fun pieces!

    From a designer's nightmare to an energetic statement piece, this diffuser has come a long way!
    #11- Lab Station Turned Dining Room Buffet

    servin' it up old school… The story of how a lonely old science lab station gained new life as an industrial-style dining room buffet.
    Once upon a time…on an unusually warm and sunny spring day, I was leisurely browsing a flea market when I spotted this piece and was immediately drawn to it…the color, the rust & patina, it's industrial style, and the fact that it was old and had great visual evidence of it's previous life--lots of it. As I looked closely at the butcher-block top complete with bunsen burner stains, student-carvings (i.e."jennie-loves-alex") and distress-marks galore, I knew that I had to have it--for something, but what that something was, wasn't clear to me at the time. We just had"chemistry"--I could feel it.; ) Luckily, the kind gentleman who I was buying this (very heavy) treasure from was willing to help me get it into my truck…and let me tell you: it. weighs. a. ton. Chapter Two: Fast forward to Project One CWTS: Upcycle. I knew instantly that this sad science lab station was about to have a major career change. I tossed around a few ideas, but pretty quickly decided it would be a fabulous, industrial-style dining room buffet. The hardest part was this: while I love the"vintage-industrial-rusty-patina" look and eagerly welcome it into my house, this was looking a bit too"raw" for my dining room. Well, try googling"how to tone down rust on metal, yet keep just the right amount of color and patina". If there is a tutorial for this…I didn't find it!

    Chapter Three: So, I did a little DIY-science-experimenting and discovered a technique to get just the look I was hoping for. After this process I added the casters, the door knobs, stenciled on the quote and stained the butcher-block top.
    Add some wine, grapes, cheese…and this"new" buffet is all ready to help you eat, drink and be merry.; )

    …and she lived happily ever after in my dining room.

    #12-From Frumpy to On Fire, Fireplace! When I was told that the first week of Creating With the Stars theme was upcycle I was over the moon excited. Upcycling is my thing. It’s where I get my groove on. And so, it wasn’t a matter of finding something to upcycle; it was a matter of deciding which thing to upcycle. So, I took a tour of my house and gazed at all of the items that needed some good loving. And then, I sat and thought about what I wanted in my home. And, it came to me. Hmm… could I? Would it be possible? Yes… yes, it could!!

    CWTS collage

    I’ve wanted a fireplace forever and ever. Okay, that’s an exaggeration. But, you get the gist. And, while this fireplace/bookcase might not be the real thing it fits the bill quite nicely. I was able to create my “fireplace” from an old bookcase that was sitting in my laundry room, a mirror frame that was on it’s way to the trash, and an antique footboard that had lost it’s headboard (poor thing). The bookcase is the most important element; the mirror and footboard helped create awesome and turn the bookcase/fireplace into something spectacular.

    CWTS collage2

    I cut the footboard down to size and used it as the “mantel” as well as give the fireplace/bookcase a skirt at the bottom. Scrapbooking chipboard embellishments gilded, painted, and antiqued look like beautiful wood cutouts on the mantel. The trim on the sides of the fireplace/bookcase are pieces of the mirror cut down to size. A chimney that runs the length of my 12 foot wall was created with a simple frame covered in tin. The back of the bookcase was covered in that same tin for added charm. I must say this project exceeded my expectations and far surpassed the image of awesome I had for this project when I started out. I love walking into my home and seeing this and am so pleased waiting forever and ever is over!

    CWTS final final5

    Can You Believe That Talent? It's Time to Vote! You can only vote one time, but you can vote for your favorite 3 projects. Before voting, please LIKE EC2 on Facebook. Thanks! If you're having trouble viewing the voting box, click HERE to vote.
    Don't forget that tomorrow it's your turn to link up your own upcycle project! Thanks for playing along!!

  • A Pinteresting Home! {Meet Kelly}

    A Pinteresting Home! {Meet Kelly}

    We all love Pinterest… there are so many ideas and cool people to be inspired by. I wish I took the time to do more of the projects I see, but honestly this lil' old blog takes a lot of time, so I don't do as many as I'd like to (sounds weird that a DIY blog would take time away from DIYing, but it's true!)

    Today I'm excited to introduce you to two people I adore. Meet my adorable sister-in-law Kelly and my awesome brother-in-law Bryan. This cute couple lives in Ohio, so we miss them 24-7, but we have a blast when we're together.

    I also have to introduce you to their little stud Jax. He's our one and only nephew and we think he's the best!

    Okay, so why are we having this Mangin Family blog reunion?? Well, Kelly is not just a Pinterest addict, she actually does what she pins! {Gasp!}
    On our recent visit to Ohio, I felt like I was walking through a Pinterest Museum. It was too awesome not to share. Kelly has some creative friends and family, and between them all they have done so many fun projects for her home. So without further ado… Welcome to Kelly's Pinteresting Home! State Artwork Kel is from OH and Bry is from PA.

    IMG_0012

    Aqua Painted Pedestal Table Kel got her table and chairs at goodwill for $75 total. Add aqua and white paint and you have an awesome statement piece!

    IMG_0013

    Funky Pendant Light This was one of the first changes Kelly made to her kitchen when she moved in!

    IMG_0014

    Crossword Names Takes 2 seconds, but is so cute as an accessory. It's just a frame turned chalkboard.

    IMG_0015

    Kitchen Office Space She removed the wall cabinets, added open shelving, and did some adorable accessorizing. Kelly claims she can't decorate, but I'm pretty sure you'd all beg to differ!

    IMG_0017

    Spray Painted Faux Antlers Kel is super lucky to have a Hobby Lobby right around the corner. These beauties came from there and got a coral spraypaint treatment.

    IMG_0018

    Simple Printables She doesn't just PIN free printables, she actually uses them… imagine that! A simple piece of twine, some clothespins, and voila!

    IMG_0019

    Modern Painted Chandelier Bye Bye Brass, hello funky green. The circle bulbs are just right and add a cute modern flare.

    IMG_0020

    Window Frame Kel found this awesome salvage shop in Springfield, OH. They have windows galore!

    IMG_0021

    Family Rules and More Printables Kelly and Jess both have the Be Happy print. You can get it at Sprik Space.

    IMG_0022

    Magazine Paper Frame & Vase These two were purchases, but I liked them too much not to include them. If you're patient enough you can make your own!

    IMG_0023

    House Numbers and Hooks There are so many things you can do with frames, and digital paper. Our favorite site is Moo & Puppy!

    IMG_0024

    Yarn Wreath You know I'm the"anti-wreath," but this one is really cute! I love the homemade pompoms

    IMG_0025

    Paper Flowers Kelly's friend Amy made these for her and they match her aqua table so well. Jones Design Company has tons of paper flower tutorials!

    IMG_0026

    Clip Hooks Are you seeing a clothes pin trend? They're affordable, easy to use, and cute!

    IMG_0027

    Fabric Lined Shelves Kel took plain bookshelves from drab to fab with this blue fabric. Her shelves always look so cute! Her sister gave her the frame with the subway art and has it loaded up with a print for every season/holiday.

    IMG_0028

    Unique Gallery Wall These cool rounded frames are from Ikea and the doorknob is from Hobby Lobby.

    IMG_0029

    Growth Chart I love this growth chart that Kelly's sister made for her. It's exactly like this one from Miss Natalie. No time to make one? You can buy one on Etsy for $56.00.

    IMG_0032

    Last but not least, check out this fabulous fabric choice for a DIY headboard!

    IMG_0035

    What do you think? Are you inspired to go look at your pin boards and actually do a project? I know I have a list a mile long that I want to do now! I also have to tell you that Kel had no idea I was snooping around her house taking pictures, so none of this was staged or cleaned… this is real-deal, everyday life and I think it's great!
    Have you turned a pin into a project? Share the link, we'd love to see!

    Monica

    Only following on the blog? You're missing out. Use the buttons below to join in on all the fun!

    Follow Me on Pinterest
  • Top 11 Projects of 2011 {Jess' Recap}

    Top 11 Projects of 2011 {Jess' Recap}

    I'm going to keep it real here and first say that I felt like I was in a blogging slump the last few weeks. But a wonderful Christmas break and looking back over our past year has rejuvenated me! I'm so proud of the projects Monica and I completed, and of this blog that we love! I'm going to try to keep it short and sweet (I tend to be a bit wordy, yes?; )

    1. Ever hear of a guy named Nate Berkus?

    I just couldn't do a 2011 recap without mentioning our whirlwind love affair crate challenges with Mr. Nate Berkus, himself. You can see what we did for the show here, here and here.
    2. Barnwood Artwork

    This beauty was, by far, my favorite project of the year. Modern, rustic, simple. Plus it was made with love for my best friend- you can't beat that!
    3. Easy Door Headboard

    This sort of makes me laugh, but this project is one of our most popular. My hubs and I made this headboard on a whim using some very non-traditional methods, but it's a winner!
    4. Antique Table turned Vanity

    I had been wanting to do this for a long time, and the Crafting with the Stars challenge gave me the perfect opportunity to give it a go! Monica and I spent one looooong evening getting it just right, but now I can't even express how much I love this vanity! (That sentence is ridiculous, but oh so true.) You can check out two of the other projects we did for CWTS on Monica's post yesterday.
    5. Modern Typography Meets Reclaimed Barnwood

    Oh barnwood, how I adore thee. Same to you, typography. Why not marry the two and make something fabulous? Well, ok, I will. Thankyouverymuch.
    6. Pallet Shelf Love

    Who loves free projects? This girl (said with thumbs pointing at chest)! This shelf was free, easy and quick. Love that.
    7. DIY Drop-cloth Window Treatments

    Drop-cloth window treatments have been floating around the blogosphere for a while now, but I tried my hand at making some valances for my living room when I heard aforementioned Mr. Berkus was sending a team to my house to film. That sure got my rear end in gear, and boy, am I glad. Those naked windows were in desperate need of some clothes!
    8. From an Oops! to a Yes! Mirror Transformation

    That this mirror turned into something I'm proud of, is an absolute miracle and purely an accident. It made me so thankful that, sometimes, persistance pays off!
    9. Faux-Stained Glass Window

    I have a crush on old things of all kinds, but can't often pay for the real deal, so I came up with this idea of using a wall decal from Home Depot and an antique window from my in-law's barn and making a faux stained glass window! I really liked it then, but liked it even more after Monica used it in my basement makeover! 10. A Garden Wall

    I brought a bit of green into my kitchen by creating a garden wall with succelents. You know, the kind that are ridiculously hard to kill. It's true! I've had these since May, and they're still living, for which I can take no credit!
    11. The Barn

    Monica and I were so excited to combine our talents this year to design and create one-of-a-kind products using reclaimed barnwood. We opened our etsy shop in September amidst all our crazy Nate show stuff/ Crafting with the Stars submission/ and our first appearance on our local news. Can you say bad timing?: ) Even so, we love the items and our shop, so if you are ever in need of a unique gift or item for your home, we'd be thrilled to make one for you! ------------------------------------------------------------------------------------------------------------- So, we've had a GREAT year, and owe you a huge, fat thank you! This year would not have been possible without you and we so appreciate you taking time out of your busy lives to stop by our blog! Here's to another fantastic year in 2012!

    Pin It
  • Wallpaper Wednesday

    Wallpaper Wednesday

    So, what comes to mind when you hear the word Wallpaper ? Is it something along the lines of this?

    Well, guess what? Your grandma's wallpaper is gone and its been replaced with chic, stylish designs that can add major drama to a space. Still hesitant because of horror stories of hanging it, removing it, etc?? Maybe this post will change your mind…
    Welcome to my foyer…

    I knew I wanted something with BIG impact, but I was pretty set on stenciling the area… Well, after about five failed attempts at getting a crisp result, I started my hunt for the perfect paper. This search opened my eyes to the wonderful world of modern, trendy wallpaper.
    Let me introduce you to Graham & Brown … the leader in AMAZING wallpaper. Thanks to this cutting edge company, my foyer now looks like this…

    Although I'm not 100% finished with the space, I'm already completely in love with it! The wallpaper makes a statement that I never could have achieved with paint. It took about 2 hours to hang the paper and it was a two person job, but it was really simple and not nearly as hard as I had expected. Before

    After

    Check out some of these online wallpaper companies: Crown Wallpaper Design Your Wall Ferm Living Amy Butler, is known for fabrics, but came out with some amazing lines of wallpaper as well. These colors and styles are fresh, yet could still be subtle…

    This wall doesn't even need art because of the dramatic paper

    Used as an accent wall in a nursery

    This paper has an Imperial Trellis feel and finishes the bedroom beautifully

    Upper East Side contemporary bedroom

    contemporary bedroom design by new york photographer Alexander Johnson Photography
    Still not sure you're ready for an entire wall? It can be used as an accent when hung and finished off with simple moulding.

    The possibilities are endless. I pretty much want to paper my entire house, but I'm showing restraint and I'm only going to do a few rooms. This CRAZY paper is coming soon to an office near me…

    I might add a punch of color (you can paint it, color it, etc.) and some black and white photos of my favorite little people.

    So, I'm clearly a fan of wallpaper. How about you? What spaces could you envision some amazing paper going up in your home?

  • Paris weekend getaway

    Paris weekend getaway

    How I would love to spend this weekend in Paris! Imagine walking along the Seine, just enjoying life. Whenever I travel, I'm always almost as exited about the hotel I'm staying at, as I am about the destination. I love staying at hotels. I always find a lot of inspiration, and end up going home with at least a hundred different design ideas. Next time I'm in Paris I would love to stay at the Hotel Pulitzer. I somehow stumbled over their website, and I absolutely fell in love with their elegant but yet cosy and inviting design. They've managed to combine antique objects with a more industrial and modern look, and I think it looks stunning.
    What about you? Do you have any favourite hotels that you turn to for inspiration?
    Enjoy your evening!

    Images: Hotel Pulitzer

  • Summer Love {Sponsor-style}

    Summer Love {Sponsor-style}

    It's time for a round-up of all our favorite summer finds from the best sponsors in the world! You know those ads on our sidebar? They are all amazing shops and services that you need to know about. Just take a look at the fun things we found for you!

    1. It's wedding season, folks! This gorgeous typographical"Beloved & Friend" print from Red Letter Words would be the perfect gift. Plus it's on sale for 20% off right now!

    2. Want to make a modern and graphic statement in your home? Go for the new Honeycomb Allover Wall Stencil from Royal Design Studio. Fab.U.Lous. Get 10% OFF when you use the code RHBC10.
    3. Love this vintage Golden Yellow Serving Bowl from Nachokitty- has lots of character with a sunny yellow color! You could get lost in this Etsy shop for hours- she has amazing stuff!

    4. Lucent Lampworks is our newest sponsor (as seen on Extreme Home Makeover!).They offer some of the coolest light fixtures we've ever seen, like this Hanging Pendant Light with Glass Globe. I'm eyeing up a few of these beauties for my dining room!

    5. Have you been over to My Best Friend's Hair Blog? They offer tons of tips on the newest products and trends for your hair. Plus, you can find a stylist near you, and give reviews on your stylist, too! I have to admit- I'm digging this rainbow-hued style done with hair chalk. Who knew?!

    6. Going on a trip? Need a graduation or teacher gift? These 4 oz. Candle Travel Tins from CJS Eco Chic come in a variety of scents and can be taken anywhere!

    7. I just got a Large Utility Tote from Thirty-One Gifts to use as my beach bag. It's the perfect size for a couple of towels, swimmies for my kids and all the other things you need for the beach or pool! With all the patterns and monogramming options, you can come up with a custom bag to fit all your summer needs!

    8. With Charlie's 2nd birthday coming in just a few weeks, I've begun searching for some gift ideas for him. I LOVE this custom toy chest created with Belvedere Design vinyls. Wouldn't this be great to corral all the toy cars and trucks little boys seem to collect?

    9. We're going with an All-American boy theme for Charlie's birthday party, and you better believe I'm going to be using this Star Spangled Digital Paper pack from Moo & Puppy to make his invitations and decorations! Use the code RHBC15 to receive 15% off your order!

    10. You already know we make a weekly trip to Architectural Antiques (I just got a transom window for my kitchen) because we adore it so much. Put stopping at AA on your list of things you need to do this summer- you will not believe the unbelieveable amount of awesome finds there!

    11. Some things are better left to the professionals, and quality upholstering is one of them. Jet Upholstery does amazing work and they can get their hands on any fabric your heart desires. Mention our blog to receive 25% off your next fabric order!

    12. Stone Depot is THE place to go for a huge selection for all of your hardscaping projects. They're the ones who have helped make Monica's patio project go so smoothly! Jim is super helpful and full of information, so make sure you ask for him.: )

    So, there you have it! Our top finds from some of our favorite people! Have a great weekend and spread the East Coast Creative love to our sponsors while you're at it.: 0

  • FOR SALE!

    FOR SALE!

    Source: strictlysimplestyle.blogspot.com via The Real Housewives on Pinterest
    No, I really don't have anything to sell, but I have sold two houses really quickly and helped hundreds of other people sell theirs. Okay, now before you tune out and think,"I'm not moving anytime soon… no need to read this post." give me a second! There's two reasons to keep reading… # 1- You probably know someone that's struggling to sell a home in this market #2- People love their homes right before they sell because it's in the best shape ever. You could follow a few of these tips and love your house even more! Ready? Here are my first 5 tips!
    Get it Sold… The Mangin Way! (Part 1) (these aren't new ideas…but done right, they really work)

    1.Declutter. Pack half of your stuff. Seriously, I actually mean half of everything. It's a pain, but you'll have to pack it anyway. This will make your house seem like it has sufficient storage and room to grow. It's tough to want to move into someone's home that seems jam packed! (FYI- don't do this if you're not selling… that would just be crazy!)

    2. Depersonalize. Your kids are adorable… I get it, but now get rid of their pics. We don't want potential buyers looking at your vacation pics and thinking they really need to get back to the Outer Banks and totally not noticing your recessed lighting. Now, don't get too crazy… we didn't get rid of 100% of our pics, but honestly we replaced a lot with generic art from Homegoods and Marshalls. The second part of depersonalization is STYLE. If you're reading a DIY and design blog you either have great style or are style challenged! LOL… make sure the style of your house would appeal to the masses. Not too modern, too country, too plain, too bold. Purple.Tone it down a bit.

    Source: yakal.net via Hannah on Pinterest
    3. Declutter. Wait, she already said that!! Lame post! Nope, I don't have short term memory loss… now we're talking Pantries, Closets, Garages, Storage areas. You need to keep feeding your family, but you also need to show off the space you have. Donate, eat, or toss HALF of what you have stored. You don't need six cans of cream of chicken soup. Keep two. (House of Smiths weren't selling, but man they have a rockin' pantry before and after)

    Same applies to closets… anything you won't wear in the next month should be packed up. If you're near a change of season, just box and store at your BFF's house. That's what friends are for! (We have about 20 boxes of friend's stuff in our basement right now because they're selling). Any place that you would usually hide your junk needs to be super neat and spacious. 4. Give it a Purpose. This is a simple stager's rule. Every room should have a purpose. You want a buyer to see a value in each space. If you have a toy/craft/tv/junk room but already have a playroom, and family room with tv… well what are they paying for the random room for? Choose a purpose. Make it a specific craft/sewing room etc. 5. Clean. I'm not talking lived in clean… I'm talking Martha Stewart clean. A clean house gives the impression of a well cared for, well maintained house. You don't want anything creeping out buyers. Maybe dirty baseboards are just a part of life, but they're not a part of a buyer's dream home. Seriously, who dreams of a kinda dirty, lived in dream house? Does Pottery Barn have gross toilet rings in the Bed & Bath issue? We've done it two ways… once we did an insane deep clean and for our second house we hired someone to do it. Either way is fine, just get it done and then maintain it. Make a little pre-showing, last minute cleaning list. It was a huge help to me!

    Source: marthastewart.com via The Real Housewives on Pinterest
    Ok, so 5 simple, totally FREE steps so far… Nothing too revolutionary, but things that really make a difference. Last spring we sold our home in less than 3 weeks… the market was struggling, we didn't know what to expect, but we believed it was the right time for our family and so we busted our tails to get the house ready. Now, you're armed with part one… either share the post with a friend that might find it helpful, or take a look at your own home. Part two is a little more design friendly and exciting, but first you've gotta get through the dirty work of steps 1-5.
    I'll be back Wednesday with more!

    P.S. I bought paint tonight for a super-fun family room project. I can't wait to share it with you!
    P.P.S. Did you know that we're only 3 people away from 100 followers? We know way more of you read the blog… let's make it official! Let's take our relationship to the next step? And if you're really into us, you could like us on Facebook too! Imagine that! It's like going steady!

  • Antique Table Turned Vanity {Bathroom Redesign Update}
    Antique Table Turned Vanity {Bathroom Redesign Update}

    Oooh, I so wish you could see my hallway bathroom right now. It is coming along exactly how I had envisioned. Mostly because I finally found the perfect piece of furniture for my new custom vanity. This vanity earned us a spot in Round 3 of Crafting with the Stars over at Sew Dang Cute, and although she's pretty darn cute in pictures, she's absolutely gorgeous in real life. So, here's the breakdown of the transformation this little table underwent:
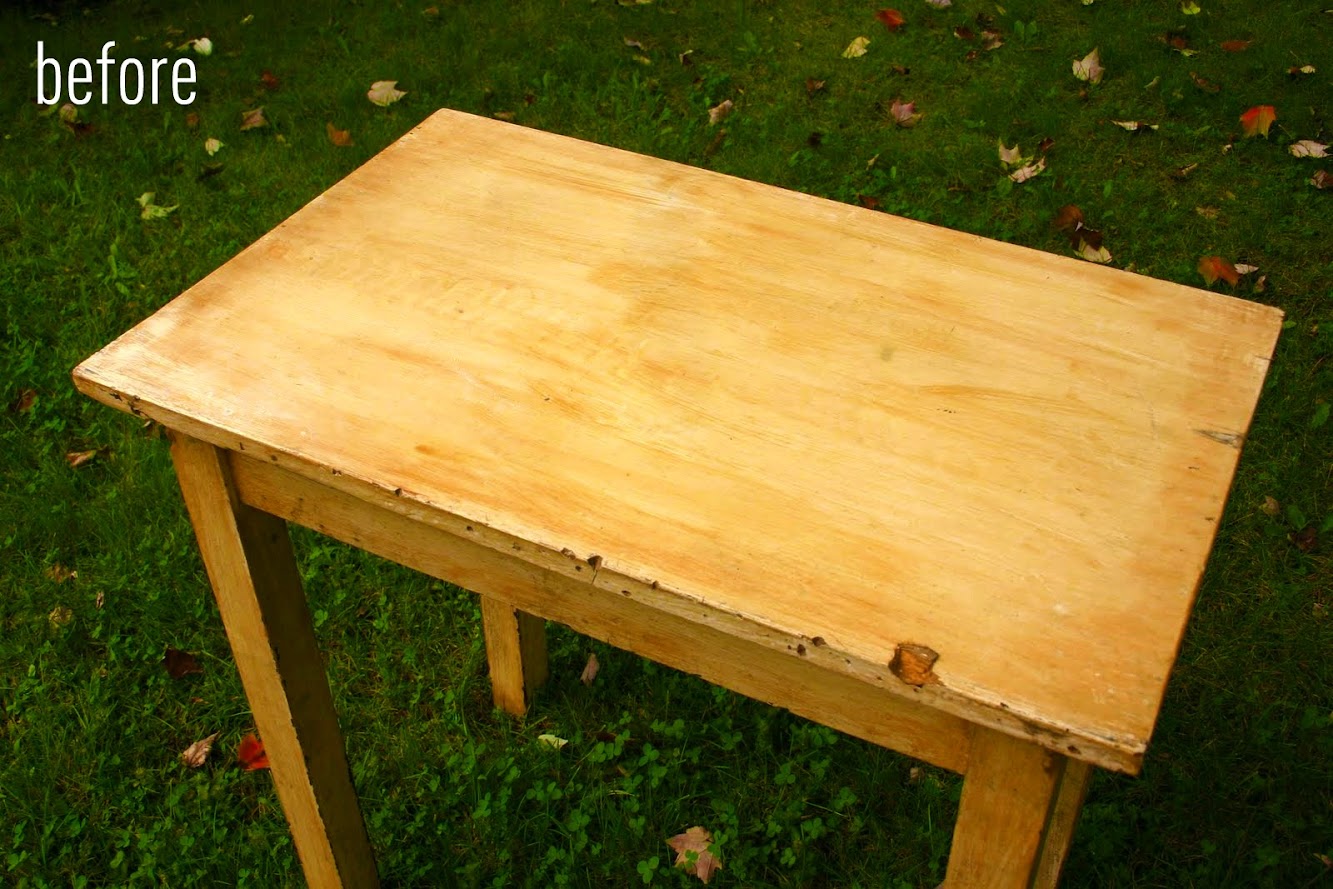
    Antiquated to Awesome Table Transformation While browsing one of our local antique stores, I stumbled across this table in an out-of-the-way-spot covered in loads of other stuff.

    Now, she doesn't look like anything special, but I could see through her battered, yellowing self to see the potential in her simple lines and aged charm. My initial thought was to sand the yellowish tones off to hopefully reveal a distressed white/wood look. After what seemed like an eternity of sanding with two palm sanders, I realized that this piece probably really was an antique and that the paint had mostly likely been there forever. I hesitate to reveal this information for fear of the antique-lovers out there giving me a hard time about sanding such an old piece, but hey, a girls gotta do what a girls gotta do.

    So anyway, the chippy paint look I was going for totally didn't happen because sanding it made the paint appear the color of a peach and that just was not at all the look I was going for.

    So, on to plan B. Monica came over to help out and she brought the custom gray stain they used on their farmhouse table and also a mahogany stain she had. We had some walnut stain left over from when we originally stained our kitchen cabinets, so we tested all three on the top of the piece. We knew we could always sand out the stains we didn't like, but we made sure to place the sample stains in the middle where the vessel sink would go, anyway.

    In the end, we decided on doing a custom mix of walnut and gray stains.

    I brushed on the walnut stain first in long even strokes.

    After about a minute, Monica wiped the stain off with a staining pad.

    Even with just the walnut stain, it was absolutely beautiful, but I knew that the addition of the gray stain would make it match the colors in the bathroom even better, so again, I brushed the gray stain overtop of the walnut in long even strokes.

    After wiping it off, we had this:

    Note to self: Do not stain a piece of furniture in your kitchen. If you're not careful, stain will get everywhere leaving you in a slight panic and making lots of extra work for yourself.

    Ahh! Let me stop here to point out how crazy our work environment was that evening:

    How we got anything done is a mystery to me. Monica and I work very quickly and as a result, leave a trail of disaster in our wakes. We were simultaneously working on the table, painting a custom destination sign with coordinates for a customer, planning our posts for the next few weeks and drinking our favorite Pumpkin Spice Cappuccino from Wawa. Craziness, I tell you. But I digress… on with the project:

    After the hours of sanding the top, I really REALLY didn't want to sand the legs, so we came up with the idea of doing a whitewash treatment. Basically, whitewashing is a combination of paint mixed with water that creates a translucent glaze of color.

    You can see that adding the whitewash took away the yellow tones, but kept all that yummy aged character of the piece.

    Finally, we broke out the power tools and got ready to make our holes for the new sink and faucet. This is a lot easier than you probably think it is. After measuring the center of the table where the sink would go, we used a drill with a 1 1/2" circle bit to make a hole for the pipes to run through.

    This creates a lot of sawdust which for us was a problem. DESIGN BLOGGER FOUL! We should have drilled the holes FIRST before we stained!

    Brushing off the saw dust on stain that hadn't dried yet gave us a minor heart attack, but we recovered after restained the parts that needed it. Phew! No big deal. (But if you attempt this project, drill first, stain second!)

    We added the sink that we bought at Lowes so we could determine the placement of the hole for the faucet. We didn't use any scientific method here; we simply placed the faucet next to the sink and eyeballed where it should go. Remember folks, I don't claim to be a perfectionist.: )

    In pictures, the faucet looks kind of goldish, but in reality it has a brushed nickel finish that adds just a touch of modern that is perfect.

    We wanted to add some detailing to the piece to make it more unique, so I picked up some oil-rubbed bronze knobs from Lowe's. Monica pre-drilled a few holes, and then we screwed them right in. They look so cool and give the affect of a drawer on the front.

    So, at the end of night one, this is how the table looked. Pretty sweet, huh? But the fun part was putting it all together the next day after I (and my mom who wanted to save me some time while I was coaching my tennis team) added 6-7 layers of a water-based polyurethane to the top to prevent water damage that may occur from my very messy wonderful family. We went with a water-based poly because it doesn't change the color of the wood tones. I'm not 100% sure this will be enough protection, and I'm paranoid about anything marring the surface of this beauty, so I'm going to be doing a bit more research on protecting the wood before we use it. Any suggestions?
    So now that all is said and done, this is how my beautiful vanity looks:

    I am so in love with this table, and am thrilled to death that it turned out just like I was hoping. It looks amazing in the bathroom, and pictures just don't do it justice. Next week, I'll be showing you the final reveal of our hallway bathroom after I add some finishing touches and I can't wait!
    What do you think of my table-turned-vanity? Have you ever turned a thrift or antique store find into something fabulous?

    Now, on to Round 3!

    Linking up to: TT & J, Show & Tell Saturday, Tips & Tutorials Tip Me Tuesday, Sundae Scoop, Sunday Showcase

  • Modern Houndstooth Stencil

    Modern Houndstooth Stencil

    Thank you all for your awesome response to our SuperFab Room Redesign! We were thrilled with how it all turned out, (and thankfully, so were the homeowners!), but we realize that the houndstooth stencil from Royal Design Studio totally steals the show! Our favorite thing about this wall is the modern color scheme paired with the very classic houndstooth pattern. However, it's one thing to tackle an entire accent wall with a stencil, but it's another whole thing to do it with multiple colors! There's quite a saga behind this wall, and we learned some really helpful things about how to stencil well that we thought we'd pass along to you. When you DIY, it's all about learning as you go, right?

    Houndstooth Stenciled Wall

    But first, let's talk about these gorgeous colors. When Monica and I met up at Home Depot, these paint colors literally jumped out at us and we picked them within five minutes of getting there. Gotta love when that happens. Of course, no one does it better than Martha Stewart, and these colors are all from her paint line. So without further ado, here are the beauties by name:

    Now, back to the saga. We planned this stenciling project like any other; chose the order of the colors, picked our starting point, leveled the stencil and got to work. The only problem is that we did NOT have the right supplies. We started with only two brushes (for 4 paint colors!) and four jars of paint samples, which, unbeknownst to us, contain no binding agents so they don't work for stenciling. Each individual"tooth" took three coats of paint! And after four hours (no joke!) this is how much we had finished:

    (Sorry, bad phone photo!)
    Ugh! So frustrating! We took a break to kick ourselves for starting this project, and then reevaluated our situation. We estimated at least another 8 hours of work, which scared us silly. We are all about DIYing as much as possible, but we can also recognize when we are in over our heads, so we called in the big guns to help us out.

    We had the good fortune of meeting Bernadette of The Faux Pro, Inc. through this blog, and boy, were we happy we did! Bernie specializes in stenciling (she's friends with Melanie from RDS), faux finishes of every kind and is truly a talent! Her work has been featured on HGTV and has an amazing portfolio of work on her site. She was generous enough to come help us out, and brought her assistant, Mary along, too. They let me tag along and watch what they do, and gave us loads of tips for making the process go smoother. And today we get to share those with you. Woohoo!
    1. Gather the Right Supplies:

    1- Five in One Tool: Comes in handy for all sorts of jobs like opening paint cans, cleaning rollers etc. 2- Frog Tape: Bernie swears by Frog Tape because it doesn't pull the paint off the walls. 3- Paint brushes, angled brushes, stenciling brushes: 4- Razor: 5- Detail brushes: Mary's entire job was to follow Bernie and touch up any bleeding. The result is an unbelieveably crisp finish! 6- Scissors: Bernie uses these to cut the stencil as needed along the ceiling and corners, instead of trying to bend the stencil. 7- Foam Rollers: Most of the time, Bernie uses a roller to stencil, especially because Mary can touch up any bleeds. 8- Spray Adhesive (not pictured): this is a must! We learned this the hard way.

    9- Simple Green: This cleaner is the best for keeping your stencil like new so that you can use it over and over again, but she uses it for absolutely everything!

    10- The Quality Masker: I have never seen anything like this, but it works magic! You attach the tape, along with brown paper to the masker and run it along the baseboard or ceiling. As you roll it out, the tape adheres to the brown paper creating a barrier. It takes literally half the time as taping out the edges by hand. You can find them at any paint store.

    2. Set-up a Stenciling Station Before ever starting, Bernie finds a place to set up her work station. She lays out a drop cloth, covers it with a trash bag, then a towel and then the stencil. In between every set, she wipes the stencil clean and dries it with the towel. This ensures that you don't get paint on the carpet, but also that no paint remains on the stencil and gets on the wall. She keeps a hair dryer close by, if she wants to hurry the process along.

    3. Use the Right Method If you're using a stenciling brush, make sure to blot it on something very absorbant, like paper towels or cardboard. Here's the most important tip I learned that day: Brush from the outside of the stencil in towards the center. Basically, brushing away from the edge lessens the likelihood of bleeding, which saves you tons of time!

    Hopefully, this helps you out a bit, like it did for us. A big thank you to Bernie and Mary for pitching in with our project. If you have a project in mind, we totally recommend that you contact them! The end result of this saga is an amazing focal wall that makes us so proud! Have you ever gotten in too deep with a project? Do share!

  • Wood Shim Wall Art {Crafting for Charity with Homes.com)

    Wood Shim Wall Art {Crafting for Charity with Homes.com)

    If we win, Homes.com will give Worthwhile Wear Five Thousand Buckaroos! For a new organization like theirs, that could be a major game changer and we really hope we can win it for them! (If you want to skip the project and just vote you can! lol Click HERE to Vote)
    You can read all about our project first, but then you have to pinky promise to follow the voting directions at the bottom of the post okay? Ok! Thanks!
    Wood Shim Wall Art I (Monica) have had this project in my mind for a few months now. It was inspired by a printed pattern I had seen in the window of a shop. I couldn't remember exactly where I saw it, but I was pretty sure it was a cool shop we had passed when we were in London in November. Great story right? Crafty DIY project inspired by a European city… Then, two weeks ago it hit me… It was JCrew at our local mall! I just about died laughing when I put it all together! Well, JCrew or London, I sure am glad it inspired me…
    For under $20 we created the coolest DIY Wood Shim Wall Art

    (You could go vote NOW since you've seen it! Click Here!)
    I wanted something with BOLD color, and a modern feel, that married well with a bit of industrial flare!

    How's that for a Before and After?
    Who knew our dumpy oak piano could be such a show stopper?

    Here's a peek at the details- the DIY light isn't my entry, but man I love how it works with the Wood Shim Art! (Light tutorial coming soon!)

    (Or you could vote now?)

    Want to know how we did it??
    You've gotta head over to Homes.com for the full tutorial (but only after you've voted!)
    Click HERE for the full tutorial

    There were a lot of DIY elements around our Crafting for Charity project, and we'll post about all of them over the next week or so!

    And now for the really important stuff! We're blogging for a charity that we love and are so proud to support. Worthwhile Wear was founded by our close friends Dan & Steph and they've committed their time and talents to make it their life's work.

    Jess and I both have daughters and we couldn't imagine any of them having to endure human trafficking. We love Worthwhile Wear's mission…
    Worthwhile Wear exists to rescue and restore girls from forced prostitution, and more importantly help prevent girls from ever entering it. We target highly trafficked areas both internationally and domestically, and offer women the opportunity to overcome two primary factors which are at the root of sex trafficking; poverty and lack of education. This solution is offered through vocational training centers which teach women how to make wears, such as jewelry, handbags, and clothing, which are sold to provide them employment. Additionally, the women are offered free education, a safe place to stay, and restorative programs geared toward encouraging personal growth and re-establishing self-worth.

    We had the honor of working on the planning committee and doing all the decor and design for Worthwhile Wear's launch in 2012. The following images and statistics were used as artwork at the launch benefit-A Worthwhile Evening.

    Those beautiful faces are not stock images. They're from Dan's last trip to India a few months back. The work Worthwhile wear is doing is critical and we hope you'll check out their site and follow along with them on Facebook.
    Now it's Time to Vote!
    There are 8 bloggers in this competition and some of them have a lot of followers, but none have the amazing fans we do! We know you guys have our back!
    All voting will be done via Homes.com's Facebook Page
    (On their Facebook Page, there's a little button that says Crafting for Charity. Click there)

    Click HERE to Vote

    A HUGE Thank You to Homes.com for sponsoring this awesome contest and for spreading the word about amazing charities like Worthwhile Wear. If you'd like more information about the organization and how you can help, click here.

    Thanks so much!
    Now, Go Get Your Vote On!

    jess
    Monica
  • Making the Master our Own

    Making the Master our Own

    I've decided that it's about time I dedicated some of my decorating/reorganizing energies to our master bedroom. I am in love with our Nautica paisley bedding (a Christmas gift from my parents), and I even like the paint colors in the room, but the artwork, flooring and disorganized closets are just not working for me. Let's start with the artwork, shall we? Nothing in our room says"Kevin and Jess". It doesn't capture our personalities, or even our design style. Most of what I have hanging on the walls were gifted to us for our wedding, and while they are lovely, almost seven years have gone by and I'm ready for something new.

    Artwork above bed: BEFORE

    Baby on the left is my daughter at about 1 month old, and baby on the right is my son at about the same age. (The colors are sort of wierd- must have been a different time of day. The colors on the right are more true to life.) The babies are adorable, but take a look at the artwork. Too country-ish. And the picture really is a nice picture of lilies, but I was over it. (Also, if you are wondering, my husband made our headboard from an old door that he cut down, painted and mounted to the wall. I love its simplicity and the fact that it was FREE, since we had removed the door from another area of the house to open it up a bit. It's a really easy DIY project for those of you looking for a headboard.) Right before Christmas, Monica and I went to Hobby Lobby, which, sadly, is all the way in Easton. If you are in to crafting/decorating, you will want to plan a day trip to this store. We planned a special trip where we had dinner and then meandered throughout the store for hours. I was so giddy at the checkout counter that I rambled on and on about my love for Hobby Lobby and how far we travelled to get there. I'm sure the lady thought I was crazy and wanted me to move on, but I didn't even notice so high was I on all the possibilities of this amazing store. Anyway, one my purchases was two chipboard letters, a K and a J. They cost $1.77 each, and I knew I could use them for artwork above the headboard.

    The first thing you may notice is that I'm extremely impulsive. I didn't really think this project through, and so I took many, many steps to get to the finished product. But I'm a trial and error kind of girl, and I've accepted that. My first thought was to decoupage a really cool french script paper to the letters. They looked awesome and I was thrilled. Until…

    …I held them up against the wall. I hated the color of the paper against the color of the wall, and it wasn't working hung next to the awesome brassy-gold ampersand that I also bought at Hobby Lobby.

    So, I decided to rip the paper off, and try spray-painting the letters in a metallic finish. Turns out that ripping off paper that has been decoupaged is no easy task, so I decided to stop that, and sand the paper (really? Sand paper? Yes, I told you I'm impulsive and not always sure of what I'm doing.)

    The metallic finish was equally awesome, but again I didn't like the finish of it against the wall, in the dark brown frames, or next to the brassy ampersand. So, what did I do? I painted the darn things the same color as the headboard.

    Artwork above Bed: AFTER

    I love it! It's just a touch modern, which is fun against the more traditional lamps and bedding. And you can't tell from the picture, but the"&" really brings out the goldish color in the bedding. I'm super happy with the finished product.

    Just to keep it real, here's an up-close picture of my bedside table.

    Eeeeww! Dust much?
    I have a few other projects up my sleeve for our master bedroom that I hope to start in the next few weeks. (I guess I should add dusting to that list.) It may take some smooth talking and the perfect timing to get the hubby onboard, so we'll see!
    Next up: the floors

    We have disgusting carpet that was disgusting before we moved in, and is even more disgusting now since we've lived here for 3 years. We are planning on ripping it out and then painting the subfloors, ala Ashley. Not exactly traditional, but it's cheap and pretty!

    We won't be doing an elaborate stencil, though. We're thinking big, broad horizontal stripes in muted colors. I can't wait and I'll keep you posted on the progress. I also have a few other ideas for art for the other walls that includes some of my favorite photos of the hubs and me. Time to get crackin'!

    So, we're one step closer to ma king the master our own.

    Posted by Picasa
  • gray dining room mix

    gray dining room mix

    via design darling
    modern. antique. gray.
    good.