My Creative Blog [Search results for new vintage]
A Visit to Blue Ridge Flea Market

Silver or Black Jewelry Finish? Which Do You Prefer?

East Coast Creative 10k Fan Giveaway!

The {Bathroom} Game Plan

Cupcake!

Classic, Timeless Style {FOSSIL Vintage Revivals Handbag GIVEAWAY!}
Birds on Vintage China Patterns

Creating with the Stars Round 3 Voting
Creating with the Stars Round 1 Voting

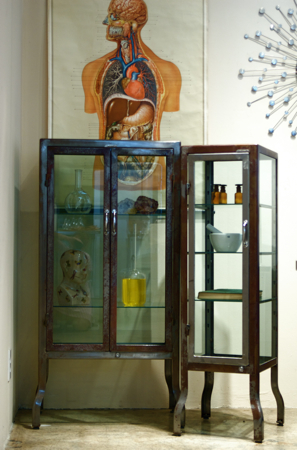
vintage stainless steel medical cabinets
My Design Process For Working With Unique Elements: Vintage Keys

SuperFab Room Redesign REVEAL {Guest Room}
Free Printable Art Round-Up

How to Make Domino Jewelry

Limited Edition Designs

Give a Custom Feel to Your Home with Lighting!

At the Foot {Master Bedroom Redesign}

My Trend Forecast for 2011....Nature in Handcrafts
Behind the Scenes of a Small Business {Lucent Lampworks}

Pallet Love {And Giveaway Winner Announced!}


