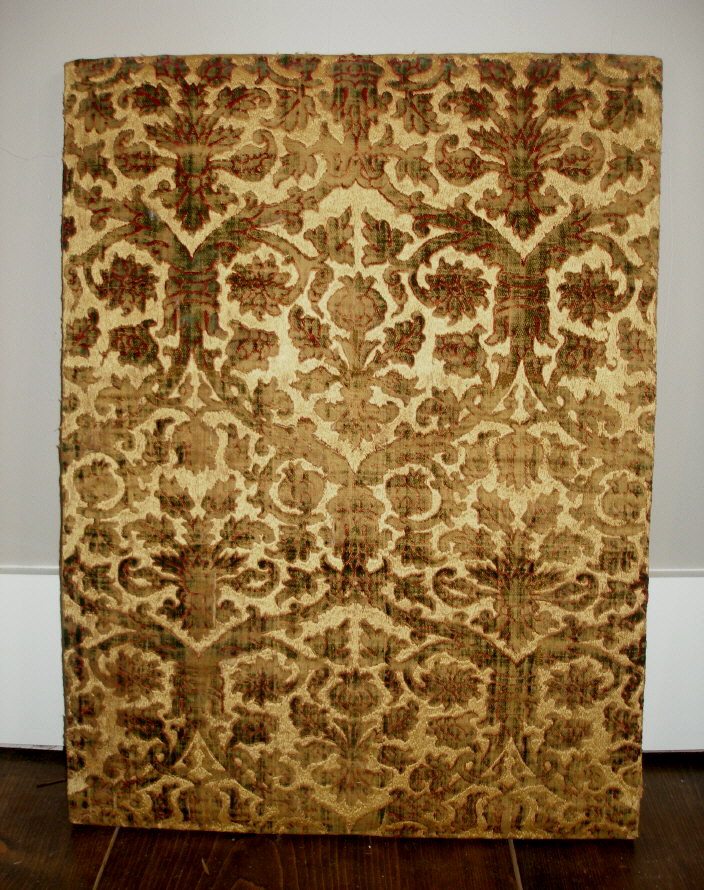
Italian, 16th Century, cut and voided silk velvet from Genoa Standing in at 26" x 20"
In case some of you don't know I'm an antique textile dealer, I deal mainly in 15th '18th century European textiles and I make pillows out of fragments. Sometimes I get pieces in that are to big for a single pillow and I never cut pieces that are in mint to near mint condition. If they're too small to make a hanging I mount them on a stretcher frame so they can be hung for display. Sometimes once mounted they don't stand out or have as much presence as I think they should have so I give them the presence I feel they need. Hence the project!

I just happened to have purchase a 19th century antique frame a couple of years ago and have never found anything to place in it, the frame measures 52' x 45' so it's quite considerable in size. The gold gilt is chipped and the gold leaf has tarnish some but I think that just gives it more character. So we're going to blend the two pieces together and make them a perfect pair!
The things that I needed for this project are:
3/8' thick plywood, you want it thick enough so it doesn't have any 'bend' to it
cotton batting, silk velvet fabric, spray tacky glue, staple gun and staples

Mister Man, aka the husband, cut the plywood an eight of an inch shorter all the way around since the cotton batting and silk velvet will be wrapped to the backside and they take up frame space. Next cut a piece of batting to size and spray the plywood with your tacky glue and lay the batting over the plywood smoothing out any wrinkles. I repeated this step again to give a nice plump layer over the plywood. Be sure to wrap the batting over the edges and staple on the backside. Next simply lay your silk velvet over the cotton batting and start stapling the edges on the backside, DO NOT SPRAY GLUE THE SILK VELVET. I started at the top, then bottom and then the sides making sure the fabric was pulled tight but not to tightly and stapled on the backside as I went. Trim up the edges but not to short, insert your board into the frame and use small nail brads to secure into the frame.

Next it's time to wire the backside of my frame for hanging. (I didn't cover the backside of my frame because the only thing I was out of was brown craft paper.) Since this frame is heavy and large I thought it best to support the bottom so I used four screw eyes for wiring up my frame. As shown I ran the hanging wire all the way around looping it through the screw eyes twice for added security. Make sure your wire is rated for the weight of your frame.
Next it's time to hang my frame and set up this very blank wall in my studio. When hanging something of size and weight you want to make sure you use two hangers and make sure they're nailed into studs. Studs can be found by measuring from a corner over every 16'. Lets make this wall come alive!

Up goes my frame centered on the wall.

So my frame isn't floating on that wall alone up go a pair of mounted circa 1600 Florentine silk velvet panels. The silk velvet on those panels is very cool, the design is done in REAL silver thread and the design is huge mainly because this fabric would have been used in place of wallpaper. Yes, this very expensive fabric covered walls!

Since I want to temporarily hang the mounted silk velvet in the center of my frame I had to come up with an idea....safety pin anyone? I simply inserted a safety pin upside down into my padded velvet and the board behind balances and keeps the pin in place. Next I just hung the mounted piece wire on its backside from the head of the safety pin, I created a hook of sorts.

Yep, works like a charm and it's easily removable since the frame isn't for sale. See, the mounted silk velvet looks like it's floating in the middle of that big frame.

Finish off with a few accessories and a little greenery and VOILE! (Click on the picture if you would like to see bigger)


So what do you think of my little project, did I give my mounted piece more presence?
One wall completed now to decorate the rest of my studio but before I do that perhaps I should take you backwards in time and start from the beginning on how my studio came to be....