My Creative Blog [Search results for painting

  • White Cabinet Reveal! {Kitchen Update}

    White Cabinet Reveal! {Kitchen Update}

    Before you get your hopes up, this is not a total room reveal. (I can already hear the booing and hissing.) We still have loads of final details to finish up, but I wanted to give you a peek at our freshly-painted cabinets, which I am head over heels in love with. You may remember that our goal was to lighten and brighten our kitchen by painting the cabinets white, adding a neutral color to the walls, and taking down some unused cabinets. We then added open shelving, a fabulous stenciled wall and a beautiful new pendant light with custom shade. Today I'm just sharing the take-your-breath away cabinet transformation, so I'll give you the nitty-gritty details of our painting process in a post next week. You may remember that this is how we started out:

    And here's where we are today:

    I know, right? It doesn't even look like the same room! It's such a calming space, and is ten times brighter. Plus, because the cabinets are white, the space seems so much more open and a lot bigger.

    My hubs finished off the half-wall and added a ledge made of a 1x12 piece of pine. He painted it, sanded the edges until they were rounded, and then trimmed it out with moulding.

    Well, fickle, little me decided I didn't like the black brackets used to hold up my shelves, so we took them all down and are in the process of painting them white. My poor husband.

    Painting the cabinets has made me want to change the countertops out ASAP, but we're being patient and are waiting until it fits in the budget. We took a trip to Ikea and were told that, based on our measurements, unfinished butcher block counters would cost us around $300. Not bad at all, but that's just not going to happen any time soon. Don't tell my hubs, but I'm hoping that Fall will be ther right time.; )

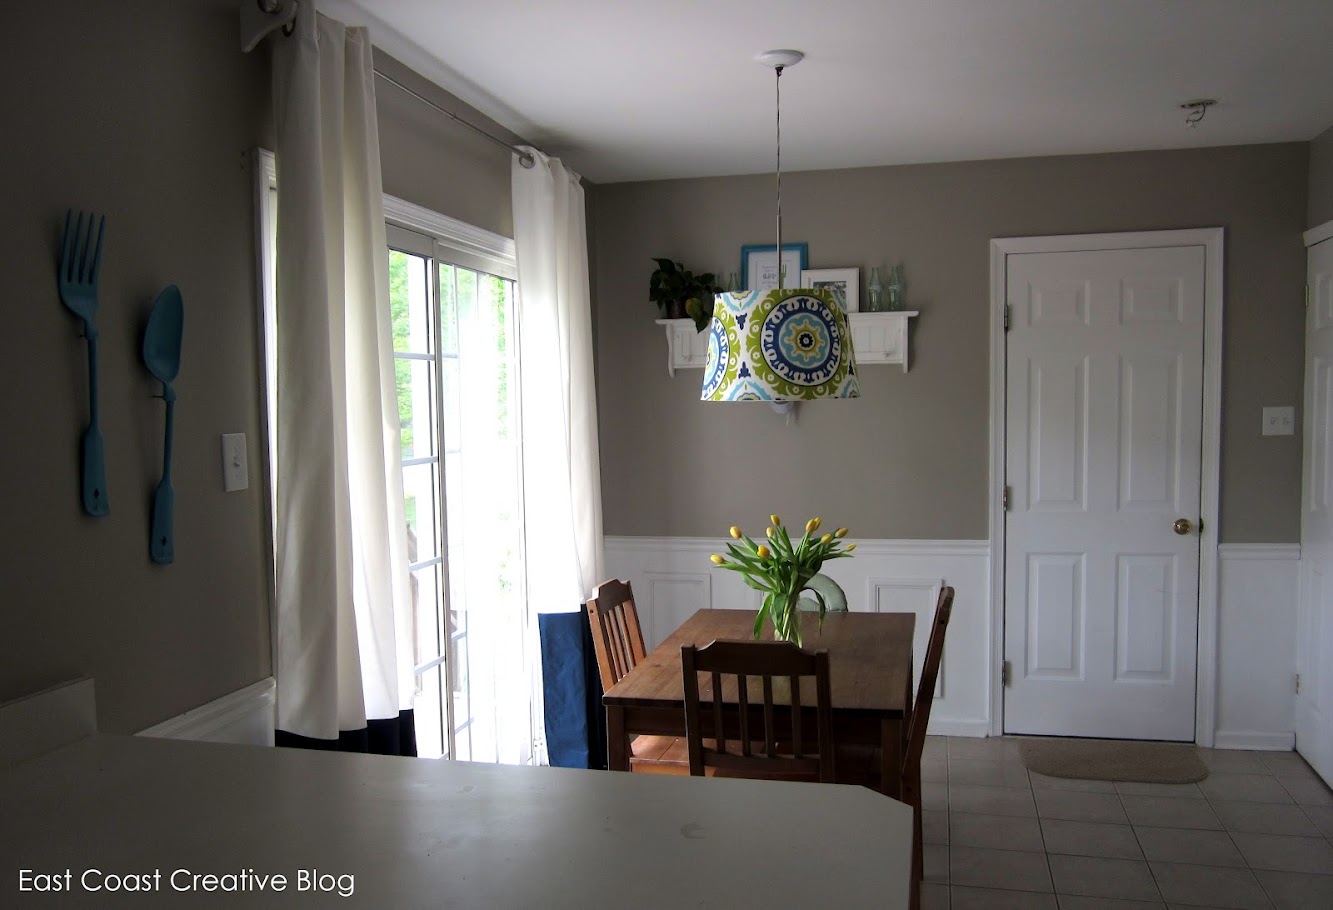
    Yes, in case you were wondering, I have decided to take back my brown Ikea curtains and replace them with navy panels. Thanks for all of your input!

    The next phase will be installing two shelves to the right of the refrigerator. The bottom shelf will house the microwave, so that we can have a bit more counter-space. You can get a good idea by my rough (and I mean really rough) drawing below:

    Before that happens, though we have to take care of this little problem behind the fridge:

    We moved our oven across the room to the other side of the kitchen, but the problem is that we originally had a gas oven, and so there is a pretty substantial gas valve sticking out from the wall. As a result, the fridge doesn't sit flush against the wall. We're pretty sure we can cap off the valve, but we're going to consult an expert because the last thing we want is our house to set on fire after all the hard work we've put into it!

    I really am starting to love our kitchen and can't wait to start adding some color back into it with accessories and linens (dish towels etc.)!

    Now, when you walk in the front door, the house feels clean, fresh and bright! Hallelujah!
    What are your feelings about white kitchens? Beautiful or boring?

    jess
  • Summer Porch Makeover

    Summer Porch Makeover

    You guys, it was time. Remember that I added some much needed curb appeal to the front of my house by painting the front door and shutters a gorgeous blue and gray last summer? That made a huge improvement, but it was still sadly lacking…mainly because of the ugly, stained concrete slab that we call our front porch. Well, you can't call it ugly now!

    When 3M Tekk Protection asked if I wanted to do a project that added some curb appeal to my house in time for the Fourth of July, I knew immediately that it was time to tackle this concrete mess.

    Ugh. I decided that since removing the concrete wasn't a possibility, I would paint it with what else? Stripes! Painting concrete is not difficult, but you need to make sure you prep the surface well and get the right materials.
    Here's what you'll need to paint your concrete step: - Concrete Primer -Patio and Porch Paint in your desired colors (I got mine from Home Depot) -Scotchblue Edge Lock Painters Tape
    -Paint Odor Valved Respirator -Paint brush -Paint Tray -Roller -Broom -Hose

    I hadn't ever tried this painters tape with edge-lock but had heard good things, so I was excited to give it a try!

    I'm not usually one who worries about painting while pregnant, but I have been doing so much more painting than usual for Knock It Off that I've been super careful and have been wearing a mask. I really like this one from 3M TEKK Protection- it's comfy and light and does the trick, especially with the special epoxy primer needed for concrete.

    I love that I can actually breathe through the special valve, instead of feeling like I'm suffocating.

    Cute, huh? Anyhow, let's get started:
    1. The first thing you need to do is prep the surface. Make sure you sweep away all dirt and debris from the step and then spray down with soapy water. Let dry completely,
    2. Roll the primer onto the step, making sure to cover the entire surface. Concrete primer is really thin, so keep this in mind as you roll it on. It's designed to soak into the concrete, not sit on top, which actually helps the paint to adhere to the concrete better. I actually poured the primer right onto the step and rolled it out instead of putting it in a tray. Less mess! Don't skip this step! Trust me. Otherwise you'll be scraping paint off the concrete instead of enjoying your pretty new front porch. (Not that that happened to me or anything…)
    3. Roll your base color onto the step. Repeat with a second coat, if necessary.

    4. Determine the width and placement of your stripes and place the Scotchblue tape in the appropriate places. I liked the look of the stripes coming out from the door, but horizontal stripes would have been fun too! Run a credit card along the edges of the tape to create a nice seal. Then, using a paint brush, paint the edges of the tape with the base color (in my case, white) so that if any paint bleeds under the tape, it will be the color that's already there. This is our fail-safe way to get perfect stripes every time!

    5. Roll your second color over your pre-taped areas. Repeat as necessary. Then pull that tape back at an angle and take a look at those crisp lines! I'm telling you, there is no better feeling out there.

    Finally, I added some new house numbers, a DIY wreath, a chalkboard American flag and some pretty potted plants to complete my porch makeover.

    I made a little video for you guys to explain the whole process for you and show you the end result. Three things to note: 1) I'm huge and I know it. I still have 3 months to go and it looks like I could pop any day! Be kind. 2) It was buggy and I couldn't stop itching! 3) Clearly the camera should have been turned the other way. Sorry, folks!

    Oh my. Well, my legs are still skinny.; )

    I'll share the tutorial for this rope-wrapped wreath later this week so stay tuned!

    I'm thrilled with the way it all looks, but still have one more ummmm, kind of big, item on my house exterior to-do list: paint the siding! I've never loved the yellowish siding and would really like to go with a darker color (maybe gray?) and white shutters, but my hubs is not quite on board. Don't worry, though, I'll convince him soon enough!; )

    How about a little before and after action for you?

    I'm so relieved that our guests don't have to look at that ugly concrete anymore when they come to my front door. Now they get a taste of what the rest of my house looks like!
    .

    For lots more DIY inspiration and information, following along on the 3M DIY Twitter page and Facebook page!

    jess

    *This post is a collaboration with 3M™ TEKK Protection™ Brand, but all words and opinions and extra baby weight are my own.

  • Painted Hardwood Floors {Knock It Off DIY Project}

    Painted Hardwood Floors {Knock It Off DIY Project}

    Jess and I had so much fun working on this episode of Knock It Off - We transformed this baby's nursery from crazy, blinding pink into a kid-friendly version of a loft space- we called it a"soft loft."

    To check out the full video of this episode, click here
    One of the biggest projects in this space was painting the hardwood floors. The floors were pretty beat up and actually had planks going in all different directions. It took a little convincing, but eventually we got both homeowners on board with the idea of painting their hardwood.

    The first step was to sand the floors. You need to get off any gloss, because the paint won't adhere to the floors if you don't. We rented our sander by the hour and it took less than an hour to do the whole room. $50 later we were all done!

    Once we were gloss-free, we whitewashed the entire floor. We wanted to cool the tone down a bit- sometimes warm oak can seem a bit red-orange. We used 3 parts water to 1 part paint. This step goes by super fast using a roller and an extender pole.
    Just make sure you don't paint yourself into a corner! lol Start at the far side of the room and work towards the door!

    After the whitewash had totally dried, we used painter's tape to mark off our pattern. I won't lie, this was tedious and almost made me poke my eyes out a few times. Of course we couldn't have just gone with a plain old pattern, we made ours cool and funky. Actually the taping was easy, but figuring out what color went where actually had me and 3 guys on our camera crew going nuts!: ) I think they thought I was losing it.

    Here's the pattern we went with. It's just a combo of diamonds and lines, but it gives a fun, 3-D look and we like the combo of diamonds and some herringbone-ish arrows!

    We used mini foam rollers for each of the colors. We use a coral, charcoal, greige, navy, and the whitewash color that was the base. The mix of colors is where it was tricky to get the pattern down. What I recommend is using a sticky note or little piece of painter's tape in each shape to make sure you have the colors laid out right before painting.

    When each square had two coats, we had one awesome, show-stopping floor! It was so much better than the damaged hardwood and had to much more of an impact on the room!

    There were tons of fun projects in this room! Check out our KIO DIY page to see more!

    Click HERE to visit the Knock It Off homepage to watch this full episode!
    So, do tell… would you be on board with painting your old hardwood floors or not so much?

  • Curb Appeal

    Curb Appeal

    I've already confessed to you that yard work is not really my thing. I pay way more attention to the inside of my house, and tend to neglect the outside. Unfortunately, my hubs isn't really into working outside either. But, I started to feel really bad for our neighbors because the front of our house was sooooo not welcoming. A few years ago, right before my daughter was born, I had Kevin paint the shutters and front door of our home a nice neutral brown. It was a major improvement over the faded blue that was there when we bought it, and for awhile, I liked the look. But not anymore. Now that I know what style I'm going for in my house, it wasn't fitting the bill. Not unique enough, not coastal/cottagey enough and not"me" anymore.

    Oh did I forget to mention that we also have a jungle of a flower bed right outside our front door? Ugh. This flower bed is the bane of my existance. It's very large and overgrown with weeds. I figured that if we were going to add some curb appeal, the weeds had to go. We'd really like to put some low ground cover (suggestions, anyone?) in the entire bed so that we don't have to worry about it too much, but for now, we did some much needed cleaning out.

    Our house is only about 15 years old, but the paint was peeling badly on the columns, so we added that to the facelift list.

    It really just didn't scream,"Hi! Come on in!", did it?

    I had slowly been accumulating paint chips to find the best front door color, and finally narrowed it down to Deepest Aqua by Glidden. Since I got my paint at Home Depot, I had them color match it for me in Behr Ultra Exterior Paint + Primer (you can see the code below, if you're interested!). I chose Behr Ultra Exterior Paint +Primer in Dark Granite for the shutters. No joke, this paint was amazing! It went on soooo smooth and covered really well on the first coat. I highly recommend it! We ended up only doing two coats, and they look perfect.

    All of the trim on the porch and both columns got a fresh coat of white paint, as well.

    I'm so impatient that I had to snap a picture of the house after the door was painted but before the shutters were painted. Loved it immediately. That blue is spot on and the perfect color for my front door.

    I had Kevin take the door knob off because it had seen better days, and sprayed it with a dark bronze hammered metal spray paint. What? You don't spray paint on an old tree stump? Why ever not?!: )

    That simple step made a world of a difference, and was free, since I had the spray paint already. Score!

    After weeding, painting, spray painting and a lot of sweating, here's how the house looks now:

    The house feels more calm to me, if that makes any sense at all. And the colors make our house look more white, when actually it's an off-white, pale yellow. I'm a big fan of that, as it was completely unplanned!

    We didn't take down our shutters, because they're a bear to do so. My hubs just used a step ladder and his mad painting skills to get them done.

    To dress up the porch a bit, I brought my DIY floor mat from the kitchen out. I was never really a huge fan of it in the kitchen, and with the addition of my new rug, I liked it even less. It matches perfectly out front, so there it sits! Much better.

    This chair was one of my grandma's (I have two of them) and a while ago I spraypainted them in Krylon Pimento Red. I thought it would be fun to paint our house number on the back of the chair, but before I commited I wrote it on with chalk. One of these days I'll get around to painting it for real…or maybe not.

    I'm really digging the non-traditional mix of these colors.

    I'm planning a few more little touches to the front door and then I can't wait to get my Fall on in the next few weeks!

    And just for posterity's sake, let's take one last look at the before and after:

    Can I get woot-woot?!: )
    Are you guys into working outside? What can you recommend for the giant weed-fest going on in my front bed? P.S. Do you follow us on Facebook? If not, you totally should because we're always posting in-process pics and teasers about the projects we have going on. Plus, you'll get an inside look at our craziness!: )

    Recent Facebook Spoilers

  • Creating with the Stars Round 3 Voting

    Creating with the Stars Round 3 Voting

    Ok, guys, we are in the last two weeks of competition with Creating with the Stars and to say that the contestants exceeded our expectations would be the understatement of the century. We have six competitors still fighting for a spot in the final 3 and no one is going down without a major fight. If you missed the first two weeks of projects, check them out below: Round 1 Projects & Winners Round 2 Projects & Winners

    This week some amazing prizes are at stake. The semi-finals winner will take home…
    $500 Gift Card to Home Depot (Contestant & Blog Star!!) $100 worth of Martha Stewart supplies from Plaid Crafts $125 Gift Card to Lucent Lampworks Project featured by HomeTalk

    -------------------------------------------------------------------------------------------------------------------

    Now, we know you're all dying to see what amazing projects our contestants have come up with this week with paint! Let's go!
    1. Painted Couch Featuring a Handmade Horse Stamp

    We have all seen these couches before in someone's grandma's house. This vintage couch is not the good kind of vintage, but I may have some of you convinced that this traditional style can be made more modern. I painted the couch white, carved out a horse, and stamped the living daylights out of it with black paint from Home Depot. Enjoy!

    2. Painted Map Coffee Table Painting! I'm not going to lie, I was pretty stoked about this week… and amazed I made it here. Painting is one of the easiest and cheapest ways to transform almost anything. And my table was in need of some transforming- big time. I picked it up at a flea market type place for $40… peeling, chipping, splinters, dirt and all.

    I sanded and scraped (forever) until no more paint chips fell off when you walked by. Then I gave the entire table a coat of latex paint from Home Depot (mixed with a little plaster to make chalk paint), leaving some of the peeling paint texture on the legs. After that was dry, I taped off a large"X" pattern on the smaller shelf and added a painted stripe detail to IKEA storage boxes for the bottom.

    On the top, I made my own basic map stencil by cutting away the continents on a large world map I printed out. I stuck the map to the table with painter's tape, then painted over top with blues and greens. Once that was"roughed in", I removed the paper map and spattered the rest of the painted detail free hand using mostly a plastic spoon and really watered down paint. The last step was to give the entire table a coat of protective finishing wax.

    I kind of think the end result is out of this world… hehe, get it?

    3. Painted Desk and Accent Wall Using Custom Stencils

    I love paint! It sets the mood of a space and has the power to completely transform a piece. I found this large bookcase at Goodwill and loved the detail on the doors, arch at the top, and the drop panel but didn't like choppy layout, worn finish, and heavy bottom. Luckily, all of my dislikes were easy to fix with a little paint and reconfiguration of the layout.

    With a little help from the Home Depot, I was well on my way to getting started. Thanks Chris!

    Fix #1 — I moved the drop panel down to 30" so that it can now be used as a secretary desk. Goodbye choppy bookcase, hello new desk!
    Fix #2- Paint! The finish was worn and it had a few areas that needed to be filled with wood filler so painting was the perfect solution! I chose a classic ivory and paired it with a deep turquoise stenciled background. I created the stencil based on one of my favorite Farrow and Ball wallpapers.
    Fix #3-the thick base and doors made this piece look bottom heavy. To fix this, I added small feet to lift it off the ground and create a little visual space at the base.
    I also created a large stencil based on one of my favorite rugs. The large scale and contrast provides a lot of visual impact and adds variety from the small scale stencil used on the back.

    With the help of paint and a few power tools, this bookcase has been given a new life and I love the way it looks in my new space! 4. Painted Chalkboard with Map and Games
    This week's theme was my favorite so far…I love the many many ways that paint can be used to make an instant change and impact on a space or an object. I also love chalkboard paint. This week's project is dedicated to my kiddos who surprise, surprise…love to get that their craft on too!; )

    In designing the chalkboard wall, we decided to have a map of the U.S.A…I love the way it looks and it will be fun to track the different states we go to as a family. After coloring in the states my kids have been to, they commented"well that's not very many", so I let them each choose a state they would like to go to someday…which explains why Hawaii and Alaska are colored.: )
    Lately my oldest child has loved playing tic-tac-toe, so I thought a large, interactive wall version would be super-fun! I also included many"frames" for the kiddos to draw their masterpieces in. I picked the step-stools up at IKEA and painted them in fun colors, and the animal hooks holding our chalk and erasers came from Anthropologie.
    It was a blast picking out all the fun paint colors at Home Depot! Because I was using so many colors and didn't need a gallon of each color…Home Depot made my day when they told me that they can mix any color in a small, 7.5 oz jar…perfect!!!

    And after a super-busy week painting…I'll go to bed tonight and dream about being on a beach in…

    ;)

    5. Aztec Wonder Painted Rug I have been in love with the Aztec inspired rugs that I have been seeing in catalogs and online lately. The drool kind of love. But alas, rugs can be expensive. They are not something I can change an a whim. So, when the paint round came about I decided that it was time for me to get my hands on my latest crush and do it in a budget-friendly way. In DIY style, of course.

    Isn’t she beautiful?! This rug was a labor of love. And a lot and lot of sponges cut into stamps…applied one by one. Fabulous colors, a gentle application of paint from Home Depot, and lots of patience made this rug come together into something lovely.

    My rug is more then happy living with me. And, I am so pleased to have my own version of this latest craze. And… you know what? I’m glad we’ve moved on from Chevron to Aztec. I’ve got my Aztec rug and I’m ready to go!

    6. Painted Wall Mural and Dresser
    I have a thing for maps right now — doesn't everyone? So, when it came time for the"paint" challenge, I was pretty excited to hop right in and paint a giant world map on my wall. Because who doesn't need one of those?!

    I used a projector to hand-paint the whole thing, and then for a bit of contrast (and fun!) I added an old Ikea sideboard we had laying around that I painted Sunny Side Up by Behr from Home Depot. For a couple more little touches, I added bicycle drawer pulls (because, why not?) and numbers to the door fronts — you can barely see them from straight on, but if you look at it from a different angle, they suddenly show up. It's a subtle touch, but I didn't want anything to compete with the map above it!

    I love how the black and yellow work together, and I'm pretty excited to finally achieve my dream of covering a wall with the entire world. And, really, I find it hard to believe that this bright and sunny sideboard was once a plain, boring black Ikea piece — don't you love how big of a transformation paint can make?!


    It's time to vote! You guys have a ridiculously hard job- we don't envy you a bit! You can only vote one time, but you can vote for your favorite 3 projects. **The voting glitch for Round 3 has been corrected and voting will be adjusted accordingly. Thanks!
    In order to vote, please LIKE EC2 on Facebook.

    jess
    Monica
  • Tomatoes!

    Tomatoes!

    W e enjoyed our first cherry tomato harvest over the weekend! It was a notable moment as the tomatoes got off to a rather slow start due our cool, rainy June.
    Most of the heirloom varieties are still quite green. We're hoping that before the fall temperatures settle in, we'll get some more late hot summer days to help them ripen.

    As you can see, I'm ripening as well. I'm a little over 23 weeks pregnant now and the babies are growing fast. I'm so excited to say that we've begun working on the nursery. Hubby finished all of the painting in the dining room (photos to soon follow) and has officially begun the painting projects for the nursery.
    Once the painting is finished, everything should come together quite quickly as all the furniture and design plans are pretty much complete! Can't wait to share it with you!

  • The Curtain Solution {DIY Painted Curtains}

    The Curtain Solution {DIY Painted Curtains}

    This curtain situation in my kitchen stumped me for the last month or so. I showed you the brownish-gray drapes I bought from Ikea first:

    And after living with them a day or two, (and asking for your advice. Thanks, BTW!) I decided to take them back because they made the room look dark. Then I bought navy drapes, also from Ikea, that made the room look even darker, so back they went. And so, it's like I always say, when all else fails, go for the DIY! Well, maybe I never said that, but I'm going to start. Here's what I ended up with:

    I loooooooove them. Color-blocked drapes for only 25 bucks! DIYing it lets you do your own thing and create something totally custom. Now for the break down:

    The curtains came from…Ikea! Surprise.: ) These things are so awesome because they cost $25, and that's for 2 panels. Woohoo! The panels are 96 inches long, but come with fusible webbing to hem them without sewing. (Another plus in my book!)

    It's a good thing they provide the stuff to hem them because they were way too long when I hung them up. I also felt like they were just a little too uninteresting and, since this is a high-traffic area (we let the dog in and out through the slider, go out to the deck to play, and close the drapes at night), I knew that white would get soooo dirty really quickly.

    Then the idea of color-blocking them popped into my mind and I knew that that was the solution! It would hide the dirt on the bottom of the curtains, while still allowing the room to feel airy, bright and clean. Yesss!!! I ironed, measured, hemmed, ironed some more, measured some more and then got to work painting them using this method. It worked like an absolute charm.

    While painting curtains might just be the bane of my existance- don't ask me why, I really don't have an answer- I am so happy with the results and the fact that it was so inexpensive. I already had the paint on hand from our first Nate Show episode, which was super convenient, and so it really was only 25 dollars for a pair of custom drapes!

    They totally compliment my fabric-colored pendant light and bring a little more color to this side of the room.

    And now, I think, I'm taking a break from kitchen stuff. We'll see how long that lasts…

    Oh yeah, I added a picture of my hubs and me eating souvlakis from our favorite place in Athens, Greece (which is where we met!) right next to my"People who love to eat are always the Best People" quote. Makes me smile every time I see it.

    And did you know that if you put a penny in the water with your tulips they will *supposedly* stand up straight instead of drooping? Just a little tip I picked up from Emily that I thought I would pass on to you. You're welcome. I'll let you know if it works.; )

    One last thing: lest you think my kitchen is darn near perfect, here's the other side of it: one of the doors to our laundry area, that never actually fit properly, ripped off the doorframe last week. Sadly, it is always that disorganized. *Sigh*

    My daughter told me today that she does not appreciate me painting everything (she's four!), but man, I sure appreciate how you really can paint everything!
    What unusual things have you painted?
    *Monica once spray-painted a pillar candle. Hilarious!*
    P.S. Did you hear about the awesome new Pinboard we've started with five other amazing bloggers? You'll definitely want to check it out for loads of home decor and crafting inspiration.

  • Risky Business…

    Risky Business…

    So, I'm not a huge risk taker in most areas of my life. I'm not into extreme sports, I don't buy high risk stocks, don't go wild with my clothing or my haircuts. My husband is a bit more of a risk taker and his annual cliff-jumping trip at the Adirondacks proves that…

    (I pray a lot during this annual trip!) One area I am brave enough to take a risk in is my decorating. I was inspired by The Nester to share my thoughts on being willing to take a little risk in your home.

    She wrote,"We don’t risk because it’s easy or normal or natural, we risk because of hope." So often when I want to try something new or different, I find myself thinking,"I sure hope this works out!" and sometimes it does, and sometimes it doesn't. It really isn't about it always working out perfectly, but it is about being willing to try something that would make you happy if it works out! Now, don't go knocking down walls right away, but maybe a new color paint (you'd only be out about $30 and two hours if you don't like it) or rearranging the furniture in a room (you simply move it back if you're just not feelin' it), or maybe attempt a fun DIY project you've seen on a blog. Here are a few tips that The Nester shared:

    TIPS FOR TAKING RISKS IN YOUR HOME:

    • start small and pick a project that won’t take much time
    • don’t invest too much money
    • don’t force perfection
    • be open to changes and new ideas during the process
    • don't be afraid to put a nail hole in the wall (I added this one, but so many people are afraid of hanging art. I promise, it's no biggie! If it goes poorly I'll buy you some quick dry spackle!)
    Here are a few of my recent, minor risks… Outdated bottom half of my hutch…

    Meet awesome orange paint

    Fingers crossed as I was painting (sorry for the non-glamorous painting scene). I'll share the end results soon and let you know if this risk worked or not.

    This was a little bigger risk because Eric really liked this mirror. It was fairly expensive when I bought it for our old house, but I didn't have any place for it in the new home. I liked the size for this playroom, but I wanted it to have some color! I finally decided to take the plunge and paint it!

    Here's a risk I actually wouldn't recommend, wearing your favorite jeans and sneakers while painting. I'm not sure if I was just feeling really risky or lazy!
    ( Thankfully no shoes or jeans were harmed in the making of the awesome mirror re-do)

    I chose a really cool mustard yellow paint and was just a wee bit disappointed when the paint wasn't taking and it looked canary yellow at first!

    But, after 4 coats, I finally had a finished product that I really love. I can't wait to show it to you in the room.

    So, what risks have you taken? What risks are you going to finally try? Let us know, we'd love to see what Risky Business you're up to!

  • Stenciled Outdoor Rug

    Stenciled Outdoor Rug

    While Jess has been working on some indoor projects, I've been focused on our patio, and today's tutorial actually had me fist pumping quite a bit while I was doing it. Now, you're getting a sneak peak of the patio, but I'm not doing a real reveal until it's 100% finished (We're waiting on the lights we ordered and we've already started on a little addition!) So, don't focus on the patio, just the DIY project okay?

    Spray Paint Stenciled Rug

    I knew that spray painting my outdoor rug, rather than hand painting it, would save me time, but I
    had no idea just how simple it would be and how much I was going to love it! I wanted an awesome outdoor rug for the sitting area, but man alive, are they pricey! Jess actually found this insanely cheap outdoor rug at Home Depot for a project at her house, so I jumped on the cheap rug bandwagon and got one too! Check out that price… $17.88!!

    Home Depot Rug

    I did a project on one of our Nate Show episodes last Christmas, and it got me thinking… I really didn't want to spend a long time painting a rug, perhaps I could try something a little easier (I'm all about the lazy-man's DIY).

    To make those canvases, I just laid a reindeer template on the canvas and spray painted over it. When I peeled the template off, I was left with pure awesomeness! I decided to give that method a whirl with the rug.

    Stenciled outdoor rug 3

    Materials:
    Plain outdoor rug Stencil Spray Adhesive Spray Paint (6x8 required 3 cans) Scrap or Newspaper

    Stenciling process

    1- Spray the back of your high quality stencil with spray adhesive (I only sprayed it 2x for the whole rug). I had this Chez Sheik Moroccan Stencil already from Royal Design Studios (they're our favorite!). Then, choose one corner of the rug to place your stencil in. I honestly only leveled and squared by eye and it worked out perfectly.
    2- Use scrap or newspaper to cover the area around the stencil.
    3- Spray the stencil with your paint. I used Valspar's Outdoor White so that it will hold up against all kinds of weather (including the million degree heat we're having right now!)
    When you're spraying, you'll want to spray directly down onto the rug, to prevent any bleeding, and hold your can a lot closer than you normally would. I found about 4 inches gave me quick, solid coverage.

    As soon as I was done with one section, I moved onto the next. I didn't have to wait for any drying time etc.

    Here's some evidence of how fast and easy this project is… Each star represents something (from bottom left) 1- I didn't bother with a drop cloth. 2- I just moved the sticks from the thunder storm to the side. 3- Child #3's scooter 4- Child #2's skateboard (I knew I'd be out of their way fast!) 5- Plywood from another DIY 6- Recycling bins I was supposed to take to the street, but hey they can wait 20 minutes for this project right?
    Here's the patio sitting area before…

    before stenciled rug

    And after…

    after stenciled rug

    If you're anything like me, you're wondering, But how crisp are the lines? Does it really look good or does it look like a sloppy 20 minute project?? I'll let you be the judge. I'm crazy picky and this meets the Monica standard.

    After hauling 40 tons of stone and working for weeks on this patio, I needed a quick and simple DIY. This outdoor stenciled rug cost me under $30 and completely helps bring the space together. I can't wait for cool, crisp fall evenings, when I plan on spending a lot of time outside in my new space!
    What do you think of it?

  • Art

    Art

    W hen I was a Music/Art major in college, I visited a home with the most amazing collection of original art work. The home inspired me because the people who lived there were not wealthy by any means. In fact, you could probably call them 'starving artists.'
    Nevertheless, they had an amazing collection that included paintings by well-known regional artists as well as unsigned paintings found at tag sales.
    It was a collection that they had been working on for many years and it was a collection they acquired passionately. And it showed. Their house breathed a wonderful sense of vitality because of it.
    My collection of paintings has been greatly inspired by them. Here are a few of my favorites.

    18 x 14
    I bought this Eric Jacobsen painting, unframed, at a fundraiser for our local art gallery. Months later, I happened to find an antique frame that fit it perfectly (see this post ). The painting in the first photo was also purchased at the same fundraiser, and is by the same artist. I found an antique frame ($15) that happened to fit it as well.

    15 x 18
    This still life was purchased at Matthews Gallery in Portland. I had taken the owner a few paintings for him to appraise, and ended up trading them for this piece.

    18 x 23
    This piece is a reproduction of the The Torn Hat by Thomas Sully. It's signed by a well-known Seattle artist. I purchased it for $60. I found an old wood frame for $20 and had it cut down to fit the piece for another $20.

    28 x 15
    This is one of my favorite pieces. I love the companionship of the horses. It was a rare find in that the original frame was in pristine condition. I paid $120. Margaret and Graham have taken a liking to this one too!

    9 x 13

    13 x 9
    A few years ago, an artist friend of mine allowed me to raid her seconds bin in her art studio. This pair of landscapes paired nicely with these antique Victorian frames ($45 each).

    26 x 19
    This piece is one of the largest pieces I've acquired. The frame drew me in as it's a beautiful chunky gold frame with clean lines and a wide profile. I knew the frame alone was worth the cost of the painting — $225.

    17 x 22
    I did a post on her here. I found this portrait unframed for $44. When I got home, I was thrilled that she happened to fit into this antique floral frame I had picked up several months prior ($20). My friend Steve described the frame poignantly as a beautiful 'dress' for her.

    13 x 11
    This is done by a local artist, Cathleen Rehfeld. Cathleen's work lovingly captures the essence of the landscape in our region. I bought it unframed and paired it with an antique frame I had cut down to size by a frame restorationist for $100.

    16 x 13
    This lone oak is by the same artist. I had this frame cut down as well.
    As you can see, I'm especially drawn to landscapes and portraits. And I love finding beautiful antique paintings, but I also collect new art that offers that classic Hudson Valley School aesthetic.
    I look forward to continuing to grow our collection. The vibrancy of the art is one of the reasons I'm so drawn to having white walls in our home. I love the way the neutral wall contrasts with the brilliance of the gold frames and the lovely imagery of the paintings.

  • Top Projects 2012

    Top Projects 2012

    Phew! Can you believe that 2012 is over already? We are gearing up for an unbelievably awesome 2013 filled with lots of fun and exciting things for this little blog (we'll share those with you tomorrow!), but we thought we'd take some time to round up our favorite projects from each month in 2012. Take a look, let us know what you think, and pin it if you like it!

    January Monica's Fav: I loved going green in 2012! Not really in the earthy-crunchy way, but by adding a pop of color to my collection of ornate frames. These Green Granny Frames had a fun impact on my dining room!

    Jess's Fav: I breathed some new life into our New and Improved Entryway by adding a striped accent wall and a big gallery wall.

    February:
    Jess' Fav: This project injected what can only be called Stencil Happiness into my kitchen renovation. Thanks to an awesome stencil from Royal Design Studio, my kitchen now has style for miles!

    Monica's Fav: I took a bit of a risk and got personal with all of you by sharing my Game of Love Perfect Valentine's Gift. You ladies sure loved it, because it became our #1 post of 2012! Stay tuned for this year's version- it'll be on the blog on Monday!

    Since 2012 was a leap year, I get to add another for February! This post went live on 2/29 and it's such a time saver in our house! Once a Month Sandwiches

    lunches intro

    March
    Jess' Fav: This Giant Shaped Frame is by far my favorite project from 2012! I'm pretty sure there is no better way to dress up your wall for this crazy low price. This is a big impact project, people. *I also have to nominate this one too! Jess and I had no idea how successful this project was going to be when we created it- we sure love Staples Prints! -Mon*

    Main Pic

    Monica's Fav: I love the BIG impact my Chevron Wall made in my kitchen. It's packed with personality and was pretty easy to paint!

    DSC_0093

    April
    Jess' Fav: My hubs and I surprised my daughter with this Playhouse Loft Bed for her fourth birthday. It was totally worth it, because she and my son play in it all the time. I'm all for a DIY project that keeps the kids happy and occupied! *wink*

    Monica's Fav: My Front Door got a major face lift with a super cool color and house numbers that are so my style!

    Add numbers

    May
    Jess' Fav: We started our kitchen renovation in December and were finally ready to do the big Kitchen Reveal in May. Of course, I'm still tweaking it, but this room makes me super happy. It's filled with tons of DIYs like painting the cabinets, stenciling the wall, making a fabric shade pendant light, painting color-blocked curtains and adding a fab rug.

    Monica's Fav: Warm weather meant it was time for some outdoor projects! I loved how simple and inexpensive these DIY Planters were. Even now, they have winter pansies and look great on my front porch!

    Color Block Planter

    June Jess's Fav: I love the ability to customize things and this Fabric Floorcloth let me create the perfect mat for my entryway!

    Monica's Fav: Jess and I completed our Super-Fab Guest Room Makover. We loved everything from the shutter headboard, fun accessories, and of course the houndstooth stenciled wall! We also had a blogger's dream come true when Young House Love featured our makeover!

    Houndstooth Stenciled Wall

    July
    Jess: My son turned 2 this month so I showed you how I made his custom invitations using digital scrapbook paper and picmonkey. How to Make Custom Printables became one of our top posts- you guys obviously love free things!: )

    Monica's Fav: While we were busy finishing up our patio project, I also worked on an Outdoor Furniture Upcycle

    August
    Jess' Fav: We took our house exterior from boring to awesome by painting the front door and shutters. Hello Curb Appeal!

    Monica's Fav: August was when I pulled off a birthday surprise for my hubs with a Garage Mudroom Makover I'm still loving the organization and how it's actually functional for this family of 6!

    September
    Jess: It's a tie! I just can't decide between Stenciled Faux-Tile Fireplace & Planked Wall with Exposed"Stud' Shelves. Both of these guys transformed the room and I'm in love with them!

    Monica's Fav: I went a little outside the box with my Shut the Front Door — Foyer Update. It's still one of my favorite things in my house.

    October Jess: Our dining room has been slowly undergoing a transformation and my refinished dining table fits perfectly in the new space! Refinished Dining Room Table

    Monica's Fav: In October, we had our DIY Patio Reveal! It was a HUGE DIY project, but we saved tons of money doing it ourselves and the end result was pretty awesome!

    November
    Jess's Fav: I love Mr. Berkus and didn't think he would mind me knocking off one of the items from his new line- the Rope-Wrapped Hurricane Vase. Want to know a secret? I like mine better.: )

    Monica's Fav: During a road trip to visit one of my best gal pals, I whipped up a Fireplace Makeover in her new house. It's a super-simple way to get rid of that brass fast!

    December
    Jess: This project was honestly a surprise to me. It came out so much better than I ever thought it would! The Wood Slice Wreath is the perfect winter decoration.

    Monica's Fav: Just in time for Christmas Jess and I made this Illuminated Silhouette Art. It looked great next to my Christmas tree, and now I'll be swapping out the silhouette for a lovey-dovey Valentine's quote!

    One thing that stands out to us the most this year is how thankful we are for YOU! We so appreciate your comments, emails and faithful visits to our blog. Here's to another crazy, fun year!

  • Our Fireplace

    Our Fireplace

    From a distance, you may not notice the stains on the brick fireplace. These stains come from the glue that the previous owners used to adhere the faux wood paneling.

    Here is our fireplace in its former glory. The incinerator-like wood stove compliments the dark gloomy look and took two grown men (chimney guys), several hours, and several swear words to remove.

    Here's Hubby prying off the first bit of the faux paneling. This is literally thefirst day (maybe even the first hour), after taking ownership of the house.

    This is after all of the paneling was removed. We knew that there had been an old leak so that wasn't a surprise, but what we didn't expect was their generous use of glue (glue ended up being a four letter word during the remodel as the former owners used it everywhere).

    This is how things look now. We've covered up the bookcases with drywall, added crown and base mouldings and had a cabinetmaker design and install the mantle.

    Here's a closer look at the glue stains. We've tried everything to remove them — nothing has erased them completely. Initially, we had intended to paint over it but then kind of liked the brick (from a distance) with the white mantle so ended up leaving it....until now.
    With the new furniture on its way, and with an empty room just screaming for a painting project, we're thinking that it might be time to paint it. All along, we thought we'd paint it white, but there have been other suggestions such as black or gray. What do you think?
    I'm looking through some old magazines to try and see what different colors would look like. The good thing is that no matter what color we end up painting it, we can always change it later on....

  • Outdoor Furniture Upcycle

    Outdoor Furniture Upcycle

    As you all know, my hubs and I have been DIYing a 600 square foot patio. It's been a huge job, but it's 99% done and we're loving it! (We've even put on an addition, but our lights were back ordered so I can't give the full reveal yet-boo!)

    600 square feet is a lot of space to fill and I wasn't about to go out and buy all new furniture for the space. I've had this old record player hutch (if that's even such a thing) in my basement for about 7 years now- It was just waiting to be upcycled.

    This baby used to house my in-laws old record player and then eventually a boombox. It's crazy to think that now that all of my music is on a 4 inch iPhone. Anyhow, if you need any convincing that this piece needed some upcycling, I've provided you with some evidence…

    One of my favorite things to do, is to look at a piece of furniture and see past the"yuck" and into the potential it has. Remember when we upcycled this dresser into an Anthro Knock off.

    They key to a good furniture upcycle is to believe that anything can be changed and set some goals!

    To Upcycle this piece, I had a few goals:
    #1- Get rid of any and all scrolly things (I sorta loathe them)
    #2- Remove the speaker fabric
    #3- Paint it with outdoor paint
    #4- Add some bold details
    #5- Distress it (so I don't get mad when one of my 4 kids"distress" it for me)
    #6- Add new hardware

    Get Rid of Scrolly Things Sometimes it's easy to think there are things you can't change about a piece, but it's amazing what you can do with a jigsaw! I just taped off a straight line and cut those scrolly babies off!

    Remove Speaker Fabric
    I ripped off all of the lovely fabric and then had to take out the speakers. There was no magic to this step. I actually gave a hammer to my seven year old son and said,"bang away!"

    I love when furniture has an industrial flair, so I cut plywood panels and covered them with chicken wire. It isn't the most fun to work with, but it's not impossible either.

    Paint with Outdoor Paint
    This piece was originally intended to be used indoors, so I wanted to be sure to paint it with good quality outdoor paint. I really don't love taking tons of time painting furniture, so I used Valspar's Exterior Spray Paint. It took about 3 cans to do two coats on the whole piece.

    Add Bold Details
    Since this piece was originally so traditional, I wanted to do something graphic and more modern as a detail. I thought a thin herringbone would do the trick.

    Herringbone is super-simple!
    #1- Mark out your center line. Then, measure the width you want the stripes (I used 1") and make tick marks down both sides of the column. #2- Tape off your lines. The top of the left side slants down to one tick mark below on the right. #3- Paint & Remove your tape. Let it dry and repeat on the opposite side, but shift your painted section down one, so you have the"every other" look.

    Distress the Piece
    You might notice that my lines weren't completely crisp in the herringbone. I was painting outside in 100 degree heat (blogger foul), but I also knew I was going to distress it anyhow. I'm not always into distressing, but I figured it was going to get banged up outside (and I have 4 kids that are pretty rough on furniture).
    To distress, first I went at it with a sander with 220 grit paper.

    Have you ever had this problem? I ran out of the right size sanding pads. Oops!
    After sanding it down a bit, I gave the entire piece a good glazing. I actually began my glazing love affair by reading Living with Lindsay's blog (check her out it you haven't)!
    My favorite glaze is Martha's Black Coffee. As you can see, I slopped it on, rubbed it around, and then wiped it off. I wanted pretty solid coverage, so I used a good bit of glaze.

    After adding some hardware she was all finished and ready for the patio!

    I think she's much more my style now!

    All that's missing now is some cool, outdoor artwork. I'd love to hear any ideas you have in a comment. We have some insanely creative readers! P.S. I have to mention that I'm so glad to have my BFF home from vacation! A week apart feels like such a long time to us! Now that she's home, Jess is working like a mad-woman on some cool projects for her dining room!!

  • Ombre Painted Dresser {Knock It Off DIY Project}

    Ombre Painted Dresser {Knock It Off DIY Project}

    Got an old dresser that needs some love and attention? Don’t kick it to the curb just yet! Try out this ombre paint method for a fun, modern design that will give your dresser new life!

    *Insider tip: When we're looking for furniture to upcycle, we make sure that the piece is in relatively good condition. That doesn't mean it looks good, just that it's structurally sound. Ideally, we love a piece with clean lines and a classic style, but don't overlook a piece just because it has scroll-work or is ornate. Oftentimes, those things can be removed easily with a jigsaw.
    1. Prep the dresser by giving it a thorough sanding with an orbital sander to get rid of the old finish. Remove any hardware from the drawers for easy painting,, too! After sanding, wipe down the dresser with a damp cloth.

    2. Choose your color and get to work! You can actually achieve the ombre effect two different ways- by buying three or four colors from the same paint swatch, or, if you’re trying to save money like we were, using one paint color and changing the color with white paint! We’ll explain this method, since it’s the one we used. Don’t worry, it’s not hard and it’s worth the little bit of extra work!

    3. Go ahead and paint the bottom row of drawers using a small foam roller (designed for painting furniture) with the undiluted, fully-saturated color. The key to a nice finish is even long, even strokes and several light coats of paint. Set drawers aside.

    4. To thin out your paint for the next color, pour three parts of the original paint color in a small paint tray and add one part white paint (3:1 ratio). Roll onto next row of drawers.

    5. Using the same method, thin out the paint with a 2:2 ratio for the third row up from bottom and a 1:3 ratio for the top row of drawers. Paint and let dry the specified amount of time. 6. Add new hardware- we chose to bling out our dresser with clear, glass and gold knobs for this adorable little girl. Or, put the old hardware back on to save even more money!

    Voila! You’ve easily accomplished the fabulous and trendy ombre effect on your dresser! This style is awesome for a nursery, but depending on the colors you choose, could really be used anywhere in your house!

    We've tried our hand at lots of different dresser upcycles. Our absolute favorite is this Anthropologie- inspired dresser

    But, we also kind of love this outdoor furniture upcycle:

    So, please…for our sake…don't throw out your old furniture! Do something fun with it.: ) To watch the full episode of this nursery makeover, click Here! There were so many fun projects in this room!

    jess
    Monica
  • A Love Affair with Frames

    A Love Affair with Frames

    I love antique picture frames. I love their intricate detail and their nicely aged patina. I love that each frame has its own unique character and I love that feeling when you can bring life back to a piece that has been so sadly forgotten.
    I bought all of these frames on an antique field trip I took this past summer. The above gold antique frame is one of my favorites. It's in wonderful condition and I plan on having it cut down an inch or so to fit a beautiful landscape oil painting I have. I paid $60 for it.

    This gold frame is in fairly rough shape but at $20, it was a steal. I have a 7 x 7 rose oil painting that will go beautifully with the floral detail in the frame. Cutting it down will remove the bad spots you can see on the left. It will also get a good cleaning.

    I love the feel of these old rustic frames. It's sometimes hard to find these frames with all of their leaves in tact but when you do, they compliment nature prints beautifully. They can be surprisingly expensive so it's worth being patient. I paid $28 for this one.

    I just love this little hand carved round wood frame. It's very old and in very good shape. It's a 3 x 3 so it too will also go on the family photo wall. This sweet little frame was just $12.
    Having antique frames cut down requires a special skill. I happened to find a professional restorationist who will cut down a frame for $100. This is a very fair price because even with the cost of what I pay for the frame, it's still much less expensive than having something custom framed, and most importantly, the frame is one of a kind.

    The above is an example of recycling beautiful antique frames. I found these identical Victorian frames in pristine condition. I was thrilled when an artist friend of mine (whose work I passionately collect), offered some pieces of hers that would fit the unique dimensions of the frames. I think the gold hues go brilliantly with the blues and greens of the sky and pasture.

  • painting built-ins...

    painting built-ins...

    Elle Decor

    Elle Decor

    Atlanta Homes Magazine via Greige
    I hope you all will indulge me in a post for a friend of mine. She asked me over the weekend about painting her built-in bookcases in her living area. Should she paint them the same color as the walls (SW Pearl Gray ) or paint them white, as with the rest of the room's trim work/moulding? My fellow decor and design addicts, what is your opinion? Have you had the same question? What did you/would you do....?

  • How to Spray Paint a Chandelier

    How to Spray Paint a Chandelier

    Spraypainting a chandelier is REALLY easy and it's a super cost-effective way to change things up in your home. Back in January we shared our home goals with you, and one of mine was to start redecorating our dining room space. ALL of the furniture pieces in this room were bought on clearance (hooray for a $60 dining table!), through Craig's List (the hutch was $100) or from a family member (the red chairs were my grandmas!). Even the art was upcycled! Anyway, it's just not fitting in with that lighter, brighter, coastal-cottage look I'm going for, so I figured it was time to get moving.

    I have had a light fixture in mind for this room for months, and I guess I've gotten stuck on that idea. Because it's not in the budget right now, I had just resigned myself to wait until the time was right. Then, inspiration struck after seeing Kelly's pinteresting home, and I realized that taking stuff I already own and making it better is what I DO! Duh. So, you guessed it, I took that baby down (by myself!) and spraypainted it. Here are my go-to tips:

    1. Take your chandelier outside and find a tree with a low-hanging branch. Throw a dropcloth down under the area you'll be painting.
    

    2. Using rope or wire, tie the chandelier firmly to the branch. Hanging your chandelier allows you to spraypaint the entire thing at one time. No spraying the top, waiting for it to dry, doing a second coat, waiting for it to dry, turning it over, painting etc etc etc. (I'm such an idiot and forgot to take before pictures of the process, so you'll notice my chandy had already been attacked by spraypaint!)
    

    3. Stuff cottonballs down into the stems (where the lightbulb screws in), so you don't damage it with paint.
    

    4. Pick your poison favorite paint and start spraying! I am embarrassingly in love with this color I found from Valspar called Hacienda Tile. It's a mix between pink, red and orange that is absolutely perfect, and satisfies my longing for an infusion of coral in my home. Also, this spraypaint is awesome for this project because it can spray at all angles, so you can easily get down under the chandelier to spray the undersides. Spray 3 light coats, with some drying time in between, for the most even coverage without drips.

    5. Hope that your neighbors don't turn you in to the association for being white trash. (Yes, that is my FRONT yard!).

    I'm thankful I have such nice neighbors. Anyway, I can NOT wait to show you how this has one little change has inspired a major makeover of our dining room. Yay for more projects!
    How many of you spray painted something this weekend?
    

    jess
  • Philadelphia Home Show

    Philadelphia Home Show

    When Denise emailed and asked us if we'd like to come visit her at the Philadelphia Home Show, we immediately said,"Um, yeah. That would be awesome." And it totally was. Denise from The Painted Home guest-posted for us (and we did for her, too!) a while ago, and we've been emailing back and forth for awhile, but haven't ever connected face-to-face. Until now. She was asked to design a bedroom/office for Greg Murphy, and did an amazing job. Head on over to her blog for all the behind-the-scenes stuff, but here's a glimpse of her great work:

    I know, right? You could look and look and look and still not see all the clever things she did!

    Monica and I both loved the dresser with those pieces of old luggage. Denise has a knack for including vintage and salvaged items in her designs!

    You know that we love pallets, so Denise's pallet wall treatment was a huge hit with us!

    Still liking the old grain sack trend…

    This is Denise.Isn't she cute? And we know how crazy it can be working in within time constraints, (thanks to our old buddy Nate Berkus), but she did such a good job! And you better believe that Monica was eying up that gold, framed mirror in the back there. I was pretty sure she was going to ask me to distract Denise while she stuffed it under her sweatshirt.

    Denise worked with Philadelphia Salvage who allowed her to use some amazing old doors for her giant headboard. They were gorgeous, and sadly, already purchased by the time we got there. All of these reclaimed materials made me weak in the knees. Seriously. I swoon over them.

    We were so not prepared to have our pictures taken, and we might have accidentally made it onto the Home Show facebook page. Ha! Check out Monica's ski cap. Love it. ------------------------------------------------------------------------------------------------------------- The Home Show is really a unique experience. It's filled with so many creative ideas that you can use to improve your homes. We were definitely intrigued by The Smart Masker, which claims it significantly cuts prep time for taping before painting. Has anyone ever tried it? With the amount of painting we do between our two households, it might be worth getting one!

    And, oh my goodness, the best part of the entire show was called Clover Market. It was in a section of it's own and was full of handmade jewelry, skincare, clothing and my favorite, reclaimed materials from NYC. We found out that it's an upscale vintage outdoor market located in Ardmore, which isn't too far from us, and has tons more vendors during the spring. We can't wait to go there when it reopens on April 15th!

    Yes, those are skeleton key necklaces in what might be the cutest display ever by Charms City Company. {Love} We had a great time with two of our girlfriends (heck- any time out with your girlfriends is a good time! Especially when it includes lunch at the famous Reading Terminal Market) Thanks so much for inviting us, Denise! ------------------------------------------------------------------------------------------------------------- We'll be doing some fun stuff today for The Nate Show. Stay tuned for more details on all we have planned!

  • Stenciled Faux-Tile Fireplace {Tutorial}

    Stenciled Faux-Tile Fireplace {Tutorial}

    I don't know about you, but I'm itching to Fall-ify my home. You know that"let's get cozy, wear sweatshirts and bring out the pumpkins" feeling? Yeah, I have it. One of the major focal points for seasonal decor in our house is our fireplace and mantel, which I decided to give a little makeover before bringing out my Fall stuff. All it takes is chalk paint, a stencil and a lot of patience. I originally posted this project a few weeks ago over at Infarrantly Creative, but have been dying to share it with you! I can't believe how much I love my fireplace now, and I think you will too.

    I'm not going to lie, this was not an easy project. In fact, it took me at least 6 hours of painting and stenciling, but it was so totally worth! Here'e what you need to do: 1. Prep your fireplace. Remember my peach marble tile fireplace surround that I hated? Yuk. I first painted it with Annie Sloan chalk paint that I got from Shaunna who writes Perfectly Imperfect and sells AS paint, but before I did that, I wiped it down with a damp cloth to remove and dirt, dust and soot.

    2. Choose your paint. I used Annie Sloan's chalk paint in Pure White and French Linen. Man, I am in love with this stuff! It adheres to any surface- even marble!- with no trouble. Just a quick word about fire safety: we don't use our fireplace, so I wasn't worried about whether or not it was flammable, but be sure to check your paint if you have an active fireplace.

    3. Brush your base coat onto the surround. I used Pure White and it took 2 coats to get even coverage. I recruited my hubs to do this part, since, let's be honest, painting trim is not my strong suit and I'll take help when I can get it!

    4. Place your stencil in the upper corner of the surround. Adjust the stencil sheet and check to make sure it's level, then tape it in place with painters tape. If you want to use a spray adhesive (which I didn't), spray it on the back of the stencil and place it down evenly. I highly recommend using the adhesive for this job, because it took me a loooong time to get clean lines without it. (We have an awesome tutorial on stenciling must-haves if you need help with this!)

    5. Begin stenciling. The trick to stenciling without any bleeding is to off-load your brush properly. After dipping into the paint, dab it onto absorbant paper towels, or cardboard until it there is very little paint on the brush. Both my stencil (Beehive Furniture Stencil) and brush are from Royal Design Studio, and they are excellent quality, which makes the job go much smoother.

    I had to do two to three coats for every stencil to get the coverage I was looking for. Words can not express the excitement of pulling back that very first stencil. Go ahead- try it and tell me that's not true.

    Once the paint is dry, realign the stencil, level it and keep on moving! You might want to turn on some music, because you'll be doing this for a while.: )

    At the end of the first night, here's what I had accomplished. Ugh. I saved the hard parts for last. Yippee!

    6, Cut your stencil to fit the corners and edges. Oh, this part is so hard, because as I was cutting my stencil, I was envisioning all the projects I could do with it go right down the drain. But, it's absolutely crucial to cut the stencil if you want clean, crisp lines all the way around.

    7. Touch up any paint bleeds with a small fine-tipped paint brush…or toothpick, in my case. No matter how good you are at stenciling, there will always be some bleeding. It's easy to touch it up with the base paint color and a steady hand. No one will be the wiser!

    8. Finally, wax it and you're done! You'll want to add some kind of protective finish, and I used Annie Sloan soft wax, which was formulated to work with chalk paint. After all that hard work, you'll want a force field surrounding this thing, but wax will have to do.

    Step back, grab a drink and enjoy your pretty new fireplace surround!

    I love love love it, and am already planning a room makeover based on this fireplace!

    If you want a cheap project that will instantly give your room a facelift, this one is for you. Showstopping material, folks!
    -------------------------------------------------------------------------------------------------------------------------

    In other news, if you follow us on facebook (if you don't, you totally should) you know that I finally entered the year 2012 and have a new HTC OneX smartphone. This thing is amazing and I can't wait to share with you how it has made my life soooo much easier, but for now I'm totally loving Instagram, and would be thrilled if you decided to follow me!

    Monica has been on Instagram for quite a while now, but if you don't already follow her, add her to your list too!

    We'll give you lots of sneak peeks at our current projects, as well as fun insights into our daily lives and what makes us tick. We promise.: )

    --------------------------------------------------------------------------------------------------------------------------

    So, is your fireplace screaming for a makeover?
    Would you ever paint it??
    Linking up to: Tutorials & Tips

  • Orange, Gray & Mint Nursery Reveal
    Orange, Gray & Mint Nursery Reveal

    This day seems like a long time coming. It's the first time I've completed a nursery AFTER the baby was born. Ha! (If you missed my baby announcement, you can see it here) Doing this reveal today- October 1st- is sort of ironic, since this is the day I was due! I'm so happy I took my time to finish it because I'm really happy with it! It's not perfect- is any room ever really perfect??-, but it makes me smile and will be a great space for Bennett… when I can part from him.; ) I hope you're ready for a whole slew of pictures. Sit back and enjoy!

    Come on in!

    This room is nothing like I originally envisioned, but one thing that stuck is the color scheme: orange, mint and gray. It's so fresh, bright and a little quirky.

    Isn't that little Bennett burp cloth adorable? My friend Karen from Thread Blossoms made it and I never want to actually use it- it's too cute!

    Free printables are a great way to dress the walls in a nursery- (you can see my round up of fun printables here.) I added the printable on the far left from The Handmade Home, and I love it! The rocking chair has been in my family for years, but I just recently decided to make it work in the space by painting it in Annie Sloan's Graphite chalk paint. The abstract art was custom-made by my cute kids (more on that later!)

    These cube shelves are from Ikea- Monica actually hung them during our first Nate's Crate challenge on The Nate Berkus Show. They totally look like built-ins and fit that little nook perfectly.

    This room doesn't have a closet that we can use, so we purchased an armoire from Ikea to hang some of Bennett's clothes. When you sit in the rocking chair, you kind of stare right at the side of the armoire, so I hung an old print that was in my nursery as a baby, after painting the wood frame in the same graphite as the chair.

    I've had the coffee sign for several years, but I moved it in the nursery because I thought it was kind of funny…if you've ever had a newborn, you know how much caffeine you need!: )

    Oh, the dresser. This dresser is fabulous, isn't it? It was my grandparents and I totally wasn't sold on it at first, but we were trying to do this room on a budget and it was free. Done deal, folks. Now, I am in love with it! I'll share the details in another post, but with some paint and wax and a pop of orange paint on the legs, it was turned into the best part of the room!

    I thought the"Oh Boy" was so appropriate for two reasons: 1) we were having a boy (duh!) and 2) we were taken so by surprise with this pregnancy. It makes such a statement and adds a whole lot of personality to the room!

    I added some washi tape to the plain black lamp shade to add a little interest. Man, I love washi- is there no end to it's many uses?

    Bennett isn't spending too much time in this room yet, but I'm pretty sure he's excited about it!

    I hope you love it as much as I do! Tell me…what's your favorite part?

    jess

    Sources Sheets: Target Rug: Ikea Changing Pad Cover: Babys R Us Dresser Paint: Annie Sloan Graphite & Paris Gray, Dark Wax Giant Letters: Hobby Lobby Dresser light: Target Color-blocked baskets: Target Copper Light on bookshelf: Local antique shop Armoire: Ikea Bookshelf cubes: Ikea Rocking Chair: Hand-me-down Mirror: Walmart Coffee sign: Vintage sign store in OCNJ