I don't know about you, but I'm itching to Fall-ify my home. You know that"let's get cozy, wear sweatshirts and bring out the pumpkins" feeling? Yeah, I have it. One of the major focal points for seasonal decor in our house is our fireplace and mantel, which I decided to give a little makeover before bringing out my Fall stuff. All it takes is chalk paint, a stencil and a lot of patience. I originally posted this project a few weeks ago over at Infarrantly Creative, but have been dying to share it with you! I can't believe how much I love my fireplace now, and I think you will too.


I'm not going to lie, this was not an easy project. In fact, it took me at least 6 hours of painting and stenciling, but it was so totally worth! Here'e what you need to do: 1. Prep your fireplace. Remember my peach marble tile fireplace surround that I hated? Yuk. I first painted it with Annie Sloan chalk paint that I got from Shaunna who writes Perfectly Imperfect and sells AS paint, but before I did that, I wiped it down with a damp cloth to remove and dirt, dust and soot.

2. Choose your paint. I used Annie Sloan's chalk paint in Pure White and French Linen. Man, I am in love with this stuff! It adheres to any surface- even marble!- with no trouble. Just a quick word about fire safety: we don't use our fireplace, so I wasn't worried about whether or not it was flammable, but be sure to check your paint if you have an active fireplace.

3. Brush your base coat onto the surround. I used Pure White and it took 2 coats to get even coverage. I recruited my hubs to do this part, since, let's be honest, painting trim is not my strong suit and I'll take help when I can get it!

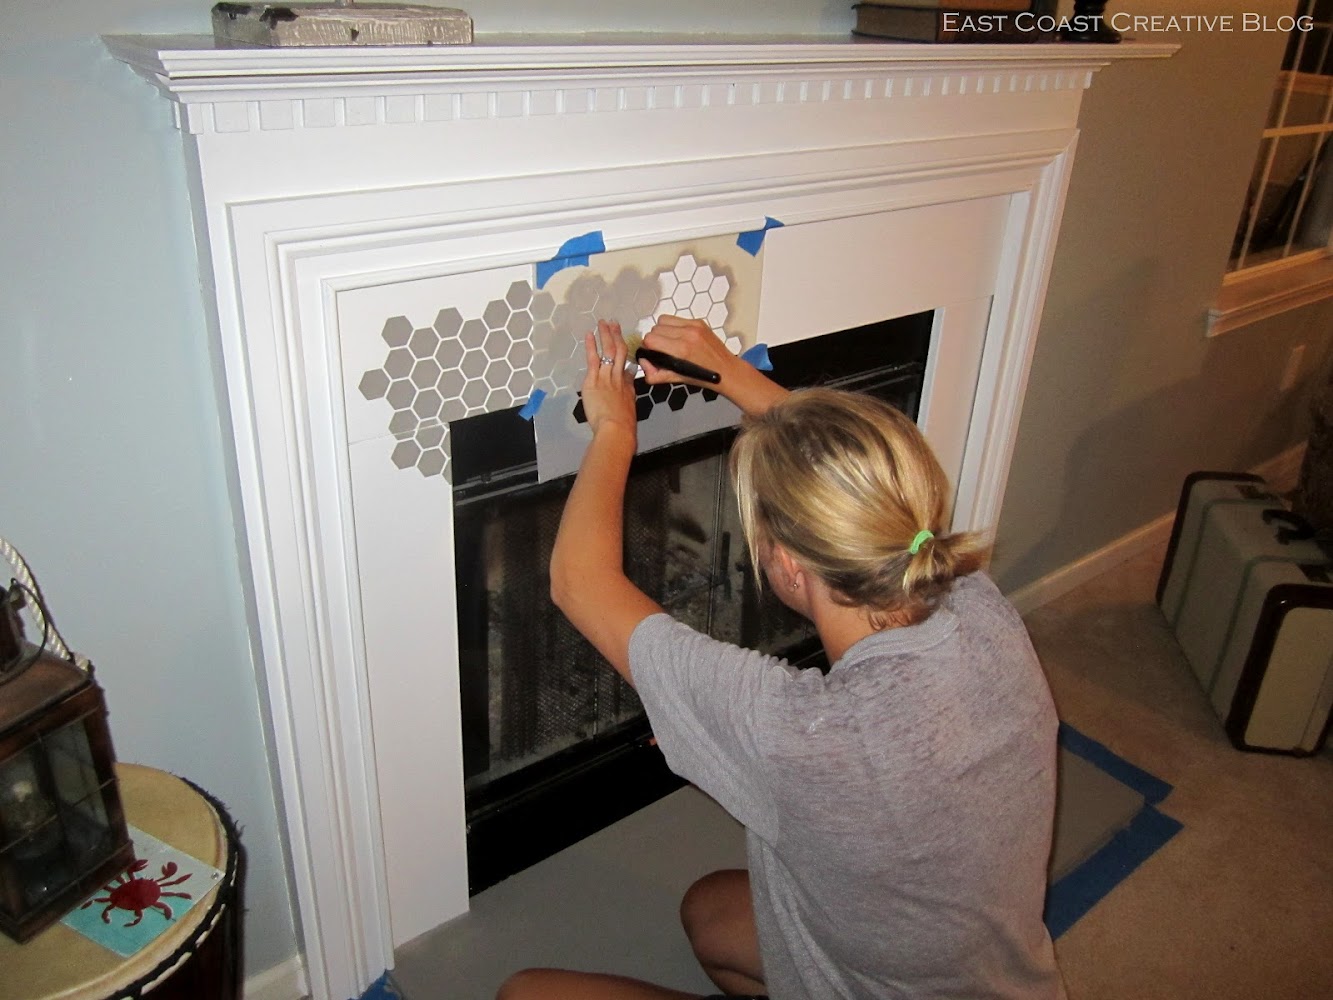
4. Place your stencil in the upper corner of the surround. Adjust the stencil sheet and check to make sure it's level, then tape it in place with painters tape. If you want to use a spray adhesive (which I didn't), spray it on the back of the stencil and place it down evenly. I highly recommend using the adhesive for this job, because it took me a loooong time to get clean lines without it. (We have an awesome tutorial on stenciling must-haves if you need help with this!)

5. Begin stenciling. The trick to stenciling without any bleeding is to off-load your brush properly. After dipping into the paint, dab it onto absorbant paper towels, or cardboard until it there is very little paint on the brush. Both my stencil (Beehive Furniture Stencil) and brush are from Royal Design Studio, and they are excellent quality, which makes the job go much smoother.

I had to do two to three coats for every stencil to get the coverage I was looking for. Words can not express the excitement of pulling back that very first stencil. Go ahead- try it and tell me that's not true.

Once the paint is dry, realign the stencil, level it and keep on moving! You might want to turn on some music, because you'll be doing this for a while.: )
At the end of the first night, here's what I had accomplished. Ugh. I saved the hard parts for last. Yippee!

6, Cut your stencil to fit the corners and edges. Oh, this part is so hard, because as I was cutting my stencil, I was envisioning all the projects I could do with it go right down the drain. But, it's absolutely crucial to cut the stencil if you want clean, crisp lines all the way around.

7. Touch up any paint bleeds with a small fine-tipped paint brush…or toothpick, in my case. No matter how good you are at stenciling, there will always be some bleeding. It's easy to touch it up with the base paint color and a steady hand. No one will be the wiser!

8. Finally, wax it and you're done! You'll want to add some kind of protective finish, and I used Annie Sloan soft wax, which was formulated to work with chalk paint. After all that hard work, you'll want a force field surrounding this thing, but wax will have to do.

Step back, grab a drink and enjoy your pretty new fireplace surround!

I love love love it, and am already planning a room makeover based on this fireplace!

If you want a cheap project that will instantly give your room a facelift, this one is for you. Showstopping material, folks!
-------------------------------------------------------------------------------------------------------------------------
In other news, if you follow us on facebook (if you don't, you totally should) you know that I finally entered the year 2012 and have a new HTC OneX smartphone. This thing is amazing and I can't wait to share with you how it has made my life soooo much easier, but for now I'm totally loving Instagram, and would be thrilled if you decided to follow me!

Monica has been on Instagram for quite a while now, but if you don't already follow her, add her to your list too!

We'll give you lots of sneak peeks at our current projects, as well as fun insights into our daily lives and what makes us tick. We promise.: )
--------------------------------------------------------------------------------------------------------------------------
So, is your fireplace screaming for a makeover?
Would you ever paint it??
Linking up to: Tutorials & Tips