My Creative Blog [Search results for how to make tags

  • How To Make Awesome Hang Tags

    How To Make Awesome Hang Tags


    These tags make great personal touches for gifts, or, if you're a crafty, use them in altered art and scrapbooking projects. If you sell your work, use these as jewelry cards or hang tags for your handcrafted items, as I have done above.
    Supplies needed:
    Manila hang tags 'available at office supply stores, or if you prefer you can cut your own from cardstock. I prefer to use the purchased ones, just because it is more time efficient for me.

    Teabags and hot water to brew some strong tea (or you can use coffee)

    Other Optional supplies & embellishments:
    Spray bottle (optional)

    Ribbon scraps
    Carnival tickets (office supply stores, Walmart, and Party supply stores)
    Misc. ephemera
    Glue stick

    STEP 1
    Brew a strong pot of tea and when cooled, pour it into a medium pot (I keep the teabags in). You can brew the teabags right in the pot on the stovetop. I use about 6 teabags per every 4 cups of water. If you prefer you can use coffee instead of tea.
    STEP 2
    Submerge and soak the manila tags in the cooled tea until stained and saturated. They do not have to be evenly stained. The less-even the stains are, the better. You can either just dip them for a lighter look, or you can allow them to soak for a while for a deeper shade. Experiment until you achieve the look you like.
    STEP 3
    When the tags are the color you like, remove them from the tea soak and lightly blot them on an old tea towel. Next, arrange them on a cookie sheet and bake in a warm oven (about 200-250 degrees F) until they begin to dry. Watch them carefully so that you do not burn them. Then remove them from the oven.

    when dry, your tags should look like this

    STEP 4
    This step is optional, but I like to go the extra mile for the look: spritz the tags with a spray bottle filled with tea or coffee to add some extra, darker stain marks. If you don't want to use a spray bottle you can just randomly drip the tea on your tags. This step helps them look old and worn or grungy: that is the look we are going for. Bake again for just a few minutes until dry and remove from oven.

    I love drip stains on my tags!
    STEP 5
    Embellishing: Once your tags are completely dry you can rubber stamp them with designs. Using the rubber stamp and stamp pad, stamp your tags with whatever designs you desire. Some nice stamps that I like to use are seasonal designs and nature designs. You can stop here and use your tags as-is, or read on for more embellishment ideas.
    For Those Who Want More * Thread a few scraps of ribbon through the hole in the tag and tie for a colorful look (see below).

    Just thread the ribbon through the hole...

    ....and then tie in a simple knot

    I coordinated these earrings to the ribbons to complete the look!
    Getting Fancy
    * Use rubber stamps to decorate carnival tickets, punch a hole in each with a hole-punch and then attach these with ribbon through the hole on the tag (as shown above). Or, if you prefer, use a glue stick and glue the carnival ticket directly to the tag.

    You can buy carnival tickets by the roll

    use a simple, small stamp on the carnival tickets

    a colorful, whimsical look
    A Few Other Ideas
    * Distress the edges of your tags by running the edge of the tag along the stamp pad or by tracing along the edge of the tag with a marker.
    * Add some color to your rubber stamp designs by coloring with colored pencil.
    * Add vintage ephemera to your tags with a glue stick for an altered art look.
    * Good idea: If you're using these as tags for items you are going to sell or as jewelry cards, use the reverse side to write pertinent info about your item (such as materials used, etc), or, stamp the reverse side with a sticker or personalized rubber stamp to advertise your business name and/or website. I had a custom rubber stamp made by Etsy seller terbearco, and I love it!

  • Doggy Style…

    Doggy Style…

    No… I'm not getting all creepo on you… this is a PG blog-Our moms read it! What I'm talking about it this adorable ball of fur that's now a part of the Mangin family…

    I'm seriously head-over-heels in love with her! She's a Bernese Mountain Dog that will be eight weeks old today and she has the sweetest disposition ever! Jess came over to meet her the other day and was surprised at how smitten I am, so she said,"I didn't think you were a dog person?" to which I replied,"I'm not! I just like my dog!" Ha! What can I say? It's true!
    So in honor of Miss Pennlyn (AKA Penn) I'm sharing some Doggy Style projects…
    Four Post Bed… Puppy Luxury! I first saw this bed a few years ago in a Lowe's Creative Ideas magazine, and immediately loved it. I don't think the size will work for Penn, but I love the look and idea of it.

    Source: lowescreativeideas.com via The Real Housewives on Pinterest
    You could also just find a coffee or end table, flip it over and get your DIY on, turning it into a bed. And of course, I'm loving the yellow!
    Crate Bed Since Pennlyn will be a pretty big dog, I'm thinking this style bed is a bit more her speed. I'm loving this DIY bed made by Home Frosting and I can't wait to make one. She used leftover 1x4s, but I think I might use some free pallets. The finish she created is fabulous!

    Source: home-frosting.blogspot.com via The Real Housewives on Pinterest
    DIY Pet Tags Leave it to Martha to come up with these adorable tags.

    Source: marthastewart.com via The Real Housewives on Pinterest
    I was about to order a generic tag from the pet store, but I plan to try this DIY this week before going the generic route. I just need to make sure it's heavy duty enough. I'll let you know how it goes!
    Pet Art I'm not really a huge fan of having pet pics all over the place (remember… not a"dog person") but I do think some pet art might be cool in the kids' playroom.

    This took me about 30 seconds to create on Picnik. I used the"Posterize" effect and voila… Pet Art! I think I'll order it as a canvas this week.
    Hungry Puppy? Since we've only had Penn for 5 days, her food is just in the bag, but I do have ambitious plans to create some kind of cool looking container. The hubs thinks I'm insane and wants to know why the dog food container needs to be cute, but he knows who he's married to, so he's cool with it. Here's one fun idea…

    Source: tidymom.net via The Real Housewives on Pinterest
    The style isn't mine, but I think I could add some of my own modern flair to it. I sorta had something wooden and rustic in mind, so we'll see…
    Custom Stuffies These are the funniest things ever! I think they'd make such an awesome gift! This seller on etsy makes custom stuffies for your pet. Just send a picture of your pooch and you'll get a look-a-like stuffie in a few weeks! I've contacted the seller, because she doesn't have this as an active listing right now, but I'm hoping she'll be back at it soon! Pennlyn definitely needs a mini-me stuffie!
    WAIT! Hold the press! Shevon contacted me and you can now buy a custom stuffie!
    Here's the link: Custom Stuffies (Soooo stinkin' Cool!)

    Source: etsy.com via The Real Housewives on Pinterest

    So, it looks like I have a lot of projects to get working on! Although, before I get working on my puppy projects I think I need to get Penn house-broken and doing fancy tricks (can I teach her how to go get my laptop for me?) I'll keep you posted on Miss Pennlyn and any cool projects we make for her!
    Oh, one last thing… She WILL NOT be owning one of these… Thundervest…No Comment!

    Source: thundershirt.com via The Real Housewives on Pinterest
    Thanks for letting me introduce my little lady to you!

    WAIT! Don't stop reading! The voting for Crafting with the Stars is now open! We've entered our first project and we need your votes. We obviously can't tell you which project is ours, but we can give you a hint… look for the coolest one… that'll be ours! Nah, we really do have some stiff competition, so head over and vote for your favorite 3 projects. The winners will be announced Wednesday. Thanks! Click HERE to see the entries and vote!

  • {Grow}

    {Grow}

    I can't really take credit for this post… I have my awesome husband to thank for making me realize that tracking our kids' growth is really important and special. I don't have to tell you that kids grow up way too fast… I'm pretty sure I see a mom a day posting something on Facebook about their kids growing up too quickly.
    Since we can't do anything to reverse the growing process, I figure we should embrace it and take tremendous joy in watching our four children grow (even if it seems to be right before our eyes.) So of course, we take about 1500 pictures a month of our kids (I plan to fill my retirement years with sorting through millions of jpeg files), but one other thing we started about 5 years ago is measuring our kids. We celebrate and measure on birthdays and half birthdays! It's amazing to see how much growth and change there can be in 6 months and, of course, our kids love that we know their 1/2 birthday and make a big deal out of it.
    So this is where Eric comes in… You may or may not know that I struggle with anything to do with routines, organization, and all that mom stuff… Enter the Outlook Reminder! Eric simply sends me a reminder that goes off on each of the kids' measurement days and voila…semi-organized mom!

    We recently moved into our new home and we weren't sure what to do about the measurement door. We knew we could replace the door and take it with us, but it was a weird size door, so that seemed silly. So, we ran a big risk and just took a million pictures of it so that we could transfer the measurements to the new house. We moved in and initially thought we'd put them on another door frame or somewhere in the master bedroom, but then I decided I wanted it to be more a part of our home. I had a plan in my mind, and thanks to Uppercase Living was able to order numbers and make my plan a reality.
    This is in our 2nd floor hallway… We all walk past it every day and from the foyer below you can see the pictures and the M.

    I'm not usually one for artwork with phrases for living, but I saw this tree art at a store in New England and something about it really struck a chord in me. I decided it might not be my style, but the words (I'll stick them in a comment) are simple and something I'd like my kids to read and to see for the next years of their lives. The M was gold from Hobby Lobby, but a little spray paint and she was perfect. The line is just painted on the wall with leftover grey (of course) paint.
    Worked from the photo of the old door… I had close-ups too…

    I love comparing the kids and how tall they were at certain ages… Kaden was about 1 1/2 inches ahead of Kenzie when they were both 5 1/2… Of course that earned some bragging rights!

    The finished product. I've had the chart on the wall for months, but just finally added the measurements this week and, since I did, the kids have been checking to see if they've grown, and have been reading all their measurements. I'm so very happy with the results… even if there are dirty little fingerprints all over it already!

    Even though I have my growth chart already made, I scoured the web to find some of the coolest options for under $100. Most of these are around $60 and would be something really special to add to your home. Even if you've been using a door frame or closet that no one sees, maybe consider transferring it over to a place that your kids and company can enjoy!

    This Miss Natalie jute cloth measurement kit is adorable. This one is super popular, but I think the paper tags would become part of one of Kira's next craft projects!  Miss Natalie Heirloom Growth Chart

    This modern, bold design would make a huge impact on a room. Oh, it also comes in 40 colors! Love it! Etsy Modern Growth Chart

    Add a little whimsy with a modern tree and a little bird ByrdieGraphics on Etsy

    These simple charts have a European flair and I love how the numbers get larger as they go up… Measure Me Stick

    The measurements are in Metric and English Units, which I think adds a little something… I also lean towards modern lines, so this one appeals to me. (slight confession… this one is over $100, but I liked it too much not to include it!)

    Cute for a child's room or playroom Woodland Growth Chart

    Believe it or not, this is a DIY project. Here's the link and everything is free and printable. Score! Coolest DIY Growth Chart Project

    I'll finish this rather long post with a little poem by Dianne Loomans. Yes, kind of unlike me, but it made me stop and think about my role as a parent because before I know it they'll be all GROWN up…
    If I had my child to raise over again I'd build self-esteem first and the house later I'd finger paint more and point the finger less I would do less correcting and more connecting I'd take my eyes off my watch and watch with my eyes I would care to know less and know to care more I'd take more hikes and fly more kites I'd stop playing serious and seriously play I would run through more fields and gaze at more stars I'd do more hugging and less tugging I'd see the oak tree in the acorn more often I would be firm less often and affirm much more I'd model less about the love of power And more about the power of love.
    So whether you make a growth chart or not, still take a moment to stop today and just enjoy the little people God has allowed you to grow for Him.

    Tip Junkie handmade projects

    Let’s Really Support Each Other:
    Linked up to: The Creative Girl Sumo's Sweet Stuff

  • Monster Mash Candy"Bowl" with Martha Stewart Crafts

    Monster Mash Candy"Bowl" with Martha Stewart Crafts

    We might have come up with a way to ensure that your house is the coolest on the block this Halloween… At least it would get my kids' vote!

    The Monster Mash Candy"Bowl" is SO NOT your Mama's Candy Bowl! It's a fun way for trick or treaters to choose their own candy or a treat- If they can get past our silly monsters!
    Monster Mash Candy"Bowl" Tutorial
    We were quick to respond YES when Martha Stewart Crafts asked if we wanted to be part of a creative Halloween Team. We love Martha and her products, so it was a no-brainer. Then we had to come up with a creative idea and honestly this one just popped into my head. I was at dinner, so I ran the idea by my board of trustees (AKA my 4 kids) and got their seal of approval.

    The fun thing about this project is that you can totally customize it any way you'd like to, but I'll give you the 411 on how I did things.
    I started on the chalkboard wooden labels first since they'd need to dry.

    I used Martha's Multi-Surface Pearl paint on the wooden plaques that I picked up at Michael's for 79 cents. I'm not making this up, I really was amazed at how smooth the paint was. It probably was a combo of a good brush and good paint, but I actually begged the hubs to come look at how smooth this paint is! Shockingly, he wasn't nearly as excited as I was.
    I then used chalkboard paint on the mini wood tags that I also grabbed at Michael's for 29 cents. Score!

    Once everything was dry, I used hot glue to attach the two together. I planned to use chalk to label the plaques, but for pictures a paint pen worked better.
    Next, it was time to make my monster mouths on the presentation board.

    I bought a foam core presentation board because I think it's easier to work with than the cardboard ones. I traced my circles with a bowl and then cut them out using a utility knife (that manly hand is not mine, the hubs was my helper on this project- just FYI!)
    Once we had holes, it was time to bring my monsters to life.

    I went with really big googly eyes so that Mr.Monster looked fun and silly and not creepo for little kids. I bought a sheet of foam for the teeth and varied between pointy fangs and chunky square teeth. (The teeth were Jess' brilliant idea when I was brainstorming my project with her! It's awesome to have such a creative BFF.) I used hot glue to adhere the eyes and the teeth were also hot glued, but to the backside of the board.
    Martha has an awesome collection of cardboard stencils and as soon as I saw the triangle, I knew we needed a pennant banner.

    I traced and hand cut the pennants onto cardstock. I used our Silhouette to cut out my letters and just used some good old Elmer's to put it together. I knew from the start that I wanted to have fun, white lights illuminating my Monsters! I was talking to my hubs about a time (a long time ago) when I used a display board with lights to write him a love message and he totally was like,"Umm that must have been some other husband. I don't remember it at all!" Ha! Glad it made such an impact on him. In his defense, I do think it was about 10 years ago.

    To add lights, we just predrilled holes for each light bulb. We had to try a few bit sizes before getting one that was just right. You want it big enough to fit the light, but tight enough to hold it in place. Once your holes are ready, just pop the lights through the back side.
    Then we were ready to fancy it up a bit…

    I used more of Martha's stencils and paint to add a skinny chevron at the bottom. I also added some fun details to my monsters accessories. The neon green paint is such a fun color and my kids told me it was cool. (Cool mom points for me!)
    And what would a candy"bowl" be without candy??

    I divided up my candy and hot glued the bags to the back of each monster mouth. In retrospect, I might swap them out for larger, brown bags so I don't have to refill it 24-7, but this let you see what was in the bags. I've had my kids try this out and it's really simple to get your hand in and out with your loot. The glue is holding up well too. I made sure we banged it around a bit as a trial.
    While I was planning this project I started thinking about what choices to give kiddos. I went with 3 traditional candies and then added glow stick bracelets and one mystery choice, which is actually little plastic spiders (from Target dollar bin. $2.50 for 250).
    My kids don't have allergies, but so many children do, so I thought this was a thoughtful alternative.

    I hope our Monster Mash Candy"Bowl" inspires you to try something new this year. We had so much fun working with Martha Stewart Crafts to make this and we're counting down the days until we can use it!

    I'd love to know what you think of our idea? Would your kiddos think it's cool?

    • Facebook: http://www.facebook.com/InspiredByPlaid
    • Twitter: http://www.twitter.com/PlaidCrafts
    • Pinterest: http://www.pinterest.c o m/PlaidCrafts
    **This was a sponsored post in partnership with Blueprint Social and Martha Stewart Crafts. All opinions are still 100% legit and ours! ** ;

  • Blogging 2 Better Summer Challenge

    Blogging 2 Better Summer Challenge

    We've been keeping a secret from you. And it's a good one. But don't worry! We're about to let you in on it…ready??…ok, here goes: Six weeks ago we asked several amazing bloggers to join with us in a collaboration group we called Blogging 2 Better. We're a bunch of like-minded home, DIYand crafting bloggers that want to learn as much as we can about blogging, while also sharing ideas, encouraging one another and sharing each other's awesome projects as much as we can. We're so fortunate to be part of a blogging community that encourages sharing! (If you write a blog, we strongly suggest getting a group of girls together to learn from. No one understands all that blogging entails except for other bloggers! You can find more about that in our Part-Time Blogger series here.)

    Anyway, these girls are really, truly talented and it was a lot of fun getting to know them better. For our final week, we had Beckie from Infarrantly Creative give us a list of materials that we all needed to incorporate into an awesome project. It's like our version of a Nate's Crate Challenge! Woohoo! And today is the day we get to see what everyone's been up to!! Once you finish taking a look at what we created, make sure you hop over to the other gal's blogs to see what they made.

    Here's the list of the supplies from Beckie:

    And here's what we came up with:

    We struggled to come up with a clever name for it, but basically it's a rustic/industrial storage bin. A very easy project that turned out adorable, if we do say so ourselves. You know we love a good pallet project (we've done several here and here), but we also keep loads of barnwood on hand, too. We picked one that was already the perfect length (yay! no extra cutting required!)

    We also scored these three wire bins at HomeGoods for four bucks a pop! We didn't love the color, but knew immediately that this is where we could use coral! We spraypainted them with Valspar's Hacienda Tile- the perfect coral.

    Next we found a font that we liked and printed number 1 through 3 large on regular, old paper. With a pen, we traced the number while pressing down to leave the outline on the barn wood.

    Have you tried paint pens yet? They're so easy to use, but they still looks like paint. We carefully filled in the stencilled numbers with a black Sharpie paint pen.

    Once the paint on the bins had dried, we brought them in and laid them down in front of the wood to determind the placement. We measured the board, divided it into thirds and then marked where the hooks would go.

    Monica drilled pilot holes where we had previously marked and then we screwed in the eye hooks …Six hooks for three baskets.

    Then I gently sanded down the numbers to distress them a bit.

    Monica whitewashed the entire board with a mixture of paint and water to give the piece a little more depth. (Side note: working as a team makes the project go faster! We're so fortunate to have each other.: ) (I totally Agree! -Monica)

    The last step for the wood piece is to add a coat of water-based polyurethane (water-based won't change the color of the wood!).

    To hang it, we took chain, cut it to the length we wanted with wire cutters and screwed threw one of the links directly into the wood. Make sure your screw isn't so long that it goes right through to the other side!

    Then we hit a creativity wall. Booo. We could not for the life of us figure out how to incorporate fabric into this project. We toyed with lots of different ideas, but finally decided on a cute hanging pendant banner for one of the baskets. Recently we came across a shop called The Finest Kind and we couldn't get over how cute their stuff is! We decided to purchase three of their typographical tags to use on our pendant. You'll probably catch the significance: EC2.: ) First, we spraypainted the little cuties blue.

    Next, we took apart three 2x3 frames so that we could use the cardboard backing. Wierd, I know, but there's always an untraditional use for everything!

    We wrapped the fabric around the cardboard and mod podged it right on.

    Before the Mod Podge had dried, we stuck our tags on, and voila! An adorable pendant honoring our blog for the basket!

    We were thrilled with the finished product, and it has now made it's home in my dining room. And just so you know, it totally inspired me to rearrange my living room and gave me the motivation I needed to start our dining room makeover!

    To be completely honest, we liked this project better without the fabric banner, but do think it makes a super cute accessory!

    And now for the REALLY fun part! We were so excited to see what our blogging buddies came up with using the same materials, and they did not disappoint!

    Please stop over at these amazing ladies blogs to see what their projects. Share the EC2 love with them and tell them we sent you!
    Clockwise from top right:
    Kim from Sand & Sisal: Surfboard Pallet Art
    Brook from Being Brook: Fabric Wall Map
    Allison from House of Hepworths: Dangle Earring Frame
    Jenna from SAS Interiors: Monogrammed Chevron Pallet Tray
    We had SO much fun putting this project together and consider ourselves lucky to be in the company of these awesome bloggers. If you don't already follow them, shame on you! But it's not too late, go ahead and do it now.: )
    We want to know: What would YOU do with those materials?

    ** And if you're loving up all the wood ideas, this one is one of our favorites! Check it out!

    **If you're visiting from one of the other bloggers' projects, thanks for stopping by! If you like what you see use the links below to stay up to date with all of our projects and ideas!

    Follow Me on Pinterest
  • ByeBye Picnik… Hello PicMonkey!

    ByeBye Picnik… Hello PicMonkey!

    You've probably heard by now that Picnik has been taken over by the ants! On April 19th it will be gone and that was going to cause a major issue for this blogger. We relied on Picnik for all of our editing and for creating collages for our posts. Boo!

    picmonkey 3

    We’d heard that many of Picnik’s tools would be moving over to Google+, and while that at least kept me from hyperventilating, it still didn’t leave me too happy. (Tip Junkie has a good post on using Google + to edit pics) Then I heard a rumor about some new program that was in the works that was going to be completely awesome and nicely fill the void in my heart that Picnik had left. I waited anxiously, and finally got the email that it was ready!

    email

    Let me tell you, it took me all of about 5 seconds to start my little “PicMonkey is awesome and saved the day dance!” The creators are actually some of the original Picnik crew that knew that there were lost souls wondering how they would ever photo edit again.

    19

    PicMonkey replaces Picnik

    picmonkey 1

    The functionality is really similar and so far I haven’t seen anything I didn’t love. Let me give you a little tour. A few things right off the bat… "Collage and more” are coming soon, so that’s one thing I’m still waiting on, but I’m already sure it’s going to meet my needs just fine. Another cool thing to know is that for a limited time the premium features are being offered for free- sweet! Okay, so I loaded up a picture of our Nate Show dresser turned buffet and got to work comparing the two sites. Basic Edits- You have the exact same basic edits, even in the same order, just with some funky-fun images on the sidebar. They were super simple to use and that made me happy!

    basic edits

    Effects- One of my favorite things about Picnik was the fun, easy to use effects. Have no fear… PicMonkey is here! All my favorites and a few more were there for the takin’! Applying effects is done exactly the same way, but no Mr. Frog staring you down anymore.

    effects

    My favorite effect is Cross-Process, so of course I gave it a try on both sites and was over the moon to see it worked perfectly!

    cross process

    PicMonkey also had an effect that caught my eye… Cinerama. I love it! Look how cool our buffet looks now!

    9

    Text- The text feature works perfectly, and although there isn’t as large of a font selection on PicMonkey yet, I’d bet money that there are more fab fonts coming soon!

    text

    Stickers- Not like little kid reward stickers, but I do think those are fun too… We use stickers for all kinds of graphic design work. Layer them up and it’s amazing what you can create. Similarly to the text options, the stickers are limited at this point, but I imagine we have big things in store for us!

    stickers

    One thing I’m hoping for is a huge selection of tags and fun shapes. In Picnik I used to use the Christmas tags whenever I wanted a fun header. So far I didn’t see anything comparable in PicMonkey, but perhaps I’ll leave a request on their Facebook page.

    18

    Frames- Last but not least, I wanted to make sure all my frames were intact! And by now, you’re probably seeing a trend… they had them all (okay, almost all, they didn’t have camo, flowers, or Christmas lights etc., but honestly I’m pretty happy about that.) They did have Polaroid, which I don’t use much, but I do love!

    Frames

    You might be wondering about some other features, but I’m not going to give you the play-by-play for every single tool, so head on over and give PicMonkey a whirl. I have a feeling you’ll be pretty happy. My hubs was slightly weirded out by the fact that I was dancing around our kitchen, making up songs about how PicMonkey saved the day!

    bye hello

    Let us know what you think of the new site… did it produce any kitchen dances for ya?

    Monica


    If you aren't connected with us on Facebook, we'd love you to!
    We use it to post all kinds of cool ideas and to connect with all of you!

    A to Z TipJunkie Skip to My lou Craftomaniac

  • Do you Vista?

    Do you Vista?

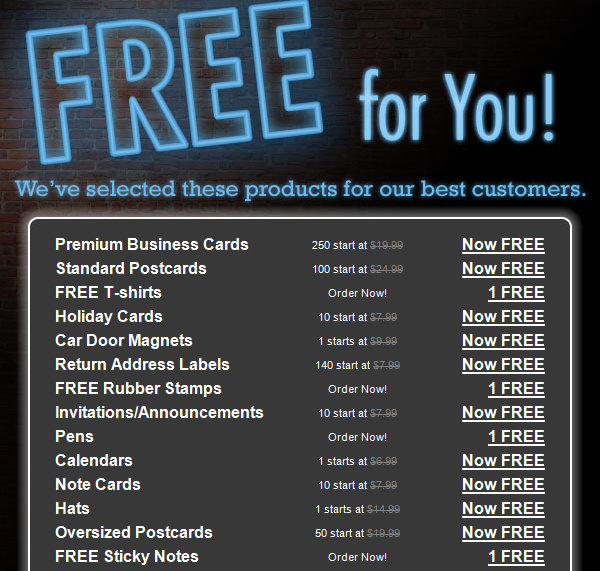
    Okay, so two years ago Vista Print entered my life… yes, it sounds dramatic, but man, it Rocked My World! Maybe you've heard of Vista, and maybe you know you can get FREE pens and oodles of business cards, but that really doesn't excite nor apply to you. Well, I'm hoping that some of these ideas will get you almost as sold on Vista as I am (and no, I don't get commission- lol.)
    Ok, so with Vista Print, you sign up for their emails (and yes, you'll get a lot, so don't use your everyday email address unless you want to. I have one email account for all my"junk" emails I subscribe to and one"real" account that I use daily) Every few days, Vista will send you FREE products you can order- you only pay shipping. There are 3 shipping options, so the price is decent and totally worth all the products you'll be getting for free!

    Now onto the fun part… what you can create in Vista! The suggestions I'm giving in this post were all made without using Photoshop or any professional design programs. Vista has designs to choose from or you can create your own and upload a completed design. I do a lot of both. Idea # 1- Mommy Cards These little cards are perfect for the playdate lovin' mom. Keep them in your purse and when your child makes a friend at the local park, you can give new friend's mommy one of your super-cool cards so that you can meet up again. If you're like me, you've jotted down a mom's cell number on a scrap of paper, only to completely lose it and then feel awful that you never called. 250 Mommy Cards Printed as business cards = FREE!

    Idea # 2- Shower Invitations You don't need to pay insane prices for cool, trendy invitations. Get ideas online and then design your own! Baby Lucas (after Luke Skywalker) was due to arrive last summer and of course we needed fabulous Star Wars invitations for our Star Wars themed Shower. The pictures were simply pulled from Google Images and the font was free online. 50 Invites Printed as Oversized Postcards = FREE!

    (sorry for the blurry parts, but I wanted to get rid of the personal info) Have I mentioned I have the best, most super-fun friends ever?

    Idea # 3- Children's Birthday Parties I haven't bought an invitation in two years. Small postcards, large postcards, notecards, or invitations can all be used to create your invites in Vista. This is Kenzie's Spa Party invite. She had so much fun helping me design it! This one was one-sided, but the back can be personalized as well. We put them in 5x 7 envelopes and voila! I only needed 10 invites, but 100 were Free, so we have lots to use as scrap cardstock. 100 Party Invitations = FREE!

    Idea # 4- Christmas Cards Can you believe how much Christmas cards have changed in the last few years? Gone are the days of the painted, snowy scene cards and in are awesome photo cards and more! The only problem is that it can cost a small fortune to send the nice photo cards to everyone. These were our Christmas Cards from 2009. I used Picnik (free editing software) to edit our pics, create a collage, and add some bling; and then I uploaded it onto the oversized 5 x 7 postcards.

    I think my favorite part was that I could fully customize the back and had plenty of space to say exactly what we wanted to share. Another bonus was that I could mail them as postcards and didn't need envelopes. Score! 100 Christmas Cards (2 orders of 50) = FREE!

    Idea # 5- Kids Pretend Supplies Last Christmas I used Vista to put together a Vet Kit for Kenzie. She loves animals and loved playing vet, but she was getting a little"old" for typical pretend play. So, we made pretend"cool" again by giving her a present of real vet supplies. Her vet supplies included: a Pet Vet Poster, a personal stamp, business cards, a personalized pen, a tote bag, stationary and printed forms (I went online and grabbed a basic vet form.) She LOVED it and had so much fun playing vet again, since now it seemed a bit more grown up. You could do this for anything your child is into… Doctor, Builder, Photographer, Ballerina, etc. Oodles of Pretend Play Supplies = FREE! Pet Vet Poster

    Personal Stamp

    Idea # 6- Totes for Everything I mean everything! Every time I put in an order I add a tote (umm they're free, why not!) Here are some ideas: Library Book Tote, Sports Tote (the one below was for Kenzie's cleats, shinguards, and water bottle for soccer.) Books for the Car, Snacks for on-the-go, Sleepover Bag (sized just right for one night and you could write something cute on it), Pretend Shopping Bag. What ideas do you have? Share them and I'm sure I'll order one! Everything Tote Bag = FREE!

    Idea # 7- Gift Tags These are just business cards repurposed into gift tags. I used these for Christmas presents and they matched so well. I used a hole punch in the corner and attached them with coordinating ribbon. You could also make some non-holiday tags to have on hand. You could even make a set from each child for all the class birthday parties. My kids love when I have things personalized. To: _____ From: Kaden. I haven't done that yet, but I will be soon! 250 Gift Tags printed as Business Cards = FREE!

    Idea # 8- Teacher Gifts Want a great, personal gift for a teacher? How about giving them a collection of coordinating, personalized supplies? Hit up Target's dollar bin for a cute container and your gift will be the talk of the teacher's lounge! Here are some items that you could include: notepads, sticky notes, pens, postcards, notecards, and more! I plan to do this for my kids' teachers this spring, so I won't give all my ideas away, but stay tuned for some inspiration! Personal, Thoughtful Teacher Gifts = FREE Notepad with magnet on the back

    Matching sticky notes

    Phew… that was a long post, but hopefully at least one of these ideas made you ready to jump in and give VistaPrint a try. I promise you'll be hooked! Use this link to sign up for Vista today and be sure to share your creations with us!

  • The Presence of Presents!

    The Presence of Presents!

    Mother's Day, Father's Day, End of school, and graduations… This is present season baby! Now, I know it's tempting to just hit the dollar store and buy a gift bag and tissue paper, but an awesome wrap job goes a long way. Perhaps it could be said that I have two fetishes in life… sneakers (I seriously can't get enough!) and wrapping paper. I might be one of the only people that have asked for wrapping paper as a birthday present. I was so excited to open rolls and rolls of it a few years ago!
    So, let's ditch the dollar store and check out some fabulous ideas for prettifying your gifts. It only takes a few more minutes and it will really let the recipient know how much you care!
    #1- Yarn Embellished Presents I love the rainbow effect and the tiny little knots. Kids could totally help with this technique!

    Source: thingsbright.com via Monica on Pinterest
    #2 Map Wrap How fun and modern is this? I think the small scale ribbon is a must and adds just the right finished touch. How cool would it be to wrap a high school graduate's present in a state map from the college s/he is headed off to?

    Source: marthastewartweddings.com via Monica on Pinterest

    Source: thecraftingchicks.com via Monica on Pinterest #3 Monogram Tags & Newspaper These tags are adorable and would be so simple to make with your printer. The baker's twine is really popular right now and much cheaper than ribbon. The newspaper is really easy to work with and makes the red accents really pop!

    Source: thecraftingchicks.com via Monica on Pinterest
    #4 Picture Presents It's no surprise this adorable idea is from the queen of craft… Martha Stewart. Tell me grandparents wouldn't LOVE a present wrapped like this…

    Source: marthastewart.com via Monica on Pinterest
    #5 Fabric Wrapped I have tons of scrap fabric that could be used to wrap! This idea would be especially helpful for those oddly shaped presents that are impossible to wrap. You can knot the top or tie it up with some ribbon.

    Source: wedfully.com via Monica on Pinterest
    #6 Tissue Paper I first was inspired to wrap with tissue paper when I was at a Christmas wrapping party and watched my friend Patty turn a present into a masterpiece! Granted, she only wrapped one present in about an hour, but it was one rockin' present! I think that layering is the key when working with tissue paper.

    Source: fig2design.com via Monica on Pinterest

    Since I have A LOT of wrapping paper, of course I needed a wrapping area. This is my favorite wrapping station in all of blogland…

    Source: pixiesdidit.com via Joia on Pinterest
    I've loved it for years and only wish mine would look anything remotely like this (I'm not neat nor organized enough… it would always be a mess!) Here are a few other ways to store your paper (just in case you develop a fetish like me!)

    Source: realsimple.com via Kimberley on Pinterest

    Source: chicspacesforlittlefaces.com via Amy on Pinterest
    So, with Father's Day this weekend (I hope you didn't forget!) maybe you can try out a new wrapping technique… I promise you'll love it!

    PS- If you win one of Bethany's Blossom Bands, maybe you can wrap it all fancy-schmancy before giving it to your little one! Make sure you've entered the giveaway… check out Tuesday's post for all the details!

  • Favorite Things Party Recap

    Favorite Things Party Recap

    Before we get into today's post, we wanted to take a minute to stop and express our extreme sadness over what happened in Sandy Hook Elementary School on Friday. We know that the Lord is close to the brokenhearted, and we pray that that is true for every person affected by this tragedy. Please keep those sweet children and their families in your prayers as you go through this holiday season and beyond. If you'd like to help in some way, you can donate here. Psalm 34:18 The Lord is close

    to the brokenhearted


    and saves those who are crushed in spirit.
    -------------------------------------------------------------------------------------------------------------------------- A few weeks ago we filled you in on one of our most-anticipated holiday traditions: a Favorite Things Party (we even explained what we do in a fun video which revealed that we really are dorks). To make it even easier for you to host your own, I created this adorable chalkboard-inspired printable invitation.

    Well, because our girlfriends have such great taste, a recap of all the gifts is in order, don't you think?! You know Monica and I can't resist creating pretty things, and our gift packaging was no exception. Let's take a peek: Monica's Gift 

    Monica used the fun wrapping accessories she talked about here. Each girl got a mason jar of"Melted North Pole Snow" and a striped paper bag with a super cute wood tag. I'm not going to tell you what her gift was yet, because she's going to show you later this week. It's a good one, friends. Definitely worth the wait.: ) Jessica's Gift

    I wrapped my gifts using paper from Target (is there any other store?!), gray and white bakers twine and little paper tags that I hand-stamped with my mini alphabet stamps. Lest you think they were perfect, take a look at Monica's tag.

    Haha. Oops, ran out of space, and then the dog licked the tag and smeared it.: ) Our Girlfriend's Gifts 

    Before we open any gifts, we go around and guess what we think each girl brought. It's fun to see how well you know each other. It turns out that I don't know them very well I'm a bad guesser. Without further ado, here is our list of favorite things from our closest gal pals to you! 

    1. Our most stylish friend, Jane (sorry everyone else!) brought homemade Candy Cane Sugar Scrub. I don't what recipe she used, but I found a recipe you can make for yourself here. She also gave us Eos Lip Balm, which is fabulous if you've never tried it. 2. My gift was so random. It included Brownie mix, because I'm obsessed with the batter. True story: I bought 6 boxes (one for each girl), but the night before the party I got hungry for brownie batter and used one of the boxes. My poor sister got jipped that night, but I made sure to buy another box for her later! Good thing she loves me anyway.;) I also gave Maybelline Illegal Length Mascara which I shared my love for back here. I totally dig that stuff. 3. My sister Chrissie's most favorite thing is getting a large Diet Coke from MacDonald's whenever she can, so we all got a gift card to Mickey D's, along with her favorite candy: Reese's. Her gift wins as most unhealthy, but also the most yummy!

    4. Lindsey, our tell-it-like-it-is-friend (which we love, by the way!) gave us some pretty pink lace undies from Aerie and her most-used spice: Tony Chachare's Creole Seasoning. She promised us she'd give us her famous jambalaya recipe, as well. (I haven't forgotten, Lindsey! I'm coming after that recipe!) 5. Steph, our socially-conscious, health food-nut friend, (remember last year? She gave us Spelt flour. Hilarious) gave us her favorite bag from Worthwhile Wear, the company she and her husband started to help save women from human trafficking. Most meaningful gift for sure, but super cute and functional, too! 6. Jane, the sweet, sensitive and ultra-caring book junkie, gave us an Amazon gift card in a handmade card, which just made my day. I love downloading books to my kindle, and now I can do it without feeling guilty! 7. (Or 8, if you look at my picture above. I clearly can't count correctly) was Monica's gift, but like I said, you'll just have to wait to see that one!

    Sadly, we didn't get a group shot of the seven of us, even after I made an announcement that no one could leave until we had done so. That's two years and counting that we have more pics of the presents, than of our friends. Boo for us. There's always next year, I guess!: ) So, if you came to our party, what would YOU bring?

  • Favorite Things Party

    Favorite Things Party

    After being inspired by Hayley, I hosted a Favorite Things party with 7 of my best girl friends last night. I asked each of them to find their favorite thing under $10 and wrap it up; one for each girl, as well as a favorite appetizer or dessert to share. We had so much fun that I completely forgot to take any pictures of my friends, but of course, we got a few of the goods!: )

    Both of us had fun wrapping our gifts up pretty. I printed my adorable {free}tags from Jones Design Company and they were the perfect addition to my gift. Can you guess what our favorite things were based on the packages?

    There was such a wide variety of favorite things, which made it that much more fun! Each girl wrote what she thought the other one brought and then we revealed our guesses just before we opened each gift. Some guesses were really accurate, and others were waaaaayyyy off. (Based on the packaging, I guessed that one of my friends brought trash cans, but really it was a tub of popcorn!) So what were our fav things? (Clockwise from top left corner.)
    1. Homemade Iced Coffee with the fixin's & a Starbucks gift card. Jane used this recipe from The Pioneer Woman, and let me tell you: it was awesome! And that's coming from a non-coffee drinker.

    2. Mrs. Meyer's Basil Hand Soap. If you guessed that this was mine, you were right! I've already gone on and on about my love for Mrs. Meyer's, so I'll stop now. 3. A thermal"sippy cup" for adults. Don't call it anything else or Jane might bite your head off. 4. Popcorn in a Christmas tin. Man, we used to get loads of these from my dad's co-workers etc. and so this brought back memories of eating more popcorn than is legally allowed. 5. J.Crew t-shirt and Land O' Lakes Mint Hot Cocoa. Yes, it's good to have friends with good taste, folks. 6. Spelt Flour. A bit unusual, but my friend Steph is unusually passionate about the stuff. 7. My sis made her famous Puppy Chow, because, duh, it's peanutbutter, chocolate and powdered sugar. Everyone's favorite mix! 8. Monica's gift was chocolate chip cookie dough and a pair of tight-fitting ankle socks. She actually buys the children's sizes because she's so particular about the fit. And you wouldn't believe how much cookie dough we consume in a year. It would probably break a record.
    Of course, we had great food too! A yummy hot chocolate bar:

    And I also made Cheddar Bacon Ranch Bread (aka Crack Bread) that is absolutely to die for. I'm sorry, but if you don't like this, your taste buds must not be functioning correctly. This has been my go-to appetizer lately. No joke- I've made this 3 times in the last 4 days, and it never fails to please.

    I'm so thankful for good friends and sharing the little things that make us happy. I'm adding this to my list of annual traditions!

    Pin It
  1. Just Contemporary Review — Audrey, Wait! by Robin Benway
  2. Memory Monday — A little bit different today
  3. Just Contemporary Review — Virtuosity by Jessica Martinez
  4. Just Contemporary Week 2 — Contemporary Roundup
  5. Just Contemporary Review: I Wanna Be Your Joey Ramone by Stephanie Kuehnert