I love to strip for photos. No, no. That's partly true not what I meant to say at all. I love photo strips. There, that's a little better. Does anyone else LOVE those old black-and-white photo booth pictures you get at the beach? They're so simple, but I can't get enough of them. This past weekend, my fam was at the Jersey shore, and we managed to squeeze the four of us into an ancient photo booth for our not-so-yearly tradition, which I am determined to make into an annual thing. I'm starting with these:
I know I want to do something cute and fun to display these pictures, but was feeling uninspired. Cue the worldwide web. Believe it or not, there weren't many great ideas out there, but I did find a few that got my juices flowing.
Source: my-mania.eu via Jessica on Pinterest This is soooo much fun. I'm not sure I'm brave enough to enlarge a picture of my face 70x. Trust me, too much pixelation is not a good thing for this girl.
Source: younghouselove.com via Jessica on Pinterest John and Sherry at Young House Love put all their photobooth pics (which they take on the day of their anniversary) into a glass so guests can take a look through while hanging out.
Source: nyctaughtme.blogspot.com via Jessica on Pinterest This is a super interesting detail on a regular door at the end of a hallway. Love that it immediately draws your eye to that door. Again, enlarged photo + me = not pretty.
Source: storageandglee.blogspot.com via Jessica on Pinterest This is pure craziness. Who has that many photobooth pictures? Someone with waaaaaay too much time on their hands, if I may be rude enough to say. Still, it makes me happy to see those bad boys displayed so proudly.
Source: younghouselove.com via Jessica on Pinterest This last one is definitely more my speed (again from Young House Love). So many things going on here that I adore: light walls and white frames, and organic gallery wall with photobooth strips included! I see a trip to Ikea for frames in my near future.
Ikea So, here's what I've come up with so far. I'm not quite finished, and still haven't decided on a location for these frames, but I think they're coming along nicely. (WARNING: The next few pictures are very bad quality. This is what happens when one very tired blogger tries to blog way past her bedtime. Forgive me, please?!)
I started with two of these frames. I know, they're terrible. And yes, I did have them hanging in my home for at least 3 years. I have no clue why, especially because I hate coffee.
I disassembled the frames, spray-painted them, and then painted the mats a light blue-gray.
When they're done, they'll look something like this. Now, I just need to find approximately 32 more frames to complete my gallery wall. {Sigh} What crazy memories do you have stored in your photobooth pics?
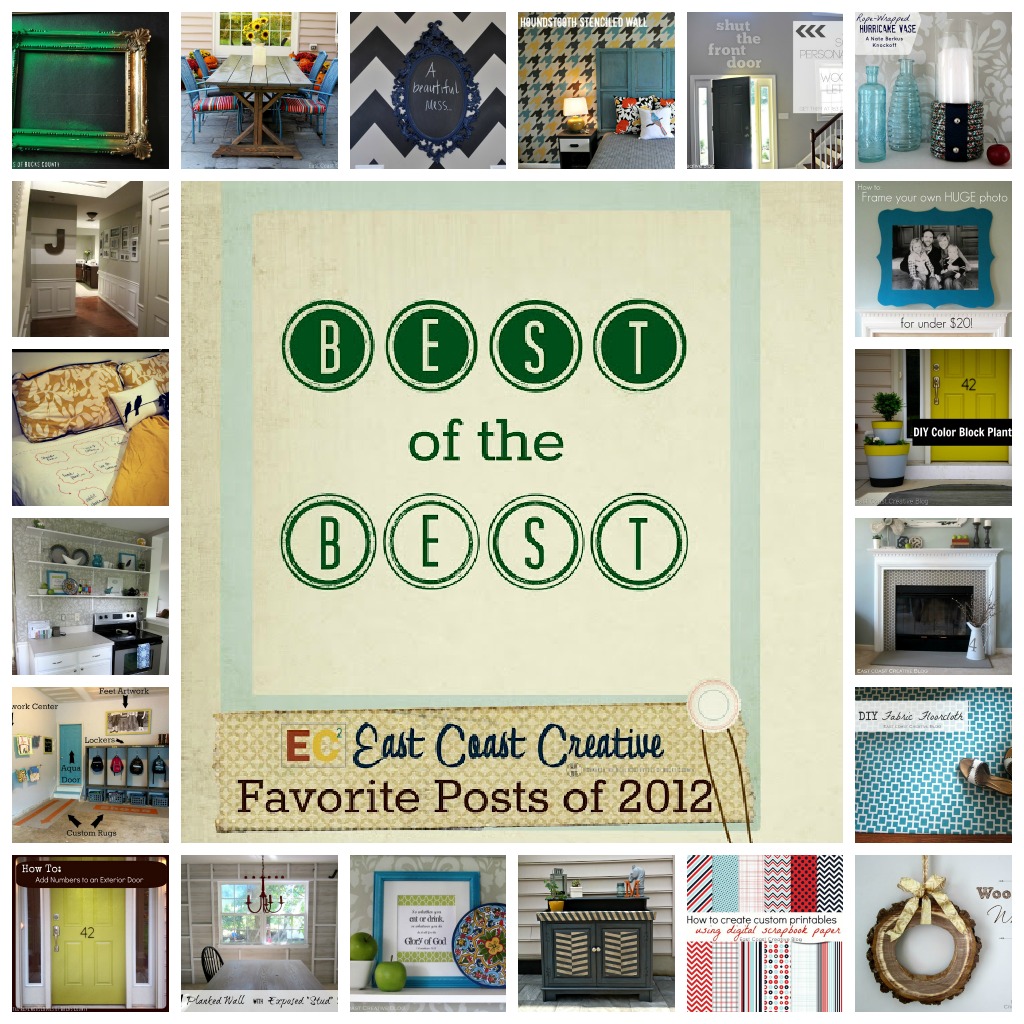
Phew! Can you believe that 2012 is over already? We are gearing up for an unbelievably awesome 2013 filled with lots of fun and exciting things for this little blog (we'll share those with you tomorrow!), but we thought we'd take some time to round up our favorite projects from each month in 2012. Take a look, let us know what you think, and pin it if you like it!
January Monica's Fav: I loved going green in 2012! Not really in the earthy-crunchy way, but by adding a pop of color to my collection of ornate frames. These Green Granny Frames had a fun impact on my dining room!
Jess's Fav: I breathed some new life into our New and Improved Entryway by adding a striped accent wall and a big gallery wall.
February: Jess' Fav: This project injected what can only be called Stencil Happiness into my kitchen renovation. Thanks to an awesome stencil from Royal Design Studio, my kitchen now has style for miles!
Monica's Fav: I took a bit of a risk and got personal with all of you by sharing my Game of Love Perfect Valentine's Gift. You ladies sure loved it, because it became our #1 post of 2012! Stay tuned for this year's version- it'll be on the blog on Monday!
Since 2012 was a leap year, I get to add another for February! This post went live on 2/29 and it's such a time saver in our house! Once a Month Sandwiches
March Jess' Fav: This Giant Shaped Frame is by far my favorite project from 2012! I'm pretty sure there is no better way to dress up your wall for this crazy low price. This is a big impact project, people. *I also have to nominate this one too! Jess and I had no idea how successful this project was going to be when we created it- we sure love Staples Prints! -Mon*
Monica's Fav: I love the BIG impact my Chevron Wall made in my kitchen. It's packed with personality and was pretty easy to paint!
April Jess' Fav: My hubs and I surprised my daughter with this Playhouse Loft Bed for her fourth birthday. It was totally worth it, because she and my son play in it all the time. I'm all for a DIY project that keeps the kids happy and occupied! *wink*
Monica's Fav: My Front Door got a major face lift with a super cool color and house numbers that are so my style!
May Jess' Fav: We started our kitchen renovation in December and were finally ready to do the big Kitchen Reveal in May. Of course, I'm still tweaking it, but this room makes me super happy. It's filled with tons of DIYs like painting the cabinets, stenciling the wall, making a fabric shade pendant light, painting color-blocked curtains and adding a fab rug.
Monica's Fav: Warm weather meant it was time for some outdoor projects! I loved how simple and inexpensive these DIY Planters were. Even now, they have winter pansies and look great on my front porch!
June Jess's Fav: I love the ability to customize things and this Fabric Floorcloth let me create the perfect mat for my entryway!
Monica's Fav: Jess and I completed our Super-Fab Guest Room Makover. We loved everything from the shutter headboard, fun accessories, and of course the houndstooth stenciled wall! We also had a blogger's dream come true when Young House Love featured our makeover!
July Jess: My son turned 2 this month so I showed you how I made his custom invitations using digital scrapbook paper and picmonkey. How to Make Custom Printables became one of our top posts- you guys obviously love free things!: )
Monica's Fav: While we were busy finishing up our patio project, I also worked on an Outdoor Furniture Upcycle
August Jess' Fav: We took our house exterior from boring to awesome by painting the front door and shutters. Hello Curb Appeal!
Monica's Fav: August was when I pulled off a birthday surprise for my hubs with a Garage Mudroom Makover I'm still loving the organization and how it's actually functional for this family of 6!
September Jess: It's a tie! I just can't decide between Stenciled Faux-Tile Fireplace & Planked Wall with Exposed"Stud' Shelves. Both of these guys transformed the room and I'm in love with them!
Monica's Fav: I went a little outside the box with my Shut the Front Door — Foyer Update. It's still one of my favorite things in my house.
October Jess: Our dining room has been slowly undergoing a transformation and my refinished dining table fits perfectly in the new space! Refinished Dining Room Table
Monica's Fav: In October, we had our DIY Patio Reveal! It was a HUGE DIY project, but we saved tons of money doing it ourselves and the end result was pretty awesome!
November Jess's Fav: I love Mr. Berkus and didn't think he would mind me knocking off one of the items from his new line- the Rope-Wrapped Hurricane Vase. Want to know a secret? I like mine better.: )
Monica's Fav: During a road trip to visit one of my best gal pals, I whipped up a Fireplace Makeover in her new house. It's a super-simple way to get rid of that brass fast!
December Jess: This project was honestly a surprise to me. It came out so much better than I ever thought it would! The Wood Slice Wreath is the perfect winter decoration.
Monica's Fav: Just in time for Christmas Jess and I made this Illuminated Silhouette Art. It looked great next to my Christmas tree, and now I'll be swapping out the silhouette for a lovey-dovey Valentine's quote!
One thing that stands out to us the most this year is how thankful we are for YOU! We so appreciate your comments, emails and faithful visits to our blog. Here's to another crazy, fun year!
It's actually incredibly hard to believe that we are 2 years in to this whole blogging thing. Last year we celebrated our one year blogiversary with loads of talented guest posters, giveaways and fun facts about our crazy first year. This year, we have soooo much going on that we just couldn't swing all that, but we still wanted to recognize some of the funny, ridiculous and amazing things that have happened to us over the past two years. But before that we want to thank YOU guys, whether you're a brand new reader or have been here for the long haul, for your support and encouragement to us. We would be nothing without you guys!! So thank you. Now, for the fun part;
Three Posts We Wished We'd Never Written We seriously laugh out loud sometimes about the posts we wrote when we first started. Let's just say it took us awhile to figure out our niche.; ) I'm sure there are tons of other lousy posts, but these are a few of the ones we love to hate. 1. In our second month of blogging we wrote a post entitled, For All You Tomboys Out There about how to braid your hair. Ha! As if we are experts about anything related to hair. Hilarious. (Our friend, Jane, did the braid, and she IS awesome at doing hair, but us? Not so much.)
2. I threw an Angelina Ballerina-themed 3rd birthday party and posted about it way back when. The party was cute enough, but nothing over the top, and the pictures are pitifully bad. The funny part is that this is one of our most successful posts! I guess there aren't too many people throwing Angelina birthday parties??
3. Monica shared her adventures in trying to DIY a belt out of fabric in this post. Even her daughter was like,"Ewww…Mom, don't wear that." Love that.
Blog Design for Beginners We prided ourselves on doing everything by ourself- including our blog design. We did ok for novices, and actually have done everything related to the way our blog runs and looks ourselves until the last 6 months or so. Now, we happily turn our ideas over to Kim, at 733 Design, for our custom blog design. Anyway, take a look at the way things used to be… Header 1… Designed at 12am the night we randomly decided to start a blog…
Header 2… About 3 months in…
Header 4… this one lasted about 2 minutes. We hated it!
Header 5… this one lasted for almost a year until we had to play the name swaparoo game…
Ahh… How much we love Kim and her design expertise. She"gets" us and did a great job on our logo and header!
Five Incredible Opportunities We've Received as a result of this Blog All that goofiness aside, we have been blessed to have some awesome experiences because of this little ol' blog and we're sure we're on the verge of lots more. 1. The Nate Show: Last year we had the priviledge of being on four episodes of Nate's 2011-2012 season and it was a blast. Nate is a sweetie, and we fell in love with live TV, for sure. This will forever remain as one of the highlights of our blogging careers.
2. Mexico: Thanks to our buddy, Nate, we won a trip for 6 days to Cancun, Mexico that totally rocked. We had such a blast with two other girlfriends and enjoyed loads of down time and really great food. Without this blog= no Mexico= sad girls.
3. HGTV Magazine and Ladies Home Journal
4. Feautred on Young House Love! I think every blogger wants to be featured by John and Sherry (if you're living under a rock, they are THE biggest and most successful home bloggers out there) and we got our opportunity with the Guest Room Makeover we did for a friend. Check that off the bucket list.: )
5. Creating with the Stars. It's crazy how things come full circle, isn't it? We LOVED being a part of this contest, and are even more thrilled to be hosting it this year! Speaking of CWTS, TODAY is the last day to enter your projects! Over the next week, we (with the help of the 12 stars) will be poring over the submissions to choose the best contestants! Don't forget- the contestants and their blog star partners will be announced next Friday, March 1st! Get excited, people, get very excited.
So, we've shared our highs and lows from the past two years, and again we want to say that we are so honored to have had you on this amazing journey with us. 2013 promises to be our BIGGEST year yet, so hold on tight, we're all in for a crazy ride! In honor of 2 Rockin' Years of Blogging, we're gonna open the floor for a little Q and A… Leave a comment asking us anything under the sun and we'll respond. It can be about blogging, life, our friendship, how to braid hair (haha!) or whatever you want to know. We'll comment back throughout the day! So… what do you want to know??
You want to know what we learned this year at the first ever Haven conference? There are so many talented people in the world. It's true. Every single blogger we met has unbelievable talent, was super cute (I'm not lying when I say that Monica and I left feeling old and frumpy!), and could not have been nicer. It totally felt like a huge family reunion (except that we had never met before!) Seriously, though, we attended some inspiring sessions, chatted with some of our favorite bloggers and enjoyed really fun BFF time, too! It started out with a smooth flight, a pricey cab to the hotel (60 bucks, one way!) and the discovery that the hotel had overbooked and that our confirmation was actually a pending notification. Booo. But the guys at the Crowne Plaza worked it out and we got a room (a nice one, I might add!)
Upon arrival, we met some of the Haven crew and received our swag bags. There were some pretty sweet finds in the bag, but our favs were definitely the Annie Sloan Chalk paint, Purdy paint brush, Kreg Jig Jr. and a stencil from our go-to stencil girls at Royal Design Studio. Score!
We attended six sessions total, each of them were taught by some blogging bigwigs- do you see that list below? Southern Rhoda, Tracie at Beneath my Heart, Beth from Home Stories A to Z, Sarah of Thrifty Decor Chick, and Myra from My Blessed Life We were SO thrilled to meet these ladies in real life and hear all the stuff they've learned through their blogging experience. We also spent time talking with vendors (Monica won 3 awesome paint brushes at the Annie Sloan chalk paint booth), and with business cards in hand, checked out all the blogs we hadn't read before,.
Rashon Carraway, aka Mr. Goodwill Hunting, rocked the Thrifting 101 session! Remember him from The Nate Show? We had fun sharing stories about our times on the show and how great the staff was to us. Good times, I tell you.
Sherry and John from Young House Love were the keynote speakers, and not only were they adorable, they were so down to earth, full of good tips and witty, to boot. Not fair. We loved their mindset about writing their blog, and their honesty about sort of stumbling into blogging fame. We could have talked with Sherry the entire night. She's totally like the other best friend we wish we had.
We LOVED meeting so many people with similar passions as ours, and discovering awesome blogs we had never heard about. No one truly understands blogging except other bloggers, that's for sure.
Beth from Free Stylin' and Jamie from C.R.A.F.T
The highlight of our trip was meeting our blog mentor, Beckie. We've been chatting with her on the phone every week for the past few months. We knew she was insanely talented and driven, but we were so not prepared for how awesome she is in person! And drop-dead gorgeous. Her session about advertising had everyone buzzing about her. And for good reason! Love.that.girl.
Monica was really excited to meet her, and I was scared, I guess. Awkward, Jess, awkward. And I'm sure you've all heard of Allison from House of Hepworths, but we were psyched to meet her since we were in the Blogging 2 Better collaboration with her the past 6 weeks.
Layla from The Lettered Cottage, taught a killer session on photo styling that rocked our picture-taking world. How she preps rooms for photos is genius, and even though we learned a lot, we're pretty sure that she has a creative eye that can't be duplicated. I am a HUGE fan of hers, so was pretty excited that she sort of knew who we were (or pretended to, anyway!)
We also had the priviledge of hanging out a bit with Ashley and Whitney from Shanty 2 Chic. These girls make DIYing look amazing. A gorgeous, creative blogging duo.
And speaking of gorgeous-ness…take a look at Ana White building a rolling storage caddy in sky-high heels and tight cropped pants. Fabulous, isn't it? Makes us feel like we should maybe reconsider our t-shirt and sweatpants attire for DIYing. Or maybe not.
And finally, here's a shot of us fooling around at the Homes.com photo booth. Our new bloggy best friend, Karah from The Space Between, took this picture and we love it. And you'll love her. First of all, she lives in Curacao, and secondly she does great projects (just check out her rooftop pallet bed) and thirdly, she's a lot of fun to hang out with.
So that's our crazy recap! All in all we had as really fun time, and I can't say enough how much fun I have with Monica. It may actually be possible that two people share the same brain. Just sayin'.; ) If you could meet one blog crush, who would you choose?
We're pulling a Young House Love and are double-posting today. It's kind of fitting since Melissa is Sherry's partner!. If you missed the Round 2 projects, you can see all of themright here. To see the bloggers you chose to move on to Round 3,. We're sure these girls are already working hard on their Paint challenge this week- ack! We're loving the suspense.: )
------------------------------------------------------------------------------------------------------------------------- If any knockoff was a bear to tackle, this one is it! All that detail-oriented stenciling makes us tired just looking at it. We love that Melissa took the design and changed it up so that it is unique and matches her home. Take it away, Melissa!
Anthropologie is my very favorite store. I love all the colors, the design, the textures, the ambience and inspiration that I always find there. When I saw this gorgeous ikat hand painted console, I knew it was the perfect piece of inspiration for CWTS Project #2: Knock Off. (and at $1698--it's a great piece to knock off; )
1. I bought a similar looking cabinet base from IKEA. In looking for the right piece of furniture to use for this project, the most important thing was to have flat doors with plenty of space for the ikat stencil design.
2. In order to achieve a wood-like look similar to the anthro console, I did some research on painting IKEA furniture. Leaving the cabinet in pieces, I spray-painted them with three coats of Zinsser BIN shellac-based primer. In between each coat of primer, I sanded very lightly. This stuff is amazing and allowed me to paint right over it with no problems. After letting the primer dry, I painted the cabinet pieces with two coats of paint which I had left over from other projects. I painted all pieces with BM Wheeling Neutral, with the exception of the cabinet doors, which I painted BM Linen White.
3. The next step included a bit of experimenting, but ended up turning out great. On top of the painted cabinet pieces, I used a soft dry cloth and applied a light layer of Annie Sloan Dark Wax. I wasn't sure how this wax would take to the paint, but it worked wonderfully and gave the piece a great look. In the second picture below, you can see the difference between the boards (before wax on the left and waxed on the right). After all the pieces of the cabinet were waxed and dry, I put the cabinet together, minus the front doors.
4. I ordered the ikat stencil ("ikat pattern #1 repeating stencil") online from Olive Leaf Stencils. Next up was choosing paint colors. I went to the paint store and pulled paint chips to match the anthropologie console. I knew their color palette worked well but I wanted to create a similar palette that would work better in my own home. I played around with paint chips in my hand to create my palette. Then I took the paint chips to the craft store and matched them to acrylic craft paint. (While at the craft store, I also purchased Elmer's Spray Adhesive to help keep the stencil in place while I painted.)
5. I put the cabinet doors on top of the kitchen counter and put the six different paint colors onto paper plates. I measured and marked the various spots where I would need to line up the stencil. Next, I sprayed the back of the stencil with the Elmer's Spray Adhesive and let it sit for about 2 minutes before placing it on the cabinet door. (Waiting the 1-2 minutes helps the spray to be more temporary, and easier to remove. I did not have any problems removing the stencil-and the paint on the doors did not peel off at all.)
6. After I had my stencil in place, I began painting. You really only need to use a small amount of paint for stenciling, this helps to prevent bleeding of the paint. I used a soft jabbing motion to get the effect I was wanting and found that a small firm paint brush worked well. I had sketched the stencil out on cardboard and planned which colors were going where…this was especially helpful. It took me about three hours to stencil the cabinet doors.
7. I let the doors dry overnight and in the morning I used a very small brush and linen white paint to touch up the few spots where little bits of paint had bled.
8. Last, I applied a layer of Annie Sloan Clear Wax over the top of each door, which darkened the colors very slightly and gave it a nice smooth finish.
9. After the wax was dry, I put the doors onto the cabinet base. I styled the console using some of my"real" anthropologie treasures: ) in addition to two old flea market wooden spools with candles, some favorite books and beautiful orange tulips.
It's such an amazing piece and it's going to be a conversation starter, for sure! We snooped around Melissa's blog and found this adorable Secretary makeover. Love that color blue!
You know we love us some reclaimed wood and this barnwood jewelry display is super cute!
Check back tomorrow for our favorite knockoff from the link party this week! There were some great entries, and you all are NOT making our jobs easy.: ) And don't forget that you can begin voting for Round 3 midnight on Monday!
If you missed all the amazing projects in the first three weeks of CWTS, be sure to check them out below!
Round 1 Projects & Winners Round 2 Projects & Winners Ro und 3 Projects & Winners Round 4 Projects Before we do anything else, we want to say thank you to all of our sponsors! This fabulous contest was made possible by them and we are ever so grateful! Also, a HUGE shout out to Homes.com and HomeGoods for sponsoring the Grand Prize round this week! You guys are the best! The Grand Prize Winning Team will EACH receive: $500 from Homes.Com $500 Gift Card to HomeGoods Project featured by HomeTalk
We just can't keep you guys waiting in suspense any longer! Without further ado… The Grand Prize Winner of The 1st Annual Creating with the Stars Contest is…
1. Sarah { Sarah M. Dorsey Designs } & Brooke { All Things Thrifty }
(Sarah, her hubs, and cute pup!) Colorful, Texture-filled Bedroom Makeover
Congratulations Sarah and Brooke! Sarah has delivered such amazing projects throughout this contest. Let's take a look back, shall we? Round 1: Statement Light Fixture
Round 2: Custom Cornice, Drapes and Bench
Round 3: Painted Secretary Desk and Accent Wall
We have LOVED having Sarah in the contest and have been continually inspired by her. Well done, girl! Make sure you keep up with all of Sarah's DIY awesomeness- Follow her on Facebook!
Melissa and Amanda have been awesome competitors too! They worked hard, stretched their DIY limits and came up with some super fun and stylish projects. Thanks for being a part of the contest, ladies! We also want to thank Beckie and Sherry for being amazing blog stars! Their partners loved working with them, and we already love them (duh!)
2. Melissa { 5 foot 12 Creations } & Sherry { Young House Love } Guest Room Makeover
3. Amanda { Love and Renovations } and Beckie { Infarrantly Creative } Reading Room Makeover
Here's the official vote tally…
This contest has been absolutely amazing and we're so thankful to all of you for playing along! Tomorrow we'll share how Sarah put her room together and then Friday we have a fun wrap up post for ya… think David Letterman top ten meets Monica and Jess. We know… you can hardly wait right?!? We'll also be sharing our favorite home decor project from the link up party (you have until Friday at 10 PM EST to link up right here). The good stuff just keeps on coming!: )
It's been a while since I first posted about never having bought a rug and daydreaming about what I'd buy if I could. Since then, I DIYed two floor mats and made my first big rug purchase. I feel like rugs are a really big commitment, and I have trouble taking that first step knowing that next year, I'll probably change my mind and hate the rug, but I have to keep it anyway because it was so expensive. Is that true for anybody else? Well, I found the perfect solution: a really cool rug for under $100. That's a commitment I can -and did- make. Let's take a look, shall we? (Warning: This is a picture-heavy post!: )
I'm so super excited about this rug because it adds so much personality to my otherwise pretty white and neutral kitchen. I love the pattern and that it isn't too overwhelming, but still makes a statement. After seeing the same rug in a different color on Young House Love, I got it from Urban Outfitters for $89 plus free shipping.
It is not a cushy rug at all, and will probably need a rug pad, but I'm going to live with it a few days before making any decisions. You know, because I'm cheap like that.
I was so anxious to get it in the kitchen and snap pictures to show you guys, that I didn't even let the seams settle at all. Oops!
I'm pretty happy with the way the navy color-blocked drapes play off the green in the rug. The room still feels sophisticated, but also a little bit playful. (Which, by the way, I would love to be described that way!)
I'm still on the lookout for a round pedestal table and chairs, but haven't had any luck. My original plan was to thrift a table and chairs, but I actually just saw that Ikea has a white round table exactly like I want for just over $100. I may have to resort to that if I don't come across a table I can DIY soon.
Ooooh, I'm so thrilled. My first rug purchase made me a happy girl. What do you think of the rug? Did you know Urban Outfitters sold rugs?
Phew! The contestants and their Star partners really set the bar high this week with their Round 1 projects. Almost every one of you commented about how hard it was to choose only three favorites and we felt that pain right along with you! We know that you're not really here to read lots of mumbo jumbo from us, so let's get to those results, shall we? And the Winner of Round 1 is…
We loved this project and think it was executed so well! Nice work Karianne!! Can't wait to see what you'll come up with for Round 2. Let's see who else made it to Round 2… 2. Sarah {While They Snooze} & Sarah {Thrifty Decor Chick} Trash Pile Made Trendy Table
3. Sarah {Sarah M. Dorsey Designs} & Brooke {All Things Thrifty} Statement Piece Light Fixture
4. Amanda {Love and Renovations} and Beckie {Infarrantly Creative} Televison Stand Upcycled to a Bar
5. Jane {Life, Crafts & Whatever} & Jamielyn {I Heart Naptime} Tin Tile Mirror
6. Melissa {5 foot 12 Creations} & Sherry {Young House Love} Lab Station Turned Dining Room Buffet
7. Nancy {Owen's Olivia} & Kari {Ucreate} Dresser Turned Modern Sandbox
8. Ann Marie {White House, Black Shutters} & Shaunna {Perfectly Imperfect} Floor Board Kitchen Island
9. Janel {Nellie Bellie} & Brittany {Pretty Handy Girl} Frumpy to On Fire, Fireplace
We're so sorry to say goodbye to the following three contestants! Boo, we hate this part. Thanks for all your hard work and excellent projects this week, girls! 10. Jourdan and Ashley {Little Yellow Barn} & Beth {Home Stories A to Z} Man Chairs
12. Nat and Holly {My Sisters Suitcase} and Jane {Tatertots & Jello} Little League Lounger
To keep things legit, here are the official results!
I'm sure she doesn't need a reminder, but here's what Karianne won this week! Round 1 Prize Package: $50 worth of 31 Gifts products $60 worth of Twysted Yarn products $70 of Henle Headbands products $100 Blog Re-design from 733 Design (who designed all the CWTS logos!) Project featured by HomeTalk We also want to thank Homes.com for being the Official Grand Sponsor of Creating with the Stars!
Congratulations to the nine moving on! You have your work cut out for you, for sure! Next week's theme is KNOCKOFF!
The winner of Round 2 will win the following AWESOME prizes: (to see the entire prize package, click here) The Week 2 Winner will receive: $100 Gift Card to Royal Design Studio A pair of $120 Robert Allen pillows from Chic Decor Pillows Project featured by HomeTalk
Voting for Round 2 will begin on Monday, March 18th at 12 AM EST. Don't forget that you can link up your favorite upcycle through this Friday at 10 PM EST right here for the chance to win prizes and be featured here on EC2! Finally, we're super excited because: 1. Tomorrow we'll be sharing Karianne's tutorial for her awesome bike clock. 2. On Friday you'll get to see how Sarah put together that amazing trendy tire table and, 3. Saturday, Sarah will be giving us the step-by-step process behind that insane light fixture! Be sure to come on back for loads of inspiration starting tomorrow!!
We thought Round 1 was pretty impressive, but Round 2 officially blew us away. Apparently all of blogland was pretty excited too, because we had a bajillion of votes over the last two days (yes, that's the official number, FYI). This round was the closest one yet, with 1st and 2nd place only separated by around 20 votes the entire time! Let's see who ended up on top!
The Winner of Round 2 {Knockoff} is… 1. Amanda { Love and Renovations } and Beckie { Infarrantly Creative } West Elm-inspired Wood Tile Dresser
We thought this project was amazing and it's actually been on our list of"Knockoffs to Try" for a while now! Thanks, Amanda, for showing us how it's done! Congratulations on the Round 2 Win! Who else made it to Round 3, you ask? 2. Sarah { While They Snooze } & Sarah { Thrifty Decor Chick } Anthropologie-inspired Sharpie Plate Art
We want to give Sarah a shout out for her project too. It was incredible and so many of you loved it and voted for it, too! Congrats Sarah! 3. Melissa { 5 foot 12 Creations } & Sherry { Young House Love } Anthro-inspired Ikat Console
4. Sarah { Sarah M. Dorsey Designs } & Brooke { All Things Thrifty } Schumacher Zimba-inspired Drapes, Anthro-inspired Bench, Custom Cornice
Ok, so now we totally know how Len, Carrie-Ann Inaba and Bruno feel on Dancing with the Stars each week…saying goodbye to talented people is HARD!! We're sorry to let the next three incredible DIYer's go, but wish them tons of success with their blogs. We've loved having them! 7. Jane { Life, Crafts & Whatever } & Jamielyn { I Heart Naptime } Horchow-inspired Mirrors
8. Ann Marie { White House, Black Shutters } & Shaunna { Perfectly Imperfect } Anthro-inspired Duvet
Once again, to keep things legit, here are the official results…
And here's a reminder of the awesome prize package that Amanda won from this round…
$100 Gift Card to Royal Design Studio A pair of $120 Robert Allen pillows from Chic Decor Pillows Project featured by HomeTalk
------------------------------------------------------------------------------------------------------------------------------------------------ Congratulations to the 6 contestants moving on! Are you ready to get your paint on? We hope so, because Round 3's theme is Paint!
Round 3 is our Semi-Finals Round, so this is when things really get serious! This week both the Contestant and their Star partner are in it to win it! The Semi-Finals Winner will receive: $500 Gift Card to Home Depot (Contestant & Blog Star!!) $100 worth of Martha Stewart supplies from Plaid Crafts $125 Gift Card to Lucent Lampworks Project featured by HomeTalk
Voting for Round 3 will begin on Monday March 25th at 12AM EST. Don't forget that you can link up your own Knockoffs through this Friday at 10PM EST…the winner will get an awesome prize pack and have their tutorial featured here on EC2 this weekend. Click here to link up! Make sure you check back throughout the week! Thurs, Fri, and Sat we'll have the full tutorials for the top three projects and Sunday we'll share the Link Up winner's tutorial! Thanks so much for making this contest awesome so far!
How many times can we say we were floored by the Round 2 projects? Not enough, apparently, because, people, those projects were incredible. If you missed the Round 2 projects, you can see all of themright here. To see the bloggers you chose to move on to Round 3,click here. We're sure these girls are already working hard on their Paint challenge this week- ack! We're loving the suspense.: )
We have been anxiously awaiting the tutorial for this wood-tiled dresser since we first laid eyes on it. I'm not sure you guys realize this, but the contestants get about 3-4 days to complete their projects, photograph them and submit them to us. That is a crazy turnaround, but you would never know it with this one! It was so well-executed and came out beautifully. Love it! --------------------------------------------------------------------------------------------------------------------- Is it awkward for me to admit that I knew I would be knocking off this dresser before I even got into this competition? I've been in love with it for a while now, and I remember a week or so before I even found out I was in the competition I stumbled on it again and my husband Corey and I decided right then and there that if we got in and if there was a knockoff round, we'd be doing this guy.
(The inspiration — via West Elm) Luckily, we did, and there was, so here we are! Like I said, this dresser has been on my mind for a while because it's just so beautiful, but if you know me at all you know I'm not the type to spend $900 on a piece of furniture. It's just not gonna happen. So, Corey and I set out to re-create this dresser as affordably as possible, all while putting our own little spin on it. What we used:
An antique dresser
Scrap 1x4 wood — we used maybe one board total
White paint and Gray paint
Gorilla glue (or any wood glue you like)
3/4" dowel rods (for drawer pulls)
1/2" dowel rod (for drawer pulls)
We started off with this beautiful antique dresser that we found at a local flea market. We loved the clean lines, the tall frame, and (of course!) those casters. Drool. Our style is a pretty good mix of modern and more traditional/vintage furniture, so we liked that this would lead to a slightly less sleek and modern look than the original, which fits right in with the rest of our house. It was basically perfect.
The first step for us was figuring out a way to inset the drawers a bit so that when we added the wood tiles they wouldn't stick out. We wanted the entire front of the dresser to be flush (the West Elm one has the drawers slightly inset, but we thought a flush look would be a bit more fitting for our dresser). Our original plan was to just move the drawer slides back a few inches in the dresser, which would hopefully make the drawers sit the way we wanted them, but thankfully it was an even easier fix than that with this particular dresser — there were little metal pieces on the inside of the drawers that stopped them from going all the way in. All we had to do was pull those out and make some new stoppers with some little dowel rods and we were good to go.
Next up was cutting all of our wood tiles. Let me warn you — this project isn't for the faint of heart…it took forever! But, I think the end result is totally worth it, so I won't complain. For the tiles we took a few 1x4 boards that we had already laying around and cut them down to 1/4" thick tiles. It was the quickest way we could think of to do it, and it also meant that the end-grain of the wood would be showing, which added some fun texture. It was a pretty quick job to cut the tiles — we just used a chop saw with a piece of wood clamped to it to make sure all of the tiles were the same size. Our stack quickly grew, and soon enough we had a giant pile of wood tiles.
One they were all cut, we gave them a quick whitewash. I wanted a bit of variety within the tiles, so we did a whitewash on some of them and a gray wash on others. It was a subtle difference, but it makes the end product look a bit more random and varied, which I like.
Once our tiles were all dried and ready to go, it was time to attach them to the drawers. We didn't want to nail them in because then we'd have a billion different nail holes to fill, so we just used some wood glue. We glued 'em on in a subway pattern and then clamped a board to the drawer while it dried to ensure they all stuck. As the tiles got wet with the glue, some of them started to bow, so clamping it down also kept that to a minimum. We let it all dry together for about 12 hours (just to be sure!) then removed the clamps, sanded down the edges, and that was all there was to it!
The last step was creating the drawer pulls — we knew we wanted ones similar to the inspiration piece, but we also knew that actually finding and buying those pulls would be challenging (not to mention expensive!) so, we decided to make our own! Corey bought a 3/4" dowel, drilled two holes in the back, and inserted a small, 1/2" dowel piece. We then spray painted the whole thing with some oil-rubbed bronze spray paint, and screwed 'em in!
Once we put it all together, it looked a little something like this:
And that, my friends, is how we created our own version of West Elm's wood-tiled dresser — and under $200, to boot! -------------------------------------------------------------------------------------------------------------------- Isn't that fabulous?! An amazing knock off that even West Elm would be impressed by.: ) We were peeking around at Amanda's blog and found these adorable DIY Animal Magnets. Another knockoff, and we are obsessed.
This Dresser turned Media Console isn't too shabby either, is it?
Check back tomorrow because we're pulling a Young House Love on ya, and posting TWICE!! We'll be sharing the tutorials for the super fun Anthro-inspired plate wall and the Anthro Ikat Console!! Also, do you want to be a part of Creating with the Stars yourself? You can link up your favorite knock off project right here until tonight at 10 PM EST for a chance to win a great prize package and be featured on EC2!
Did I ever mention that I'm impulsive? And that I'm really good at convincing my hubs that the impulse is a good one? Well, I am. Such is the case with our kitchen remodel. I have, of course, been thinking about creating a more open kitchen, one that flows easily into the dining/living room, but it was sort of a spur of the moment decision to tackle that project the week before Christmas! . All of this was inspired by our oven breaking down. We needed a new oven, so why not remodel the kitchen while we're at it??!! Yes, I am crazy. However, I couldn't be more excited about this project, especially since it's the first full-blown remodel my hubs and I have ever done! We're totally newbies at this, but I'm fully confident we can handle it. And we know several DIY"experts" that we can call with questions. I keep telling my hubs that unless we burn the house down, there's nothing we can't fix. Can you tell that I'm an optimist? Disclaimer: This is going to be one long, ongoing project that will probably take several months to completely finish. I'll be walking you through all the nitty-gritty details, ala Young House Love, so don't expect the"After" photos next week!: )
Here's a peek at our kitchen BEFORE:
That's the dining room beyond the kitchen. See how closed off it feels? That doorway could not be any more narrow!
This wall is getting a MAJOR makeover. You won't even recognize it- I promise!
That hole there is where the oven used to be. It now has another home!
And now, the view into the kitchen from the dining room. The first thing we did was take down that huge mirror. We're so lazy that we didn't ever take that thing down when we painted the room. We just painted around it (in our defense, it's HEAVY, and was really, really attached to the wall). Then we measured and marked and measured again where we wanted to take the wall out. We didn't really use any scientific methods here- we just planned according to what looked good to us, and also where the studs were located. (I've highlighted our sketch below so you can see it better:)
Then, it was demo time! The hubs took his drywall saw and started cutting away.
Oops! There was a major heating duct running right through the middle of our opening! Gah! I'm pretty sure that my hubs was less than thrilled with me at this point (and that's putting it nicely). Lesson learned: do some research, like cutting a small hole in the wall to see what's in there first, before knocking down the entire wall. Luckily for us, after some brainstorming, we realized that this duct could be cut down and redirected (more on that in a minute).
Demolition is not glamorous. In fact, it's gross, messy and downright ugly. You might even find mouse droppings everywhere, along with the home they've made in your insulation. Makes me gag just thinking about it.
We took out that unbelievably-foul-it-makes-me-want-to-throw-up insulation and got to work cutting the duct with a sawzall. We called in the big guns, aka, my father-in-law, to help since he just remodeled his kitchen and it's ah-mazing! At first we just cut it to the height of the half-wall while we decided what we wanted to do from there, but then we decided to remove the entire duct and redirect the vent into the dining room.
Kevin took the old ductwork and reconfigured it to shoot the heat into the dining room, then installed it back where it was, but facing the opposite direction into the dining room!.
The next step was rebuilding the half-wall to make it sturdy. The wall that we removed is a not a load-bearing wall, so it was ok to take it out. Definitely check with someone who knows whether a wall is load-bearing or not before removing it! For whatever reason, this wall had (2) 2x4 studs backed up to each other (for extra support maybe?), so he re-installed new studs with braces in between them. Then came the drywall- an exciting step for me because you really start to see what it's going to look like!
Of course, we still have to add corner bead, spackle, sand and paint the wall, and add a piece of decorative wood that will act as the countertop to the wall. Phew! The list of things is overwhelming, but the important thing is, we're making progress!: ) So here's where it stands right now: (and yes, you're getting a glimpse of the few other changes we've made, but I'm saving those for another post so this one doesn't become the longest post you've ever read and are not that interested in; ):
It already makes a HUGE difference in how the two spaces feel, and I can tell that we'll be using our dining room in a whole different way in the future.
It makes the kitchen so much larger, it's nuts. Woohoo! I can't wait to get to the fun stuff- decorating! So, tell me, have you ever remodeled a kitchen? Do you have any tried and true tips we should know?
This is so exciting, isn't it? We're almost into the final round of our first ever Creating with the Stars contest which is crazy! We know that the contestants are putting in hours and hours of work on their projects each week so that they are the best they possibly can be, and we just have to say that the caliber of their projects is blog star-level!
This week was Sponsored by The Home Depot, and isn't it amazing what a huge impact a little paint can have? Ah-mazing! Here's a little reminder of the epic prizes our Round 3 winner will receive… $500 Gift Card to Home Depot (Contestant & Blog Star!!) $100 worth of Martha Stewart supplies from Plaid Crafts $125 Gift Card to Lucent Lampworks Project featured by HomeTalk
The votes were neck and neck again this week, with only a few votes separating the top two spots. Only three contestants move on to the finals, so the pressure is really on! Ok, enough of our chatting, let's get those results!
1. Amanda { Love and Renovations } and Beckie { Infarrantly Creative } Painted Wall Mural and Dresser
This is Amanda's second week in a row in the top spot…for good reason! You just can't ignore that yellow dresser (Monica has a similar painted dresser in her dining room!) and set against that black wall, it's just stunning! Congrats again, Amanda!
2. Melissa { 5 foot 12 Creations } & Sherry { Young House Love }
Painted Chalkboard with Map and Games
3. Sarah { Sarah M. Dorsey Designs } & Brooke { All Things Thrifty }
Painted Desk and Accent Wall using Custom Stencils
Ack, this is just so hard to do (does it ever get easier?!!), but we have to say goodbye to these three amazingly talented women. 4. Sarah { While They Snooze } & Sarah { Thrifty Decor Chick }
Painted Map Coffee Table
5. Nancy { Owen's Olivia } & Kari { Ucreate } Painted Couch featuring a Custom Horse Stencil
Seriously, we could cry about having to let Nancy, Sarah and Janel go! You guys are welcome back here anytime. And, now we know who to call when we need something awesome painted! Here's the voting break down… the first and second place projects were separated by under 50 votes!! Insane!
--------------------------------------------------------------------------------------------------------------------- Ok, it's the finals now, people- the last chance these bloggers have to show what they're made of!
The prizes are stinkin' awesome this round (and the Blog star gets them too!) The Grand Prize Winners (Contestant and Blog Star) will each receive: $500 from Homes.Com $500 Gift Card to HomeGoods Project featured by HomeTalk
Next week the challenge is Home Decor- so anything (even a room makeover) is fair game! Tomorrow we'll be sharing the tutorial for that amazing mural and yellow dresser! We'll be so sad when this contest is over and we don't have these incredible tutorials on our blog anymore!
**Update:Submissions are NOW open! Click here to enter! You'd better be sitting down ladies and gents, because we're thrilled to announce that we are hosting the BEST, MOST AWESOME contest in all of blogland!! Remember that contest we won last year? Crafting with the Stars? Well, not only did we win it, but we also bought it! Tam, from Sew Dang Cute, took a leave from blogging and we jumped at the chance to run the contest that helped jump-start our blogging careers. We're hoping that we can help one of YOU jump start or boost your blogging career, too! Welcome to the new home of Creating with the Stars! ------------------------------------------------------------------------------------------------------------ We're super excited because it's bigger, badder and better than it has ever been. In case you didn't notice, we've renamed it Creating with the Stars, which means no limits to the incredible stuff you can create. It's not just crafts anymore, people.
What the heck is Creating with the Stars, you ask? CWTS is the ultimate creative DIY competition that pairs 12 contestants with 12 of blogland's biggest stars to duke it out over 4 weeks. Only one team will make it to the end to claim the Grand Prize. The best part? You, the readers, choose the winners! Here's a peek into our projects from the 2012 season…
One of our favorite parts of this competition is that contestants are paired with a super famous, awesome Blog Star! We've rounded up the best of the best and we know you all would LOVE a chance to work 1:1 with any of these bloggers!
Introducing the 2013 Creating with the Stars Blog Stars!
1- Sherry from Young House Love 2- Whitney & Ashley from Shanty 2 Chic 3- Brooke from All Things Thrifty 4- Jane from Tatertots and Jello 5- Sarah from Thrifty Decor Chick 6- Beckie from Infarrantly Creative 7- Mandi from Vintage Revivials 8- Jamielyn from I Heart Naptime 9- Shaunna from Perfectly Imperfect 10- Beth from Home Stories A to Z 11- Kari from U Create 12- Brittany from Pretty Handy Girl That's some serious talent all in one place! And let me tell you, some of these bloggers are in it to win it-they're all about the competition!! Wouldn't it be so awesome to be paired up with one of them?!?
We also have some ridiculously awesome sponsors, who are chomping at the bit to give you some great prizes! The 2013 CWTS Prize packages Total over $4100!! A special thanks to Homes.com, HomeGoods, and Home Depot for their generous sponsorship of CWTS! We're so honored to have them! The Grand Prize Winners (Contestant and Blog Star) will each receive: $500 from Homes.Com $500 Gift Card to HomeGoods Project featured by HomeTalk
All contestants that make it to Week 4 will be given a $100 Giftcard to HomeGoods to use during the week 4 home decor challenge! The Semi-Finals Winner will receive: $500 Gift Card to Home Depot (Contestant & Blog Star) $100 worth of Martha Stewart supplies from Plaid Crafts $125 Gift Card to Lucent Lampworks Project featured by HomeTalk
The Week 2 Winner will receive: $100 Gift Card to Royal Design Studio A pair of $120 Robert Allen pillows from Chic Decor Pillows Project featured by HomeTalk
The Week 1 Winner will receive: $50 worth of 31 Gifts products $60 worth of Twtsted Yarn products $70 of Henle Headbands products $100 Blog Re-design from 733 Design Project featured by HomeTalk
Here's how it all works: Submit one project that shows everyone your best stuff into the linky party here on East Coast Creative that will begin on February 5th. Projects must have been made October 1, 2011 or laterand must be your own work. You have until February 21st to enter. From those entries, 12 of you will be chosen by the blog stars and us as contestants and will be randomly paired up to work one-on-one with a Blog Star, to duke it out in a four-week competition to see who's the most creative. The Star will give suggestions, ideas, encouragement, and help so you can come up with the best project possible. Each round will have a theme and the bottom three will be eliminated based on reader votes. Once the contest is started, weekly projects are anonymous, so big blogger or rookie, everyone's on the same, even playing field! Find your favorite project to link up and be prepared to put your best foot forward if you want to survive!
What to do Now! Submissions are NOW open! Click here to enter! Be sure to Like East Coast Creative on Facebook. We're going to be messaging reminders, sneak peeks, and lots of contest info via Facebook, so you don't want to miss out! Also, start deciding what one project you want to submit for your chance to be a contestant! The sky is the limit and we're so excited to see all the amazing project submissions! Anytime you tweet about the contest, make sure you use #cwts2013 to stay in the loop and see what everyone else is saying about the contest!
If you have any questions about the contest, please email us at CWTScontest{at}gmail.com
We're so excited about our 1st season hosting CWTS and we hope you are too!! Spread the word, because it's going to be one awesome ride!
The day is finally here! Submissions for Creating with the Stars are Open! We are so excited to see all of your submission projects!
This group of blog stars is pretty epic! One of them could be your new partner in crime! 1- Sherry from Young House Love 2- Whitney & Ashley from Shanty 2 Chic 3- Brooke from All Things Thrifty 4- Jane from Tatertots and Jello 5- Sarah from Thrifty Decor Chick 6- Beckie from Infarrantly Creative 7- Mandi from Vintage Revivials 8- Jamielyn from I Heart Naptime 9- Shaunna from Perfectly Imperfect 10- Beth from Home Stories A to Z 11- Kari from U Create 12- Brittany from Pretty Handy Girl------------------------------------------------------------------------------------------------------------------------------ Let's just recap CWTS a bit and then we'll get onto the How To details!If you missed the announcement post with ALL the details, click hereYou can submit one project that shows everyone your best stuff into the linky party below. Projects must have been made October 1, 2011 or laterand must be your own work. You have until February 21st to enter your submission. From those entries, 11 will be chosen by the blog stars and us as contestants and will be randomly paired up to work one-on-one with a Blog Star, to duke it out in a four-week competition to see who's the most creative. The Star will give suggestions, ideas, encouragement, and help so you can come up with the best project possible. Each round will have a theme and the bottom three will be eliminated based on reader votes. Once the contest is started, weekly projects are anonymous, so big blogger or rookie, everyone's on the same, even playing field! Find your favorite project to link up and be prepared to put your best foot forward if you want to survive!---------------------------------------------------------------------------------------------------------- How to Enter CWTS:1.Link Up your Project. Use the Linky below to submit your project entry *Reminder: Be sure to link to the actual project page, and not just your homepage. 2. Grab a Button. You need to add a link back to EC2 in your submission post. Even if it's an old post, just grab the button code below and paste it into the post.
3. Follow EC2 on Facebook. Make sure you LIKE East Coast Creative so you get all the updates and info we'll be sharing there as well. (This step is a requirement to your entry- sorry to be big, bad, rule enforcers- We promise we aren't mean!)
4. Start Spreading the Word! The first 11 contestants will be chosen by the Blog Stars and East Coast Creative, but #12 will be chosen by popularity in the link party. Get your readers to come over and give your thumbnail a click- yours could be the most viewed!! (Just don't act like some weird robot and click on your own entry a million times, that's lame-o!)
And, as if you need any more motivation to enter, we have the BEST.SPONSORS.EVER!! The 2013 CWTS Prize packages Total over $4100!! A special thanks to Homes.com, HomeGoods, HomeTalk, and Home Depot for their generous sponsorship of CWTS.nWe're so honored to have them! The Grand Prize Winners (Contestant and Blog Star) will each receive: $500 from Homes.Com $500 Gift Card to HomeGoods Project featured by HomeTalk
All contestants that make it to Week 4 will be given a $100 Giftcard to HomeGoods to use during the week 4 home decor challenge! The Semi-Finals Winner will receive: $500 Gift Card to Home Depot (Contestant & Blog Star) $100 worth of Martha Stewart supplies from Plaid Crafts $125 Gift Card to Lucent Lampworks Project featured by HomeTalk
The Week 2 Winner will receive: $100 Gift Card to Royal Design Studio A pair of $120 Robert Allen pillows from Chic Decor Pillows Project featured by HomeTalk
The Week 1 Winner will receive: $50 worth of 31 Gifts products $60 worth of Twtsted Yarn products $70 of Henle Headbands products $100 Blog Re-design from 733 Design Project featured by HomeTalk
Okay, enough talking, let's get submitting! We're so excited to have each and every one of you!! Good Luck and May the Oddsbeever in your Favor (sorry, two Hunger Games lovers here!)
We can hardly believe it, but we're in full planning mode for 2014's Season of Creating with the Stars! We had so much fun hosting the world's best DIY blogger contest last year and of course we're planning to make it BIGGER and BETTER for the upcoming year! Remember how awesome last year's winner's projects were? Sarah Dorsey has mad talent and has had a huge year of success! If you haven't checked out her blog- umm do it!
Even though CWTS won't begin until Feb. 2014, we wanted some input from all of you! Tell Us… What Blog Star would ROCK your world?
Here's last year's epic line up…1- Sherry from Young House Love 2- Whitney & Ashley from Shanty 2 Chic 3- Brooke from All Things Thrifty 4- Jane from Tatertots and Jello 5- Sarah from Thrifty Decor Chick 6- Beckie from Infarrantly Creative 7- Mandi from Vintage Revivials 8- Jamielyn from I Heart Naptime 9- Shaunna from Perfectly Imperfect 10- Beth from Home Stories A to Z 11- Kari from U Create 12- Brittany from Pretty Handy Girl If you could pick anyone under the sun, who would you choose to be your STAR? Let us know in a comment below, and it just might happen. We can be pretty persuasive when we want to!
PS: We have the winners of our 10K Fan Giveaway…are you ready? Grand Prize of the $200 gift card from Wayfair.com goes to Kristen Derstein! 2nd Prize that includes gifts of $50 to Royal Design Studio Stencils, $50 to Gussy Sews Shop, and $35 to Vintage Vinyl Journals goes to Carrie Summerlin! 3rd Prize that includes gifts of $50 to Frog Prince Cake & Cookie Design, a $32.00 Mila Rose Designs headband, and $100.00 to HorseFeathers Gifts goes to Priscilla! We're so happy with the results of the giveaway, a big thank you to everyone who entered and thanks again for helping us reach 10K on Facebook. Congrats to our winners, you will be contacted by email with the details.
When we opened submissions for Creating with the Stars on February 4th, we had no idea how how incredibly amazing the submissions would be. Really, we knew we'd get some good ones, but this was out of control! You guys made choosing so.incredibly.hard! We want to thank all 361 of you that took the time to enter. It has already been a great start to our first season!
Without further ado, let's get down to business… Introducing the Contestants for CWTS2013 (In no particular order)
1. Janel
#23 Boys Bedroom Makeover on a Budgetand her Blog Star is… Brittany from Pretty Handy Girl!
2. Jourdan & Ashley
#33 DIY Barndoor Headboard
and their blog star is… Beth from Home Stories A to Z!
3. Sarah
#48 80's Chandelier to Glass Mirror
and her blog star is… Brooke from All Things Thrifty!
4. Jane
#75 DIY Plank Wall
and her blog Star is… Jamielyn from I Heart Naptime!
5. Amanda & Corey
#131 Handmade Dining Room Light
and their blog star is… Beckie from Infarrantly Creative!
6. Nancy
# 137 Owen's Nursery Makeover
and her blog Star partner is… Kari from U-Create!
7. Jessica
#164 Anthro-Inspired Inventor's Bell Jar Lamp
and her star is… Mandi from Vintage Revivals!
8. Sarah
#223 Herringbone Metallic Artwork
and her blog Star is… Sarah from Thrifty Decor Chick!
9. KariAnne
#243 Shutter Wall
and her blog stars are… Ashley and Whitney from Shanty 2 Chic!
10. Nat & Holly
#281 Living Room Makeover
and their blog star is… Jane from Tatertots & Jello!
11. Ann Marie
#344 Mom Cave Makeover
and her blog star is… Shaunna from Perfectly Imperfect!
12. Melissa
#345 Bedroom Reading Corner
and her blog star is… Sherry from Young House Love!
Aren't those projects amazing? It's going to an incredible season! The first week's challenge is a fun one. Week 1: UPCYCLE
You Can Play Along with CWTS Too! Now, if we could have chosen all of you, we would have. We still want to showcase all of your talent and project. For every weekly challenge, we're going to have a link party where you can link up one of your favorite projects that fit in with the weekly theme. We'll pick our favorite project each week and we'll feature our favorite here on EC2. Get your Upcycle DIY projects ready for week one, starting next week! And we're sure don't need reminding, but just incase… we have an EPIC prize package! The 2013 CWTS Prize packages Total over $4100!! A special thanks to Homes.com, HomeGoods, HomeTalk, and Home Depot for their generous sponsorship of CWTS. We're so honored to have them!
The Grand Prize Winners (Contestant and Blog Star) will each receive: $500 from Homes.Com $500 Gift Card to HomeGoods Project featured by HomeTalk
All contestants that make it to Week 4 will be given a $100 Giftcard to HomeGoods to use during the week 4 home decor challenge!
The Semi-Finals Winner will receive: $500 Gift Card to Home Depot (Contestant & Blog Star) $100 worth of Martha Stewart supplies from Plaid Crafts $125 Gift Card to Lucent Lamp works Project featured by HomeTalk
The Week 2 Winner will receive: $100 Gift Card to Royal Design Studio A pair of $120 Robert Allen pillows from Chic Decor Pillows Project featured by HomeTalk
The Week 1 Winner will receive: $50 worth of 31 Gifts products $60 worth of Twysted Yarn products $70 of Henle Headbands products $100 Blog Re-design from 733 Design Project featured by HomeTalk
W e have a new house house plant living with us. I thought our Eastlake plant stand could use some company as I couldn't keep it appointed with fresh bouquets as often as I would like. The fact that I chose a spider plant is quite funny because as a child, I was deathly afraid of my parents' spider plant. This was because my young imagination believed that actual spiders (most likely thousands) made their home in it. This house plant acquisition (which I couldn't help but thoroughly examine for spider inhabitants) was instigated by my Mom, who sent me the following note not too long ago. It read:
Now just to give some history, my Mom and I talk on the phone often (almost daily). She lives in California. Nevertheless, I think my Mom still thinks I'm off at college and getting something in the mail makes me feel loved. Ok, it does. The things she sends in the mail vary....health tid bits like the above, articles on river and wetland restoration (for Hubby), recipes, and then there's the hard goods such as holiday decorations, clothing, books, pruning shears and twine....and most recently, lots and lots of baby clothes. My Mom is actually coming to visit next week and truth be told, I'll miss getting that little something special in the mail. Although I wouldn't put it past her to mail something on her way to the airport. Love her. xo
This weekend Jess and I got up bright and early on Saturday morning to attend a barn sale. We weren't 100% sure what to expect (the details were limited) and on the way we were laughing at the possibility of us walking it and it being all farm equipment! Thankfully it wasn't! The sale was inside and out of this cool, old barn
There were plenty of random things, but also tons of furniture, mirrors, and stuff that was right up our alley!
I REALLY wanted to buy this piece for my dining room, but it's a corner unit that wouldn't fit. I was bummed!
Jess almost bought this mantle to turn into a headboard, but I kind of talked her out of it!
We both loved this cool sign!
I spotted and scored this awesome"Mirror, Mirror, on the wall…" style mirror for $5.00!
DIY Chalkboard Mirror Have I mentioned I'm impulsive?? By Saturday afternoon I was ready to start working on my mirror project! I make my poor husband take all kinds of dorky pictures of me holding things… He accidentally got himself in this picture (don't tell him I used it on the blog!)
Here's the mirror before… Jess is in a gold phase, and liked it gold, but me… not so much…
I went to Lowes and after staring at the spraypaint choices for an eternity, I decided that blue will now be my kitchen accent color. A worker actually made a comment about how long it took me to choose.: )
Did the blue in the above picture worry you?? It just looks crazy bright in the pic, in reality, it's a really great, dark blue! Love it! If you're doing this project with a mirror, I recommend spraypainting right over the mirror as well. It acts like a primer for the chalkboard paint.
See the little cobwebs?? I clearly didn't take the time to prep the mirror. Thankfully, they wiped right off. Impulsive remember?
Next, it was time to paint the mirror surface with chalkboard paint. You can get it by the quart at any Lowes or Home Depot.
Rather than using my real painting brushes, I opted for some art brushes because I was going to freehand the edges.
It is just me or do other people like taking pictures of open cans of paint? I always think they look so cool!
Thankfully, the mirror had an easy edge to follow and I was able to get my lines nice and crisp (perfectionist tendencies!)
The chalkboard paint went on really evenly and only required one coat.
And of course I hung it before it was dry! Ahhh I love it so much!
We decided we'd use it for a countdown for this kids for now. Eventually, I'll need some kind of quote that makes me seem way cooler than I am.
Here's where it's hanging in my house…It's on a small wall area between the kitchen and living room. And look, I've been using my Key Hooks and you can see them in this picture!
So, do you have any cool frames or broken mirrors that you can make into a cool chalkboard? What do you think of my Mirror, Mirror on the Wall turned Chalkboard?
We're linking up to a few Great Blogs! Shabby Nest, Remodelaholic, Under the Table and Dreaming, Today’s Creative Blog, DecorChick, Finding Fabulous, The DIY Show-Off, Be Different Act Normal, Tatertots and Jello, Polly Want a Crafter?, Shabby Chic Cottage, Stories of A-Z, House of Hepworths, Beneath My Heart, Shanty 2 Chic, The CSI Project, CRAFT, House of Grace, Domestically Speaking, Creations by Kara, Southern Hospitality, Lolly Jane, Keeping it Simple, Somewhat Simple, Making the world Cuter, Young and Crafty, My Backyard Eden, Dittle Dattle, A Glimpse Inside, At Home with K, Brambleberry Cottage, Beyond the Picket Fence, Sumo’s Sweet Stuff, Someday Crafts, Serenity Now, The DIY Club, My Girlish Whims
Maybe you noticed something missing from our Fall Lovers Series… Pumpkins! We’re not haters and we didn’t forget… we were saving them for this special pumpkin post! We had the pleasure of sharing some fabulous, non-traditional pumpkin ideas for the 69 News in Allentown, PA and now you’ll get to see the inside scoop on how to make your own.
We got together this week to have a pumpkin party of sorts… it included lots of pumpkins, a large bowl of uncooked cookie dough (yum!) and a big old mess!
I Can’t think of a better way to spend time with a BFF can you? Tac Pumpkins
This is a Horchow knockoff and we’re thrilled with how cool it looks. Jess said it looks like a “biker chick pumpkin!” Simply spray paint your pumpkin (we used Oil Rubbed Bronze) and when it’s dry, simply push the tacks in a cool pattern. This literally took about 5 minutes.
Sticker Pumpkins If you have kids, they’ll love to help with this one. We used simple “teacher stars,” but you can use any sticker shape. Make sure your pumpkin is clean and totally dry, add the stickers, and then spray paint. When the paint is pretty much dry, remove the stickers and reveal the awesomeness!
Ribbon Jack Be Littles These guys would look great in a big, black wooden bowl. It doesn’t get any easier than this folks… Simply wrap the ribbon and hold in place with a thumbtack.
Mr. Pumpkin Head If you've seen Toy Story 3, the you know that Mr. Potato head works even on a pancake, so why not try pumpkin? If you have little ones that are a tad young for real pumpkin decorating or carving, this is the idea for you!
No pumpkins were harmed in the making of this tutorial! You do need to poke the holes with a pen so that the pieces stay put. I promise I used Novocain before starting the procedure.
Don’t be afraid to think outside the box (cliche, but oh so true) and use fun items you already own!
Sexy Lady Pumpkin Vera Wang might want to hunt us down after this post, but we love the look. We took some sexy tights and believe it or not, squeezed a pumpkin in! It was really quite hysterical and I almost wish we had it on video.
It’s definitely a two person job!
We cut the bottom end and then wrapped the stem with the other.
I think Vera might be proud!
Decoupage Pumpkin The key to this funky-punky is cutting thin strips of paper. Simply take scrapbook paper or fabric and cut it into ½ -1 inch strips. This was a small pumpkin, so we used ½ inch. Apply modpodge heavily to the back of each strip and start wrapping the pumpkin. When it’s completely covered give the outside a coat of modpodge as well. This one is to go with Monica’s Poe Inspired mantle.
Modpodge goes on white, but don’t worry… it dries clear.
By about this time in our pumpkin party, here’s what the kitchen looked like. We never claimed to be neat crafters did we?
Crackle Paint Pumpkins This project was inspired by Beth who was inspired by Jane… don’t you love the sharing of ideas in the blog world? We sure do! For these you’ll need some cheapo dollar store pumpkins… and man, they’re ugly at first.
First, spray a base coat. We used flat, black that we already owned.
We had a little spray paint station outside. The hubs loves our multi-colored grass! Then, apply the crackle medium. We bought Martha’s brand from Michaels. We patiently waited grabbed the blow drier to pick up the pace and once it was totally almost dry we brushed on the top color. The key here is long, even strokes. Crackle paint can be a tad fussy.
Let the top coat dry and watch as the cracks magically appear. It’s pretty cool!
House # Pumpkin Another simple idea, but one that would look adorable on your front porch. We picked up these numbers at Lowes and then used a mallet (a hammer would work too, but there’s just something fun about a mallet) to bang in the screws. Presto- Chango… house # pumpkin!
Cookie Cutter Pumpkin Since we're committed to being the REAL housewives of Bucks County, we're sharing once again another FAIL with you! We were inspired to try banging cookie cutters into pumpkins. Sounds simple enough right? Well, it would have been simple if the pumpkin wasn't thicker than the cookie cutter. I do think it would have worked on a smaller pumpkin… Instead, it broke the cutter and we had to do quite a bit of work to get it out.
You can barely even tell it's a bat. Drats!
If you've tried this and it worked, let us know and give us some tips! So there you have it… some non-traditional pumpkin ideas to try in 2011. If you want to see us in action, we'll be posting the clip to the 69 morning show soon. Be sure you"like" us on Facebook, because we'll link it there.
Happy Wednesday, thanks for pumpkin partying with us!
Linking to: iheartnaptime Under the Table and Dreaming, Tutorials & Tips, Tip Me Tuesday
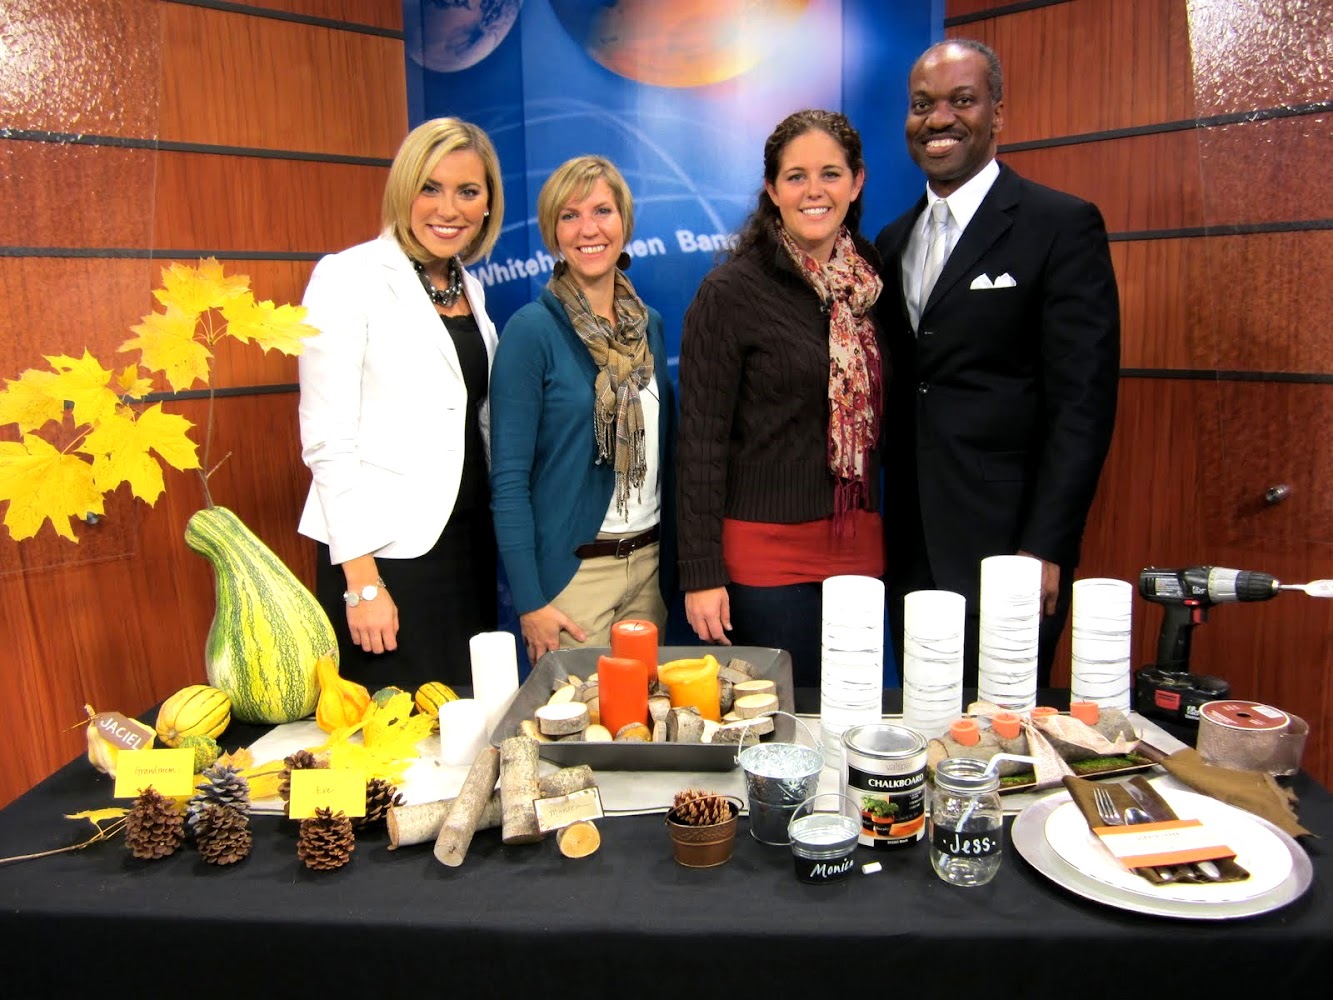
Ok, we're back, as promised, with all the information about our Thanksgiving centerpiece and place card ideas! If you didn't see the segment today on the Channel 69 Sunrise morning show, you're in luck because you can watch it here! First of all, I just have to say, that Monica and I love doing this show. It is so much fun, so laid back, and Eve Tannery is a total pro! Plus, she actually reads our blog so we know she's legitmately a fan (thanks, Eve!)
And of course, we had to include a goofy one…
I just have to mention one funny thing that happened this morning before our segments. Monica and I were setting up the table and Mo started to light the candles in some of our centerpieces. I wasn't sure if we were allowed to, so I caught Jaciel's (the other anchor) eye while Eve was doing her thing and mouthed"Can we light these?" He didn't hear what I asked, and said,"Do I like those? It looks so nice." We were cracking up thinking about what he must think of us asking if our table looked nice as he was giving the news. Maybe not so funny to you, but stinkin' hilarious to us that early.: ) Ok, now on to the good stuff: Centerpieces The Gourd Vase We like to keep it simple, bring the outdoors in, and use things you can find around your house. This centerpiece meets all of those requirements, so I'm one happy camper!
I (Jessica) went to a local farmstore called Penn-Vermont Farms (which is fabulous by the way!) and picked up a bunch of different sized gourds. The gourd I used for the vase is a kershaw gourd, but you could also use a birdhouse gourd. You want to choose a gourd that is not top-heavy so it can hold the weight of the branches and leaves. Then, I drilled a small hole into the top.
I recommend making this centerpiece on the actual day of Thanksgiving because once you cut the branch, the leaves quickly die. Ask me how I know that. You could easily use berries or bare branches and this centerpiece would still look amazing. (Curious about my table runner? You can check out how I made that using a dropcloth here)
------------------------------------------------------------------------------------------------------------- The Candle Log
This centerpiece is so simple, but really pretty. Monica made this using a birch log, but any kind of wood will do. First measure the length of your tray (Mo picked this one up at Michael's!) so you can determine the length of the piece of wood. You'll want to leave a few inches on either end. Cut the sheet moss to the size of the bottom of the tray and lay it down lengthwise in the tray.
Place the candles on the log and mark where you want them to go.
Using a circle drill bit (this one is 1 1/2 inches), partially drill the holes until you have enough depth to place your votive candles.
Wrap the whole thing with a pretty ribbon, and voila! An easy, rustic centerpiece!
Fall Tray with Cut Log Pieces and Candles
I found a great oversized tray at ReStore, and could not wait to put it to good use! Monica had recently cut a bunch of birch logs for a project (more on that to come later!), so I used them to fill my tray. Use a chop saw to cut your log into 1-2 inch circles.
I surrounded the birch discs with a bed of yellow and red leaves and then placed 3 orange pillar candles in the center. You could easily do a more modern, less rustic, take on this by leaving out the leaves and adding white pillar candles for a sleek, cool look.
------------------------------------------------------------------------------------------------------------- Place Cards Modern Name & Menu Napkin Rings
Monica made these using regular cardstock in two fall colors. Decide on the font you want to use, type it up in a word document, and then print it out. Layer the printed paper onto the opposite color paper and wrap around the napkin. Mo used extra fabric she had laying around to make a napkin and laid the utensils on it, followed by the place card. Finally, lay the whole thing onto the plate and you're done! Remember: you don't have to spend a million bucks to create a beautiful tablescape for Thanksgiving. Use what you have on hand!
Pair it with the candle log and you're table practically sets itself! (BTW- do you notice the name Mo used on the place card? Greyson. She secretly wished she had named one of her children that. Now the secrets out.: ) ------------------------------------------------------------------------------------------------------------- Chalkboard Mason Jar Mugs & Tin Buckets
This is one that the kids will enjoy because it uses chalkboard paint. Let them write the names of your young guests on these mason jar mugs and place them around your kid table. They'll love being involved and will be thrilled they have their very own cup! Or for a more mature version, grab a few tin buckets and paint with chalkboard paint. Fill it with a few pinecones, or a few after-dinner treats.
Anyone can do this, and it adds instant fun to your table! ------------------------------------------------------------------------------------------------------------- Pinecone Placecard Holders
Michael's has loads of scented pinecones for sale right now, but you could also take a nature walk and collect them yourselves for an even less expensive way to decorate. Enlist someone with some muscles, because cutting into a pinecone is no easy task! Use a hack saw to create a"slot" in the top of the pinecone and then slide your placecard right in. Mo used cardstock, but you could get a little fancier if you wanted because you saved a bundle by using pinecones!: )
Of all the placecard holders, this just might be my favorite. Take a couple of the wood slices you cut for your centerpiece, and create a slot in the wood using a hack saw or a sharp knife.
To make the placecards shown here, find two complimentary pieces of cardstock and scrapbook paper. Cut to size and layer them. Add a tiny clothespin for interest and write the name of your guest on the card. That's it! Use this with the fall tray centerpiece and you're able to maintain continuity of your design throughout the entire table.
Ok, I saved the easiest for last. Make your placecard with cardstock and write the name of your guest on it. Punch a hole and tie it around the stem of your gourd. Easy peasy and adorable! ------------------------------------------------------------------------------------------------------------- We hope you liked our table decor ideas for Thanksgiving- we had a blast coming up with them! We'll be making another appearance on the Channel 69 News Sunrise show in December and would love to hear what YOU would like to see us create or design! Leave us a comment with your thoughts.: ) T minus 16 days until Thanksgiving. Get decorating!