My Creative Blog [Search results for Have A Laugh

  • Perfect Valentine's Gift {The Game of Love}

    Perfect Valentine's Gift {The Game of Love}

    Good ole Valentine's Day… Love it or hate it it's coming! Well, you can thank me later, but I have the perfect gift for your hubs! This gift started over ten years ago on our very first anniversary… we were broke, still in school, and oh so in love. Let me tell you it was a hit! So much so, that I just gave the same gift for our 10 year anniversary back in November. **Disclaimer- This post is written totally from the perspective of a married woman that adores her husband. I'm being honest here ladies, so you've been warned. Also, if you are my mother, STOP reading right now. Thanks!**
    The Perfect Valentine's Gift- The Game of Love Imagine with me for a moment… It's been a long day, you and the hubs are headed to bed. You've put on your favorite comfy, frumpy sweats and a tee for bed. Once your hubs sees your bedtime wardrobe choice he knows there's no shot of romance for the night. He pulls back the covers to hop in bed and… what's this??

    You've just pulled off the best Valentine's Day surprise ever. It's time to play The Game of Love! It's a game your hubs will love even more than the Superbowl!
    All you'll need for this DIY is some time without your hubby around, some markers, some kind of shape template, and a fitted bed sheet…Seriously mom, if you're reading- Stop!

    Ok, you can kind of see where this is going, and I must make a public confession… yes, I used one of my bff's birth announcement as my template! It was an adorable shape- Sorry Mandi!

    I spent a lot of time ironing my sheet and then had an idea… I could have just washed and dried it. That would be easier.

    Pop on your still wrinkly ironed sheet and you're ready to start making your game board.

    If you want nice, straight lines, you can use some masking tape and your template to help with your spacing.

    It doesn't have to be perfect (trust me he won't be too focused on your straight lines!) Start tracing your template. Trace it over and over again. Darn that I couldn't really have a friend come and help me with this DIY… awkward: )

    Before removing the masking tape, I added some cute little dashes along the top.

    You can add your game's title across the top. Don't you love my cheesy name? The Game of Love… still makes me laugh! Feel free to use it or come up with a less cheesy one!

    Now it's time to get creative. I included a few presents, snacks, wardrobe changes, and lots more!

    Here are a few of my squares… (if you really want to know what else I added, you can try and read the teeny writing! Ha!) I had a few gifts wrapped and ready to go and a few yummy romantic snacks as well.

    Put your mattress back and it's ready to go! (Okay, I have some limits, so I pulled a little censored for your protection action!)

    In case you're wondering, here are The Official Game of Love Rules: 1. The player will roll a die, but the highest number can be 3 (so divide by 2 or the game goes too fast!) 2. Each square has a 1 1/2 minute time limit 3. No getting carried away- you have to stop at 90 seconds and roll again (the hubs might fight you on that one) 4. Only one person"plays" your role is just the game"facilitator" 5. The Final square is"Score" and you can't skip ahead (if ya know what I mean)
    Okay, now my rationale for posting this. No, it's not my life's aspiration for my personal life to be all over Pinterest (don't worry, I am cool with you pinning it though). I just know that marriage is tough. It takes effort each and every day, not just Valentine's Day. I don't know your situation, but I know that 4 kids takes a toll on the love life. As a woman, I have to be intentional about connecting with my husband and making him a priority (FYI"connecting" is a code word! lol). I wanted to encourage woman to have FUN with their husbands… it's really okay- you're married! I call this the"Perfect Valentine's Gift" because for me, it meant so much to Eric that I took the time to think through this, plan out the surprise, and then have an unexpected evening dedicated to us.

    So, will you be using The Game of Love to attempt to"Connect" with your husband this Valentine's Day?

    Psssst! We came up with a new version of this game this year. Click here for the Game of Love: Travel Edition!
    Linking to: TT&J, Stories of A to Z i heart naptime

  • True Confessions of a Blogger {and a Giveaway}

    True Confessions of a Blogger {and a Giveaway}

    It feels like I haven't blogged in forever! It's nice to be back… well, honestly if you told me I could jump on a plane now, I'd grab my suit and be gone in an instant. Mexico was insanely awesome. I'm going to do a whole post on it next Monday!
    So we're supposed to be giving interesting statistics this week… I've got a good one for ya!

    The Disappearing Giveaway.. If you've followed us since the very beginning you might remember a post about our Design Challeng{ed} contest… Or maybe you don't remember because not one single person entered. Ha! We'd only been blogging about two months and it was a major flop! It sure makes us laugh though!

    Famous Angelina… Jess wrote a cute post about Cam's 3rd birthday party last year. It was a cute Angelina Ballerina theme. The post is fine, but nothing over the top. We didn't have great lighting and all the pictures are so-so… however, thanks to the post's title it was in our top 15 posts for landing pages! So many people have Googled Angelina Ballerina and found us! Ha!

    So maybe we laugh a lot and blush a little over these silly posts, but it reminds us of the amazing road this blog has taken. We can't wait to look back next year and see what 2012 had for us!
    Now, get ready for some stinkin' awesome giveaways! --------------------------------------------------------------------------------------------------------------------- We have three awesome giveaways for you today! The giveaways are separate entities (in other words, if you win, you don't win them all, but you can enter all three!) Please let us know which giveaways you're gunning for in your comments.
    My Best Friend's Hair Giveaway My Best Friend's Hair is our most recent sponsor and it's the coolest concept! Their site can help you find the best stylists all over the country and get ratings and reviews. Want to find the best stylist in your area that can deal with insanely thick, unruly hair (that would be my wish)? They can help you with that! They also have tons of info about the hottest cuts and styles- so fun! Today they're giving away a Neuma Beauty Hair Products gift set. I don't know about you, but I love using high quality hair products, and getting them for free is even better!

    To enter: (This giveaway is now closed)
    1-Like My Best Friend's Hair Facebook Page and leave us a comment letting us know.
    2-For an additional chance to win, head over to the My Best Friend's Hair website and either search for a stylist in your area or leave a review of your stylist and then leave a comment letting us know you did.

    Scentsy Giveaway I must have been living under a rock for a while, because I had never tried Scentsy until Breanne joined our blog last fall. Honestly, I wake up, walk down stairs, and turn my warmer on immediately, my kids take turns picking out the scents we should use. It's awesome! Breanne is giving away one warmer and scentsy bar of your choice!

    To enter: (This giveaway is now closed)
    1- Go to Breanne's Scentsy website and then tell us in a comment what scent you'd love to try.
    2-For an additional chance to win Follow RHBC on Twitter and leave us a comment letting us know.

    Kotton Pickin' Kute Hat My poor kids were all born well before the world thought to make amazingly cute hats- boo! I honestly don't think there's anything cuter than a baby with a sock monkey hat! Krista hand knits all of her hats and lucky for us, she's giving one away! Don't have an itty bitty baby? No worries, she can make them in child and even adult sizes. I just might buy the hubs a sock monkey hat… actually, I won't because I could possibly die of laughter.

    To enter: (This giveaway is now closed)
    1- Go to Kotton Pickin Kute's Etsy Store and then tell us in a comment what hat you love!
    2-For an additional chance to win like Kotton Pickin' Kute on Facebookand leave us a comment letting us know.

    Giving things away is so darn fun! I can't wait to announce the winners tomorrow! Hope you're enjoying our week of giveaways just as much as we are!

    AND NOW FOR THE WINNERS FROM YESTERDAY!

    The winner of the Thirty-one Gifts giveaway is: Dwell Wool Knits! Congratulations!

    The winner of the Dream Dinners meals is: Whitney! (and I promise I didn't cheat just because she's having her first baby! Congrats Whitney!)

    (email us your address so we can get you your prizes!)

    jess
    Monica
  • Nate's 12 Days of Holiday DIY's {Day 4}

    Nate's 12 Days of Holiday DIY's {Day 4}

    So let's just call a spade a spade… today's post is definitely less of a tutorial and more of a tool for inspiration. I can own the fact that this projectwas not hard at all. It's also not something a person would normally think of doing as a part of Christmas decor, and it turned out to be my favorite part (and Monicas!) of the entire room, so it's worth talking about, for sure. What the heck am I talking about?
    Accent Tree Branch

    I'm such a fan of bringing the outdoors in because it's beautiful, but also because it's FREE. As soon as I heard that we were swapping houses and that I was decorating Monica's living room, I knew immediately that I wanted to incorporate a branch above the mantle, that would draw the eye upwards since they have high ceilings. I also knew that a branch would coordinate beautifully with their earthy, stone fireplace. I had seen branches used as decor in several magazines as well as a few ideas floating around in blogland. I'll be honest- this was my wildcard project. It had the potential to turn out awesome, but it also could make Nate Berkus laugh at me.

    Source: apartmenttherapy.com via Kayleigh on Pinterest

    My original thought was to hang a branch from the ceiling (I knew that the few holes I put in the ceiling could easily be repaired when they decided to remove the branch) using fishing line and something like this:

    Zoomed: Stanley-National Hardware 1/4" Galvanized Coarse-Thread Eye Bolt

    But then, my husband found the perfect branch ever in the yard and I realized that I might be able to avoid making Monica's hubby Eric angry putting loads of holes in the ceiling. Could it be that this branch was the right height with the right arch at the right angle to complete my mantle? Honestly this was too good to be true in a crazy fast, 48-hour challenge.

    Yes, that is actually the way the room looked most of the time. Can you even believe I could get anything done with all that mess? I seriously spent about 3/4 of my time wandering around looking for scissors. And here, Monica, had laid out all of her supplies all pretty and organized…

    To each, his own, I guess.: ) Wait, what was I talking about again? Oh yes, the branch. After much debate, (should we cut the branch and hang it from the ceiling? Should we lean the branch on the mantle? Should I throw the branch in the fire and burn it?), we decided on keeping the branch. From then on the branch was treated like gold. If anyone got near it, I gave them the stink eye and told them to stay away from it. My hubs accidentally stepped on it, and you should have heard the way I yelled his name. It had our camera crew rolling on the floor laughing. It's not every day that the perfect branch comes along to complete a Christmas mantle. C'mon, you know how it is.

    In a 48-hour challenge, you have to think and act quickly. Being in someone else's house and trying to find supplies that will help with your project is tricky, so we had to be resourceful and creative. My hubs found two rake mount/wall holder/things in the garage and we figured out that the two arms could bend around the branch. The bottom of the branch is resting on one of the rake thingys, and the other one is hugging the branch tight to hold it in place. Lucky for me, one of the offshoots of the branch could rest right on the mantle holding a good bit of the weight.

    Obviously, there are other ways of doing this, but we were in a hurry and were trying to make the least amount of repair work for them (aren't we sweet?). However, this method is still holding! To finish it off, I hung three ornaments I made (more on those to come!) on the end of the branch for a touch of Christmas whimsy.

    All in all, this was a cheap and easy project that makes such a huge impact. I am totally in love, and have been looking for a place to hang a branch in my home ever since.
    Would you ever hang a tree in your living room or am I the only crazy one?; )

    ------------------------------------------------------------------------------------------------------------- Welcome to our newest sponsor, Red Letter Words! If you haven't already heard of Red Letter Words, what rock have you been hiding under? Dee creates beautiful pieces of art that incorporate either verses of Scripture or favorite travel spots in a subway panel style. They are so modern in design, but offer a vintage touch with the"erased chalkboard" effect she uses. And not only that, she offers custom designs as well! My personal favorite for the Christmas season is this:

    O Holy Night Cafe Mount Print
    and this is pretty cute too:

    Santa's Reindeer Art Print
    Hurry! You still have time to buy several of these as gifts for everyone you know. Use the code MERRY15 for 15% off your order. (Offer exludes custom prints and the print of the month) -------------------------------------------------------------------------------------------------------------------------------------------------------------------

  • Happy 2nd Blogiversary to Us!

    Happy 2nd Blogiversary to Us!

    It's actually incredibly hard to believe that we are 2 years in to this whole blogging thing. Last year we celebrated our one year blogiversary with loads of talented guest posters, giveaways and fun facts about our crazy first year. This year, we have soooo much going on that we just couldn't swing all that, but we still wanted to recognize some of the funny, ridiculous and amazing things that have happened to us over the past two years. But before that we want to thank YOU guys, whether you're a brand new reader or have been here for the long haul, for your support and encouragement to us. We would be nothing without you guys!! So thank you. Now, for the fun part;

    Three Posts We Wished We'd Never Written We seriously laugh out loud sometimes about the posts we wrote when we first started. Let's just say it took us awhile to figure out our niche.; ) I'm sure there are tons of other lousy posts, but these are a few of the ones we love to hate.
    1. In our second month of blogging we wrote a post entitled, For All You Tomboys Out There about how to braid your hair. Ha! As if we are experts about anything related to hair. Hilarious. (Our friend, Jane, did the braid, and she IS awesome at doing hair, but us? Not so much.)

    2. I threw an Angelina Ballerina-themed 3rd birthday party and posted about it way back when. The party was cute enough, but nothing over the top, and the pictures are pitifully bad. The funny part is that this is one of our most successful posts! I guess there aren't too many people throwing Angelina birthday parties??

    3. Monica shared her adventures in trying to DIY a belt out of fabric in this post. Even her daughter was like,"Ewww…Mom, don't wear that." Love that.

    Blog Design for Beginners We prided ourselves on doing everything by ourself- including our blog design. We did ok for novices, and actually have done everything related to the way our blog runs and looks ourselves until the last 6 months or so. Now, we happily turn our ideas over to Kim, at 733 Design, for our custom blog design. Anyway, take a look at the way things used to be…
    Header 1… Designed at 12am the night we randomly decided to start a blog…

    Header 2… About 3 months in…

    Header 4… this one lasted about 2 minutes. We hated it!

    Header 5… this one lasted for almost a year until we had to play the name swaparoo game…

    Ahh… How much we love Kim and her design expertise. She"gets" us and did a great job on our logo and header!

    Five Incredible Opportunities We've Received as a result of this Blog All that goofiness aside, we have been blessed to have some awesome experiences because of this little ol' blog and we're sure we're on the verge of lots more.
    1. The Nate Show: Last year we had the priviledge of being on four episodes of Nate's 2011-2012 season and it was a blast. Nate is a sweetie, and we fell in love with live TV, for sure. This will forever remain as one of the highlights of our blogging careers.

    2. Mexico: Thanks to our buddy, Nate, we won a trip for 6 days to Cancun, Mexico that totally rocked. We had such a blast with two other girlfriends and enjoyed loads of down time and really great food. Without this blog= no Mexico= sad girls.

    3. HGTV Magazine and Ladies Home Journal

    4. Feautred on Young House Love! I think every blogger wants to be featured by John and Sherry (if you're living under a rock, they are THE biggest and most successful home bloggers out there) and we got our opportunity with the Guest Room Makeover we did for a friend. Check that off the bucket list.: )

    5. Creating with the Stars. It's crazy how things come full circle, isn't it? We LOVED being a part of this contest, and are even more thrilled to be hosting it this year! Speaking of CWTS, TODAY is the last day to enter your projects! Over the next week, we (with the help of the 12 stars) will be poring over the submissions to choose the best contestants! Don't forget- the contestants and their blog star partners will be announced next Friday, March 1st! Get excited, people, get very excited.

    So, we've shared our highs and lows from the past two years, and again we want to say that we are so honored to have had you on this amazing journey with us. 2013 promises to be our BIGGEST year yet, so hold on tight, we're all in for a crazy ride! In honor of 2 Rockin' Years of Blogging, we're gonna open the floor for a little Q and A… Leave a comment asking us anything under the sun and we'll respond. It can be about blogging, life, our friendship, how to braid hair (haha!) or whatever you want to know. We'll comment back throughout the day! So… what do you want to know??

  • Top 11 Projects of 2011 {Jess' Recap}

    Top 11 Projects of 2011 {Jess' Recap}

    I'm going to keep it real here and first say that I felt like I was in a blogging slump the last few weeks. But a wonderful Christmas break and looking back over our past year has rejuvenated me! I'm so proud of the projects Monica and I completed, and of this blog that we love! I'm going to try to keep it short and sweet (I tend to be a bit wordy, yes?; )

    1. Ever hear of a guy named Nate Berkus?

    I just couldn't do a 2011 recap without mentioning our whirlwind love affair crate challenges with Mr. Nate Berkus, himself. You can see what we did for the show here, here and here.
    2. Barnwood Artwork

    This beauty was, by far, my favorite project of the year. Modern, rustic, simple. Plus it was made with love for my best friend- you can't beat that!
    3. Easy Door Headboard

    This sort of makes me laugh, but this project is one of our most popular. My hubs and I made this headboard on a whim using some very non-traditional methods, but it's a winner!
    4. Antique Table turned Vanity

    I had been wanting to do this for a long time, and the Crafting with the Stars challenge gave me the perfect opportunity to give it a go! Monica and I spent one looooong evening getting it just right, but now I can't even express how much I love this vanity! (That sentence is ridiculous, but oh so true.) You can check out two of the other projects we did for CWTS on Monica's post yesterday.
    5. Modern Typography Meets Reclaimed Barnwood

    Oh barnwood, how I adore thee. Same to you, typography. Why not marry the two and make something fabulous? Well, ok, I will. Thankyouverymuch.
    6. Pallet Shelf Love

    Who loves free projects? This girl (said with thumbs pointing at chest)! This shelf was free, easy and quick. Love that.
    7. DIY Drop-cloth Window Treatments

    Drop-cloth window treatments have been floating around the blogosphere for a while now, but I tried my hand at making some valances for my living room when I heard aforementioned Mr. Berkus was sending a team to my house to film. That sure got my rear end in gear, and boy, am I glad. Those naked windows were in desperate need of some clothes!
    8. From an Oops! to a Yes! Mirror Transformation

    That this mirror turned into something I'm proud of, is an absolute miracle and purely an accident. It made me so thankful that, sometimes, persistance pays off!
    9. Faux-Stained Glass Window

    I have a crush on old things of all kinds, but can't often pay for the real deal, so I came up with this idea of using a wall decal from Home Depot and an antique window from my in-law's barn and making a faux stained glass window! I really liked it then, but liked it even more after Monica used it in my basement makeover! 10. A Garden Wall

    I brought a bit of green into my kitchen by creating a garden wall with succelents. You know, the kind that are ridiculously hard to kill. It's true! I've had these since May, and they're still living, for which I can take no credit!
    11. The Barn

    Monica and I were so excited to combine our talents this year to design and create one-of-a-kind products using reclaimed barnwood. We opened our etsy shop in September amidst all our crazy Nate show stuff/ Crafting with the Stars submission/ and our first appearance on our local news. Can you say bad timing?: ) Even so, we love the items and our shop, so if you are ever in need of a unique gift or item for your home, we'd be thrilled to make one for you! ------------------------------------------------------------------------------------------------------------- So, we've had a GREAT year, and owe you a huge, fat thank you! This year would not have been possible without you and we so appreciate you taking time out of your busy lives to stop by our blog! Here's to another fantastic year in 2012!

    Pin It
  • How to Add {Awesome} House Numbers

    How to Add {Awesome} House Numbers

    Thanks for all your great comments about my new front door color. Valspar's Spritz of Lime paint might be a new obsession for me! I gave you a little sneak peek of the door numbers yesterday, but today I'll give you the full low down. Adding numbers to a metal door can be tricky, but don't worry, I made all the mistakes for you and can save you some time!

    Add numbers

    My front door is heavy, and metal or something like it… bottom line, it's not wood. I didn't want to make any holes in it. I found these clean lined, modern house numbers at Lowes. I had big plans to DIY numbers out of MDF, but for $4.99 each, I decided these would work just fine. I'm all about the DIY, but not when it makes more sense to just buy em!

    DSC_0228

    So… metal numbers on a metal door… hmm… I'm smart (or so I think…) so I decided heavy-duty, double sided magnet was a perfect non-permanent solution. This way, depending on what wreath (or not) I have on my door, I can move the numbers around! Pure Genius!

    DSC_0231

    The magnet has adhesive on one side, so just cut little strips and stick it to the back.

    DSC_0236

    Like this!

    DSC_0242

    Umm… Guess what?? I guess my door isn't really metal and doesn't work with a magnet. DARN! Would have been nice to check that out first. Oops!

    IMG_0573

    They work great on my fridge! So if you even need house numbers on a fridge, now you know how!

    DSC_0245

    Okay, plan B… off I went to Lowe's with plans to get double sided adhesive. I asked the nice man where the industrial strength tape would be found. Of course he asked about my project and had a better idea. He suggested industrial velcro.

    DSC_0246

    It's nice and heavy duty, so I was swayed from my plan and gave it a try.

    DSC_0251

    Apply it the same as the magnet…

    DSC_0253

    Because this stuff is sticky, I wanted to be sure I had it straight. Look how muddy my level is… not really sure why…

    DSC_0256

    Peel the plastic off the adhesive and firmly press on…

    DSC_0259

    Wait 30 seconds and…
    watch them fall to the ground. ARRRGGG! This is the point where I started to get a wee bit annoyed. Then I started to laugh… why would I think velcro was a better idea than just double sided adhesive? I must have had temporary brain loss.

    IMG_0573

    Here's the winner and what I should have used from the start. So, if you want to add house numbers, just begin here and skip the other methods I tried!

    tape

    Finally! There they are. Nice and permanent (well sorta, if I want to remove them I can pull them off, and I'd just need to touch up paint)

    door close up

    I love the way they look against the green/yellow!

    DSC_0270

    And just as a reminder, here's what else I have planned for my porch!

    To do list

    There ya have it… 2 ways NOT to add numbers, and 1 way that works like a charm! Aren't you glad you have me to do all the trial and error for you? Do you have numbers on your door? Do Tell!

    Monica
    Follow Me on Pinterest
  • Nate's 12 Days of Holiday DIYs {Day 12 Monica's Details…}

    Nate's 12 Days of Holiday DIYs {Day 12 Monica's Details…}

    Happy 12th Day!! Can you believe we made it? Who would have thought 48 hours could have provided us with over two weeks of projects to post about!?! We've really loved sharing everything with you, although if you want us to be completely honest… since we've been seeing these rooms since OCTOBER, we're sort of glad to be done with all of it! Bad bloggers!
    To finish off the final day I'm going to be sharing the itty bitty little details that don't quite deserve a post of their own, but do need a shout out at least!

    One of the projects that was so simple it made me laugh, was the bracelet Christmas tree. Like most of my projects it came about by accident (and hey, so did Penicillin, so don't knock it!)

    I was moving the bracelets onto my workspace and stacked them… Hmm, looks sorta like a tree. Could this be the World's Easiest DIY? And that's how it went down. It's a bit hard to see in the"After" pics, but in the room, the gold looks nice and shiny and kind of adds a funky element that I love.

    Jess had this metal letter J floating around, but rather than thinking Jackson I was thinking Joy! I grabbed a black frame, printed out some holiday text and put it all together. I'm sooo bummed I can't figure out where I found the holiday text, but I know I googled something like"Holiday words typed" or something really obscure like that… did I mention I was short on time? Here's the picture I used. If you know the source let me know and I'll gladly add it!

    For me, little details like these make such a huge difference. Even if they're never even seen on TV, I just couldn't do a room without them.
    Ok, now for a whirlwind of final details…

    This no sew gal was thrilled with how the sweater accent pillow turned out! My Epsom salt faux snow made me feel ready to hit the slopes. I'm a wrapping addict, so chunky stenciled presents were right up my alley. Seriously, who can have a horse without an ascot?? That would be just plain wrong! (hehe) And finally, I was inspired by this blog post to try a lighted felt garland.
    Well there you have it! Thanks so much for hanging with us for these 12 days! We'll be back to our regularly scheduled programming tomorrow! And can I just mention that I'm fairly certain I'm more excited than my kids about Christmas?? Only 5 more days!!!

    P.S. Tonight Jess is hosting a"Favorite Things" party and we're both pretty excited about it. I can't wait to see what our gal pals' favorite things are! Have you ever been to one before?? We'll give you all the details later this week!

  • Poe Inspired Mantle & DIY Fall Scrap Sign

    Poe Inspired Mantle & DIY Fall Scrap Sign

    Source: tumblr.com via The Real Housewives on Pinterest
    Is it just the English teacher in me, or is this funny? I seriously laugh every single time I see it. Perhaps this picture is what inspired me to shoot for a non-traditional fall mantle this year. I'm usually a warm colors, traditional fall mantle girl. Not this year. I wanted something with cooler tones and some personality. Enter the Poe Inspired Mantle.

    The black & white pumpkin and the raven are both from Hobby Lobby. (My daughter claims it's a crow, but it's a raven to me, heck it even squaked"Nevermore" the other day!) I was thinking of getting sticks for the vase, but I saw these peacock feathers and they just screamed"AWESOME" so I went with them and some spoooky branches. The owl is adorable and will become a permanent part of my decor somewhere.

    I still really struggle with having the TV above the fireplace because it cramps my decorating style, but it's definitely the most practical. Sorry, for the BTR promo… when you have 4 kids, sometimes you gotta let them watch tv so mommy can take blog pics. Who knows, maybe BTR will want to be featured on our blog? Ha! (If you don't know BTR, then you clearly don't have an 9yr old)
    In addition to finishing my fall mantle, the babies and I (perhaps at 2 and 4 they're not babies, but we call 'em that) did a little fall craftin' with some scrap particle board.
    DIY Scrap Fall Sign Nothing fancy about this wood; I think the builder left it. It's really poor quality particle board, but I saw its inner beauty! Well…actually… I was just glad it was free.

    My famous paint can shot (can something be famous just because I declared it so?) I just used some leftover paint that Nate left here. Oh, who's Nate you ask?? Umm, just my pal Nate Berkus. We're tight. (hahah!) This paint did come in the Nate Crate though.

    Did you know that Jess and I like to paint topless? KIDDING!! I let my kiddos do the painting… you thought I was a hoochie for a second there didn't you?

    We did a very rough base coat. I didn't want it 100% covered. Then it was time to stencil the letters and I needed to get it straight, so rather than take 2 minutes to find a ruler, I just used a scrap piece of paper and a piece of chalk to make some guide lines.

    The stencil I used was the Helvetica font and I got it for $7.99 at HobLob.

    I love these little bracket symbols. Jess and I probably over use them, but we can't help it. They're cool.

    Some of the letters require a little work. First, stencil in the shape as is…

    Then, you need to fill in where the plastic was for support. I just used two little pieces of painter's tape. It fills in nicely as you'll see in the finished product.

    DARN my lack of planning. LEAF PILE was too long… I had 2 options… pretend"AF PILE" is a cool, family inside joke, or come up with a plan B…

    I went with plan B. I painted over the AF…

    and decided that a visual would work. Kaden ran outside and picked out two leaves that he liked the most. I pressed them on the wood and did a light stencil around the edges to create the shape of the leaf

    I'll be the first to admit: 1. This is not a fancy-schmancy masterpiece 2. It's really hard to read. (Fall sorta looks like"fail"… The hubs was confused why I wrote the word"pile" until I explained it… and yes, there is a P missing from"pumpkins" for the sake of space)

    However, even with all its quirkiness, after a final light sanding, I was really happy with the finished product.

    I think it's a fun, personal addition to our front porch.

    Sure, it's no crazy-cool subway art, but for $7.99 it's cute and kept me and my kids busy making it for at least an hour. That scores one in my book!

    So, do you have any junky wood sitting around that you can make a cool family sign with? Give it a try and let us know how it turns out.

    P.S. I have to confess, there are many things I wanted on this sign that didn't fit… Starbucks and Pumpkin Spice Latte just to name a few!

    The Lettered Cottage

    Linked up to: Stories of A to Z

  • Memorial Day Drinks!

    Memorial Day Drinks!

    This is a repost from last year, but it's packed full of delicious drinks that are perfect for Memorial Day, or any other day of the Summer! We hope you have an awesome day honoring those who have sacrificed for and served our country! ------------------------------------------------------------------------------------------------------------
    Whip out those flip flops, fire up the grill, the unofficial start of summer is just days away! We have come to LOVE Memorial Day Weekend and all of it's festivities. Today we're excited to share some must have Memorial Day (or any day) drinks! We've tasted tested three drink recipes that we think you'll love!

    Memorial Day Drinks

    Pineapple Planter's Punch as seen in June 2012 issue of All You Magazine

    Pineapple Punch Recipe

    Although it's not Red,White, or Blue, we think this is the perfect punch for ushering in SUMMER! What says summer more than fresh fruit? Pineapple Planter's Punch Recipe 4 cups pineapple juice 2 cups orange juice 1/2 cup lemon juice 2 liters ginger ale fresh pineapple to garnish Mix all ingredients together and garnish with fresh fruit *You can add rum to make this an"adults only" punch, but then we don't suggest drinking it with breakfast!*

    DSC_0249

    Let me tell you, we were having a good laugh as we took pictures of ingredients etc. We're not food bloggers by any stretch, but we do know what's really yummy!

    DSC_0252

    We thought we'd let Jess demonstrate how to pour, just in case you needed some direction. Have we ever mentioned we're dorks? Look how happy she is to be making punch! Ha!

    DSC_0256

    One thing we actually did learn (from trial and error) is how to cut a pineapple so that it sits nicely on the side of your cup. First, cut a triangle wedge

    DSC_0263

    Then, cut a straight line half-way up the middle.

    DSC_0268

    Most of the time people don't think of breakfast as being special on Memorial Day weekend (the focus is more on BBQ food etc.), but we thought a simple patriotic breakfast would be fun! I know my kids would LOVE it if they woke up to a fun, little breakfast like this!

    Holiday Breakfast ideas

    Combine your Pineapple Planter's Punch with some blueberry muffins and voila! We picked up the cute decorative flags and stars for 40% off at JoAnn's. And, since we're calling this the SIMPLE breakfast, I'll share a secret with you…

    These muffins take about 4 minutes to whip together and we love them!
    Stars and Stripes Sangria We made this drink up…and the name too. Who knows, it might actually be the name of another drink (it appears we're good at taking names from other places- HA!), but for this post we made it up and named it ourselves.

    Sangria Recipe

    Wanna hear a funny story? I'm not a big drinker, I just happen to like Iced Tea or Coke Zero better than any other drink. So, I headed off to the liquor store for red wine…UGH! It's like sending my 4 yr old into Lowe's to find upholstery tacks. I actually had to Google Merlot, to make sure it was a red wine (it is btw). Then, the checkout lady DIDN'T card me… I was bummed. Does she know I just turned 30 and she wanted to rub that in a bit? It wasn't Awesome.

    Sangria Ingredients

    Stars and Stripes Sangria Red Wine Sprite Blueberries Strawberries You can combine this to your liking. We preferred 2 parts Sprite to 1 part wine (but neither of us are big wine fans). Our husbands thought a 1:1 ratio tasted fine. Layer your fruit in an alternating pattern and add the wine and Sprite. Allow to sit for a few hours before serving. This helped the flavors to blend really nicely.

    DSC_0360-001

    This drink is the perfect color for the holiday weekend, and the taste is really light and fruity. Taking a few extra minutes to garnish your glasses is a must. Blueberries on a skewer, a little flag, and some strawberries make all the difference.

    East Coast Creative's Favorite Drink
    Lime Rickey
    We've been enjoying this drink for years. An old friend of mine taught me to make them about ten years ago and I'm so glad she did!

    Lime Rickey
    Lime Rickey

    Lime Rickey Ingredients 4 or more limes 1 cup sugar 1 cup water Seltzer water Lime zest Juicer (not required, but recommended)
    Combine 1 cup of sugar and 1 cup of water in medium saucepan. Heat over medium until sugar has dissolved (cooling is recommended, but we're usually too impatient) Juice 4 or 5 limes. (We love the Pampered Chef juicer because it gets out ALL the juice.) Combine lime juice and simple syrup. Zest a few of the limes and save zest for garnish. Add ice to a glass, fill 3/4 of the way with seltzer water, add about 3 Tbls. of the lime syrup and garnish with zest. There's no exact ratio of seltzer to syrup, because everyone likes theirs a little differently, but you can add more or less syrup to taste. This recipe will make about four drinks, but we usually double it up to make lots more!

    DSC_0421-001
    Happy Memorial Day

    We hope you enjoy these drinks as much as we do! Be sure to let us know if you try any of them over your holiday weekend! What are your weekend plans or traditions?

    Follow Me on Pinterest
  • Fab Find Friday {Salvatori Photography}

    Fab Find Friday {Salvatori Photography}

    Jess and I are super excited to share today's post! Back in the fall, we had a fun double photo shoot with both of our families. Choosing a photographer is a big decision. It's an investment and you want to be sure that whoever is taking the pictures will really capture your family as they truly are.
    This is where Stacy comes in. I might have broken some laws, but I used my snipping tool to steal her picture from her website! Stacy is crazy talented, I'm a snooper and so I kept looking at her pictures SOOC (straight out of the camera) and they looked amazing. I'm jealous of her skills, but thankfully have her around to take pictures of my family!

    Stacy is super laid back, which is a must for someone with kids. Her fun approach to a session made it really enjoyable and not like my JCPenney torture experiences of the past. My kids played in the leaves, ran around the park, climbed fences, and lived life just as we would on any old day (although dressed in semi-coordinating outfits-ha!) Now for a peek at her incredible work with one of the cutest families I know.
    The Jackson Family… Since I'm writing this post, I get to add comments, in where I want, so I have to tell you a funny story. See the picture on the left? Jess used one really similar to it for her Christmas card… well, about half the world, saw the"waiting room" and thought she was prego! HA! I was loving it. They were really at a train station, but apparently"waiting room" is code for"we're announcing we're pregnant!"

    Miss Campbell has the most amazing eyes ever.

    Charlie or Charlie-man as we always call him is beyond adorable.

    cute couple alert!

    The Mangin Clan… Apparently a family of 6 is a clan in my mind… Eric and I had never had family pictures taken. Can you believe that? 10 years and this was our first full family session.

    Boys vs. Girls

    I totally snagged this idea from my blogger pal Beth. It could be one of my favorite pics ever! E and I aren't touchy feely people, so this pic is just perfect!

    I'm a sucker for a good shoe pic. I'm thinking this is going to be blown up very, very large and put in my bedroom. I have to tell you that Kira (far left) calls those shoes her"Pumped up Kicks" My kids make me laugh.

    Thank you Stacy for this picture. It's worth so much more than I can explain!

    Of course we had to have some blogger pics… Did we mention we're total dorks? And how did I end up on the bottom!

    Jess and I never had pictures of us together before this blog came along. I'm so glad we do now.

    I'm now a huge believer in family pictures and I will be calling Stacy this summer for another session! If you want someone that's talented, great with your family, and reasonably priced Stacy is your girl!
    Go check out her website and then contact her to get some pics done! Make sure you let her know we sent you, then she'll know to take extra good care of you!
    Have an awesome weekend!

  • Do You Like Us? And Mark your calendars!

    Do You Like Us? And Mark your calendars!

    You probably noticed that we post 4-5 times a week here on the blog. That means most days you can come here for a daily dose of creativity. But what if I want more??? So you want more than just one dose a day? Sounds like it's time to follow us on Facebook! We love Facebook because it let's us interact with so many of our readers and lets us share far more than we can here in only one daily blog post.

    Click HERE to Like Us on Facebook! Still not completely convinced? Let's see what you've been missing…

    Project Sneak Peeks. I did a major 48 hour garage renovation as a surprise for my hubs. I'll be blogging it soon, but if you were following along on FB you'd have gotten some major sneak peeks and you'd have known that my husband came home 8 HOURS earlier than he was supposed to!: )

    Jess gave this project sneak peek for an AMAZING project she just finished. This one will be posted on Infarrantly Creative next week. I know I'm biased as a BFF, but it's freaking awesome!

    Bits of Monica Humor. If it makes me laugh, I share it. Sometimes I get eye rolls from Jess. Ha!

    Real Life. We're totally normal (well kinda) gals with lots going on in our crazy lives. Sometimes we share things (like Jess' Anniversary last month) that let you get to know a bit more about the girls behind EC2.

    My baby girl turned 5 this week. Don't be fooled by me sweetly calling her"baby girl"… she's in a supper annoying, naughty phase right now. Actually, I told Jess the other night that KJ was so naughty that I didn't even want to mention her bday on Facebook- GASP! Don't worry, I got over it and below is the post.

    Awesome Finds. We use Facebook to share awesome inspiration for projects, products, and FOOD! Anytime we find a great deal or an amazing recipe, we'll let you know. I shared this project last week and I'm still swooning over it!

    So there you have it. Plenty of reasons YOU should be following us on Facebook. Oh and wouldn't it be cool if you told your friends to do the same? We think it would be pretty darn fabulous! Like us HERE
    In other news…

    If you're not super familiar with blogs, I'll fill you in on a secret… people are too busy in the summer to regularly read all their favorite blogs. That's kind of okay with us because we love to relax and play in the summer too! Here's another secret… Fall through Christmas is a stinkin' amazing time in the blog world. We're talking insane creativity people. So mark your calendars because September 3rd EC2 is ready to rock your world! (slight exaggeration, but we do have some cool projects!)
    Have a great weekend! Do you already follow us on Facebook? If not, did I convince you to?

  • Powder Room Pick Me Up

    Powder Room Pick Me Up

    Are you looking for the link party for your Creating with the Stars submission? Yay! We're thrilled to have you! Click here or use the button below to link up. Submissions are now open until February 21st. If you want to read more about the contest and all that it entails, click here.

    -----------------------------------------------------------------------------------------------------------
    At the end of 2011 I set a goal to give our hideous powder room a face lift… well, 2012 came and went and I'm here to apologize to anyone that had to do their business in my ugly bathroom. My bad! This isn't a full, makeover so let's just call it a"pick me up" (I thought about calling it a poop-me-up or something like that, but Jess hates jokes like that. Ha! I think I might need to hang out with Katie Bower or something!)

    Part of the reason I waited so long is that this bathroom is Weird, with a capital W… I actually got on the floor to take a picture of the ceiling, so you can see the wonky shape of the room…

    Yeah, it's straight up weird, but I finally got over it and got to business!
    Here's what we did for our Powder Room Pick Me Up…

    The pear colored paint, stayed the same, but we added a birch stencil that made it so much cooler (and almost aged me by about 15 years… really, who decides to stencil the one wall that has the light, toilet, and sink!Ahhh!)

    I recycled some old frames and added some super inexpensive Ikea prints
    The mirror was another freebie! I used a piece of wood that was an old wagon side- Jess hooked me up with the wood. BFF with barnwood hookups = Awesome! Tutorial coming later this week!

    I said ADIOS to the builder grade light fixture…

    And fell in LOVE with this outdoor light from Lowes! It was under $40!

    I recycled an old, ugly piece of art into a custom piece with one of my favorite verses from an old hymn. I love how the words are subtle, but man, do they speak to my heart every time I read them. I've got a full tutorial coming your way on this baby. The before and after is crazy different!

    And if you don't know by know, I can't really have a room without a touch of my sense of humor, so in direct contrast from the hymn artwork… let me introduce you to POTTY TALK!

    It's just a little ol' chalkboard where you can leave a note while you… well… ya know… We told our kids that bad words excluded, anything goes on the Potty Talk wall. The first week we had a lot of #1 and #2 notes, but since then it's been pretty entertaining. I'll also mention that Uncle Bry and Daddy are responsible for the potty poems. Those guys make me laugh!
    Last, but not least, I added a rug from Target and called it a day.

    The entire room cost me under $60 and now it's a decent space, with a bit of personality! I love when I can switch things up for almost no money! Check back later this week for the mirror and artwork tutorials!
    What do you think of this Powder Room Pick Me Up? Would you be willing to do your business here??

  • Blog Reader Survey Results

    Blog Reader Survey Results

    We thought we'd start the week off with the results of our 2013 Blog Reader Survey! You guys get to learn about us daily here on the blog and by watching Knock It Off, but we rarely get the inside scoop on you, so reader surveys really excite us!

    Alrighty then… let's get started shall we?

    We were thrilled to see that so many of you have stuck around for a while!! So, if you're new here, you totally should keep visiting, all the cool kids are doing it!

    Okay, so maybe we added the flirty part, but… we think it's true! It's actually still kinda weird to me that we're in the 30-45 range too! 31 is like really grown up!

    So, not the Al Bundy, Married with Children demographic, but the cute little family with kids kind.

    We definitely still want to appeal to the masses, but it's good to know that kid-friendly decor ideas, kid crafts, and family stuff works with you guys! To be completely honest, I read a lot of blogs and there are a few I LOVE and sometimes I want to emulate some of their style, but then I remember I have 4 kids and my house needs to be livable. So, we think it's a good thing that you guys are cool with kid-friendly!

    Okay, so this made us laugh! We know that we have about 98% girl power readers, but I know at least 10 guys that read and comment. So, we're just going to assume men aren't fans of surveys (on a somewhat girly blog) Trust us, we gave our husbands a hard time for not completing the survey! The Nerve!!

    Now for the MOST important part… What you want more of from EC2. 1- We had lots of requests for videos- we're cool with that! We think they're fun to make, usually they involve a lot of laughing and ridiculous jokes that only we think are funny! Sidenote: Anytime you want to watch us, go and watch some episodes of our TV show Knock It Off by clicking HERE- lol! We know that's not completely the same, but if you need an MJ (Monica/Jess) fix, it'll do. We're going to try to do some home tour videos too! The only tricky part is getting our homes clean enough to show you!
    2- DIY Home Projects- well, the good news is that we're a home DIY blog, so yup, we've got that one covered! We plan to deliver a solid amount of our home projects, and sometimes we'll just put KIO tutorials on our DIY page, so we don't have constant show tutorials. Some upcoming rooms we'll be sharing are Baby Bennett's Room, My"new" Living Room, My Playroom Makeover, and Jess' porch!
    3- LOTS of Posting! Did you notice we posted like 6 times last week?? It was semi- accidental, but still awesome! Our goal will be no less than 4x a week- sometimes 5, but that will just be a surprise! We're glad you like regular posting, because we like having regular readers!
    4- Letting you into our Brains! This was an interesting request that came through many times… You guys want to know what the process looks like as we plan and work through a room. We love that idea!! Although, this weekend my planning process involved me walking around my house, going to the pantry for a snack and staring because I didn't know what I wanted, walking more around the house, and then back to the pantry. Repeat 10x. But seriously, we're excited to share inspiration boards and ideas with you- thanks for the suggestion!!
    We gathered lots more info, but this post might actually put you to sleep if I keep going. The bottom line is that, knowing more about YOU guys helps us to make this blog the best it can be! So thank you, thank you, thank you, for helping us out!!
    Here's a peek at what we have coming up for ya this week… Bennett's Room Update A Perfect for Fall Chicken Chili Recipe and More!!

    jess
    Monica
  • Fab Find Friday

    Fab Find Friday

    That's right. In honor of our trips to Disney this week, we are highlighting our favorite things about this magical place. We had two totally different experiences here- Monica had no kids which meant sleeping in and staying out late and taking in all the"adult" rides and activities. I was with my family and some extended family which included 5 kids, so we were up early, getting home early and hitting up all the kid-friendly attractions. So, don't be jealous- just take some notes on things you do NOT want to miss next time you're in Disney World.: )
    Jessica's Top Picks

    1. Disney Photo Pass. This pass is ingenious! There are the usual photographers posted strategically around the parks (you know, in front of Cinderella's castle, with the characters etc.), but instead of having to go to a booth to pay for a picture and take it home with you, they scan your pictures onto the photopass card. You'll want to keep that card and have it handy any time you get your picture taken. When you get home, you can input the information into the photopass website, and all your pictures can be found in an album. From there, you can order and buy prints, or share the photos on facebook or through email, at no cost! We were told that if there are 9 or more prints that you love and want to have to use as you wish, ordering a CD of the prints is the easiest and cheapest way to go (however buying the CD will set you back $150!)

    Festival of the Lion King

    2. Disney Live Shows. Honestly, these shows are Broadway quality, but cost nothing (after you pay to enter the parks). The talent is amazing, the costumes and backdrops are so colorful and amazing, and the music is phenomenal! Our favorites include The Festival of the Lion King at Animal Kingdom, Beauty & the Beast at Hollywood Studios, and Finding Nemo-the Musical at Animal Kingdom. Plus, the kids love all the colors and lights and music. It really is a fun-for-the-whole-family event!

    3. Camp Minnie-Mickey at Animal Kingdom. If your kids are into meeting all the characters, this is the best place to do it! The three older kids in our group had autograph books and nearly filled them at Camp Minnie-Mickey. We met Mickey Mouse, Minnie Mouse, Goofy, Donald Duck, Pluto, Chip & Dale, Pocahontas and a bunch more. Definitely get there as it opens at 9:00 AM to avoid the lines.

    Monsters, Inc. Laugh Floor

    4. Monsters, Inc. Laugh Floor at Magic Kingdom. This interactive show is hilarious and incorporates real people from the audience into the show. The technology truly is amazing- the characters (ie: Mike Wazowski) are animated, but somehow they can interact with the audience. The kids (and my husband) thought this was hysterical.

    5. We used the book Birnbaum Guides: Walt Disney World 2011 to help us navigate the parks successfully with kids. It has a suggested game plan of action if you have kids which didn't steer us wrong. I highly recommend this book!
    Monica's Top Picks

    1. FastPass. Basically, the best thing at Disney since sliced bread! FastPass removes the one complaint people used to have about Disney… long lines. With this system, you can reserve a spot in line for a ride while you visit other areas of the park. You go to the ride, use the Fastpass ticketing area and are given a slip of paper which gives you a one hour window that you can return during to go on the ride with a very minimal wait (our longest was 10 mins max.) All of the most popular rides have FastPass, but if you're thinking of going early in the morning to get reserved spots for all of your favorites, think again. You're only allowed so many FastPasses within a certain amount of time, so you can get one and then your ticket will tell you when you can go and reserve another one elsewhere. It's just plain old awesomeness!

    2. Test Track at Epcot is a high-speed vehicle-simulation ride that I loved! It's one of Disney's longest (5 mins) and fastest rides. It takes you through a series of driving simulations (heat, corrosion, anti-lock breaks, etc.) but, the fun starts when you head out onto the open road. The speed and smoothness of the ride is amazing. Definitely check out this ride and of course use a FastPass to avoid an eternal line.

    3. IllumiNations at Epcot. Every night this show is done at 9pm and I think I just happened to catch it on the best night ever. It was a warm night with an almost full moon, and the music, lights, and fireworks made"Disney Magic" come to life. It's a 14 minute show and it's not overly loud if your little ones aren't huge fans of the crazy loud fireworks. I recommend dinner in China and then watching right outside of Japan for an amazing viewing spot.

    4. Downtown Disney. I like this part of Disney for many reasons, but the top two are that 1. It's free and 2. It has great shops and restaurants and isn't grossly overpriced. Earl of Sandwich was perfect for a midday lunch and in my opinion rivaled Panera (which is impressive in my book.) The Lego store (and the amazing Lego displays outside), the huge Disney Store, and the specialized Disney Toy Store were my favorites.

    I also had the pleasure of meeting Jess for dinner at Downtown Disney's Rainforest Cafe. We were laughing about the fact that we rarely get to go out for dinner just the two of us and had to go to Orlando to do it.

    The famous hold the camera ourselves shot…

    Do you see the size of that dessert?

    Ahh…Vacation 
    My favorites list is a little shorter, but that might be because one of my very favorite parts of this trip was just sitting poolside reading for hours! Being able to get through three books in five days was just a little bit of paradise for me.
    So, we hope you enjoyed hearing our Disney Fab Finds. Now, do tell… what are your Disney Favorites?

  • Honey-Do # 1- DIY Wall Hooks & Letters

    Honey-Do # 1- DIY Wall Hooks & Letters

    I mentioned Eric's Honey-Do list in my last post, so I thought I'd give a little project update. We made these bathroom hooks in our old house and I wanted to be sure that we added them to the new house as well. Here's how we did it…

    You can buy these little wooden plaques at Michael's for about.99 each.

    I used leftover dark brown paint (I'd recommend a different finish if you have one.) Once they were painted and dry, I used a clear spray paint sealant with a satin finish.

    I picked up four hooks at Lowes for about $4.00 each. The installation was Eric's job, but he tells me that all he did was level the wood on the wall and use one screw in the middle. Then, he used the holes on the hook to add two more screws. Easy Peasy!

    Four little hooks all ready for my kiddos wet towels and whatever else they stick there!

    The towels looked good, but they were missing something…

    I ordered the kids' names from Uppercase Living

    They came horizontally, but I wanted to put them vertically, so the first thing I did was to cut the letters apart

    These are my very professional tools… laser level (a must have for any DIYer), a wooden spoon from my kitchen, and scissors.

    When working with vinyl decals, you first need to flip them over and rub the back so the letter temporarily adheres to the thin paper backing.

    Now comes the high tech tools…

    I found the centerpoint and then used chalk from Kaden's chalkboard to create a guide… I clearly was a little wobbly with my line, but I had the general idea.

    The thin paper backing is sticky and you can position the letters and reposition them until you have it"almost perfect"

    Then, I brought out the professional tools again and just rubbed the letters on the wall

    The thin backing pulls off leaving the vinyl. Sometimes you have to do a little more rubbing on the corners.

    Kenzie's… as I said,"almost perfect"… I didn't gett all crazy with measurements, I just eyeballed it.

    And Kaden's…

    UGH! My son's name is not K-A-D-N-E… I am a moron! Here I am taking pictures and thinking of blogging my project and I can't even spell his name. So, the moral of the story is… if I can DIY… ANYONE can!

    I was able to peel off the N and E and fix his name. I'm happy with the finished product! Now, I just need to find a shower curtain. If you recall, Kira spilled an entire gallon of the yellow wall paint, and I had to throw out the curtain that I loved… Here's one option I found- what do you think?

    While it makes me laugh, I think I'm gonna pass on this curtain. I did find one curtain I loved, but it had a hefty pricetag!

    So much to Eric's dismay, I've added another DIY project to my list and I'm going to recruit Grandmom Bunney to help me make a patchwork curtain of fabrics I love. I can't wait! So what's on your Honey-Do list? What DIYs do you have up your sleve?

    The Lettered Cottage
    Tip Junkie handmade projects
  • Top 11 projects from 2011 {Monica's Recap}

    Top 11 projects from 2011 {Monica's Recap}

    It's been over a week since we've blogged! It seriously felt like forever (okay, being slightly dramatic, but it did seem really long). Since we're totally still rookie bloggers (still in the first year) we're kind of noticing that the trend is to do a little old recap post, so here it goes… RHBC Style…

    Monica's 2011 Blogging Favs
    (click on the title to link to that post)
    #1 Farmhouse Table Remix
    Don't you love how that title makes me sound all"gangsta?" That's right… I'm a gangsta that makes DIY farm tables. Baha!

    So, not only is this project the one that gets the most use in our household, it also took the cake for our most popular post of the year. Over 14,000 people have peeked at the hub's handiwork… Of course this now has given him bragging rights, so I needed an amazing project in 2012 to put him in his place! If you haven't checked out this post, I highly recommend it… it sorta makes you think you just might be able to accomplish any DIY project out there!

    #2- The Year of the Pallet
    Obviously, pallets made a huge impact on 2011 DIY projects. Everyone was coming up with amazing ways to use them. My very favorite way we used them was building pallet walls.

    #3- Painting the Perfect Stripe
    This post is a perfectionist's dream come true. The crisp straight lines make my heart skip a beat. (again, slightly dramatic…sorry!)

    I do love the direction they started taking my family room in. It's sort of lacking any personality… just has a lot of toys and broken accessories and lamps (because we play ball in there all the time). I do hope to work on this room early in 2012.

    #4- More Stripes
    I was pretty thrilled to finally try out painting on fabric. Since we can't sew, I was thrilled to find something else I could do with fabric.

    #5- Foyer Wallpaper
    The very first thing I tackled when we moved into our house last November was the foyer. The funny thing is that no one actually comes in our front door… Honestly, if you ever come visit, just come on in through the garage door. We're tight right?
    It took me forever to find just the right wallpaper, but I am soooo happy with what I chose. It makes a bold statement and it's totally me.

    #6- Paint Chip Artwork
    This is one of the most popular projects from 2011 and I was pretty happy with how it turned out, but… I'm about to take it out of my bathroom and re-do the room. I'm so darn fickle. I'll put it up somewhere, but for now it's taking a break. This project has become my 9 yr old's favorite craft to do lately. If she can do it, I definitely think you should try!

    #7- Make a Hideous Dresser Awesome and then Give it to a 2 Year Old.
    Jess and I LOVED our Anthro knockoff SO much. Seriously, it was a labor of love and it still makes me laugh that my 2 year old has it in his room.

    #8- I HEART yellow
    I really do love yellow. Whenever I'm thinking of an accent color I'm always like,"Oooh yellow!" and then I remember it's not cool to use the same color in every single room of your house. I am glad that I went with it for my buffet that it became quite famous as the"challenge in the room" on our first Nate Show episode. Ha!

    To be completely honest, the buffet still smells like dead people (I got it at a barn sale) but I love it and I just don't ever open the doors!
    #9 Under Pressure Dining Room Nothing like a little pressure to get a renovation moving along. My dining room still isn't accessorized, but it was ready just in the nick of time for my fabulous family (all 36 of them) for Thanksgiving.

    #10- Discovering I enjoy being in Small Crates and taking Self-Photos
    2 ways I expanded my horizons this year… Apparently I enjoy spending time with my knees up near my ears while being crammed into a small crate, and I take oodles of cheesy self-pics for our blog. I never could have imagined how much 2011 would grow me as a person. HA!

    Honestly though, being on The Nate Show has been one of the coolest experiences ever. We thought one visit was amazing, a second a dream come true, and a third just rocked our world and made us so amazingly thankful for the opportunities we've had. So, thanks Nate, we REALLY appreciate it.

    #11- Did you really think I'd actually post 11 things? Don't you know I procrastinate and wanted to be in bed like an hour ago??? In true Monica style, I'm ending this at 10 things, because well I don't feel like coming up with a # 11 and because all the other bloggers did 11, so 10 makes this way more original right?

    Looking back over our blog for the last 10 months has been pretty cool. We've done some super-fun projects and I'm just beyond thankful that Jess and I can do this together and that you come and read what we have to share each and every day. Thank you. Really, I don't get touchy feely, but we appreciate our readers so much. Ok, that's all. Mushy moment over.
    Tomorrow Jess is recapping her 2011 year and then Wednesday I'm letting you know what's to come in 2012… and I'm crossing my fingers that Eric and Kev don't read that post because they might freak out if they know how many things we have planned!
    So, welcome to 2012…

  • Thanksgiving #1 and Dining Room Update!
    Thanksgiving #1 and Dining Room Update!

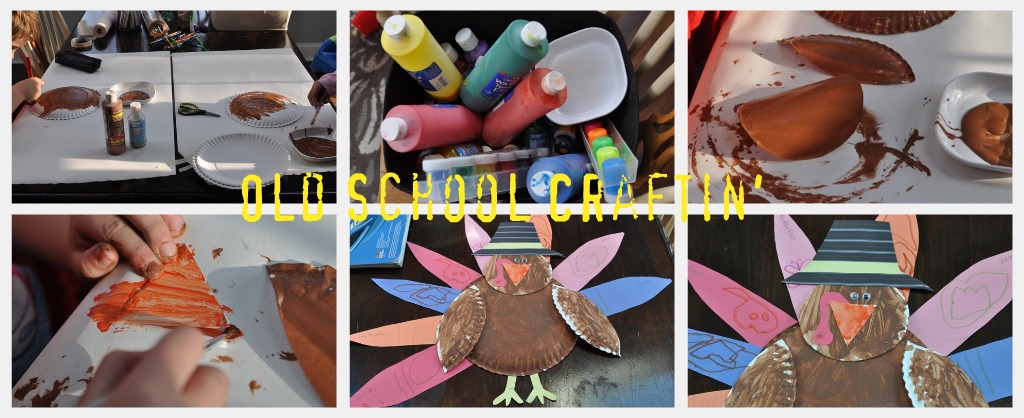
    I can't even tell you how stuffed I am right now. I couldn't eat another bite if you paid me! We had Thanksgiving with some of our close friends and it was awesome. We're so thankful to be blessed with such amazing friends. I didn't go crazy with decor, but I did a few cute little things that I thought you might like to see… My kiddos helped me make"really fancy" centerpieces for the kids' table… Craftin' it old school my friends…

    Who doesn't love a paper plate turkey? My favorite part is that we made these before 9am Saturday!
    I wanted the kids' table to be fun (so that the adults might actually get to sit down and eat), so my younger two helped me make placemats.

    I made the little name cards on Picnik and then snagged a free printable from Pinterest (I pinned it if you want it), added a piece of construction paper, tied up the utensils and voila! Remember, this was quick and easy, not fancy schmancy, but the kids loved it and had a blast!

    Look at all those happy kiddos!

    Since the kids had a fun table, I had to do a little something for the adults. Using the same method we shared on 69 News, I just printed out some little cards. Under the"Thankful" I listed the people at Thanksgiving. If you wanted to use these as place cards, you could just circle the name of the person.

    Since Jess shared a fail (turned awesome) yesterday… I'll share a fail (turned umm… still fail!) today. So, I was inspired by this jute runner, but forgot to get jute, so I figured I'd use my kids' craft paper and do the same thing… umm, not so much…

    I measured out the paper, I had the hubs help me fold it (then I mentioned he was in the picture, and this is the cheeseball pose I got. Nice one babe), I started cutting on the lines and was reminded that I'm a lefty in a right handed world (and my perfectionist husband couldn't stand the sight) so Eric cut. I started weaving, but guess what? The paper was all rolly and wouldn't stay put and needed tape every two inches. UGH. I gave up halfway through, trimmed what I had done, plopped a huge gourd on it and had a good laugh with Jess over it!

    Lame table runner or not, we had an amazing time together! Now, ready for a dining room update? Well, thanks to an awful cold, I've been worthless the past few days. Today, about 4 hours before 20 people arrived for thanksgiving Eric and I used our lunch breaks to paint the bottom half. (I love the days he works from home!)

    We love chalklines. Honestly, I won't paint a line without one! Since we're using a chair rail we didn't have to be neat with the top line (just in case you thought we were sloppy!)

    I'm so thrilled with the color. It's Antique Silver, from Olympic (but I got it color matched in Valspar).

    We still need to paint the area between the moulding, but that can wait until after I've wallpapered. It arrived in the mail and I can't wait to put it up!! I called in the big guns for that job. My father in law is coming this week to lend a hand. There are just some things that I know better than to do with the hubs!
    So there you have it. Thanksgiving # 1 and at least some progess on the dining room. I'm hoping that my next update will have the room almost done!

    PS… Did I mention that we deep fried our first turkey? It was amazing, but I'll point out that it's never a good sign when someone is lighting the gas and has the directions in hand. We were clueless, but in the end, it was worth all the craziness!

  • Faux Sofa Table {Tutorial}

    Faux Sofa Table {Tutorial}

    A few weeks ago during my Christmas home tour, I gave you a sneak peek at the faux sofa table we built and promised the tutorial for how we did it. Well, today's the day, folks! Quite honestly, this does not even need a step-by-step because it's such a simple project. You'll laugh when you see what I mean, and then you'll get to work building your own. I can't even believe what a difference this little DIY made to our living room space, which if you remember, is on my list of rooms to tackle in 2013. We're one project closer to an updated, fresh living space. Woohoo!

    Before we get started, let's take a look at the room before the sofa table came to be. Seriously? This picture makes me want to slap myself across the face. I can't believe I was ok with this for so long!

    Our sofa is a recliner on both ends, which is super comfortable, but kinda ugly. See that big gap behind the couch? It's a wall-hugging recliner so it needs a little space to open up the recliner. I used to just shove random picture frames back there…you know, to utilize the space. (aka to lazily hide things there because it was easier than taking them to the garage).

    Luckily for us, we had some great old barn wood laying around (we LOVE barn wood!) that just happened to be the perfect length of the couch. Every once in a while, these things happen and they renew our DIY energy and make us feel like we're invincible…until the next project. If yours isn't the perfect length, use a chop saw to cut it down. Anyhow, we held the wood up to the wall at the height that we wanted (FYI- the standard height of a sofa table is 32-36 inches high), found the studs and marked the location for each of the"L"-brackets. It's important that you make sure you're drilling into studs so that your shelf faux console table holds up when you put items on it. Once the brackets are attached, place your board on top and screw the brackets to the wood. That's it! Super easy.

    You ready for an onslaught of after pictures? You better be!

    Ahhhhh…so much better, right? I love it. Unfortunately, because the back of the couch is still about 8 inches away from the wall, there's still a noticeable gap. We could have added legs to our shelf/table- in fact, that was our original plan- but since it's a recliner there was still an awkward gap. But, never fear! A plant that I found on clearance at Lowes' for $2 (yes, you read that correctly!) distracts the eye from the space.

    The room feels so much more finished. And in case you're wondering, that old window that I love is moving. Not sure where, but I have something else in mind for above the couch. You'll just have to wait and see. Bahahahaha.

    It's looking pretty good with the dining room (full reveal coming in 2 weeks!):

    Of course, nothing is ever perfect in my house- that's just how we roll. If you'll notice, there are several things that are wonky about the shelf, but I couldn't care less.: )

    So, what do you think of my faux sofa table? Gonna give it a try?

    Yay for checking things off my home goals to-do list!
    Linking up to: Home Stories A to Z, I Heart Naptime

  • And it's a …

    And it's a …

    A few weeks ago, I announced that I'm expecting baby #3 ) early this Fall (it's a pretty funny story actually, if you're int he mood for a laugh)! It came as quite a surprise to us but we're looking forward to meeting this new little one that God has chosen to give us in His perfect timing. With my first two kids, we chose not to find out the gender and waited until they were born. However, with this baby, I really felt like finding out ahead of time would help me connect with him/her and plan appropriately. And so, without further ado, our new baby is a…

    Woohoo! I can't believe I'll be holding another baby boy in my arms in a few months. Crazy!! I did NOT want to find out the gender in a doctor's office with no excitement or hoopla, so I called my go-to photographer friend, Stacy, and asked her if we could come up with a way to capture this special moment for our family. Of course, with the help of Monica who was the ONLY person who knew what the gender was, she delivered big time. Take a look at what we did…

    Monica created this awesome huge box and dressed it up really cute. Check back tomorrow for how she went about setting this whole thing up. She's awesome.: )

    And then we opened it up and…

    My parents couldn't be there, so my sister face-timed them in. It was so fun for them to"be there" and I'm so glad Stacy captured that moment. Thank goodness for technology!!

    Stacy does an amazing job getting great family pictures. I'm in love with so many of them!

    The boys are pretty psyched about adding another boy to the family. Uh-oh, Campbell and I are outnumbered.

    Campbell isn't so sure about it…

    Isn't that backdrop adorable? Stacy and Monica set it all up and it looked so cute. It helps that my parent's have a gorgeous property they allowed us to use for all these photos, too!; )

    BLUE!

    Two blue balloons and one pink.I'm still not quite believing that I'll be mom to three kiddos.

    I HIGHLY recommend Stacy of Salvortori Photography for all your family pictures! Remember Monica's day-in-the-life photo session? That was downright awesome too, so no matter what your"theme" or event, Stacy is your girl. Thanks so much for capturing this exciting time for us, Stacy!
    I want to know: are you a fan of finding out the gender before the baby is born, or do you like to wait until the delivery? Do tell!

    jess
  • A Worthwhile Evening

    A Worthwhile Evening

    These are our good friends, Dan and Steph:

    They are always good for a laugh, strange health-food items and a helping hand. Not only that, they have really big hearts. Recently, they decided to start a non-profit organization to help rescue young women from human trafficking. It's called Worthwhile Wear. Here's what Dan and Steph have to say about it:

    Worthwhile Wear exists to rescue and restore girls from forced prostitution, and more importantly help prevent girls from ever entering it. We target highly trafficked areas both internationally and domestically, and offer women the opportunity to overcome two primary factors which are at the root of sex trafficking; poverty and lack of education. This solution is offered through vocational training centers which teach women how to make wears, such as jewelry, handbags, and clothing, which are sold to provide them employment. Additionally, the women are offered free education, a safe place to stay, and restorative programs geared toward encouraging personal growth and re-establishing self-worth.

    A big part of their mission is to provide items that these women produce, to us, here in the States. The women are given a fair wage (30-40% higher than the average paid person in their area) so that they can protect themselves from ever having to go back to their old lives. And the stuff is gorgeous!

    But here's where we come in: Dan and Steph and the board of Worthwhile Wear are hosting a huge kick-off party for their new organization on November 17th at Calvary Church in Souderton at 7 PM and they've asked us to decorate. Yee-haw! Using our talents and what we love to do to help others is our idea of a good time (we like to call it a"Helping Hobby"). The theme of the night is"Celebrating the Richness of India", and we can't wait to try out some fun ideas.

    We're planning on incorporating this Indian Paisley Damask Stencil from Royal Design Studio in some fabric wall treatments, and possibly some art.

    We, of course, want to include the rich, vibrant colors of India like you see in this Inspiration Mood Board from Limn & Lovely. Don't those colors knock your socks off?!

    Did you know marigolds are one of India's national flowers? Were going to try and get our hands on some for a splash of color on the tables and around the room. This Inspiration Mood Board from Marigold Events inspired us to add in some fun yellow and orange tones!

    Here's where YOU come in:
    We are hosting a table of 10 at the event and want YOU to join us! Wouldn't it be so fun to hang out with fellow blog junkies, while supporting an amazing cause and experiencing the culture of India? Tickets and more information can be found here. Make sure you let us know that you'll be there, so that we can be sure to save a spot for you. Hurry to buy your tickets!

     If you can't make the event, then go ahead and start your Christmas shopping on their website! Don't want to come to the event or shop, but still want to help? Donate here to help save young girls and give them the hope for a future. --------------------------------------------------------------------------------------------------------------------------
    We are so excited about Worthwhile Wear, and so proud of our friends, Steph and Dan! We hope to see you at A Worthwhile Evening in a few weeks!