My Creative Blog [Search results for Green Living

  • Green Painted Piano {Annie Sloan Chalk Paint}

    Green Painted Piano {Annie Sloan Chalk Paint}

    Before we get into today's post, we want to announce the winner of the Mother's Day Giveaway from Salvatori Photography…

    Congrats Holly! We know your session pics are going to be amazing! If you missed it, Wednesday I shared the awesome story session pics Salvatori Photography did for my family. Check it out here. Even if you didn't win, Stacy would love to take pics for you! Contact her before her schedule for late spring/summer is full! -----------------------------------------------------------------------------------------------
    I don't play the piano… well, that's not entirely true, I took lessons for about two years, so there are about 3 songs I can pluck out- Ode to Joy, Hey Jude (talk about random!), and one nameless song that is kind of my signature song. Long story short, I stink! Eric however, is an amazing pianist. I absolutely love listening to him play. Our kids have names for all the different songs,"The Angry Song" is a fast song and the kids run around our house like crazy people when he plays it. I love watching him play and it reminds me how crazy talented (in so many areas) my hubs is.
    As much as I love the sound, I have never been a fan of the look of the oak piano. It's just so dated and not me…

    Because the piano was so blah, I let two years go by with our front living room looking pretty much like this… no style, Eric's choice of colonial blue on the walls, and just an overall hot mess.

    My living room is attached to my dining room, so the difference between the two rooms was pretty stark…

    We finally decided to take the plunge and paint the piano! I knew I was going to for ages, but I didn't know what color, so I wanted until I was positive!

    I decided on Annie Sloan Chalk Paint in Antibes Green. I'm sure you know all about ASCP, but if you don't it's one of the coolest paint products out there! It is a chalk paint, but not chalkboard paint. Basically it adheres to all kinds of surfaces and wait for it… you don't have to sand!! Boyah!

    Since I didn't have to waste time sanding, I got right to taping. I needed to make sure that I was super careful and no paint would damage the piano since the hubs actually uses it.

    The prep work took me about 5 minutes and then it was time to paint. Eric was working on painting stripes on the ceiling for me (post coming on those soon) and we just put"Hit List" on Fios and got our painting groove on.

    Yeah, I don't look too thrilled, but I promise I was…

    How's that for a comparison… bye bye nasty oak!

    I did two coats, but after the first I knew I was in love!

    Chalk paint looks really uneven when it's drying, but have no fear- it looks nice and smooth once it's fully dry.

    I used Annie Sloan dark wax to seal the piano and give it the darker, rich color I wanted. I'm not going to give you any tips on that part because I completely did it wrong! Apparently I was supposed to wax with clear wax and then dark… I just tell people, I was going for a more imperfect look! Ha!

    The bench got ASCP on the legs, but to add a little awesomeness, I upholstered it with this fabric from Spoonflower.

    Ahh! I love the fabric with the green!

    So what do you think of the before and after? I hear so many people say,"but you can't paint it- it's REAL wood!" and I want to go on the record saying,"It can be REAL wood and still be REALLY ugly!" Don't be afraid to paint!!

    And now for an onslaught of after pictures… I'm so happy to finally have a living room that I love!

    And don't forget… We're the ones in a contest now and if we win, we get to give $5000 to the charity of our choice! We need your help, though- you can learn more about our project and the charity we chose here, or go vote for us every day for the next two weeks right here (like their page and then click on the Crafting for Charity button on their FB page). Thank you!

    And just because this absolutely made my night… look at the picture I found on my computer! I recently taught Kaden how to use PicMonkey and apparently he's having a good old time with it! I actually might frame this pic I love it so much…"ther is monsters"

    Have a great weekend and watch out for those darn monsters!

    Monica
  • Another Perspective...

    Another Perspective...

    Okay one last picture of the kitchen. This is the only picture I happened to take of the old kitchen showing the upper cabinets. They went all the way to the ceiling, so it wasn't easy to capture them standing in the kitchen itself.
    This photo was probably taken within hours of owning the house because we started tearing things apart that same day. Notice the plaster falling off the ceiling from an old leak, the pea green industrial carpeting (which ended up preserving the old oak floors beautifully), the 60's style linoleum (which preserved the old fir floors beautifully), the plastic partition that was hung in the threshold (those were in every threshold)....wow, it takes me back. We had so much work ahead of us at this point and were pretty much naive on how hard that work was going to be!

    Here's the after, taken a few days ago. What we did....replaced entire living room plaster ceiling with new drywall (this wasn't a choice), added new crown moulding to both kitchen and living room, exposed original oak floors in living room and fir floors in kitchen, decided to forgo the plastic partition, new kitchen cabinets, spackled lots and lots of cracks in the original plaster, used lots and lots of paint....and needed patience, patience and more patience.

  • The Living Room: Before and After

    The Living Room: Before and After

    Just to review....this is how we found it.

    The single-paned window, and perhaps even the deck, were most likely added sometime in the 80's. When the contractors put in the new Marvin window, they had to tear down the deck in order to put in both the headers and footers. We'll rebuild something more period looking to the house — a balcony with a wide center staircase going down the middle and into the back yard.

    This is the opposite wall. See all that brown trim? That's all covered in faux wood tack paper to assimilate wood trim. It was horrible to remove.

    This room has evolved over the three years we've owned our house (we once had our bed in here). It was the very first room we tackled when we bought the place (the picture of Hubby was within hours of taking ownership) and so it was the first room we finished in terms of the bare bones part. The actual decorating would come much later, as in now....and it's quite serendipitous as again, we're 'moving' into this room just before Christmas.

    Here's sort of another 'before' picture that shows our previous color scheme, dictated primarily by the furniture and rug we had on hand at the time.
    And here are the 'afters.' I took these pictures on the darkest days of the year as we're having lots of fog and rain — hope they turned out alright!

    As you can see, I painted the room white. It's Simply White by Benjamin Moore (Eco-Spec line), which is the same color we've used on all of our house trim and many of our walls. The old color just felt too ruddy looking and I realized (no agonized over) that I'm most drawn to that classic white wall farmhouse look where the color of the walls isn't what the room is about.
    I wanted the room to be more about the fireplace, the windows, the view, the light coming in, the furniture, and the artwork. And I just thought that white allowed these things to shine more than any other color. Also, Janet (hi Janet!) over at The Gardener's Cottage just painted her living room Simply White and it completely inspired me!

    The mirror over the mantle is such a better fit than our other one. I found this several weeks ago at an antique store for $120.

    I picked up the brass sconces at an antique store for $20 each. I had been looking for some sconces online but found them to be very expensive. So these were in our price range and I've always loved the look of a pair of sconces over a mantle.

    The seagrass rug is a 9x12 (it hasn't quite flattened out yet after being rolled) and will be relocated to the dining room once I decide what size seagrass rug I want for this room. I know it will be several feet bigger but still trying to figure out exact dimensions before I order it (the first one I ordered had a mid-January delivery date so I cancelled it).

    The furniture is by a company called Rowe Furniture. We knew we'd choose something from their line because they are committed to natural fiber fabrics, eco cushion cores and wood from replenished forests. They are also members of the Sustainable Furniture Council (SFC).
    This was all very important to us as we have made great efforts to make our home as green and healthy as possible. We also liked the price — due to a special sale that they were having at the time, the couch was just $1,099 and the chairs were $599 each (and we chose the highest grade fabrics).

    The velvet couch is extremely luxurious. We love the high curved arms (much like a sleigh bed) as it provides the perfect support for reading a book, sipping a cup of tea or snuggling up next to the warm fire — especially on days like today.
    I picked up the brass easel a few years ago for $40 — a price I just couldn't pass up. The antique frame was my Great Great Grandfather's and I'm in the process of ordering a beautiful print for it. I can't wait as I've always loved the artist and will be absolutely delighted to have a piece of hers in our home.
    The cabinet used to be in the dining room. It got bumped from there because there will be two new windows going in this spring/summer leaving no room for it. It's sad but I absolutely love it in the living room. It's gone from dining cabinet to secretary, a look I have always loved.
    I also like the height it provides and think it really adds a nice finishing touch to the room. We found this piece at a local antique store that used to get antique furniture shipments in from England. During my semester abroad in college, I lived in England and would spend hours going through all of the gorgeous antique stores looking at beautiful cabinets very similar to ours. So it's sort of serendipitous that this piece found me after all of these years.

    The cabinet came with black oriental pulls on the drawers, which I don't believe were original due to the lovely brass button knobs on all of the cabinet doors. So I switched them out for Eastlake pulls which offer it more of a country look (and of course, I absolutely love all things Eastlake).

    So there it is! I'm sure it will continue to evolve as all rooms do! I hope you like it! We just got our Christmas tree today so we'll be putting that up tomorrow night....so more photos to follow!
    Photo updates:

  • Going Full Circle

    Going Full Circle

    Downtown with only two streets
    I thought I'd tell you how we came to be living in an 18th century house in the country. My husband Rick and I were living in NYC and had been searching the suburbs for 5 ' years looking for the perfect antique house to no avail. We had quite the list of wants and weren't willing to settle. After one particularly disappointing day my husband brightened up and said time to go farther out and made a call to an old childhood friend who was in real estate.

    Autumn in Our Town
    An hour later our fax machine started humming away spitting out house listing after house listing, talk about excitement! The house listings were in Rick's childhood hometown up in New Hampshire and one house in particular caught both our attention and Rick couldn't figure out why it seemed so familiar so time to take a drive up and have a look.

    Front of House at first meeting
    Rick had driven up alone to see the house and called that night telling me I needed to hop on a plane and get up to NH pronto, he had found our dream home. Meeting our home for the first time took a bit of imagination to envision what it could look like when brought back to life. Upon arrival to our house you couldn't see it sitting up on the side of the mountain from the road since the front forest was so over grown. But once up the drive there she was'''a cape built in 1790 sitting looking very blank and forlorn just waiting for someone to love her.

    Side yard looking into the back
    The property was blank! No shrubs around the house, no gardens, no nothing except what Mother Nature planted. Those 'shrubs' you see at the back of the house were actually invasive weeds called Japanese knot weed or bamboo and were next to impossible to kill off.

    Back of house

    The property in general was an absolute mess! The side field weeds had grown part way into the side yard and calling them weeds was putting it mildly. There were huge wild rose bushes the size of a vehicle, poisonous sumac trees and giant weeds taller then a man. The only way around that mess was walking around on the road because you couldn't go through it.

    Rick told me while we were touring what we termed 'the mess' that he finally knew why this house seemed so familiar, it was his old pediatricians house. My husband was born and raised right down the road from this house, talk about going full circle. Another surprise from our realtor, the old gal is buried right out back on the tier. I guess she really loved this house!

    Yes, as far as you can see this is our mess!

    The interior turned out to be as dismal as the outside, the whole house had white walls, not semi flat painted white walls but the white of primer paint. Yes, you read that right, everything was painted with primer white paint! While almost every trim throughout the entire house was painted that strange blue/green. Take it from me people white is not neutral it's shockingly bright!

    We had seen our house on a rainy day so found out first hand that the roof needed help since it was raining on the first floor of a two story house. See the rain coming down the window shade? It's was flowing steadily from the ceiling as well. Despite the fact we were going to need a bulldozer and every surface in the house needed help the structural bones of the house were perfect and ready to stand for another 200 years.

    Front forest after we cleaned and thinned it out
    We found everything we wanted in a property and house even if it was going to take a very strong back and many years to put right. So after nearly six years of searching we took the plunge and bought our home. Welcome to our dream!

  • Formal Living Room Makeover {Knock It Off}

    Formal Living Room Makeover {Knock It Off}

    Today marks our first day back to work filming for Knock It Off! We've had 6 weeks off so that Jess could enjoy time off with Baby Bennett- I was the lucky one to get maternity leave too! We really enjoyed our break, but we're also super excited to get back to helping homeowners with some awesome room makeovers!
    Before we went on our break we tackled our first Formal Living Room makeover. We were super excited about the challenge because neither of us have particularly formal homes.
    If you haven't watched the episode- check it out HERE!

    Here's where the room started off… The family had a TON of amazing pieces of furniture, but some of them were being hidden because there was a lot of stuff in the room.

    We used a bright, yet sophisticated kelly green on the top portion of the walls.

    And added a clean, crisp board and batten on the bottom two-thirds.
    And of course, we couldn't leave the black piano alone. It looks okay in pictures, but it was pretty beat up and needed some love… you know what that means… Yup! We painted it!! (painted piano haters everywhere are cursing us! lol)

    Isn't that so much more fun? The homeowner's kids all play piano and they were excited to have their first lesson on their blue piano. I kinda wanted to be a fly on the wall when the piano teacher saw it for the first time. Mwhaha. Actually, I heard the blue color made the kids play so well that they're all headed to Julliard!
    From the homeowner's submission video we actually hardly noticed there was even a fireplace in the room! It was so covered up by furniture and accessories.

    We narrowed down all the accessories and furniture, replaced the glass shelves with wooden ones, lined the back with fun zebra paper (we couldn't resist adding a fun pop) and then displayed some of their amazing plate collection on the freshly painted white wall.

    We kept many furniture pieces the same, but others- like the one below- we changed. The wood dresser on the left is what we turned into a mini office on the right. We painted it, added new hardware, removed the bottom two drawers and it became the perfect place to keep all their office supplies. You'd never know that it's totally functional… well minus the two printers I suppose!

    The room had a huge picture window, but it was really covered up by the sheer curtains. Sometimes people think sheers are great because they let in the light, but in this case, they were hiding so much!

    We brought in 4 curtain panels (you can only see three), and even though they're solid, not sheer- the window looks so much larger! These curtains are IKEA curtains that we painted to have a custom feel. You can see how to paint your own curtains in this post.

    We were so happy with this room- it might have been one of our favorites from Season 1! We can't wait to see what season 2 has to offer!!
    Check back tomorrow to see how we added the fun pop of gold on the piano wall…

    Monica
  • Top 11 Projects of 2011 {Jess' Recap}

    Top 11 Projects of 2011 {Jess' Recap}

    I'm going to keep it real here and first say that I felt like I was in a blogging slump the last few weeks. But a wonderful Christmas break and looking back over our past year has rejuvenated me! I'm so proud of the projects Monica and I completed, and of this blog that we love! I'm going to try to keep it short and sweet (I tend to be a bit wordy, yes?; )

    1. Ever hear of a guy named Nate Berkus?

    I just couldn't do a 2011 recap without mentioning our whirlwind love affair crate challenges with Mr. Nate Berkus, himself. You can see what we did for the show here, here and here.
    2. Barnwood Artwork

    This beauty was, by far, my favorite project of the year. Modern, rustic, simple. Plus it was made with love for my best friend- you can't beat that!
    3. Easy Door Headboard

    This sort of makes me laugh, but this project is one of our most popular. My hubs and I made this headboard on a whim using some very non-traditional methods, but it's a winner!
    4. Antique Table turned Vanity

    I had been wanting to do this for a long time, and the Crafting with the Stars challenge gave me the perfect opportunity to give it a go! Monica and I spent one looooong evening getting it just right, but now I can't even express how much I love this vanity! (That sentence is ridiculous, but oh so true.) You can check out two of the other projects we did for CWTS on Monica's post yesterday.
    5. Modern Typography Meets Reclaimed Barnwood

    Oh barnwood, how I adore thee. Same to you, typography. Why not marry the two and make something fabulous? Well, ok, I will. Thankyouverymuch.
    6. Pallet Shelf Love

    Who loves free projects? This girl (said with thumbs pointing at chest)! This shelf was free, easy and quick. Love that.
    7. DIY Drop-cloth Window Treatments

    Drop-cloth window treatments have been floating around the blogosphere for a while now, but I tried my hand at making some valances for my living room when I heard aforementioned Mr. Berkus was sending a team to my house to film. That sure got my rear end in gear, and boy, am I glad. Those naked windows were in desperate need of some clothes!
    8. From an Oops! to a Yes! Mirror Transformation

    That this mirror turned into something I'm proud of, is an absolute miracle and purely an accident. It made me so thankful that, sometimes, persistance pays off!
    9. Faux-Stained Glass Window

    I have a crush on old things of all kinds, but can't often pay for the real deal, so I came up with this idea of using a wall decal from Home Depot and an antique window from my in-law's barn and making a faux stained glass window! I really liked it then, but liked it even more after Monica used it in my basement makeover! 10. A Garden Wall

    I brought a bit of green into my kitchen by creating a garden wall with succelents. You know, the kind that are ridiculously hard to kill. It's true! I've had these since May, and they're still living, for which I can take no credit!
    11. The Barn

    Monica and I were so excited to combine our talents this year to design and create one-of-a-kind products using reclaimed barnwood. We opened our etsy shop in September amidst all our crazy Nate show stuff/ Crafting with the Stars submission/ and our first appearance on our local news. Can you say bad timing?: ) Even so, we love the items and our shop, so if you are ever in need of a unique gift or item for your home, we'd be thrilled to make one for you! ------------------------------------------------------------------------------------------------------------- So, we've had a GREAT year, and owe you a huge, fat thank you! This year would not have been possible without you and we so appreciate you taking time out of your busy lives to stop by our blog! Here's to another fantastic year in 2012!

    Pin It
  • Merry Christmas to You! {Sponsor Special}

    Merry Christmas to You! {Sponsor Special}

    You know what make us thankful? Besides our families, good friends, this blog and each other (of course!), it's Black Friday! So, while Monica is living it up in London and Paris this week, I'll be doing some die-hard shopping with my hubs. Love that man and his passion for finding good deals. (Would you believe he is MORE into Black Friday than I am?!) However, some of the best things you just can't find in brick and mortar stores, and that's what I'm bringing to you today. I've rounded up some red and green favorites from our awesome sponsors. Without them, this blog would not be, so show them some love and snag some good deals this weekend at their shops.

    1. Kelly Green Crocheted Scarflette from Twysted Yarn. I am all about scarves this time of year, and this one is too cute! Order by December 6th for Christmas delivery. Use the code ECCFAN to get 10% off your order! 2. Last year, I purchased 12 Christmas books at Liberty Thrift store, and did a 12 days of Christmas countdown. Each day we read a different Christmas story. I LOVE this tradition, and Liberty Thrift makes it possible to do it inexpensively (Photo credit: Katherine Maries.com) 3. This Joy to the Lord Print from Red Letter Words is so beautiful and would make a great gift or a perfect accessory for your own walls. Plus, you just can't beat that message. Get 20% off all Black Friday weekend! (No coupon code necessary.) 4. I adore this Ikat Decorative Pillow Cover from our newest sponsor, Chic Decor Pillows. It's so stylish, but totally ties in with traditional Christmas colors. You HAVE to see the tons of pillow covers in their shop. Gorgeous stuff, folks! Beginning at midnight on 11/23, everything in the store will be 15% off!

    5. You better believe that I'll be doing a few Christmas printables this year using this Gem Christmas Digital Scrapbooking Paper from Moo & Puppy. I'm telling you, the possibilities are endless! Use the code EC215 for 15% off your order. 6. I can't get enough of this Red/Orange Paisley Headband from Henle. I'll be buying a few of these for my sister and girlfriends this year (shhhhh…don't tell!) 7. Isn't this Pendant Light with Red Enamel Shade from Lucent Lampworks so much fun? Love the pop of color in this industrial style light fixture. I can't WAIT to show you what Brad designed for my dining room. Ummmm…let's just say, it completes me. Oh wait, I mean, the room. Use the code EC2tenoff for 10% off your order!

    8. I know this isn't all that Christmasy, but my goodness, I adore this Herringbone Pattern Wall Stencil from Royal Design Studio. I'm running out of wall space, but I'm determined to incorporate this somewhere-anywhere- in my house. All stencils shown in black and white will be 30% off on Black Friday (go here for the sale!) 9.Buy a few of theseQuilted Jar Candles in Spiced Pear from CJS EcoChic for a quick and easy neighbor, hostess or teacher gift. You can never go wrong with candle, especially soy ones that last forever! 10. I'm thinking another awesome gift for a teacher would be this Medium Utility Tote in Red Parisian Pop from Thirty-One Gifts filled with fun books for the classroom, survival items (chocolate and coffee, anyone?) or extra supplies.
    Where's your favorite place to shop on Black Friday? Do you have a plan of attack, or do you go at it all crazy-like?

  • The Evolving House {C1's Bedroom}

    The Evolving House {C1's Bedroom}

    The evolution of a house and style is an interesting thing. I take great pleasure in changing, rearranging and tweaking the rooms in my house. My style has changed pretty drastically (since I basically started out my married life with no style preference at all), but I'm still developing my tastes and preferences. Things rarely stay the same for long, which is exactly how I like it. My desire is to create a home that is comfortable for my family and welcoming to guests, that is pleasing to the eye, but that is also practical for raising two kids. I'm fairly certain that this will be a life-long quest. However, money and time (or the lack there of) make it a little more difficult to decorate and change things like I'd like. Kevin and I have had a few rough years financially, and so, I am finding that if I want to redecorate, I have to be resourceful and creative, and most importantly, learn how to repurpose items we already have. I've been learning the very difficult lesson of contentment (Melissa, at The Inspired Room, said this about contentment that really resonated with me), and am realizing that I don't have to have the perfect house, just one that my family considers beautiful and can enjoy living in.

    With all that said, Monica and I will be showcasing our houses to you; not because they are perfect, far from it actually, but because they are a huge part of who we are. So, welcome to the evolving house.

    This is C1's bedroom. Just recently, we changed her over from a toddler bed to a full-sized bed. In one afternoon, it seemed like she grew older right before our eyes just because of the furniture! I love her room- it's girly and sweet, but can also really grow with her. We painted the walls a really pretty shade of green (I'm sorry I don't know the paint color anymore!), and we used all-white furniture. Every piece of furniture (except the headboard) is hand-me-down or was hand-made by my hubs. Her cute butterfly and flower bedding came from HomeGoods and was a gift from my mom. She has a great dormer window, in which Kevin built a toy box/window seat. When we were creating her baby nursery, I envisioned that little space as a great reading spot for her down the road. For now, she uses it to play and look out the window.

    This shelf came from my mom's attic (she has a great supply of decor and furniture she's not using and is really generous with it!). I made the monogram, using adorable patterned and hot pink card stock, and put them in frames we already had. I hot-glued ribbon to the tops to make them a little more feminine.This monogram project cost me no money at all, since I used items I already had! The little porcelain shoe to the left of the frames was a gift from her great-grandmother and has all her birth stats painted on it.

    This is my favorite feature in her room. Inspired by something I saw in Pottery Barn, Monica and I created a tree stencil for the walls. I then hand-painted the trees (there are two of them- one on either side of the dormer window area), and added leaves and pictures of our families to make it a family tree. One side is the hub's family, and the other side is my family. I wanted C1 to have an understanding of the importance of family, and how blessed she was to have such a Godly inheritance, from an early age.

    Isn't this chair the most precious thing you've ever seen? Ahh, I can't get enough of it, and you'd never guess that I got it at Big Lots for $40!

    But really, these pictures show what I love most about this room: My two kids living in it.

  • Company's Coming! AHHHH! {Entertaining Part 1}
    Company's Coming! AHHHH! {Entertaining Part 1}

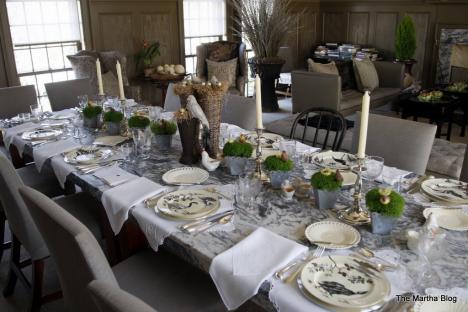
    This is the first installment of a mini-series on entertaining and hospitality. For me and Eric, it's a big part of our relationship and family- we love having people over and sharing our home and our food! Over the years, we've learned that so many people are intimidated by the idea of having company over. The stress and hassle they feel, makes it not-so-fun to have people over. I have some entertaining tips, ideas, and also some myths to debunk over the next few weeks! Let's get started… When's the last time you were at someone's house and wished the entire experience was fancier and more formal? Let's be real… I have never left a friend's house and thought,"Man, I wish she had more fork options around my plate, and the wrinkles in the cloth napkins were so distracting!"

    The Martha Blog This photo is from a dinner Martha hosted recently for a"few friends." The menu was: Warm Salad of Spring Vegetables -Â Green Pea Jus Osso Bucco -Â Risotto Milanese with Saffron Pavlova -Â Passion Fruit Sorbet NEWSFLASH: Your guests DO NOT expect the Martha treatment (Unless you're really Martha Stewart, in which case- thanks for reading our blog!) Yes, it's nice to sometimes add special touches, and there is definitely a time and a place for that, but don't feel pressured to impress. REMINDER: It's assumed that the people coming over already like you and vice-versa! You don't need to impress them- just make them feel welcome. Since we sold our dining room table three weeks ago, our weekly company has been sitting on folding chairs around two Costco tables and they keep coming back! Monica's Entertaining Rule # 1: Don't try to impress your friends and family. They already like you and think you're pretty great. On this note, I want to share one of my favorite blogs with you. Catalog Living is a humorous look into the lives of families living in the uber-perfect rooms in all of our favorite catalogs. Gary and Elaine are my favorite, and they often live in Pottery Barn rooms. Here are a few of the rooms and captions that made me smile…

    Satisfied that he’d gotten enough practice in today, Gary decided to treat himself and stow away his counting board a little early.

    Kids! Dinner! Last one to the table gets the tetanus stool!

    Recognizing the familiar sound of a shattering crunch followed by a scream, Elaine prepared for another recitation of her “These are not powdered sugar donut holes” speech These absolutely kill me and I was laughing so much tonight choosing which ones to post. There are tons of funny ones, but I chose these pictures to remind you that you don't live in a catalog-perfect home (again, sorry Martha if you're reading… your home is quite perfect.) Yes, people don't want sticky pancake syrup on themselves from leaning on your kitchen table, but don't go overboard thinking your home needs to be spotless and look like something out of a magazine. So, let these things sink in over the weekend and next week we'll work on some easy peasy tips and ideas to make this entertaining thing less stressful and a lot more fun! Have a good weekend and don't forget to submit your Design Challeng{ed} photos!

  • Outdoor Dining Patio

    Outdoor Dining Patio

    If you would have told me how long it would take to put in our outdoor dining patio, I wouldn't have believed you. I simply had no idea of the time involved in completing such a project. Like the fence, it took many, many hours (and many, many weekends) of meticulous consideration and hard work.
    Hubby did most of this work. He did all the math, the measuring, leveling and planning. See Exhibit A.

    Exhibit A. As for myself, I was good at pointing around and saying, "like this, and there!" Which hubby was able to translate into a beautiful patio and stairs.
    Although it was our intention to have this completed before summer officially began, it has now been completed before summer is officially over!
    So the following photos are what it took to create this new space of ours...

    This is what we started with after the dining room addition was built.

    Retaining wall was built first. See urns? I'm already starting to decorate.

    After a significant amount of gravel was added and leveled, Hubby built a frame for the patio stairs. We decided that the easiest way to build the stairs was to adhere pavers to a strong foundation of concrete.

    This was the night before the concrete truck came to pour the concrete into the stair frame.

    The concrete pourer was able to help with leveling the concrete as it was being poured.

    After concrete cured, pavers were adhered.

    Next step was to lay the patio floor pavers.

    To make sure that the pavers looked right (as much like real stone as possible), Hubby worked out a pattern on paper first. The pavers were the same width but came in four different lengths so there was a system in place to ensure that all seams were staggered.
    There are a lot more photos. Most of them are of hubby up to his ears in gravel, dirt and pavers. And a few with him giving me the stink eye when I interrupted him with, "stop, let me take your picture!" This request was usually met with deaf ears.

    Here's hubby ignoring me after such a request.

    This photo shows the completed patio before we planted the boxwood hedge and limelight hydrangea.

    This photo shows the beginning stages of planting a hedge of boxwood around patio to create a living wall. We wanted the patio to be as green as possible so we opted for a living wall rather than concrete/stone.
    Later on, we decided to add stairs down the center.
    AFTER

    PHOTO UPDATES: New patio table and chairs. Full post here.

  • A Clean Slate

    A Clean Slate

    I've been enjoying this fantasy that we've just bought our house and everything is just as it is now....crisp, clean and ready to decorate! In this fantasy world, it is as if the era of pea green carpeting and faux wood paneling never existed...
    So my fantasy goes like this....Hubby and I pull up to a lovely country house that's in our price range! Wow, huh? We're instantly in love as we can see that the house has been well-taken care of. We walk up to the front door and as I step in, I begin to glide through the each room seeing nothing I don't like.
    When I make my way to the living room, my eyes light up and as I turn, Hubby takes me in his arms (suddenly I have my wedding dress on) and we begin to dance, giddy with laughter as we know that we have finally found exactly what we're looking for in our new home. We pause only for a moment, with bright beaming smiles, and say to our realtor without any doubt or hesitation, "we'll take it!"
    Nothing in this fantasy had anything to do with what really happened, especially the part about the doubt and hesitation. But I'm enjoying every minuteof my fantasy as I stare into this empty room, dreaming of how I'm going to decorate! It feels like such a luxury!
    So let me take you through the room...

    This is the perspective you get when coming from the kitchen. The french door next to the picture window will eventually take you to a balcony, which we'll build this spring. The original 'deck' was torn down when they put in the new Marvin windows. The door you see through the entryway, goes to the wraparound porch....this is our formal entry into the house.

    This is looking towards the fireplace from a corner that no one will ever stand in, but I thought I'd give every perspective. Entry is where the hall tree stands.

    If I pan left a bit more, you'll see the coat closet to the left and to the left of that, the hallway where the den, guest bedroom and downstairs bathroom are located.
    So this is what I've come up with so far...

    ....the main layout. The couch will face the fireplace and the two chairs will flank each side of the fireplace. I love the coziness that this layout will offer and I know that there will be many hours spent snuggled in front of the fire.

    Here's the new couch we've ordered....accompanied by two of the above chair! We went with a couch with more modern lines to contrast a little with the more traditional lines of the coffee table. The coffee table (you can see here ) is an antique pedestal with rounded feet and oval top, which will compliment the round lines in the chair.

    Here are the fabrics we chose....the sofa fabric is a beautiful velvet (so luxurious) and the chair fabric, which goes really well with the tarragon velvet, is linen- esque (the photo doesn't really show the chair fabric very well). And due to the furniture store's amazing sale — I made sure that I picked out the highest grade of fabric — of course I did!
    I've also been considering a tall narrow table to put behind the couch. I'd put two table lamps on each end to illuminate the room. I was thinking of something a little modern, made of mostly glass so that it doesn't feel too heavy. I think this would be the best option as end tables wouldn't work well with the tuxedo-style (high arms) couch.
    Also, we'll order a 9x12 natural fiber rug, perhaps this one from Pottery Barn, to go in front of fireplace. All the furniture fits on the 9x12 size. I'll accent the rest of the room with antique rugs I already have.

    I'll put an antique rug in front of the french door. This door will eventually lead to a balcony. There's about a seven foot drop outside the door right now. The balcony will have wide center stairs going down into the yard. It will be big enough to put a couple of rocking chairs or a small table and chairs for an extra place to eat or drink.

    Our existing dining cabinet, that I'll be stealing from our dining room (photo below), will be relocated to the above wall. Instead of holding dining odds and ends, it will be transformed into a secretary that will be a place for beloved books, unframed art, special momentos, etc. I'll be stealing this cabinet from the dining room because we've decided to add two more windows on the wall where the cabinet is now. But I'll go into the dining room plans later.
    Here's the cabinet we'll be stealing for the living room. Hopefully, someday I'll find a narrower dining cabinet to replace it.

    On that small wall to the right of the kitchen entry, I've been considering a temporary bookshelf. Lauren at Pure Style Home inspired me when she put one in her house, on a similar sized wall, and it looks fabulous — like everything else she does. And I say 'temporary' because as you can see in the next photo, I have plans for Hubby (wink, wink Hubby), to build a built-in bookcase (love the look of those — I have a gazillion inspiration photos of them) on that huge wall.

    We're waiting to begin this project until after we get rid of that floor furnace. It's the one 'functional' thing in the house we have yet to figure out. But whatever we decide to do, that floor furnace grate will eventually go....and hello bookcase. ; )
    So odds and ends still left to find are: some sconces for above the mantle (any suggestions?), a 9x12 natural fiber rug, perhaps a white bookcase, a tall modern table and...
    Any other inspiring ideas? I would love your feedback! Just love it!
    *Also, I've made another friend over at High Street Market.... Kelly has the most amazing Etsy shop with so many beautiful treasures. I was eyeing the pair of marble table lamps, an antique oval mirror and a lovely pewter pitcher....and it's all so reasonably priced! How fun is that!

  • Happy day!

    Happy day!

    (Although a very cold one.)

    It's one of those twilight days. Still summer but fall is catching in. The green couldn't be greener from the sunshine but when you stick your head out the door it's cold as h***. I'm not sure I'm amused.

    Here life goes on, whether it's summer or fall. We're happy and enjoying life and each other. My Black Panther (cat) is running around calling for attention, wanting to go out all the time, which is making me a bit suspicious so today I'm booking her for a vet. 'Snip snap'

    A happy day to you all. Enjoy fall, soon the winter is here.


    19755_1090549599352_1694850024_192715_1477579_n
    7d99ff1916indian
    7d993b3025derson
    7d99211c0ok1
    Outdoor dining ih
    folk-style-seating countryhomes and inter
    hallway34 country homes and in
    livinetc
    garden-cushion hg
    relaxed-kitchen-diner chi
    Relaxed-courtyard hg
    chi
    folk bedroom @ living etc
  • Done…for now! {Kitchen Renovation Update}

    Done…for now! {Kitchen Renovation Update}

    Ahhhhhh…I can finally breathe a sigh of relief. Well, kinda. Our kitchen renovation that I've chronicled here, here, here and here, is done…for now! You may remember that it all started like this:

    Ugh. That's a sad picture, people. It's not sad anymore, though, just look at it now in all it's *almost* finished glory!

    Seriously, that is one big difference! I am absolutely crazy about our open shelves, new kitchen layout and big opening to the dining room. (Although I REALLY wish I made some sort of effort to clean up our dining room before snapping pics! Bad blogger!) I've been decorating and undecorating the shelves for weeks now, and I'm pretty happy with them, so I figured it was about time I shared. This is how they look right now, but I can absolutely guarantee you that they won't stay this way forever, since I crave change after about 4 days of anything staying the same.

    The blue and green add just the right pop to my otherwise serene color scheme. I really do love the contrast of the fancy stencil with the trendy aqua blue accents. So fun! Those two round pie plates were wedding gifts, but they're only hanging out there until I can find a tray or something that I love- the blues just aren't perfectly spot on.

    Up close and personal:

    You've already seen the printable I made, but the plate right next to it is from the Pottery Barn Outlet. Can't get enough of that thing. That and the bird (from Joann's) are the only new things I bought for the shelves. Everything else was gathered from around the house- you got to work with what you have sometimes, right? Ok, I lied. I forgot that I bought this blue vase at a flea market this weekend for $4, and the mugs came from Ikea.

    I have been scouring the stores to find dish towels that I liked and that matched the kitchen, and couldn't find anything that wasn't chevron (no offense to all you chevron-lovers out there, but I'm just not on that bandwagon!), but I found this one at Kmart! Yes, I was shocked too.: ) Cute, cute, cute!

    I'm showing you this picture of all our mail for two reasons: 1) I just got this mail sorter from Kmart and it's a lifesaver. Really. All that stuff used to just lay on my counter making my already frazzled brain even more frazzled (if that's possible), and 2) See that uncovered outlet? I didn't even realize it didn't have a cover on it until I looked at this picture. It's so ridiculous what you get used to living with, and then start to ignore. *Fingers crossed that that baby EVER gets a cover.*

    Here's a view of the other side of the kitchen:

    We finally cut and hung two more open shelves to house our microwave. I gotta tell you, I so enjoy the extra space on the counters now that thing is off of it. So roomy! And if you're wondering about that crack in the counter, it's there because we moved a cabinet and it's counter from it's original spot on the other side of the fridge. It'll stay like that until we upgrade our countertops, and then it'll be seamless. Technically, I could hide the seam using a painting method a friend told me about, but, honestly, there are so many other things I'd rather be doing with my time.; )

    I'm thrilled that, after 8 years of marriage, I can finally easily access my china. What a nice surprise to see that it actually works really well with my damask stencil and the colors in the kitchen. Woohoo for happy accidents!

    Oh yes! I almost forgot that we installed this new light fixture above the window, and it's stinkin' awesome. Forget about all the additional light it gives off, it's adorable!

    ***Update: Several people have asked where I got this light. It's Allen + Roth from Lowes.

    And finally, a view from the hall. I'm contemplating adding simple, wooden blinds to the window because it seems a bit bare. Anyone have thoughts about that? Should I or shouldn't I?

    So now I've promised my husband that I'll tackle only really easy projects that don't involve him for a while.: ) I think this room has come a long way, and it just feels so much more like me. After a few annoying touchups on paint, fixing some broken tile and installing one more light switch, this pretty baby will be complete. Phew! Next week I'll show you what I finally decided about the curtain situation on the other side of the room.

    Next on my agenda? A dining room redesign! I can't wait to show you what I have up my sleeve.

    So, what's your favorite part about my new kitchen? Color scheme, open shelving, white cabinets, something else entirely?

    Linking up to: Tutorials & Tips

  • Veranda: Life in Ruins

    Veranda: Life in Ruins

    Have you seen the August issue of Veranda yet? If not run out and buy it now! Pictured on the front is a French house that was once a ruin. Why couldn't someone have discovered America sooner than 1492 so we could have a few ruins? I wouldn't mind living in a stone ruin, who cares about a little rubble when it looks this fabulous? If I can live in an 18th century dwelling with all it's quirks a little ruin is nothing!

    (All photos courtesy Veranda, photographer: Peter Vitale)

    Look at the inside guest patio, those 15th century curved stone arches, that antique tile floor'''now I ask you who wouldn't be happy there?

    The house was originally built in the 11th century and added onto each century. The kitchen area dates to the 17th century, love how they simply plastered over the arches. Just think if I could afford that house I wouldn't have to cook except when I wanted to.

    The chairs in the Renaissance hall look to be covered in tapestry that more than likely came from Michel Biehns' shop since he deals in textiles of all sorts. As an antique textile dealer myself it's killing me I can't see those chairs closer. And look at those pillows in the background hiding from me!

    I could sleep in this master bedroom all draped in Italian silks. That pillow on the bed is antique Italian silk velvet, why don't they just shoot me now? One of my passions is Italian silk velvets, I'm a collector as well as deal in velvets and I can't see that pillow well. I NEED TO SEE THAT PILLOW!

    Can you believe this is the dressing room? I wonder if it's up those stairs pictured in the master bedroom? I love how they're storing their hats in the French laundry baskets and look at that dreamy mirror, love the juxtaposition between the gilded mirror and straw baskets. Look at the baskets on top of the closets, they give you a sense of the height in the room.

    The 17th century staircase is original to the house and was restored, think of the entrance you would make coming down those stairs! Love the huge picture at the top too!

    All the silk fabrics just in this small dining room come from Antico Setificio Fiorentino in Florence Italy and can be found Here. Those sconces and chandelier are to die for! And those chairs....come to Mama! They're in that French Parisian green I love so much!
    I love how they used a nice mix of highs and lows of antiques and modern furniture so that nothing overwhelms, tough to achieve. I wish someone would come out with a magazine that shows all the accessories that decorate rooms so we could see more clearly....not to be I guess. I won't spoil the entire article for you but I couldn't resist, who wouldn't want to live in France in all that history?

  • December Tidings

    December Tidings

    I 'm a little disconnected from blogging these days. It's not due to the arrival of our sweet babies though — we're still pregnant! Rather, it's due to my very pregnant body, and my general lack of energy to do much of anything.
    Thankfully, my Mom is here and helped me decorate the dining room for Christmas!

    On the way home from our last doctor's appointment (the only time I leave the house these days), we stopped in at our local Christmas tree stand to pick out a tree for our dining room. Mike commented that it was the quickest tree selection I've ever made! This is true....my aching feet and back cured my perennial case of 'Christmas tree indecision.'
    The three of us decorated the tree with cardinals and simple strands of white lights. We'll have another Christmas tree in the living room, which will be decorated with our vast collection of childhood ornaments (yes, this includes my favorite ornament — 'Hunk of Love' ).

    My favorite Christmas decoration is the greenery. I just love the lush green color against the sleeping winter landscape outside our window. I also love the fragrance of the cuttings, which offers such an intoxicating mix of nostalgia and crisp earthy freshness.

    We replaced the burlap runner on the table with an antique crocheted table cloth I bought a few years ago for $10. My Mom has a larger one that my Great Great Grandmother made, which was always put out for Christmas Eve dinner.

    My dear friend Joan from For the Love of a House added three beautiful antique brass candlesticks to my collection recently, which I've placed on the Empire card table below the mirror.
    Hope you are staying warm and cozy wherever you are!
    P.S. I've been meaning to mention that our kitchen was featured in a little article on Small Space Kitchen Design over at HGTV.com.

  • On the move...

    On the move...

    Finally, we took the decision to move in together. So goodbye Gothenburg ' hello Nyk'ping.

    Big step, from the city to the country side. Surely, I've had a year and a half to practise living the no-civilisation-way, but I could always take a break from it in the big city.

    Now, it's a huge house to manage, an ever huger garden and forest and water as long as the eye can see. It's exciting but still, terrifying. Will I go crazy from the silence? Will I love the silence? Can I manage the garden (I don't even have green fingers, not even the little pinkie one)? Will I know where to start making the house 'mine'? I have no clue right now, only time will tell. And luckily; Nyk'ping is only 15 minutes away, with car, so I have to get my license NOW. And Stockholm is an hour away. So it isn't all bad.

    The pictures are from Ti Mo. They have really beautiful and special clothes! The two first photos made me fall totally in love!

    Ti Mo
    Ti Mo
    Ti Mo
    Ti Mo
    Ti Mo
  • Behind the Scenes of a Small Business {Lucent Lampworks}

    Behind the Scenes of a Small Business {Lucent Lampworks}

    Did you guys know that Monica and I love discovering and studying small businesses, right? We both have owned our own businesses, and now run this blog which has turned into a small business in it's own right. We find it fascinating to watch people do what they love to do and turn their gifts into a fulfilling career! There's just something so inspiring about the whole thing. A few weeeks ago, I gave you a peek into my dining room complete with three new fabulous light fixtures from Lucent Lampworks. We thought it would be fun to let you in on what it's like behind the scenes with Brad at his home, and how we both fell in love with a few lights for our own homes.

    This is Brad. (and his adorable daughter, Lia)

    He is not an electrician. He is not a trained lighting designer. He is a self-proclaimed tinkerer with a creative side who one day decided to make a few custom lights for friends and family as Christmas gifts when money was tight. He opened an Etsy shop, had a sale a few days later and is now creating fabulous light fixtures out of old barn pulleys, found items and whatever gets his creative juices flowing for people all around the world. People, this guy is seriously talented. Since 2010, his lights have been showcased in the following awesome places: *Extreme Makeover Home Edition — Beautiful New Home in Texas that aired in 2012 *The Winter Collection Catalog for Stylish Home Magazine — www.stylishhome.com
    *History Channel show — Abandoned — aired August 2012
    *Featured in Soulemama.com
    *Food Channel — Restaurant Takeover — Canadian version airing this fall!

    Monica and I went to visit his little"shop" in his basement to see how he does it all and quickly realized how out of our element we were when Brad started talking about all the old reproduction wiring, vintage plug ends and exposed sockets.: ) But what we did know was that Brad was passionate about that stuff and it showed in his work.

    Brad styles all the photos of his lights himself and has an incredible set up. See all those different backgrounds? He makes most of them himself so that his lights pop against them.

    He doesn't mess around with lighting his"sets" either. Every thing this guy does is done right.

    See what I mean? We got a few ideas for creating backgrounds for our finished projects, so, thanks, Brad!; )

    Cage light anyone?

    Monica got two of these gorgeous green enamel shades made for her. You have to wait for Spring to see what she did with them, but they are incredible!

    I had to get my cheesy pic with that cobalt blue beauty and Monica was totally digging this glass cylinder pendant. 

    And, in case you're wondering, this trip to his shop was where I first spotted the white, enamel pendant light that is now proudly living above my dining room table.

    I also spotted this cage light which inspired the industrial cage light sconces that flank the art in that same room. Brad took my idea, researched and found cages from the early 1900's and turned them into awesome sconces. I loooooove them! 

    Isn't that amazing? We strongly encourage you to take at a look at Brad's shop to see what other awesomeness he has going on there. You will not meet a nicer guy and he'd be happy to help you create the light of your dreams (please tell me I'm not the only one who dreams about lighting…) Oh yeah, one more thing just for you guys! You can get 10% off your order at Lucent Lampworks by using the coupon code EC2tenoff! You're welcome! Do any of you have a small business? Leave us a comment with the name so we can check it out! It's one of our favorite things to do!

  • Kitchen: Part Two

    Kitchen: Part Two

    This is what the other side of our kitchen looked like when we bought the place. The cutout in the counter was for the dishwasher on wheels. To the right of that was a pea green stove. To the far left, below peach cabinets, was the yellow fridge.

    This is after we gutted the room. After sketching out several designs, we realized that the best layout for the kitchen was to keep the sink (with the view), the stove, and the refrigerator in pretty much the same places as they were.
    And here it is now...

    ....which is the same angle as the before picture.

    It's amazing how much light comes into the kitchen from the living room.

    When we designed our cabinets, we purposefully wanted to avoid an overbuilt look. We really wanted this to look like an old farmhouse kitchen — sparse and simple. So we opted to avoid upper cabinets and to not enclose the refrigerator. We also opted to have the counter terminate at the wall.

    I ordered this wonderful print of a Matisse still life, which happened to fit perfectly in one of my antique frames. I thought it would be a good piece for the kitchen.

    There's no gas line in our neck of the woods. If we opted for gas, we'd have to have a big tank in the yard. This didn't appeal to us at the time, and neither did the added expense, so we stayed with electric. When we started looking for a new stove I told Hubby, whatever we get, it won't be one of those shiny black top ones....and so here you are. But I'm used to it now.
    We almost placed the stove on the other wall (where the open shelves are now) but we changed our minds at the last minute because I decided that I wanted one wall in the kitchen to be completely pretty. We also didn't want the stove hood obstructing the view.
    P.S. Rachel over at Raenovate just postedon our farmhouse! Her beautiful blog is one of my favorites as it's, "dedicated to bringing you a glimpse of all things reinvigorated, refreshed and revived."

  • Creating with the Stars Round 1 Voting

    Creating with the Stars Round 1 Voting

    Voting is closed! To see the winners of Round 1, click here. Check back next Monday, March 18th for Round 2 projects and voting!
    --------------------------------------------------------------------------------------------------------------------------

    Welcome to Creating with the Stars 2013! Let the contest officially begin! This season of CWTS is going to be Epic and these Round 1 projects are a clear indication of the insane talent of these contestants! Just a few reminders before we get to the voting…
    Round 1 Challenge:


    Round 1 Prize Package: We have the Best Sponsors for CWTS2013 and here's a reminder of what our Contestants are playing for this week…
    $50 worth of 31 Gifts products $60 worth of Twysted Yarn products $70 of Henle Headbands products $100 Blog Re-design from 733 Design (who designed all the CWTS logos!) Project featured by HomeTalk We also want to thank Homes.com for being the Official Grand Sponsor of Creating with the Stars!

    Without Further Ado… In No Particular Order, Here are the Round 1 Projects… #1- Dresser Turned Modern Sandbox This dresser had no hope. It was in extremely poor shape. I mostly bought it for the legs, but after learning I was in CWTS, I thought I could do something with it. I decided to turn it into a sandbox filled with sand and dirt. What kid does not like sand or dirt?!
    The issue I have with sand tables is how much of an eye sore they can be. After cutting off an entire level of drawers that brought it down to kid/side table height, I placed sand and dirt inside the top two drawers. When guests come over, I simply place the dresser's top back on covering up the dirt and sand. It is an easy solution that is modern and stylish. Using a friendly exterior paint protects the furniture from the elements. Placing the dresser top on when not in use protects the sand and dirt. The two bottom drawers are functional and can be used for outdoor storage like small plant pots, garden tools, and kid toys. I used a couple of rabbit knobs for fun and green paint for a punch of color.

    #2- Little League Lounger I love taking old, crappy stuff and turning it into something that I will actually use! I found an ugly outdoor folding chair at my local thrift store, and knew it would be perfect for my upcycle project. Now, I have a completely re-done"little league lounger" to use at all my boys' baseball games this summer!

    Here's what the chair looked like before I worked my magic:

    I added all new cream-colored webbing {with a navy pin stripe}, updated the arm rests by re-purposing an old wooden baseball bat, and made a baseball stitch pillow from an old table runner. I love how it all came together!

    I can't wait for baseball season to get started so I can use my new chair!

    #3- Floor Board Kitchen Island

    these 77 year old floor boards were upcycled into a rustic kitchen island!

    I love our kitchen, but I've always wanted a big kitchen island where we could hang out. I wanted to take this unused space in our family room and add a table or counter. I had no idea what to use, but all of a sudden, a light bulb went off in my head. I remembered some old floor boards hidden in the basement rafters. They were dusty and worn and perfect. BAM — perfect for an old rustic island! We washed and sanded the boards, and got to work building our new favorite spot.

    these 77 year old floor boards were upcycled into a rustic kitchen island!

    Add in some painted stools and we now have a space just off the kitchen that is perfect for parties, eating, hanging out, or working on crafts.

    these 77 year old floor boards were upcycled into a rustic kitchen island!

    #4- Man Chairs Often the"dreaming up" of a new project can be done in my sleep, literally. But execution can feel like a trip to the dentist, one in which I go in for a routine cleaning and find I need a double root canal. The trick to any DIY project is COMMITMENT. Commit to your goal and don't let up no matter how many coats of paint are applied in vain. These previously drab, brown, faux-leather club chairs were purchased on sale for $12 each at a local thrift shop.

    A bit of auto upholstery paint, steal tacks, metal coating paint, a couple patinas for good measure and some tough new casters and this thrift store find is ready for"the man".

    #5- Tin Tile Mirror So, I'm still totally in shock that I was chosen to be a part of Creating with the Stars. With the first theme being"Upcycle", I wanted to do something a little different. I hit up a local flea market, hoping to find something that screamed my name, and when I saw these vintage tin ceiling tiles, I knew these were it. The fun color that looks so much like patina, the rust, the texture, the scuffed parts revealing the silvery color underneath. LOVE! They were marked $6 a piece, but I offered her $5, and she accepted. So $40 for all 8. Score!

    The next stop was Home Depot for wood, and I built a simple frame. Each tile was approx 12x12, so the finished size is 36x36. Not all of the tile sides matched up when I nailed them in, so I'm going to blame the tiles and say that they're wonky, rather than my measuring (which is probably more true). A little paint matching, painting in the gaps, building a frame for a mirror that I picked up at Michaels, attaching the mirror and frame with some glue, and we're almost done.

    I had the perfect spot in my hallway that was just begging for some oomph. For under $60, it's a huge statement piece that fits perfectly. I'm thrilled with how it turned out.

    #6- Television Stand Upcycled to a Bar When I saw this ugly, 80’s style television stand at our local Goodwill for a whopping $30, my mind immediately started churning with ideas. I’ve been wanting to set up a bar area in our house, and I knew this would be the perfect piece to turn into a bar. It just needed a little (or, um, a LOT) of love!

    I added legs and a little stand at the bottom to make it a bit taller, and gave it a few coats of navy paint (and, of course, a stencil to add some fun). I turned the drawers on either side that used to be used for VHS storage into the perfect place to stash a few bottles. And, since most alcohol bottles are all different sizes and shapes, I poured our frequently used ones into uniform glass bottles that I etched with the name – that way I can be sure the bottles fit and they look pretty to boot!

    Finally, for a last little touch, I dipped some of our glasses in gold paint to make things a little more sparkly and fun. I’m so happy with how it turned out and I’m loving the extra storage! I can’t wait to put this thing to good use!

    #7- Trash Pile Tire Made Trendy Table Early Saturday morning, still bra-less and in my PJs, I drove to a neighbor's house and hurled an old tire from their curb-side trash pile into the back of my car. My plan for the filthy tire was still foggy… as was my pre-coffee brain, but I was determined to turn it into something cool. After a day of deliberation, trial, and error, I determined side table was to be its fate. Let's get upcycling.

    I started by giving the tire a scrub with some dish soap. Next, I tried to figure out what to use for legs. Since this tire still has the (very!) heavy rim attached, I needed something sturdy. After contemplating many possibilities, I decided to cut them out of a piece of pine left in my garage from another project. The legs were stained and attached to a plywood circle I cut for the base. Then, I glued the tire on top of that with construction adhesive, and added a smaller circle to the top of the tire to act as the table top.

    I covered the entire tire in rope using Liquid Nails and"dipped" the legs in a bright citrus-ey yellow paint. I'm pretty jazzed with how it came out and can't wait to tell people I have an old tire in my living room. Ha!

    #8- Vertical Blinds Headboard Why is it that bedrooms are always the last rooms to get decorated? This room had no artwork, no matching furniture, and a mattress sadly sitting on a cheap bed frame. The only good thing about it was that it was prime for a makeover!

    Headboard made from Upcycled Vertical Blinds

    When my parents upgraded their patio doors from vertical blinds to curtains, my mom saved the blinds for me thinking I could “make something with them.” Does this happen to all creative types? But Mom was right, those old vertical blinds were the perfect material to make an over sized woven headboard for the bedroom.

    Sad bedroom plus vertical blinds equals

    A sleek wooden frame hangs so that the headboard almost reaches our 8 foot ceilings, and two spray painted clamp lights provide adjustable lighting for bedtime reading.

    Upcycling Challenge Headboard

    Similar, but smaller, woven headboards can cost over $700, but since I re-purposed my materials, this statement-making headboard cost less than 1/10th that much. No more sad, bland bedroom for us!
    #9- Bicycle Wheel Clock

    Bicycle-Clock-Label

    There are clocks. And then…there are clocks. There are clocks that tick and tock and ring and jingle and tell time underwater and sound an alarm. And then there are clocks made from a bicycle wheel with yardstick ruler hands perched on a chalkboard surrounded by roman numerals above a table strategically styled with a bicycle seat. That is one fine clock.

    Bicycle Wheel Clock

    And the best part? I got the bicycle wheel for free. Can you even believe it? I walked into a bicycle shop and randomly explained to the resident bike expert that I wanted to make a clock and I needed a cute bike wheel that had preferably been around the block a time or two. Wordlessly he stared at me. I don't really know why. I'm sure they get that request all the time.

    Bicycle-Wheel-Clock-Paint-Can-Label

    And then he went to the back where they keep all the spare wheels for people who come in with clock requests and he handed me this bicycle wheel. I totally wish he could see his wheel now. He'd probably charge me for it.: )

    #10 Statement Piece Light Fixture

    Walking through Habitat ReStore, I spotted a few egg crate diffusers — you know those grates that cover fluorescent lights in basements across the country. It's the last lighting fixture I would consider for a project but once I got around my thoughts of drop ceilings, I began thinking how neat it would be to use the grid to create any square cornered geometric shape that I wanted. At $2 each, what could I lose?

    Browsing Pinterest I found this amazing light and fell in love with the arms. It's lines are simple, but make a big impact! Perfect for a statement piece!
    The egg crate diffuser was cut into the shape of the arms, filled with plaster of paris, sanded and painted. So that the wiring and housing wouldn't compete with the outer arms, I made a simple fixture out of metal tubing, PVC plumbing parts, and a few parts from an existing chandelier. After wiring it (and being elated that it worked!) I installed trim on the ceiling to frame the chandelier, and added a little more interest by painting alternating stripes in ivory and a light gray. Finally, I installed a gallery wall with a few fun pieces!

    From a designer's nightmare to an energetic statement piece, this diffuser has come a long way!
    #11- Lab Station Turned Dining Room Buffet

    servin' it up old school… The story of how a lonely old science lab station gained new life as an industrial-style dining room buffet.
    Once upon a time…on an unusually warm and sunny spring day, I was leisurely browsing a flea market when I spotted this piece and was immediately drawn to it…the color, the rust & patina, it's industrial style, and the fact that it was old and had great visual evidence of it's previous life--lots of it. As I looked closely at the butcher-block top complete with bunsen burner stains, student-carvings (i.e."jennie-loves-alex") and distress-marks galore, I knew that I had to have it--for something, but what that something was, wasn't clear to me at the time. We just had"chemistry"--I could feel it.; ) Luckily, the kind gentleman who I was buying this (very heavy) treasure from was willing to help me get it into my truck…and let me tell you: it. weighs. a. ton. Chapter Two: Fast forward to Project One CWTS: Upcycle. I knew instantly that this sad science lab station was about to have a major career change. I tossed around a few ideas, but pretty quickly decided it would be a fabulous, industrial-style dining room buffet. The hardest part was this: while I love the"vintage-industrial-rusty-patina" look and eagerly welcome it into my house, this was looking a bit too"raw" for my dining room. Well, try googling"how to tone down rust on metal, yet keep just the right amount of color and patina". If there is a tutorial for this…I didn't find it!

    Chapter Three: So, I did a little DIY-science-experimenting and discovered a technique to get just the look I was hoping for. After this process I added the casters, the door knobs, stenciled on the quote and stained the butcher-block top.
    Add some wine, grapes, cheese…and this"new" buffet is all ready to help you eat, drink and be merry.; )

    …and she lived happily ever after in my dining room.

    #12-From Frumpy to On Fire, Fireplace! When I was told that the first week of Creating With the Stars theme was upcycle I was over the moon excited. Upcycling is my thing. It’s where I get my groove on. And so, it wasn’t a matter of finding something to upcycle; it was a matter of deciding which thing to upcycle. So, I took a tour of my house and gazed at all of the items that needed some good loving. And then, I sat and thought about what I wanted in my home. And, it came to me. Hmm… could I? Would it be possible? Yes… yes, it could!!

    CWTS collage

    I’ve wanted a fireplace forever and ever. Okay, that’s an exaggeration. But, you get the gist. And, while this fireplace/bookcase might not be the real thing it fits the bill quite nicely. I was able to create my “fireplace” from an old bookcase that was sitting in my laundry room, a mirror frame that was on it’s way to the trash, and an antique footboard that had lost it’s headboard (poor thing). The bookcase is the most important element; the mirror and footboard helped create awesome and turn the bookcase/fireplace into something spectacular.

    CWTS collage2

    I cut the footboard down to size and used it as the “mantel” as well as give the fireplace/bookcase a skirt at the bottom. Scrapbooking chipboard embellishments gilded, painted, and antiqued look like beautiful wood cutouts on the mantel. The trim on the sides of the fireplace/bookcase are pieces of the mirror cut down to size. A chimney that runs the length of my 12 foot wall was created with a simple frame covered in tin. The back of the bookcase was covered in that same tin for added charm. I must say this project exceeded my expectations and far surpassed the image of awesome I had for this project when I started out. I love walking into my home and seeing this and am so pleased waiting forever and ever is over!

    CWTS final final5

    Can You Believe That Talent? It's Time to Vote! You can only vote one time, but you can vote for your favorite 3 projects. Before voting, please LIKE EC2 on Facebook. Thanks! If you're having trouble viewing the voting box, click HERE to vote.
    Don't forget that tomorrow it's your turn to link up your own upcycle project! Thanks for playing along!!

  1. Just Contemporary Guest Review! Kate from Literary Explorations
  2. Just Contemporary Post — Top Ten Types of Contemporary YA
  3. Just Contemporary Review: Past Perfect by Leila Sales
  4. Memory Monday — Contemporary List
  5. Just Contemporary Mini-Reviews: It's Raining Cupcakes, Choker and Overprotected