Wondering how do you make a Farmhouse Table on the Cheap? We took told old tables and DIYed them into a huge, modern-meets-rustic farmhouse table. Even if you've never done any Furniture building, this will be easy enough for you!
********************************************************************

I am sooo excited to finally reveal our dining room table with all of you! Not only am I going to show you the finished product, but just in case you want to try this (which you totally should) Eric and I are going to give you a little play-by-play (aka longwinded tutorial). Blue is Eric and Purple is me! If you haven't been following along with the journey to making our own table, check out this post first, so you know why we started this crazy project. I'll warn you that this post is a little long but, I think it's worth it in the end!
Now, the play-by-play… How to Make a Farmhouse Table (our way) 1. Aquire a table or two to be the foundation (aka find an old junky table) 2. Plan the length and width of your new farmhouse table 3. Build a Sub-frame from cheapy wood 4. Choose planks for the table top 5. Cut, Cut, Cut 6. Determine the layout of the table top boards (kind of like a puzzle) 7. Sand, sand, and sand some more (or buy a good router) 8. Screw, Screw, Screw 9. Create trimming edge 10. Stain the wood (I love the grey we created!) 11. Paint the legs and base 12. Seal the table Ok,
Monica wants me, (her wonderful husband), to do a little explanation on what we did to make our new, gigantic table. I'll do my best to describe. Let me explain, though, that I am NOT a skilled wood-worker or craftsman. The only thing is that I'm not afraid to try something I've never done. If you take anything away from this long-winded explanation of what I did, you should take this – anyone can do this stuff. You just need to be patient, determined, and not afraid to try and try again. Ok, that's all the pep talk you're gonna get. Here goes… (I must interject here that I think my hubs just gave all of blogland a motivational pep talk, and I love it and love him!)
1. The foundation…
Monica had ideas as to what type of table she wanted. She wanted it about 10 feet long and 4 feet wide. She had several sample ideas, but all of them required me to build the whole foundation of the table and the only tools I own are a miter saw, drill and hammer. Crafting the legs, frame and everything else seemed like more than I wanted to take on at the time, so we decided to look for an old, beat-up table that we could just make a table top to place on top of. We got the perfect answer when Grandpop Bunney (yes, that's really his name) called and said that at their retirement community, someone was selling two, identical, 5-foot long tables for $20 EACH!!! In case you're one who struggles with math (i.e.
Monica), two 5-foot long tables put next to each other make a 10-foot table! We had our foundation!
2. Planning… So the length of the table was good, but it was only 3 feet wide. This is just too thin for our big family. So, I spent a lot of time planning and researching to see what to do. My final plan ended up coming down to what could I do, as easily as possible, and without totally screwing it up.
3. Create a Sub-frame… The plan was to build a"sub-frame" on top of the existing table-top and then just lay the new table-top on top of the"sub-frame" (that's a lot of tops). I don't even know if"sub-frame" is a word, or if it is the right word for what I made… but, basically, this sub-frame is just some thin, skinny boards laid across the old table-top that would extend out past the edge of the old table-top and thus, create support for expanding the width of the new table top to 4 feet wide. The wooden supports are staggered because I changed my mind about the width after my wonderful husband had already cut all the pieces. Typical Monica move…Oops!
4. Choose your wood… I looked at all kinds of wood, but the nicer it gets, the pricier it gets.
Monica wanted wood that was had some character to it, so she wanted some knots in it and some distressed marks on it. Also, she knew that we have 4 kids who still think that the primary purpose of a spoon and fork are to play drums on the table instead of eating, so this table was not going to last long without some dings and scratches no matter how nice the wood was. I also didn't want to be a psycho host that was always worried about my friends and family marking it up. I went to Lowes and they have 1 inch thick, by 8 inch wide by 10 feet long pine boards for just $13. This is not your nice, cleanly cut wood. This is the uglier, knottier, more distressed looking wood. Believe it or not, I wanted to get the nicer wood, but
Monica wanted to cheaper wood (b/c of the character). At just $13 per board, I didn't mind giving in and using the cheap wood. Really, who needs a truck when you have a mini van?? Table wood and bootcamp supplies all fit!
5. Cut, Cut, Cut… So the boards are 10 feet long and 8 inches wide, right? So planned to just lay 6 boards across and we have a table that's exactly 4 feet wide (6 x 8 inches = 48 inches, for those of you mathematically challenged). I cut and laid the whole sub-frame for a 48-inch wide table.
One small problem… when Lowes says that the board is 8 inches wide, they don't mean that it's actually 8 inches wide. Each board was 7.25 inches wide! WHAT THE HECK!!! I built the whole"sub-frame" to the wrong width! This is definitely where my inexperience comes in. Just b/c Lowes says it's 8 inches wide, doesn't mean it's 8 inches wide. Why doesn’t Lowes just make the boards 8 inches?!? DUMB!!! I guess I should have known that though… everyone knows a 2x4 isn't actually 2 inches by 4 inches. Idiot! Well, now our table was going to be 7 boards wide, and each board is 7.25 inches. So our final width was 51 inches. I cut 7 boards 110.25 inches long to make the length of the table and then two 51-inch horizontal end pieces to cap it off.
6. Sanding… The whole table is cut and ready, now it's time to sand. Grandpop B lent me his hand-held electric sander, and boy am I glad. Typically, you would use a router to round the edges of the wood and give them that finished look. But, did I mention that I don't own too many tools? I spent my evenings sanding the edges of the boards until they had a rounded, finished look. Sanding was definitely the most time-consuming part of the whole project.
7. Screwing… In my mind, this step was going to be simple. Just lay out the cut, sanded boards on top of my"sub-frame" and screw them in from the bottom. The problem was that since we used those cheap, $13 boards, NONE of them were straight. They all had curves in them so when I would lay them side-by-side, there was always a large gap between the boards. I could live a small gap (1/8 inch or less), but I'm talking about about a ½ inch to 1 inch gap at some spots.
Monica and I spent about a ½ hour laying out different boards to see which ones would have the smallest gap in between when laying next to each other – it was almost like putting together a puzzle. Once we had an order, I screwed the first board starting at the outside. For all the table-top boards, I screwed from the bottom, through the table top, through the sub-frame and into the new table-top boards. After the first board was in, I just went down the line, screwing in the other 6 boards. The Pine boards were pliable enough that I could push any gap in between the boards almost completely closed tight before I screwed it in place. After all 7 long boards were in place, I screwed in the final 2 end cap boards in place.
8. Staining… At this point, the table looked pretty cool, but I was worried.
Monica and I paint a lot, and we're pretty decent at it but, I HATE staining! It just never seems turn out well. Since we both are afraid of stain … I used lots of extra wood to create sample boards… I first wanted to figure out how to go about distressing the table. This was my arsenal of tools…
Unfortunately, it looked like… well, it looked like I had attacked my wood with a bunch of random tools. Ugh.
I decided to wait on the distressing and focus on the color. I wanted a farm-table-meets-Restoration-Hardware grey color stain for the table. I tried about 14 techniques. Honestly, I did.
Fortunately, Anthony Lelli, a friend of ours is a painter and he talked with
Monica and got a custom grey stain for us that was EXACTLY what she was wanted. Yippee!! After some practice stains and several calls to Anthony for staining advice, I did it. Apply the product… wait a minute… wipe it off. Piece of Cake!
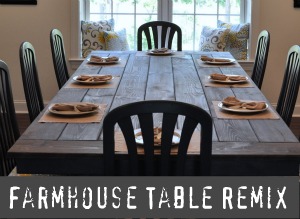
10. The finished product…
We could not be happier with the color and look of the table. The cheap pine (at least for now) looks awesome. It may get beat-up way faster than a nice oak or maple table, but for only about $200 total, we have a huge dining room table that can easily fit 14-16 people.
Seriously, I LOVE this project. When we first started thinking about building our own table, when neither of us are woodworkers, well we were very unsure. We couldn't have imagined how cool our 8 legged farmhouse table remix would turn out.
So, are you ready to make one of your own?

**We've gotten so many great comments and questions about this project that there's a Q & A follow up post that you can check out here. If you still have questions, just shoot us an email.
We love to hear from you!**