Voting is closed! To see the winners of Round 1, click here. Check back next Monday, March 18th for Round 2 projects and voting!
--------------------------------------------------------------------------------------------------------------------------
Welcome to Creating with the Stars 2013! Let the contest officially begin! This season of CWTS is going to be Epic and these Round 1 projects are a clear indication of the insane talent of these contestants! Just a few reminders before we get to the voting…
Round 1 Challenge:

Round 1 Prize Package: We have the Best Sponsors for CWTS2013 and here's a reminder of what our Contestants are playing for this week…
$50 worth of 31 Gifts products $60 worth of Twysted Yarn products $70 of Henle Headbands products $100 Blog Re-design from 733 Design (who designed all the CWTS logos!) Project featured by HomeTalk We also want to thank Homes.com for being the Official Grand Sponsor of Creating with the Stars!

Without Further Ado… In No Particular Order, Here are the Round 1 Projects… #1- Dresser Turned Modern Sandbox This dresser had no hope. It was in extremely poor shape. I mostly bought it for the legs, but after learning I was in CWTS, I thought I could do something with it. I decided to turn it into a sandbox filled with sand and dirt. What kid does not like sand or dirt?!
The issue I have with sand tables is how much of an eye sore they can be. After cutting off an entire level of drawers that brought it down to kid/side table height, I placed sand and dirt inside the top two drawers. When guests come over, I simply place the dresser's top back on covering up the dirt and sand. It is an easy solution that is modern and stylish. Using a friendly exterior paint protects the furniture from the elements. Placing the dresser top on when not in use protects the sand and dirt. The two bottom drawers are functional and can be used for outdoor storage like small plant pots, garden tools, and kid toys. I used a couple of rabbit knobs for fun and green paint for a punch of color.


#2- Little League Lounger I love taking old, crappy stuff and turning it into something that I will actually use! I found an ugly outdoor folding chair at my local thrift store, and knew it would be perfect for my upcycle project. Now, I have a completely re-done"little league lounger" to use at all my boys' baseball games this summer!

Here's what the chair looked like before I worked my magic:

I added all new cream-colored webbing {with a navy pin stripe}, updated the arm rests by re-purposing an old wooden baseball bat, and made a baseball stitch pillow from an old table runner. I love how it all came together!

I can't wait for baseball season to get started so I can use my new chair!
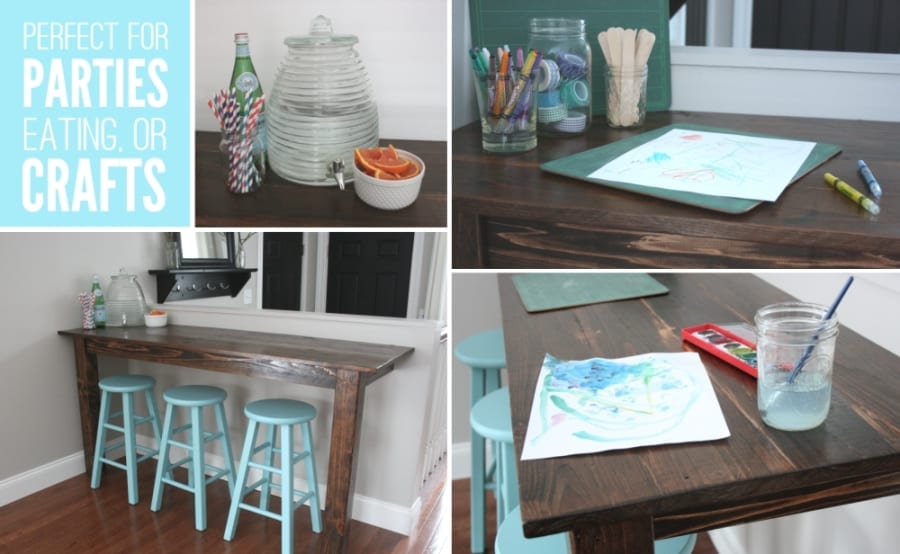
#3- Floor Board Kitchen Island

I love our kitchen, but I've always wanted a big kitchen island where we could hang out. I wanted to take this unused space in our family room and add a table or counter. I had no idea what to use, but all of a sudden, a light bulb went off in my head. I remembered some old floor boards hidden in the basement rafters. They were dusty and worn and perfect. BAM — perfect for an old rustic island! We washed and sanded the boards, and got to work building our new favorite spot.

Add in some painted stools and we now have a space just off the kitchen that is perfect for parties, eating, hanging out, or working on crafts.
#4- Man Chairs Often the"dreaming up" of a new project can be done in my sleep, literally. But execution can feel like a trip to the dentist, one in which I go in for a routine cleaning and find I need a double root canal. The trick to any DIY project is COMMITMENT. Commit to your goal and don't let up no matter how many coats of paint are applied in vain. These previously drab, brown, faux-leather club chairs were purchased on sale for $12 each at a local thrift shop.

A bit of auto upholstery paint, steal tacks, metal coating paint, a couple patinas for good measure and some tough new casters and this thrift store find is ready for"the man".


#5- Tin Tile Mirror So, I'm still totally in shock that I was chosen to be a part of Creating with the Stars. With the first theme being"Upcycle", I wanted to do something a little different. I hit up a local flea market, hoping to find something that screamed my name, and when I saw these vintage tin ceiling tiles, I knew these were it. The fun color that looks so much like patina, the rust, the texture, the scuffed parts revealing the silvery color underneath. LOVE! They were marked $6 a piece, but I offered her $5, and she accepted. So $40 for all 8. Score!

The next stop was Home Depot for wood, and I built a simple frame. Each tile was approx 12x12, so the finished size is 36x36. Not all of the tile sides matched up when I nailed them in, so I'm going to blame the tiles and say that they're wonky, rather than my measuring (which is probably more true). A little paint matching, painting in the gaps, building a frame for a mirror that I picked up at Michaels, attaching the mirror and frame with some glue, and we're almost done.

I had the perfect spot in my hallway that was just begging for some oomph. For under $60, it's a huge statement piece that fits perfectly. I'm thrilled with how it turned out.

#6- Television Stand Upcycled to a Bar When I saw this ugly, 80’s style television stand at our local Goodwill for a whopping $30, my mind immediately started churning with ideas. I’ve been wanting to set up a bar area in our house, and I knew this would be the perfect piece to turn into a bar. It just needed a little (or, um, a LOT) of love!

I added legs and a little stand at the bottom to make it a bit taller, and gave it a few coats of navy paint (and, of course, a stencil to add some fun). I turned the drawers on either side that used to be used for VHS storage into the perfect place to stash a few bottles. And, since most alcohol bottles are all different sizes and shapes, I poured our frequently used ones into uniform glass bottles that I etched with the name – that way I can be sure the bottles fit and they look pretty to boot!

Finally, for a last little touch, I dipped some of our glasses in gold paint to make things a little more sparkly and fun. I’m so happy with how it turned out and I’m loving the extra storage! I can’t wait to put this thing to good use!

#7- Trash Pile Tire Made Trendy Table Early Saturday morning, still bra-less and in my PJs, I drove to a neighbor's house and hurled an old tire from their curb-side trash pile into the back of my car. My plan for the filthy tire was still foggy… as was my pre-coffee brain, but I was determined to turn it into something cool. After a day of deliberation, trial, and error, I determined side table was to be its fate. Let's get upcycling.

I started by giving the tire a scrub with some dish soap. Next, I tried to figure out what to use for legs. Since this tire still has the (very!) heavy rim attached, I needed something sturdy. After contemplating many possibilities, I decided to cut them out of a piece of pine left in my garage from another project. The legs were stained and attached to a plywood circle I cut for the base. Then, I glued the tire on top of that with construction adhesive, and added a smaller circle to the top of the tire to act as the table top.

I covered the entire tire in rope using Liquid Nails and"dipped" the legs in a bright citrus-ey yellow paint. I'm pretty jazzed with how it came out and can't wait to tell people I have an old tire in my living room. Ha!

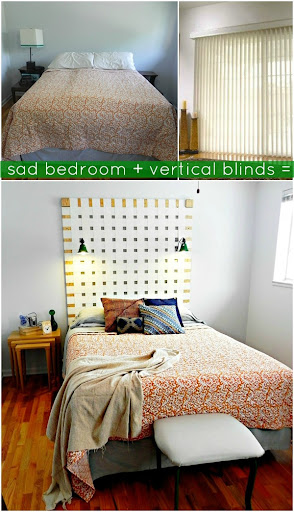
#8- Vertical Blinds Headboard Why is it that bedrooms are always the last rooms to get decorated? This room had no artwork, no matching furniture, and a mattress sadly sitting on a cheap bed frame. The only good thing about it was that it was prime for a makeover!
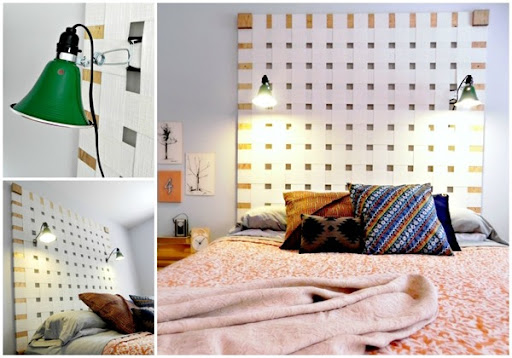
When my parents upgraded their patio doors from vertical blinds to curtains, my mom saved the blinds for me thinking I could “make something with them.” Does this happen to all creative types? But Mom was right, those old vertical blinds were the perfect material to make an over sized woven headboard for the bedroom.
A sleek wooden frame hangs so that the headboard almost reaches our 8 foot ceilings, and two spray painted clamp lights provide adjustable lighting for bedtime reading.
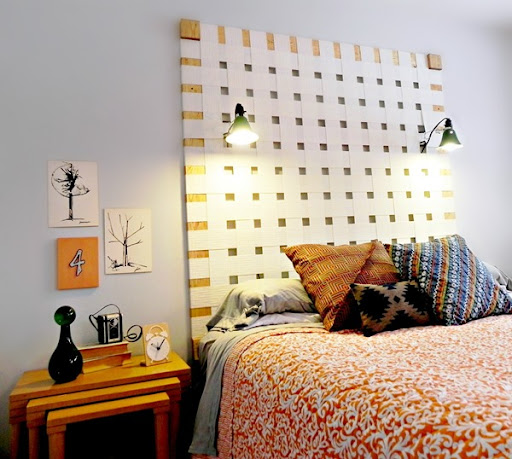
Similar, but smaller, woven headboards can cost over $700, but since I re-purposed my materials, this statement-making headboard cost less than 1/10th that much. No more sad, bland bedroom for us!
#9- Bicycle Wheel Clock

There are clocks. And then…there are clocks. There are clocks that tick and tock and ring and jingle and tell time underwater and sound an alarm. And then there are clocks made from a bicycle wheel with yardstick ruler hands perched on a chalkboard surrounded by roman numerals above a table strategically styled with a bicycle seat. That is one fine clock.

And the best part? I got the bicycle wheel for free. Can you even believe it? I walked into a bicycle shop and randomly explained to the resident bike expert that I wanted to make a clock and I needed a cute bike wheel that had preferably been around the block a time or two. Wordlessly he stared at me. I don't really know why. I'm sure they get that request all the time.

And then he went to the back where they keep all the spare wheels for people who come in with clock requests and he handed me this bicycle wheel. I totally wish he could see his wheel now. He'd probably charge me for it.: )
#10 Statement Piece Light Fixture

Walking through Habitat ReStore, I spotted a few egg crate diffusers — you know those grates that cover fluorescent lights in basements across the country. It's the last lighting fixture I would consider for a project but once I got around my thoughts of drop ceilings, I began thinking how neat it would be to use the grid to create any square cornered geometric shape that I wanted. At $2 each, what could I lose?

Browsing Pinterest I found this amazing light and fell in love with the arms. It's lines are simple, but make a big impact! Perfect for a statement piece!
The egg crate diffuser was cut into the shape of the arms, filled with plaster of paris, sanded and painted. So that the wiring and housing wouldn't compete with the outer arms, I made a simple fixture out of metal tubing, PVC plumbing parts, and a few parts from an existing chandelier. After wiring it (and being elated that it worked!) I installed trim on the ceiling to frame the chandelier, and added a little more interest by painting alternating stripes in ivory and a light gray. Finally, I installed a gallery wall with a few fun pieces!

From a designer's nightmare to an energetic statement piece, this diffuser has come a long way!
#11- Lab Station Turned Dining Room Buffet

servin' it up old school… The story of how a lonely old science lab station gained new life as an industrial-style dining room buffet.
Once upon a time…on an unusually warm and sunny spring day, I was leisurely browsing a flea market when I spotted this piece and was immediately drawn to it…the color, the rust & patina, it's industrial style, and the fact that it was old and had great visual evidence of it's previous life--lots of it. As I looked closely at the butcher-block top complete with bunsen burner stains, student-carvings (i.e."jennie-loves-alex") and distress-marks galore, I knew that I had to have it--for something, but what that something was, wasn't clear to me at the time. We just had"chemistry"--I could feel it.; ) Luckily, the kind gentleman who I was buying this (very heavy) treasure from was willing to help me get it into my truck…and let me tell you: it. weighs. a. ton. Chapter Two: Fast forward to Project One CWTS: Upcycle. I knew instantly that this sad science lab station was about to have a major career change. I tossed around a few ideas, but pretty quickly decided it would be a fabulous, industrial-style dining room buffet. The hardest part was this: while I love the"vintage-industrial-rusty-patina" look and eagerly welcome it into my house, this was looking a bit too"raw" for my dining room. Well, try googling"how to tone down rust on metal, yet keep just the right amount of color and patina". If there is a tutorial for this…I didn't find it!

Chapter Three: So, I did a little DIY-science-experimenting and discovered a technique to get just the look I was hoping for. After this process I added the casters, the door knobs, stenciled on the quote and stained the butcher-block top.
Add some wine, grapes, cheese…and this"new" buffet is all ready to help you eat, drink and be merry.; )

…and she lived happily ever after in my dining room.
#12-From Frumpy to On Fire, Fireplace! When I was told that the first week of Creating With the Stars theme was upcycle I was over the moon excited. Upcycling is my thing. It’s where I get my groove on. And so, it wasn’t a matter of finding something to upcycle; it was a matter of deciding which thing to upcycle. So, I took a tour of my house and gazed at all of the items that needed some good loving. And then, I sat and thought about what I wanted in my home. And, it came to me. Hmm… could I? Would it be possible? Yes… yes, it could!!

I’ve wanted a fireplace forever and ever. Okay, that’s an exaggeration. But, you get the gist. And, while this fireplace/bookcase might not be the real thing it fits the bill quite nicely. I was able to create my “fireplace” from an old bookcase that was sitting in my laundry room, a mirror frame that was on it’s way to the trash, and an antique footboard that had lost it’s headboard (poor thing). The bookcase is the most important element; the mirror and footboard helped create awesome and turn the bookcase/fireplace into something spectacular.

I cut the footboard down to size and used it as the “mantel” as well as give the fireplace/bookcase a skirt at the bottom. Scrapbooking chipboard embellishments gilded, painted, and antiqued look like beautiful wood cutouts on the mantel. The trim on the sides of the fireplace/bookcase are pieces of the mirror cut down to size. A chimney that runs the length of my 12 foot wall was created with a simple frame covered in tin. The back of the bookcase was covered in that same tin for added charm. I must say this project exceeded my expectations and far surpassed the image of awesome I had for this project when I started out. I love walking into my home and seeing this and am so pleased waiting forever and ever is over!

Can You Believe That Talent? It's Time to Vote! You can only vote one time, but you can vote for your favorite 3 projects. Before voting, please LIKE EC2 on Facebook. Thanks! If you're having trouble viewing the voting box, click HERE to vote.
Don't forget that tomorrow it's your turn to link up your own upcycle project! Thanks for playing along!!